Pfaff 285 Owner's Manual
Pfaff 285 Manual
 |
View all Pfaff 285 manuals
Add to My Manuals
Save this manual to your list of manuals |
Pfaff 285 manual content summary:
- Pfaff 285 | Owner's Manual - Page 1
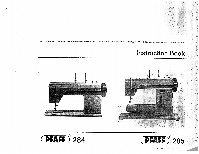
Instruction Book CPFAFFD® 284 - 44t CPFAFFI 285 - Pfaff 285 | Owner's Manual - Page 2
Cotton 50 - 60 70 - 80 Your new Plait sewing machine will enable YOU to master a large variety of sewing Jersey fabrics (synthetIc) Synthetic Cotton 70-120 70 - 80 130/705 H mbroideriflg and darning 1 obs easily and quickly This instruction book has been com piled in order to familiarize - Pfaff 285 | Owner's Manual - Page 3
mechanism 11 Stitch length control 12 Reverse feed control 13 Bed cover 14 Transverse rotary hook 15 Needle plate 16 Sewing foot thumb screw 17 Light switch 18 Stitch width control 19 Needle position lever 20 Presser bar lifter (on back of machine arm) 21 Needle thread tension 22 Needle set screw 23 - Pfaff 285 | Owner's Manual - Page 4
feed control 18 1 PFAFO 285 13 Free arm 14 Free arm cover 10 (enclosing transverse rotary hook) 15 Needle plate 22 16 Sewing foot thumb screw 17 Light switch 16 12 18 Stitch width control 19 Needle position lever 5 'VV V - 20 Presser bar lifter (on back of machine arm) 14 21 Needle - Pfaff 285 | Owner's Manual - Page 5
Machine for Sewing tomihffoeytthoomeru,raccopmhruidasnhceihnitpanonleudtghiesthAweeqailnup'tlioupogputethladeett.wtrheietcheopatthaebcruleilet-noIdnn if you have a treadle plug of the sewlight cord Mount the belt. machine The harder the machine will run. The Pfaff 284 can also builton motor and - Pfaff 285 | Owner's Manual - Page 6
the motor. This is operated by a lever (10) underneath the balance wheel. To engage the motor, flick this lever down. After you have completed sewing, flick it to its top position. With the motor swung out of engagement, all machines fitted with a treadle mechanism can be driven by toot power. 5 - Pfaff 285 | Owner's Manual - Page 7
case, rotate the ba lance wheel until the needle is at the top of its stroke. On the Pfatl 284, remove bed cover (13), as illustrated. Lift the latch, the empty bobbin drops out. On the Pfaft 285, the bobbin case is remov ed just like on the Pfaff 284. To get at the bobbin case, however, you must - Pfaff 285 | Owner's Manual - Page 8
. Hold balance wheel (8) while turning stop motion knob (9) toward you (see ill.). To engage the sewing mechanism after the bobbin has been wound, turn the stop mo lion knob away from you (as indicated by an arrow in the ill.). Pass - Pfaff 285 | Owner's Manual - Page 9
Hold the lull bobbin so that the thread un winds toward the right and place it in the bobbin case (1). Pull the thread into slot (2) and under spring (3). As you pull the thread, the bobbin should rotate clockwise (4). Leave about three inches of thread hanging from the bobbin case. - -._--v.- - Pfaff 285 | Owner's Manual - Page 10
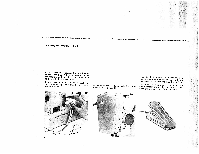
I Ii Ptaff 285 To Insert the bobbin case rotate the balance wheel into the machine, until the needle is at its highest place the bobbin ill.), making sure point. Lift the latch and case on center stud s (see its slot (white arrow) points - Pfaff 285 | Owner's Manual - Page 11
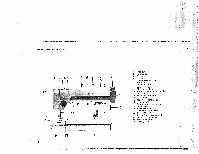
.oto2nr)b.kytphlepautebll,aincsgkwioonfugtthuaenpdmitsaswchsiiunnpge On the the bmwaasocerhpkilpnaletaesteohfasvtuhipnepgomnratochciisanrerp.yriensgsecdaseagbaainsest, 10 3 The sewing area of enlarged with the the aid Pfaff of an 284 Portable is extensIon (4). - Pfaff 285 | Owner's Manual - Page 12
toward the right with a jerk (see ill.). As you do this, hold the thread steady 3 somewhere between the spool and the ten sion. Thread the needle from front to back. 3 IL 21 21 11 - Pfaff 285 | Owner's Manual - Page 13
foot is raised and lowered by operating the presser bar litter on the back of the machine (see ill.). A = Presser bar lifter up B = Presser bar lifter down 12 To draw up the bobbin thread, hold the needle thread and lower the sewing foot. Turn the balance wheel toward you a full turn. Pull the - Pfaff 285 | Owner's Manual - Page 14
Fundamentals of Machine Operation For (19) ordinary should be sienwiitns gc, ennteeerdpleosiptioosnit.ion lever yhMoiguahkeehsatvseuprceooinmtthpelbeettefaodkreea-usypeoaumle.vbeergin(2) is and at its after 2 lsA(yus.lerweeaytahsrerorowstt)oatpeAmsbaoyltaioonuncedkonwothbheisei,sl (8) - Pfaff 285 | Owner's Manual - Page 15
.gneicnuTh"glloha2etes"foeet.-dpnhneaurnbamsdythibooeusntruilsddr,eninisbndeoegtif Place the material under the sewing foot and lower the presser bar lifter. Place the foot control your foot and depress er you press, the faster within easy reach of the pedal. The hard the machine will run. 14 - Pfaff 285 | Owner's Manual - Page 16
To sew in reverse or backtack tL3 end of a seam, simply depress the fingertip control. The stitch width is regulated by pushing the stitch width control toward the left, as may be desired. Various zigzag sewing operations are dis cussed on page 25 and the following pages. 15 - Pfaff 285 | Owner's Manual - Page 17
Balanced tensions are essential for sewing. Both tensions are correctly balanced if the needle and bobbin threads interlock in tension, or left for a looser tension. If the same size threads are used in the needle and on the bobbin, there is no need to adjust the bobbin thread tension. This tension - Pfaff 285 | Owner's Manual - Page 18
,aftrhaohnenmecoilgegyeseaeh.esnkdneeitltsneheotgdenwolepeanuseoruteddairelnoneedtfdtlhettsehha,peneautbbtdsnarhsitcenhclkeogeri.dtewwlTfuteelhpairegtc2halt2sanhtseimeednafeepands.rsdleocewafrsepibiwuntasilgtlr / Use needles table on the inosfidtheefrsoynsttecmovseri.ndicated in the - Pfaff 285 | Owner's Manual - Page 19
darning No. 93-030 125-45 plate Darning To prepare your ceed as follows: machine for darning, pro For certain feed must purpose, an is included 284 or Pfaff ib2sne8ee5wmt.hirbneeArgnopadipcdoelceyrpeereysdtrhsaiotsaiirnonipdenalscsa,ttdieovatfehran.eysionFmfugooralrlcpoPhlwtfaihantsfiee:sf - Pfaff 285 | Owner's Manual - Page 20
.g.y Turn and short ftsohtriettchfhaebosr.vicer at thrieghtpraencgeldeisngandwsoerkw back with Select ing the the darning darning job If the needle tension is too thread tight. tohoboepsperinforamesidz.e should break, the malch upper 19 - Pfaff 285 | Owner's Manual - Page 21
(which can be obtained from your Pfaff dealer). Stitch length: 1.5 to 2 Baste closed zipper on the fabric, then open it. Stitch close to the left edge of the zipper for about 1 inch, guiding the right edge of the foot along the zipper teeth (1). Leave the needle in the material, raise the zipper - Pfaff 285 | Owner's Manual - Page 22
are used to durably join two pieces of fabric and are usually straightstitched. First seam: Lay pieces Make sure the fabric enters the felling foot evenly and the bot tom fabric is folded over . Second seam: Lightly tension the fabric by pressing it against the needle plate in front of the foot - Pfaff 285 | Owner's Manual - Page 23
right hand (see ill.), making sure that the scroll is well filled with fabric at all times and the fabric does not slip side ways under the right half of the foot. To produce an elastic hem on soft fabrics, use zigzag stitches. Set the stitch width, as instructed on p. 25. ...:•,- --., - 22 - Pfaff 285 | Owner's Manual - Page 24
sewing foot No. 93-838 954-00, and insert a twin needle (which can be ob tamed from your Pfaff dealer). Stitch length: 1.5 to 2 Pfaff 285 Twin needles for needle fabrics, and cording foot No. 93-847 680-00 with grooves for lightweight materials. --.5 7 .- - .-.- It Pfaff 284 23 - Pfaff 285 | Owner's Manual - Page 25
The hemstitching effect is produced by the left wing needle penetrating the fabric. Turn the fabric by half a turn and sew the second seam, guiding the material so that the wing needle enters the needle holes it has made in the fabric previously. You can produce a nice hemstitching effect atorcg the - Pfaff 285 | Owner's Manual - Page 26
edges of light and mediumweight fabrics, set the machine for its maxi mum stitch width. Soft and flimsy fabrics are best overcast with a zigzag stitch of medium width. Make sure the needle takes one stitch into the fabric and the other over its edge. This will cover the fabric edge securely. 7 / 25 - Pfaff 285 | Owner's Manual - Page 27
Inserting Patches - 38?3.1 Attach ordinary sewing foot u No. 93-838 954-00. I Larger holes can be patched quickly. Trim away the ragged edges around the hole, cutting exactly along the fabric yarns. Cut a patch about inch larger hole and place it under the hole, its grain to that of the - Pfaff 285 | Owner's Manual - Page 28
tace on the material and stitch it down with straight stitches made with a stitch length of '1.5 on both sides (1). Cut the fabric open under the lace insertion (2) and iron it on both sides of the lace. Sew over the edges of the lace with short zigzag stitches of medium width (4). Trim the - Pfaff 285 | Owner's Manual - Page 29
Needte F'osition Some special sewing jobs are made with the needle switched to the right or left of the needle plate slot. This is done by mov ing lever (19) to the right and left, respec tively. The needle position lever is indispensable for sewing buttonholes. CPFAFFD - - - 1- t Lever at - Pfaff 285 | Owner's Manual - Page 30
4 Attach all-purpose sewing foot No. 93-1 00 179-00 Flick the needle to its left position and put the stitch width place a filler cord of medium size in the left groove of the sewing foot. For sewing buttonholes, you can obtain buttonhole sewing foot No. 94-847 616-00 from your dealer. 3 4 - Pfaff 285 | Owner's Manual - Page 31
over the filler cord. When the buttonhole is the right length, leave the needle in the fabric on the right of its throw (1). Lift the sewing foot, turn the fabric around clockwise by half a turn, place the filler cord around the needle and pull it for ward, placing it in the left groove of the - Pfaff 285 | Owner's Manual - Page 32
lower the press er bar lifter. Trace the monogram on the fabric. Let the needle stitch into the fabric at the beginning of the design and draw the bob bin thread up through the fabric. Hold both thread ends and start your machine. Slowly move the hoops in 'writing direc tion, without turning them - Pfaff 285 | Owner's Manual - Page 33
appliqué, proceed as follows: 2 1 Trace the design on the right side. 2. Set the stitch length control on '1 and stitch along the outlines. 3. Sew the fabric to be appliquéd to the right side with long stitches (1). 4. Follow the outlines of the design on the wrong side with a narrow zigzag - Pfaff 285 | Owner's Manual - Page 34
To change the light bulb, remove the face cover by pulling it in the direction indicated by an arrow. Push the light bulb into its socket, turn left and pull out. Insert the new bulb so that its pins slide into the socket slots. Press the bulb in and turn right. As you replace the face cover, slip - Pfaff 285 | Owner's Manual - Page 35
this end, re move the needle, the sewing foot and the bobbin case with the bobbin. On Pfaff 285 machines, loosen the set screw, lift the front of the free arm cover and pull the cover out lengthwise of the arm (1 & 2). Pfaff 284 machines are tilted back. On port able machines, loosen the screw on - Pfaff 285 | Owner's Manual - Page 36
Longevity and smooth machine performance are dependent on regular cleaning and proper oiling. Since your Pfaff sewing ma chine has been made from high-grade ma terials, there are only a few oiling points left. The raceway in the sewing hook is an important oiling point. From time to time, put a - Pfaff 285 | Owner's Manual - Page 37
't force the feeding motion, merely guide the material lightly. • Clean and oil the machine as instructed (pp. 36 & 37). • Make sure there are no pieces of thread wedged between the tension discs. To remove them, pull a narrow fabric strip between the tension discs. • The Pfaff rotary hook will not - Pfaff 285 | Owner's Manual - Page 38
12 Dropping the Machine Feed 18 Electrical Equipment 4 Engaging and Disengaging the Sewing Mechanism 7 Essential Parts of Pfaff 284 2 Essential Parts of Pfaff 285 3 Flat Felled Seams 21 Foot Control 4 Foreword 1 Fundamentals of Machine Operation 13 Hemming 22 Hemstitching 24
-
 1
1 -
 2
2 -
 3
3 -
 4
4 -
 5
5 -
 6
6 -
 7
7 -
8
-
9
-
10
-
11
-
12
-
13
-
14
-
15
-
16
-
17
-
18
-
19
-
20
-
21
-
22
-
23
-
24
-
25
-
26
-
27
-
28
-
29
-
30
-
31
-
32
-
33
-
34
-
35
-
36
-
37
-
38
 |
 |
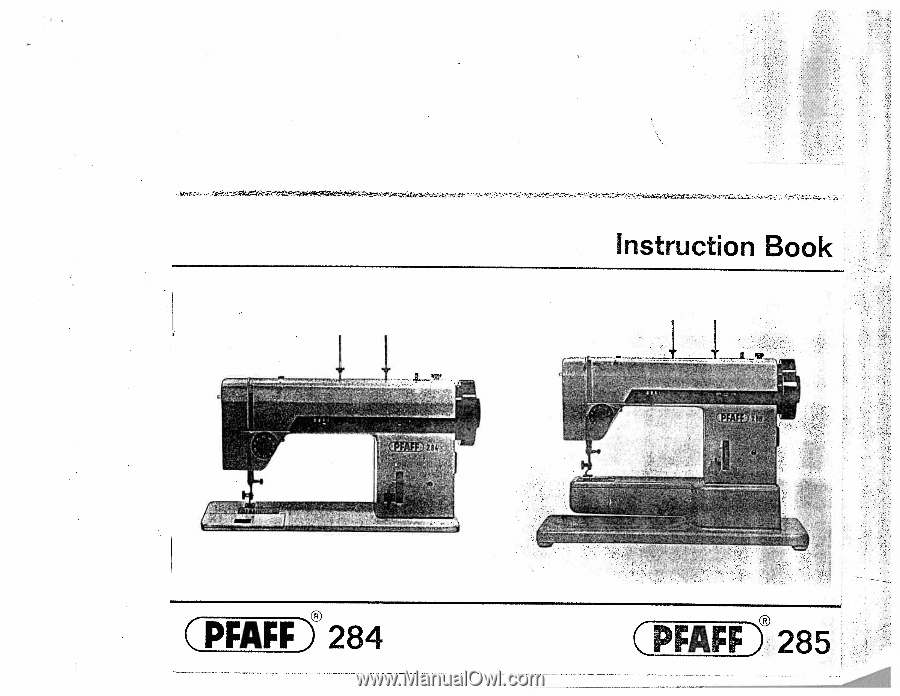
Instruction
Book
CPFAFFD®
284
CPFAFFI
285
—
44t