Pfaff 294 Owner's Manual
Pfaff 294 Manual
 |
View all Pfaff 294 manuals
Add to My Manuals
Save this manual to your list of manuals |
Pfaff 294 manual content summary:
- Pfaff 294 | Owner's Manual - Page 1
- Pfaff 294 | Owner's Manual - Page 2
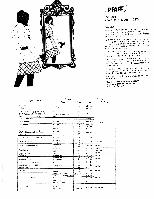
4 CPFAFFD 294, 295, 294-1, 295-1, 296-1, 297-1 Foreword Your new Pfaff sewing machine NiH enable you to master such iork as sewing, em broiderlng, darning and sewing buttonholes nuickly and easily. IVith the built-in utility-stitch mechanism you -ian also sew all functional seams needed for proper - Pfaff 294 | Owner's Manual - Page 3
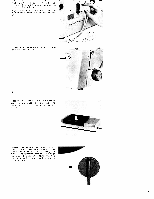
14 13 2 295' jio 1 Thread retainer stud 2 Take-up lever 3 Thread guide 4 Top cover 5 Utility-stitch control 6 Spool pins 7 Bobbin winder 8 Balance on back of machine arm> 21 Presser bar lifter 22 Needle set screw 23 Sewing foot 24 Drop-feed button Parts of the Pfaff 295, 295-1 and 297-1 12 3 - Pfaff 294 | Owner's Manual - Page 4
the other end of the cord into wall outlet. If your machine is foot-operated. push the plug of the sewlight cord foot and press down the pedal. The harder you press, the faster the machine will run. I4. Power-driven machines (with built-in motor only) feature a lever (10) underneath the balance - Pfaff 294 | Owner's Manual - Page 5
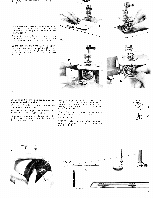
atcr k. the emotv b000in amos out On the Pfaff 295. 295-1 and 297-1 tOe bobbin case s removed as on '3 oward you see ill.,. To engage the sewing mecnanism after the bobbin has been wound, push the bobcn toward The rigor. Start the machine. When the oobbin is full, 1 stoos automati cally. Push it towards - Pfaff 294 | Owner's Manual - Page 6
. The nobn should rotate c ockwise (al. Leave anout tkree inches or tnread hanging trorn the oobbin case. 2 3 4 Pfatf 294/294-1/296-1 Ptatf 295/295-1 /297-1 To insert the bobbin case na orate the Dalance :jneei nL :be eece 5 a: ts highest pont. cdt the atc- anc a aca Oobbin case o center stuc - Pfaff 294 | Owner's Manual - Page 7
and swing ng up the lever on the back of the machine (Fig. 3). On machines having no carrying case base. the worplate supoort is pressed against the baseplate of the machine. 3 3 4 The sewing area of the Pfaff 294, 294-1 and 297-1 Portable is enlarged with the aid ot an extension (4). LI Upper - Pfaff 294 | Owner's Manual - Page 8
the needle thread to draw up the bobbin thread. Place both threads back under the sewing foot after it has been raised again. 12 Fundamentals of machine operation Before you begin working your machine you should know the following: Turn utility-stitch control (5) clockwise (as indicated by arrows - Pfaff 294 | Owner's Manual - Page 9
foot cctrol within easy reach or your foot anc oess cown the oeoal The harder you Dress. :be faster the macne will run. / For zigzag sewing torn utlity-stocn ontml 5; until the zlgzag-st;ton symbo s ooposite the dot. Then regulate tne sotch .idth by pushing the stitco width contro toward - Pfaff 294 | Owner's Manual - Page 10
be set between 3 and 5 Please note: Ease both :ensions somewnat for sewing Silk and other delicate fabrics. 16 The accessory box which belongs to your machine contains several sewing feet for special sewing operations, '7o change tne sewing foot. bring the needle to ts highest point and raise the - Pfaff 294 | Owner's Manual - Page 11
. 93-106103-91. attaching it from the rear so that soring clip c rests on needle set screw i22l Tighten sewing foot thumb screw (16). Lower the presser bar lifter Now tte machine feed has to be drohped To do this, push the drop-feed button to the right to position B. To raise - Pfaff 294 | Owner's Manual - Page 12
3 cm (11, guiding the right -. Attach >\ 20 2 Flat felled seams Attach felling foot No, 93-847 561 -00 (available from your Pfaff dealer> Stitch length 1.5- 2mm F at felled seams are used to durably io two nieces of fabr or sewing parallel seams over the entire surface of the 'abric 4 21 - Pfaff 294 | Owner's Manual - Page 13
No. 93-838954-00. or cording foot and insert a twin needle whicr can be obtained from your sewing machine dealeri. Stitch length: 1 5 to 2 T make different size oorc.ng. toe follow ng twin needles No. 93-847680-00 with 0 grooves for ightweignt mater ala. 295/295-1/297-1 / /7 Ii 294/294-1/296-1 23 - Pfaff 294 | Owner's Manual - Page 14
thread tension. The hemstitching effect is produced by th 'ext Ning needle penetrating the fabric. Lrn the fabr;c by nalf a turn ann sew the seconc seam, guiding the material so that the wing needle enters the needle noles t has made n the fabric previously. ToMu car orccuce a nice nemsttching - Pfaff 294 | Owner's Manual - Page 15
on narrow zigzag seam symbol. Sew the two pieces of material together with the machine set as indicated above. Then press the seam open. This seam is particularly well suited for stretch fabrics. When sewing synthetic stretch fabrics, please note the instructions given for regulating the tension on - Pfaff 294 | Owner's Manual - Page 16
C CD (I) -H s)000 C) .n fl Q 5S a 5 a - C 0 C O ) 0C)Ct pCD0C0C) 0C CDL g 55 Us SC) a 0 NCD cOCOw CD NQ 0° N y(C) r-n-IDV N OD.pDaCI) D)CD - C): CD a-P C) C ap nD -Crs 0 g CI) 1 O C C) ?C C)S Cs D aID CD C) C) C)) 0 £a - C aa -I-Ia a r I) I) 4 H: -o 0 C) C) CD - Pfaff 294 | Owner's Manual - Page 17
. The needle position lever is indispensable for sewing on buttons and sewing button holes, for instance. ze 19 CPFAFFD - - Button sewing Attach clear-view sewing foot No. 93-100 179-00. Flick the needle to its left position and drop the machine feed. Turn utility-stitch control to zigzag - Pfaff 294 | Owner's Manual - Page 18
the needle n the fabric on the right of its throw ii). L.ft the sewing foot. turn the fabr;c arourc o ockwise by half a turn, using the first seam. 0 usn sttch 'vcth control 18) to tne seccoct notch R 2 ano sew the second tack. sligntlv holding the material to reduce the 'eflgt'- ot bar '5). FlicK - Pfaff 294 | Owner's Manual - Page 19
294-1, 295. 295-1, 296-1 and 297-1 i /\/i/\ Elastic stitch 294. 294-1. 295. 295-1, 296-1 and 297-1. I\ /\ i\ IS Fl/Sill / hem as shown in drawing 2 and place the fabric under the sewing foot so that the folded edge s guided by the guide edge of toe foot (ill at right). Regulate the sttch width - Pfaff 294 | Owner's Manual - Page 20
the fabric along the line which is to be enhanced by shell edging. On models 296-1 and 297-1, place it under the sewing foot so that it extends to the left of the needle. Sew along the folded edge with the needle taking the left stitch into the fabric and the right stitch - Pfaff 294 | Owner's Manual - Page 21
- - Pfaff 294 | Owner's Manual - Page 22
not he folded and Simply olace oorh pieces under ng foot with 'heir edges soutting them as instructed hove edge. the oressed. 'ftp sew and oin Mending hems Apply the ordinary sewing foot. Turn ,t,iity-st'tcn contro '5) to elast c-stitch svmnoi. Stitch length: between 0 and ower e'd of buttonho - Pfaff 294 | Owner's Manual - Page 23
if the seam is exposed to great stress (e.g. on ski pants). Sew the elastic press-open seam with the machine set as ndicated above. Elastic triple zigzag stitch Models 294-1, 295-1, 296-1 and 297-1. Attach ordinary sewing foot. L Turn utility-stitch control (5) to symbol of elastic triple zigzag - Pfaff 294 | Owner's Manual - Page 24
. The more you stretch the elastic strands the more the fabric will be gathered. Pullover stitch Models 294-1. 295-1 296-1 and 297-1 l3 183 954 Affach ordina sewing foot. Turn utili-stitch control 5)to pullover-stitch symbol. Turn stitch length control to red triple-stitch symbol. Stitch width - Pfaff 294 | Owner's Manual - Page 25
-stitch symbol. Turn stitch length control to red triple-stitch symbol. Stitch Wi 0th: maximum Feather stitch Models 296-1 and 297-1. Attach ordinary or clear-view sewing foot. Turn utility-stitch control (5) to feather stitch. Turn stitch length control to red triole-stitch symbol. Sttch width - Pfaff 294 | Owner's Manual - Page 26
me ;ove o' bOng t o" the eft. I Machine care LDnq€vit and smooth machine pe'formance are decercent on regular o caning anc proper sewing hook vhich has to oe cOca regularly om ime to time, put a drop of cil toe nook raceway 'see liristrat ons Delowl Pfaff 294/294-1/296-1 Pfaff 295/295-1/297 - Pfaff 294 | Owner's Manual - Page 27
time. clean tne parts in me machne arm and in the vicinity of the sewing hook vnn a soft Crush. TO this end, remove the needle, the sewing foot anc the Doobin case witn the boobin. On Pfaff machines 295, 295-1 and 297-1 loosen the set screw, lift the front of the free arm cover and - Pfaff 294 | Owner's Manual - Page 28
Pfaff 295, 295-1 and 297-1 Workplate of the Pfaff 294. 294-1 and 297-1 Upper threading . . Raising and lowering the sewing foot Drawing up the boboin thread Fundamentals of machine Removing the face cover . . Macf-inc care . Clean ng . Trouble shooting . . . . 23 24 . . 25 . 26 27
-
 1
1 -
 2
2 -
 3
3 -
 4
4 -
 5
5 -
 6
6 -
 7
7 -
8
-
9
-
10
-
11
-
12
-
13
-
14
-
15
-
16
-
17
-
18
-
19
-
20
-
21
-
22
-
23
-
24
-
25
-
26
-
27
-
28
 |
 |