Pfaff 360 Owner's Manual
Pfaff 360 Manual
 |
View all Pfaff 360 manuals
Add to My Manuals
Save this manual to your list of manuals |
Pfaff 360 manual content summary:
- Pfaff 360 | Owner's Manual - Page 1
w iNSTRUCTION BOOK - Pfaff 360 | Owner's Manual - Page 2
book a valuable guide to easy sewing. Follow these simple instructions and familiarize yourself sewing exciting on your easy-to-operate PFAFF 360. with the exclusive automatic features of your machine. You will find If you have any sewing problems, please contact your PFAFF dealer. He - Pfaff 360 | Owner's Manual - Page 3
stud 3 Zigzag finger-tip control 4 Bobbin winder S Step motion knob 6 Stitch length dial 7 Reverse feed control 6 Light switch 9 Drop feed central 10 Needle plate 11 Free arm cover (enclosing transverse rotary sewing hook) 2 R 8152 12 Needle 13 Automatic needle threader 14 Needle thread tension 15 - Pfaff 360 | Owner's Manual - Page 4
8137 18 Balance wheel 19 Collapsible spool pins 20 Top cover 21 Needle threoder control 22 Presser bar lifter 23 Face cover 24 Sewing foot thumb screw 25 Sewing foot 26 Snap-out workplote 3 27 Free orm 28 Double receptacle for speed control and power cords 29 Free arm fop cover 30 Needle set screw - Pfaff 360 | Owner's Manual - Page 5
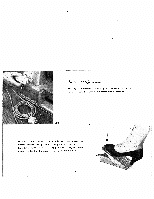
foot control with the machine. R81S1 R7132 Place the foot control under the cabinet within easy reach of your foot, Rest the right foot on the speed control and press. The harder you press, the faster the machine will run. During pauses in stitching, completely remove your foot from the control - Pfaff 360 | Owner's Manual - Page 6
unless you have fabric under the presser foot. The machine will feed the material under the sewing foot automatically. All you have to do is guide the work. Never try to boston feeding by pushing or pulling the fabric while stitching because the needle may bend or break. •1 - Always turn the - Pfaff 360 | Owner's Manual - Page 7
R 8007A $&4if/ht $iuhiq .4 Set: DiolA-O Lever B - Dial G regulates the stitch length (the higher the number on the dial, the longer the stitch). To bocktack the end of a seam, simply depress the finger-tip control. 6 R 7998 - Pfaff 360 | Owner's Manual - Page 8
the control up, the machine will sew straight, regardless of the stitch width set (ideal for tying off zigzag seams). Lever B changes the position of the needle in the needle plate slot. Thus the stitch ing can be moved from the center to the left or right of the slot, as desired. Dial G lengthens - Pfaff 360 | Owner's Manual - Page 9
R 8064 I R 6036 fJOifl1119 th 7366z Hold balance wheel a and turn stop motion knob b all the way to the left (counter-clockwise). Place spool of thread on right-hand spool pin. The bobbin thread should always be the some size as that used on the spool, or a little finer. Pull thread from spool and - Pfaff 360 | Owner's Manual - Page 10
bobbin, from inside. Set bobbin on bobbin winder spindle so that key at base of spindle enters slot in bobbin. Press in lever i. Hold end of thread and slowly start machine. Having wound a few turns, break off end of thread and continue winding at a faster pace. Bobbin winder will stop automatically - Pfaff 360 | Owner's Manual - Page 11
under the tension spring until it emerges from the opening at the end of the spring. Leave about three inches of thread hanging from the bobbin case. Hold the case by its open latch, so that the bobbin cannot fall out. V R5867 I R 5869 2 A the 7 c 6 in 3 6 Ca$e Raise needle to its highest - Pfaff 360 | Owner's Manual - Page 12
. In replacing the bobbin case, it is best to hold the loose end of thread so that it will not get jammed between bobbin case and hook. Release latch k. 3 R5870 4 R5868 A Press against bobbin case until you hear it snap into place. An improperly inserted bobbin case will cause needle break age - Pfaff 360 | Owner's Manual - Page 13
the correct relationship between needle, thread and fabric. Select the proper thread sizes and needles from this chart. The some size threads should be used in the needle and on the bobbin. Some experienced seamstresses prefer a somewhat thinner bobbin thread. However, the bobbin thread never should - Pfaff 360 | Owner's Manual - Page 14
a 6 ,ut /Vee?1e5 On PFAFF 360 sewing machine, System 130 R, flat-shank needles are used for all ordinary sewing and embroidery work. The needle system is stamped on the needle plate. Genuine Pfaff nedles, System 130R, are available from every Pfaff dealer. Bent or blunt needles should not be used - Pfaff 360 | Owner's Manual - Page 15
tension discs 3. Bring take-up lever 4 as high as it will go and pass thread from right to left through one of the holes at its end. Pull thread into slots at left of thread guides 5 and 6 and then into the stot at left of needle clamp 7. Then thread needle, front to back. The automatic needle - Pfaff 360 | Owner's Manual - Page 16
-I I, I I I? 8136 'I Ii Is I - Pfaff 360 | Owner's Manual - Page 17
d is in line with the bottom edge of the top cover. Now lower the sewing footand-- With your left hand push needle threader control down until threader prong w (see opposite page) penetrates needle eye. Keep control in this position. Hold thread loosely and lead it from left around the small pin - Pfaff 360 | Owner's Manual - Page 18
control. Prong w now pulls end of the thread - instead of the toop - through needle eye. Since take-up lever d is not at its highest point needle, pull about four inches of thread through when you thread the the needle eye before you begin sewing sewing foot before you put fabric into machine. - Pfaff 360 | Owner's Manual - Page 19
on the surface of the fabric. Cause: Upper tension too tight or lower tension too loose. 'V A To check whether the tensions are correctly bol anced, take a closely woven piece of fabric and sew a few straight and zigzag seams. If the straight stitches are tightly drawn in on bath sides of - Pfaff 360 | Owner's Manual - Page 20
turn of the tension dial. The numbers on the tension dial indicate different degrees of tension. The higher the num ber, the greater the tension. For ordinary sewing, the upper tension should be set between 3 and 5. Your upper tension has a third tension disc for two-needle work. R8029 19 - Pfaff 360 | Owner's Manual - Page 21
used. For normal satin stitching, set dial on 0.2. To backtack the beginning or end of a seam, simply press the finger-tip control down. When the control is released, the machine resumes forward sewing automatically. This feature is ideal for darning rips with the ordinary sewing foot. To do this - Pfaff 360 | Owner's Manual - Page 22
9e? The machine feed is dropped for darning hoop embroidery and button sewing. To lower feed below the needle plate, turn drop feed control clockwise, Fabric will cease feeding. When the control is turned to the right as far as it will go feeding of the fabric resumes automatically when you start - Pfaff 360 | Owner's Manual - Page 23
darning foot from the rear. Hold spring clip n so that it is behind the needle set screw, and tighten screw c. Attach darning hook d as illustrated so that when you lower presser bar lifter e, the darning foot will stay in position. Remember to lower presser bar lifter e so that the upper tension is - Pfaff 360 | Owner's Manual - Page 24
oiling. Use Pfaff sewing machine oil only. Never lubricate machine with animal or vegetable oils. Remove all lint before oiling. All moving and rotating parts require regular lubrication. It is advisable to establish a pattern when oiling your machine. Begin by removing the needle plate and oiling - Pfaff 360 | Owner's Manual - Page 25
I) R 8061 The oiling points in the machine arm can be reached easily by removing the top cover. Oil should be applied sparingly. Excessive quantities of oil may soil the work and cause machine sluggishness. One or two drops of oil usually wilt suffice. To pull cover up, tilt it back and lift. R - Pfaff 360 | Owner's Manual - Page 26
time, remove the needle plate and clean the feed with a toothpick or similar wooden object. The needle plate is held in place by a press stud and can be removed without a screwdriver. To do this, lift back end first and tilt out. V R 8237 A Open the free arm cover and take out bobbin case and bobbin - Pfaff 360 | Owner's Manual - Page 27
$Otifjht 91Wt5 The 15-watt sewlight is recessed under the machine arm and can be swung out by pulling down the grille. To change the light bulb: Push bulb into socket, turn left, and pull out. When inserting new PFAFF light bulb, be sure to slide bulb pins into bayonet socket slots. Press - Pfaff 360 | Owner's Manual - Page 28
4 $nai-Qui fOckr1at Your PFAFF 360 has a snap-out workplaie which can be raised to give you a full-size work oreo for fbi sewing ond embroidery. To raise workplate, pull it out to the left os for os it will go, then lift it until it is flush with the needle plote. Now let it - Pfaff 360 | Owner's Manual - Page 29
t.cunj th 11tc &tt 7i.cicn Your PFAFF 360 is equipped with a 30-watt electric motor (Type PE 360), which is housed in the machine base and drives the main shaft by means of a driving belt. If the driving belt tension needs adjustment, take out the four screws in cover t and remove. Loosen screw x - Pfaff 360 | Owner's Manual - Page 30
is stamped on needle plate. (For ordinary sewing, use System 130R needles.) Insert new needle. Check and correct threading as instructed on pages 14 and 15. Use correct needle and thread. 2. Needle Thread Breaks Cause: The above mentioned may cause thread breakage. Thread tension too tight. Poor - Pfaff 360 | Owner's Manual - Page 31
feeding motion. Guide the material lightly. Push bobbin case until you hear it snap into place. 4. Faulty Stitch Formation Cause: Improper tension. Thread too heavy, knotty or hard. Bobbin unevenly wound. Pieces of thread between tension discs. il[. Remedy: Adjust tensions as instructed. Use only - Pfaff 360 | Owner's Manual - Page 32
obstructed by pieces of thread. Mechanism clogged by inferior oil. Bobbin winder working while sewing (when a bobbin is not being filled.> Remedy: Loosen motor belt by adjusting idler (see page 28). Clean and oil hook raceway. Use only Pfaff sewing machine oil - never salad oil or glycerine. Stop - Pfaff 360 | Owner's Manual - Page 33
side in one continuous opera tion. Use right edge of foot as a guide. For other types of zipper insertion, follow direc tions in your zipper packoge. Edge Stitching Machine Setting: A -0 to 4 B- 4 Sew parallel rows of straight or zigzag stitches at various distances from the fobric edge by using - Pfaff 360 | Owner's Manual - Page 34
Machine Setting: A -0 or 2 (optional) B- 4 Flat felled seams are used to durably join two pieces of fabric. They are made in two operations. Flat felled seams usually are straight stitched. Narrow zigzag stitches needle right side up, insert seam ridge into felling foot opening, and stitch down - Pfaff 360 | Owner's Manual - Page 35
hem, ease thread tension slightly and set dial A on 2 or 3, To hem tricot fabrics, increase the tension and use the widest zigzag stitch so the hem has a rolled shell effect. V 1248 Hemming Machine Setting: A-Oor2to4 . B- 4 The hemmer foot is indispensable if you want to sew a uniform hem. You - Pfaff 360 | Owner's Manual - Page 36
57378 Overcasting Edges Machine Setting: A- 2 to 4 B- 4 Overcasting prevents frayed edges. Use a long, wide zigzag stitch and sew edge with .4 the needle taking one stitch into the fabric and the other over its cast edges after fabric is cut and before the pieces are loined. edge. You may - Pfaff 360 | Owner's Manual - Page 37
edge. Sew together with narrow zigzog stitches. Trim excess fobric on wrong side close to seam. V Machine Setting: A-I to 3 B- 4 This sewing job stitching under the insertion. Fold edges of material back and press. Turn work to right side, set machine for a narrow zigzag stitch of medium length - Pfaff 360 | Owner's Manual - Page 38
tnserting Patches Machine Setting A-4 B- Large holes can be patched quickly. The following method may be used for jersey fabrics. Cut patch so that its grain will match the rest of the fabric. Place the patch over the damaged area. Sew it down with a wide zigzag stitch of medium length. For - Pfaff 360 | Owner's Manual - Page 39
the sole of the sewing foot. Follow your pattern with a satin stitch and hold the filler thread lightly. The satin stitch is used for many sewing lobs, For added effects sew over embroidery with contrasting thread. Set stitch length between 1/2 and 1. V 46121 Shirring Machine Setting: A -2 to 2hz - Pfaff 360 | Owner's Manual - Page 40
R 7163 6121 Applique Work Machine Setting: A - 1 Jz to 2 - B - Appliqusing is easy and modern, Trace design on wrong side of fabric and baste a piece of contrasting material to right side. Outline design on wrong side with a narrow zigzag stitch -- and the motif will appear on the right side. Trim - Pfaff 360 | Owner's Manual - Page 41
46121 R 7166 Openwork Embroidery Machine Setting: A -0 and 21/a B- 4 C There are hundreds ef patterns excellent for openwork embroidery. Although similar in appearance to applique, openwork embroidery is much simpler. Let's embroider the 2 -squ5 are box illustrated. First, sew over all traced - Pfaff 360 | Owner's Manual - Page 42
Making Stuffed Animals Machine Setting: A - VJz zigzag seam. Attach ears and oin pieces by overcasting edges with a medium-wide satin stitch, leaving openings for the tusks. Set design on fabric. Clamp work into em broidery hoops. As you are following the scrollwork outline with a wide satin stitch - Pfaff 360 | Owner's Manual - Page 43
area to be hemstitched. 2 Stop machine when needle is in fabric on the right. 3 Lift sewing foot, turn fabric in the direction of arrow, and lower foot again. 4 Sew second row as shown penetrates needle holes of in sketch, guiding material previous zigzag stitches as it parallel to first row - Pfaff 360 | Owner's Manual - Page 44
con do it easily on your PFAFF on medium and heavy fabrics. Use zigzag foot No. 51378 with blindstitch guide No. 46669, which you can buy at your Pfaff store. Attach the guide so that its vertical flange goes through the sewing foot slot. Use a No. 70 needle, a loose upper tension and thin thread in - Pfaff 360 | Owner's Manual - Page 45
Sewing Buttonholes R 8145 Machine Setting: A - 11/2 . B - Stitch Length: 0.2 Attach buttonhole foot No. 51016 and set slide on buttonhole length desired. The buttonhole is the right length when beginning red end of slide indicator (see arrow). gouge of first to buttonhole seam reaches The - Pfaff 360 | Owner's Manual - Page 46
0 0 Instructions for Buttonholing I Sew first side over a filler cord. When beginning of seam reaches slide indicator on buttonhole gauge, it is the right length. Leave needle in fabric on right side of its throw. 2 Lift foot, turn fabric around clockwise, using needle as a pivot. Lower foot, take - Pfaff 360 | Owner's Manual - Page 47
or rings with your PFAFF. Attach button sewing foot No. 46120 ond drop machine feed. Mochine Setting A -0 B - Place button under button sewing foot and align so thot needle will enter left hole. Let needle titch through hole and make one or two tying stitches. Roise needle. Turn dial A to the right - Pfaff 360 | Owner's Manual - Page 48
the tension, or the upper tension will be released - and the thread will jam in the machine. Machine Setting: A -3 . B - 4' Use special darning foot No. foot. Place thread back and forth across damaged spot (top picture) and anchor if in unworn area. Sew across filler thread with zigzag stitches - Pfaff 360 | Owner's Manual - Page 49
Holes Machine Setting A -0 B- 4 Drop feed. You need no darning hoop to mend sleeves. trouser legs or socks on your PFAFF 360. Simply slip them over the free arm. Stitch back and forth across the hole, first length wise, then crosswise. Use a thin No. 70 needle. Remember that "a stitch in time - Pfaff 360 | Owner's Manual - Page 50
. Raise machine feed and set machine for satin stitch. Attach cord stitcher and sew outlines of monogram. Watch that seams do not overlap at joints of letters. To raise monogram, insert a filler thread. Ask your Pfaff dealer to show you PFAFF's Ornamentograph, the ingenious. ly designed monogram and - Pfaff 360 | Owner's Manual - Page 51
Cording Ta card on your PFAFF Automatic, use Cording Kit No. 50177 which is available at extra cost. R 8146 The Cording Kit comprises: 4 double-needle holders for needle dis tances of '/io, °/e, /a and 7/ inch; 3 cording feet; 3 carding plates (2 with cord ducts and I with center claw>; 1 package - Pfaff 360 | Owner's Manual - Page 52
tension slightly for cording. Pfaff recommends you fill your cording so it keeps its shape in the laundry. Filler cord thickness depends on cording size you want. To sew filled cording, use the two cording plates with cord ducts. Only very narrow tucks are made without filler cord. Machine Setting - Pfaff 360 | Owner's Manual - Page 53
zigzag stitching, varying stitch length, stitch width or needle position. To do this, press control F down in rhythm. Some of these designs are illustrated below. Surely you will be pleased to know that your PFAFF 360 can be converted into a PFAFF 360-261 Automatic at any time. Just see your Pfaff - Pfaff 360 | Owner's Manual - Page 54
unwind evenly from a crosswound spool, use the transverse spool holder which is part of the standard equipment of your machine. To attach the spooi holder, slip position spring I over the vertical spooi place firmly. Pass the thread through eyelet 3, and thread the machine as instructed. R 6533 53 - Pfaff 360 | Owner's Manual - Page 55
Bobbin Case Recommended Needle and Thread Sizes Important Facts about Needles Upper Threading Operating the Needle Threader Drawing Up the Bobbin Thread Correct Tension Regulation Regulating the Thread Tension Stitch Length Regulation Reverse Sewing Dropping the Machine Feed Changing the Sewing Foot
-
 1
1 -
 2
2 -
 3
3 -
 4
4 -
 5
5 -
 6
6 -
 7
7 -
8
-
9
-
10
-
11
-
12
-
13
-
14
-
15
-
16
-
17
-
18
-
19
-
20
-
21
-
22
-
23
-
24
-
25
-
26
-
27
-
28
-
29
-
30
-
31
-
32
-
33
-
34
-
35
-
36
-
37
-
38
-
39
-
40
-
41
-
42
-
43
-
44
-
45
-
46
-
47
-
48
-
49
-
50
-
51
-
52
-
53
-
54
-
55
 |
 |

w
iNSTRUCTION
BOOK