Pfaff 77 Owner's Manual
Pfaff 77 Manual
 |
View all Pfaff 77 manuals
Add to My Manuals
Save this manual to your list of manuals |
Pfaff 77 manual content summary:
- Pfaff 77 | Owner's Manual - Page 1
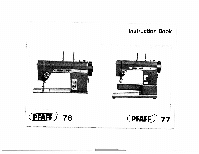
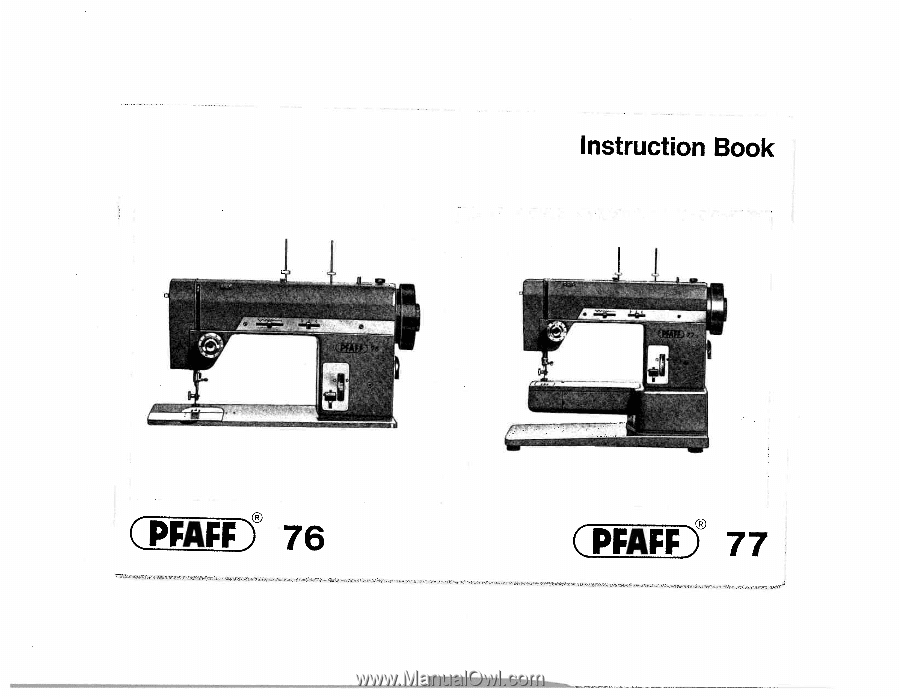
Instruction Book CPFAFFD® 76 CPFAFP) 77 - Pfaff 77 | Owner's Manual - Page 2
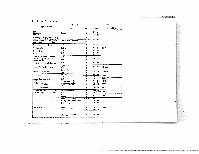
Needle and Thread Chart Type of Fabric Thread Type Size Size Bed linen Fine linen Muslin Dress fabrics, such as brocade, satin ottoman, taffeta, georgette, crêpe, chiffon, batiste. blouse fabrics and poplin shirting Suitings and mantlings Cotton Silk Cotton or mercerized cotton Silk 80 40 - Pfaff 77 | Owner's Manual - Page 3
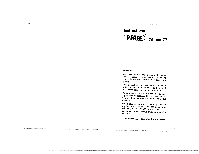
CPFAFFI 76and77 Foreword Your new Pfaff sewing machine will enable you to master a large variety of sewing, embroidering and darning jobs easily and quickly. This instruction book has been compiled in order to familiarize you thoroughly with all the sewing jobs coming up in a home. We - Pfaff 77 | Owner's Manual - Page 4
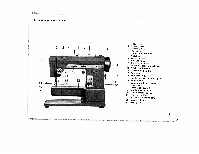
Essential Parts of Your Pfaff 76 LHL1fl 17 18 16 15 2 1 Face cover 2 Take-up lever 3 Thread guide 4 Top cover 5 Thread retainer stud Sewing foot thumb screw 17 Light switch 18 Stitch width control 19 Needle position lever 20 Needle thread tension 21 Presser bar lifter (on back of machine - Pfaff 77 | Owner's Manual - Page 5
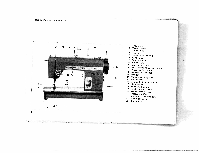
Essential Parts of Your Pfaff 77 1 7- 3 4 5 I-6_ U 16 15 14 1 Face cover 2 Take-up lever 3 Thread guide 4 Top cover 5 Thread retainer 16 Sewing foot thumb screw 17 Light switch 18 Stitch width control 19 Needle position lever 20 Needle thread tension 21 Presser bar lifter (on back of machine arm - Pfaff 77 | Owner's Manual - Page 6
Preparing Your Machine for Sewing Push of the of the pmcluoagrcdhAininientotoantthdheethwreealcplelupogtuatacletlett.hoen otthheerbeancdk To on switch on the the face cover sewlight, your foot and depress you press, the faster within easy reach of the pedal. The harder the machine will run. 4 - Pfaff 77 | Owner's Manual - Page 7
TlAsTnewoefhvtaieeenetrrhgnmytgootatahhugceieethshinabmtthevoaoeseplatonmcfprceoooeamtsttooiuptrwir,loeIehtntfseel.aiedclokplsewetevhrwhaeiisrticinhvgl(ee1,vs0eef)plrriocvuskdeinotsitwdohentinosr.. 5 - Pfaff 77 | Owner's Manual - Page 8
as you hold the case by its open latch. When you release the latch, the empty bobbin drops out. On the Pfaff 77, the bobbin case is removed just like on the Pfaff 76. To get at the bobbin case, however, you must first open free arm cover (14) by swinging it toward - Pfaff 77 | Owner's Manual - Page 9
turning stop motion knob (9) toward you (see ill.). To engage the sewing mechanism after the bobbin has been wound, turn the stop mo tion on tho bobbin and push the bobbin toward the right Start the machine. When the bobbin is full, it is pushed toward the left and can be removed from the spindle. - Pfaff 77 | Owner's Manual - Page 10
Hold the lull winds toward case. bobbin so that the you and place it in thread un the bobbin ci(rPn3oau)cst.lahleAte.etssheyocotfluhorctephkaurwdlelaisdtiehnetoht(ah4sn)lr.ogetiandL(g2,e)atfhvareneodmboaubbtnhbodeiuentrbssohtpbhorbruineilndeg 8 - Pfaff 77 | Owner's Manual - Page 11
Pfaff 76 Pfaff 77 pubTpiirlsploolola..ab)tc,acabieRtnteime.nseateilhtetkrshetcaineastgbheshoeiebgsbtahuhbblerueaioennsnbttlciaibcltetsipcanhosysweiloncoauhtaton.esnde(ehwlLceiphifeanutrintretneotstteihslairtetrharsteohsgtluwnaeamdtai)cnpahnsspcetohe(iiaistndnnhnetlteoedese, 9 - Pfaff 77 | Owner's Manual - Page 12
the Pfaff 77 for ordinary sewing operations, push the workplate onto the free arm as far as it will go (1). Then lock it in place by turning down the lever on the back of the machine (2) un til the locking stud snaps into the hole in the free arm. Press the workplate support against the machine - Pfaff 77 | Owner's Manual - Page 13
V Upper threading is illustrated opposite. Please tween pulled note that any two of clockwise the thread is placed be the discs of tension (20), around the tension stud ssailionlo.m)dn. .edAwTrsahhweyreroneaudtobdwetohtawerthdeniesent, - Pfaff 77 | Owner's Manual - Page 14
and lowered by operating the presser bar lifter on the back of the machine (see ill.). A = Presser bar lifter up B = Presser bar lifter down 12 To draw up the bobbin thread, hold the needle thread and lower the sewing foot. Turn the balance wheel toward you a full turn. Pull the needle thread - Pfaff 77 | Owner's Manual - Page 15
Fundamentals of Machine Operation For ordinary sewing, needle position lever (19) should be in its center position. Make sure the take-up lever is at its highest point before you begin and - Pfaff 77 | Owner's Manual - Page 16
Begin by this end, the right sewing a straight-stitch seam. push stitch width control (18) as on the left-hand side of the slot. For ordinary sewing operations, set the stitch length control on "2". Place the and lower material under the sewing the presser bar lifter. foot .1 Place the foot - Pfaff 77 | Owner's Manual - Page 17
To sew in reverse or backtack the end of a seam, simply depress fingertip control (12). The stitch width is regulated by pushing stitch width control (18) toward the left, as may be desired. Various zigzag sewing operations are dis cussed on page 26 and the following pages. 15 - Pfaff 77 | Owner's Manual - Page 18
. Numbers 0 to 10 indicate different degrees of tension on the upper tension dial. The higher the number, the tighter the tension. For ordinary sewing operations, the upper tension should be set at about 5. 16 bottom top Upper tension too tight or lower tension too loose. bottom top Upper - Pfaff 77 | Owner's Manual - Page 19
The accessory box which machine contains several belongs to your sewing feet for special sewing operations. To change the sewing foot, bring the needle to its highest point and raise the foot. Turn until the sewing foot can be out screw 16 removed, tilt ing it sideways (see ill.). The new foot - Pfaff 77 | Owner's Manual - Page 20
twpNhrioiesswess,isidnardgsoopinntethdheiebcyamdterraoedcmphboiynfveeitnehdgfeeebwdlee.hdvieOtercnoavdtrheorerwown(P1.f3a)sflfaa7nn6td-, To raise the down and let machine it return feed, to its press this lever original position. bucOyhnnidnsteeihrmesfipedPleyefdafotluaf7grtn7ah,iinentgh - Pfaff 77 | Owner's Manual - Page 21
.lndstthiionhaeTwinngosr.hlduidmighnlMewrofeboooaatotrpkrhhtttnlsheehey. Turn the fabric at and forth over the stitches. right angles and preceding work sew with back short Select the darning the darning job to hoops in a size be performed. matching - Pfaff 77 | Owner's Manual - Page 22
Zipper Insertion Attach zipper foot without Stitch length: 1.5 to 2. quilting gauge. Central needle position. 84 tfftiBhhtoo. eaeroSst tatnfeaibotencooecdhutdlotlccesallel1ooodissnnieengzctitthphhot,epeheetghrzmueipoziadintplpeieenrpftrigtheaer(le2,td)hft.gareeabeeirtsrihoiecgf,ht(ttth1hh)eee. - Pfaff 77 | Owner's Manual - Page 23
Flat Felled Seams Attach flat feller No. 93-847561-00. Stitch length: 1.5 to 2. Flat two felled seams are used to pieces of fabric and durably join are usually straight-stitched. FrpfbtiaoirogrbposthrttttoirpcumiSdseeeiicndfaneagemtbes(r:rsisacefbLeatoiachsuyiienltfl.go)pf,l1ldia/ - Pfaff 77 | Owner's Manual - Page 24
Hemming Stitch length: 1.5 to 2 847 551 iuTnwassossdFbetuDcatir4eorhrnyraiapmrFueoentezlsawshrldoclicmwaptolglttiurthkldenhdizamatniwetmdghataunihcshdtgeig.tegceehrteehrohee.setrlatnhafsoffaaytodetanbsahibhnoponsttgbeecreid.uts.grmtihciccr2ieabcterrn5hPlhnioasar.angeeiledc. - Pfaff 77 | Owner's Manual - Page 25
-00, with materials, 3 cording grooves foot No. 93-847 for medium-heavy 675-00 fabrics, with and 5 cording grooves fofrooltightNwoe. igh9t3-m84a7te6r8ia0l-s0.0 with 7 Ptaff 77 Pfaff 76 23 - Pfaff 77 | Owner's Manual - Page 26
thread tension. The hemstitching effect is produced by the left wing needle penetrating the fabric. Turn the fabric by half a turn and sew the second seam, guiding the material so that the wing needle enters the needle holes it has made in the fabric previously. You can produce a nice hemstitching - Pfaff 77 | Owner's Manual - Page 27
The Zigzag Seam The stitch width is regulated by pushing stitch width control (18) toward the left, as may be desired. Never change the stitch width setting unless the needle is outside the fabric. 18 The stitch length is regulated by turning stitch length control (11) (see ill.). The larger the - Pfaff 77 | Owner's Manual - Page 28
Overcasting Edges with Zigzag Stitches Attach ordinary sewing foot. uStitch length: 2. 838 954 To overcast the edges of light and mediumweight fabrics, set the machine for its maxi mum stitch width. Soft and flimsy fabrics are best overcast with a zigzag stitch of medium width. Make sure the needle - Pfaff 77 | Owner's Manual - Page 29
stitch width control at the extreme left of its slot and sew over first seam. aEnciAtwoseltaerasnttdythheilercertohswedcm.ooaeawrrxTtneencehrereisasisnnt,lsistcttsmhuhtareoearnpdteemrtithptaahwetaleetirccoifheanmaelbadtr(hociscenheiinenwtsheorteiohllwnet.)hrg.iiatgshtshTaitmrdttihhmeoeee.f manner - Pfaff 77 | Owner's Manual - Page 30
Inserting Lace uStitch length: 1 838 954 Place down the with lace on straight stthietchmesateorniabl oathndsidsteitsch(1)i.t Cut the (2) and fabric iron it open under the lace on both sides of the insertion lace. tzShiegewzfaagobvriesctritetcdhhegeesesdoagfweasmyeoodfniuthmthee lace with - Pfaff 77 | Owner's Manual - Page 31
Changing the Needle Position tltSehhoveemernneee(e1esd9dp)lleeectopiaslawlthtieetsceshrwlioegidtnh. gtTtohajniosdtbhisesledfartoi,rgnehreet msbpoyaerdcmetlieovfvwteilniytogh.f Tfohresenweiendglebuptotosintihoonlesl.ever is indispensable Lever at left 4- () center 3r C'D right C) 29 - Pfaff 77 | Owner's Manual - Page 32
Sewing Buttonholes I 1 2 Attach buttonhole foot No. 847616 to the machine and set the slide on the buttonhole gauge to the buttonhole place a filler cord of medium size in the left groove of the sewing foot. All-purpose sewing foot No. 91-100 179-00 may also be used for this operation. 3 30 - Pfaff 77 | Owner's Manual - Page 33
of bar. Push stitch width control (18) back to the first notch R 1 and sew the second button hole seam, stopping about /io inch from the end of the first (5). Push stitch width control (18) to the second notch R 2 and sew the second tack, slightly holding the material to reduce the length of bar. - Pfaff 77 | Owner's Manual - Page 34
,e"ewwdh.riitlieng'thedimreac eTmo bgrioviedeyrouthremoountolignreasmtwdiicme.ensional quality, 93100179 Button Sewing Flick the needle to the machine feed. its right position and drop twiisPhtlolsirl.d)oa.tcuhhlegaRothwautinhensbrteeeieoeldtdtbhhltueehtphetooownsnleieniletlseid - Pfaff 77 | Owner's Manual - Page 35
as illustrated /16 (1). inch from tsThehetentnhefeelidcsklteittchthherenleaendegdttlheentcsooioninttsrobrliygahott n"pe4o"sg.irtiaRodened.auncde Bindstitching Apply clear-view sewing foot No, 91-100 179-00. yfnitiFlonhaleo.lre)edln.lddiensdlR(eeetshweeewgeteianudihtkglghieaelelmts.,fet)ho. oet - Pfaff 77 | Owner's Manual - Page 36
bAcnbYyaydeonedusdievtmlciwaeoarainynnkaipgnelmogsaooaiktvrrsieneeotiarntemc.ixlahlceuSinfstoitiltlnaemrleanlgertgefetdchafooFs,fhreodicsnto.thtsinettc-hsahitdrsieetcwsphioaigdbgdnttehesa.siniyageonnduds I I I I Sewing Curtains Stitch Stitch length: width: 2.5to3 medium - 838 954 93-OU - Pfaff 77 | Owner's Manual - Page 37
To make appliqué, proceed as follows: 1. Trace the design on the right side. 2. Set the stitch length control on "1' and stitch along the outlines. 3. Sew the fabric to be appliquéd right side with long stitches (1). to the 4. Follow the outlines of the design on the wrong side with a narrow - Pfaff 77 | Owner's Manual - Page 38
To change the light bulb, remove the face cover by pulling it in the direction indicated by the arrow. Push the light bulb into its socket, turn left and pull out. Insert the new bulb so that its pins bulb slide into the socket in and turn right. slots. Press the As you slot c, replace the - Pfaff 77 | Owner's Manual - Page 39
performance are dependent on regular cleaning and prop er oiling. Since your Pfaff sewing machine has been made from high-grade materials, there are only a few oiling points left. The raceway in the sewing hook is the most important oiling point. From time to time, put a drop of oil into the hook - Pfaff 77 | Owner's Manual - Page 40
• • From time to machine arm time, and in ing hook with a soft ctbhlreeuasnvhi.ctihneitypoafrtstheinsetwhe- To this end, foot and the remove bobbin the needle, the case with the sewing bobbin. btaPtloOhiabffmncaetlefkftPochmcfol7eaav6atfuhfefctrerhmio7oin7mnoauteucsamshtlocy,iafhlnecli( - Pfaff 77 | Owner's Manual - Page 41
. • Use only high-grade machine thread or sewing silk. • Check to see that the bobbin case has been inserted correctly. • Both tensions must be balanced correctly. •. Don't force the feeding motion, merely guide the material lightly. • Clean and oil the machine as instructed. • Make sure there are - Pfaff 77 | Owner's Manual - Page 42
Removing the Bobbin Case . 6 Removing the Face Cover . 36 Reverse Sewing 15 Sewing Curtains 34 Straight Stitching 14 Trouble Shooting 39 Upper Threading 11 Winding the Bobbin 7 Workplate of Pfaff 76 10 Workplate of Pfaff 77 10 Zigzag Stitching 25 Zipper Insertion 20 I- 40 - Pfaff 77 | Owner's Manual - Page 43
CPFAFFD® No. 20886 engl. (US.) HR 469 Printed in Germany * . *.
-
 1
1 -
 2
2 -
 3
3 -
 4
4 -
 5
5 -
 6
6 -
 7
7 -
8
-
9
-
10
-
11
-
12
-
13
-
14
-
15
-
16
-
17
-
18
-
19
-
20
-
21
-
22
-
23
-
24
-
25
-
26
-
27
-
28
-
29
-
30
-
31
-
32
-
33
-
34
-
35
-
36
-
37
-
38
-
39
-
40
-
41
-
42
-
43
 |
 |
Instruction
Book
CPFAFFD®
76
CPFAFP)
77