Pfaff ClassicSttyle 2023 Owner's Manual
Pfaff ClassicSttyle 2023 Manual
 |
View all Pfaff ClassicSttyle 2023 manuals
Add to My Manuals
Save this manual to your list of manuals |
Pfaff ClassicSttyle 2023 manual content summary:
- Pfaff ClassicSttyle 2023 | Owner's Manual - Page 1
Owner's manual - Pfaff ClassicSttyle 2023 | Owner's Manual - Page 2
area, such as threading needle, changing needle, threading bobbin, or changing presser foot, etc. • Always unplug the sewing machine from the electrical outlet when removing covers, lubricating, or when making any other user servicing adjustments mentioned in the instruction manual. • Never drop or - Pfaff ClassicSttyle 2023 | Owner's Manual - Page 3
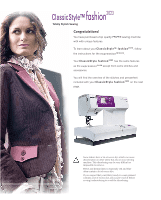
Congratulations! You have purchased a top quality PFAFF® sewing machine with with unique features. To learn about your C l a s s i c S t y l e ™ f a s h i o n 2 0 2 3 , follow the instructions for the expression™ 2028. Your C l a s s i c S t y l e f a s h i o n 2 0 2 3 has the same features as - Pfaff ClassicSttyle 2023 | Owner's Manual - Page 4
Presser feet (standard accessories) For more information about accessories, please contact your PFAFF dealer. 0 1 0. Standard Presser Foot with IDT 820250-096 1. 12 13 14 15 10. Bobbins 412 76 79-01 11. Needle box 48-020 804-32/000 12. Edge Guide/Quilting Guide 820251-096 13. Second spool - Pfaff ClassicSttyle 2023 | Owner's Manual - Page 5
Parts of the sewing machine 1 -/+ button A (stitch width/ Threading slots Needle thread tension Take-up lever Presser foot lifter Thread guide Spool holder with spool cap Hole for second spool holder Lid with stitch chart Bobbin winder Bobbin door Free arm Sewing bulb (max. 5 W) Thread - Pfaff ClassicSttyle 2023 | Owner's Manual - Page 6
2:9 Bobbin thread 2:9 Thread cutter 2:9 Changing the presser foot 2:9 Setting the needle thread tension 2:10 Winding a bobbin through the needle 2:10 Changing the needle 2:12 Threading the twin needle: 2:12 The IDT (Integrated Dual Feed) 2:13 Lowering the feed dog 2:13 3. Sewing - Pfaff ClassicSttyle 2023 | Owner's Manual - Page 7
Buttonhole with gimp thread 3:16 Sewing on buttons 3:17 Buttonhole tips: 3:17 General notes on decorative sewing 3:18 Changing the pattern width 3:18 Changing the the needle plate 4:1 Cleaning 4:1 Changing the light bulb 4:2 Sewing problems and their solutions 4:3 Introduction 1:3 - Pfaff ClassicSttyle 2023 | Owner's Manual - Page 8
stitch, Center For Ànishing seams on fabrics, applique, and inserting lace. 0 needle position 4 Elastic stitch Strong stitch for seam Ànishes, sewing elastic, darning tears, and 0 patches. 5 Blind hem stitch For securing hems invisibly on woven fabrics 3 6 Elastic blind hem stitch For - Pfaff ClassicSttyle 2023 | Owner's Manual - Page 9
stretch fabric, for decorative elastic application and sewing with elastic thread in the bobbin. Provides a highly elastic decorative seam for For sewing and patching light knit wear (undergarments etc.) 3 Classic decorative stitch for garments, linen and kitchen 1 towels. Classic decorative - Pfaff ClassicSttyle 2023 | Owner's Manual - Page 10
Introduction Quilt stitches 2028 27 28 29 30 31 32 33 Decorative stitches expression 2028 34 35 36 37 38 39 40 41 42 43 44 45 46 47 48 49 50 51 52 53 54 55 56 57 58 59 60 61 62 63 64 65 66 67 68 1:6 - Pfaff ClassicSttyle 2023 | Owner's Manual - Page 11
2. Preparations Preparations Carrying case Place the enclosed lead cord, the foot control and instruction book into the compartment of the carrying case. Lid Open the folding lid (24) upwards. The stitches of the sewing machine are illustrated on the inside of the lid. 2:1 - Pfaff ClassicSttyle 2023 | Owner's Manual - Page 12
. DO NOT modify the plug in any way! Connecting the foot control Connect the plug of the foot control to the connection socket (9) of the sewing machine. The sewing speed is controlled by pressing the foot control. The foot control type AT 0070 has to be used for this - Pfaff ClassicSttyle 2023 | Owner's Manual - Page 13
the lid upwards and towards you. Note: Some fabrics have a lot of excess dye which can cause discoloration on other fabric but also on your sewing machine. This discoloring may be very difÀcult or impossible to remove. Fleece and denim fabric in especially red and blue often contain a lot of excess - Pfaff ClassicSttyle 2023 | Owner's Manual - Page 14
fully to the right Winding the bobbin from the spool pin Place the sewing thread on the spool pin. To obtain free movement of the thread and hold the thread spool Àrmly, Àt a spool cap of the right size for the thread spool. Threading Place the thread into guide A from the front and pull it - Pfaff ClassicSttyle 2023 | Owner's Manual - Page 15
Winding from the second spool pin Insert the second spool pin in the hole provided. Threading Thread as shown on page 2:4. Turn on the machine Hold the end of the thread Àrmly and press the foot control. As B soon as the bobbin is full, the winding action will be stopped automatically. Cut the - Pfaff ClassicSttyle 2023 | Owner's Manual - Page 16
you look at the bobbin and pull the thread, the bobbin must turn clockwise Inserting the bobbin case Lift latch E and push the bobbin case fully onto pin C of the sewing hook. Opening D of the bobbin case must face upwards. Check: Pull the bobbin thread sharply. The bobbin case must not fall out - Pfaff ClassicSttyle 2023 | Owner's Manual - Page 17
Switch off the main switch Raise the presser foot lifter (20). Place the thread on the spool pin and Àt a spool cap of the right size. Using both hands, pull the thread into thread guide A from the front. Place the thread from right to left into the pre- tension device B. Now pass it through - Pfaff ClassicSttyle 2023 | Owner's Manual - Page 18
needle easier and quicker, use the Pfaff Integrated Needle threader. Lower the presser foot. Press the threader down with the handle. Threader hook F swivels through the needle eye. Place the thread over hook E and under the thread hook F and hold the end of the thread taut. Reduce the pressure so - Pfaff ClassicSttyle 2023 | Owner's Manual - Page 19
needle moves down and up. Pull the needle thread to draw up the bobbin thread. Bobbin thread Close the bobbin door (26) and pull the thread under the presser foot to the left Thread cutter Pull the thread from the back to the front over the thread cutter (29). Removing the presser foot Switch off - Pfaff ClassicSttyle 2023 | Owner's Manual - Page 20
) using the markings on the tension dial. The normal setting for sewing is 4 - 5. For decorative sewing, darning and buttonhole sewing 3. Winding a bobbin through the needle It is possible to wind bobbins even when the machine is fully threaded. Raise the presser foot lifter (20) to the top position - Pfaff ClassicSttyle 2023 | Owner's Manual - Page 21
up lever must be at its highest position. C Guide the thread to the right under thread guide C. Wind the beginning of the thread several times around the bobbin in a clockwise direction. Push the bobbin to the right. Hold the end of the thread Àrmly and press the foot control. Changing the needle - Pfaff ClassicSttyle 2023 | Owner's Manual - Page 22
and left into the thread guide and thread the needles (for additional details, see "Embroidering with the twin needle"). Note: It is not possible to use the integrated needle threader with a twin needle. The IDT (Integrated Dual Feed) For sewing any fabric precisely Pfaff provides the ideal solution - Pfaff ClassicSttyle 2023 | Owner's Manual - Page 23
sewing work such as free-motion quilting or darning and when the machine must be cleaned, the feed dog has to be lowered. To do this, open the bobbin is visible in the window. B If you tap on your foot control while sewing, the needle can be raised or lowered. This does not change the pre- - Pfaff ClassicSttyle 2023 | Owner's Manual - Page 24
Sewing 3. Sewing 3:1 Stitch selection There are three ways of selecting your desired stitch: 1. With the selection button: for scrolling backward and forward in the stitches. > in ascending - Pfaff ClassicSttyle 2023 | Owner's Manual - Page 25
Sewing Altering the pattern width e.g. Stitch 35 For decorative stitches, the overall width of the pattern is shown in the window. When entered, stitch 35 comes - Pfaff ClassicSttyle 2023 | Owner's Manual - Page 26
sewn shorter, and thus the overall length will be sewn shorter. In the plus range the stitches are sewn longer or stretched out. Reverse sewing If you press this button while sewing, the machine sews in reverse for as long as you keep the button pressed. If you press the reverse button while the - Pfaff ClassicSttyle 2023 | Owner's Manual - Page 27
(30) You can safeguard your sewing machine against the unintentional selection of another sewing program or another pattern sequence by in the window. This symbol indicates that a twin needle cannot be used to sew the stitch at the currently set width. Reduce the pattern width until the warning - Pfaff ClassicSttyle 2023 | Owner's Manual - Page 28
Sewing Formation of the stitches The stitch formation varies. Some patterns are formed from the right side of the stitch, regardless of any changes in width. Note: Do not use a twin needle to sew patterns that are formed from one side! Do not use a twin needle if this symbol in the window lights up - Pfaff ClassicSttyle 2023 | Owner's Manual - Page 29
foot,. Stitch Stitch Stitch number Stitch width in mm Stitch length in mm IDT switched on switched off Needle thread tension Number of presser foot Sewing Stitch 1 2.5 3-5 0 Straight stitch Stitch 1 is the basic straight stitch in center needle position. The stitch length can be - Pfaff ClassicSttyle 2023 | Owner's Manual - Page 30
baste a garment before trying it on. When you press the foot control, the machine will sew one stitch at a time. Press the foot control again for each stitch. • stitch can be sewn in 13 different needle positions allowing you to guide the presser foot along the fabric edge for top stitching. The - Pfaff ClassicSttyle 2023 | Owner's Manual - Page 31
Sewing Stitch A 5 4.5 2.5 3-5 3 Blind hem stitch The blind hem stitch is used to make should now be facing up. • Place the fabric under the presser foot so that the fold runs along edge guide B. • When the needle swings into the fold it should catch a small amount of fabric. If the - Pfaff ClassicSttyle 2023 | Owner's Manual - Page 32
standard stitches. Tip: Use blind stitch foot No. 3 when sewing overcast seams. This guides the fabric more precisely and prevents tunneling of the seam at 6.0 3.0 3-5 0/3 Closed overlock stitch with selvage thread If you wish to sew a fabric that frays easily, select stitch 19. With this - Pfaff ClassicSttyle 2023 | Owner's Manual - Page 33
into the hole C of the sewing foot holder. When doing this, the guide fork G should position itself around the sewing machine. In this position the thread tension is engaged for Free Motion Sewing. • Drop the feed dog. • Select a straight stitch or a zigzag stitch. • Keep an even speed, manually - Pfaff ClassicSttyle 2023 | Owner's Manual - Page 34
Sewing Stitch 8 6.0 2.0 3-5 0 Bridging stitch The bridging stitch creates a hemstitching effect. the needle catches the fabric on the right and left sides. Tip: To make guiding the fabric easier, use the bridging guide (special accessory). It is available in 3 mm and 5 mm widths. The small post - Pfaff ClassicSttyle 2023 | Owner's Manual - Page 35
the scroll of the hemmer. • Lower the presser foot and while sewing, guide the fabric edge evenly into the hemmer. When roll-hemming, make • Tighten the needle thread tension to create a deeper shell tuck. • Finish the raw edge and press the seam allowance to the left. • While sewing, make sure the - Pfaff ClassicSttyle 2023 | Owner's Manual - Page 36
guide to support the feed motion of the fabric. Place the fabric between the buttonhole foot and the guide. This ensures that the guide gap between the guide and the back of the machine. Attaching buttonhole foot No. 5: Use buttonhole foot No. 5 to sew buttonholes. Before starting to sew, pull the - Pfaff ClassicSttyle 2023 | Owner's Manual - Page 37
once. Note: If the sensormatic buttonhole guide has not been inserted you will have to Ànish the buttonhole manually by pressing the reverse button. You can also place the last bartack manually, even after the buttonhole has been programmed. Press the "reverse sewing" button one time after you have - Pfaff ClassicSttyle 2023 | Owner's Manual - Page 38
has been programmed. Press the "reverse sewing" button one time after you have stitched the Àrst bartack. The word "man" appears in the window. This indicates a manual Ànish of the buttonhole is desired. Before the left side of the buttonhole ends, the machine will slow down. When the left side - Pfaff ClassicSttyle 2023 | Owner's Manual - Page 39
on the clamp at the back of the presser foot. Guide the gimp thread along the foot at the side. Sew the right-hand seam of the buttonhole. After the machine sews the Àrst few stitches of the curved end pull the gimp thread down from the clamp with a straight pin. Warning: The presser foot must - Pfaff ClassicSttyle 2023 | Owner's Manual - Page 40
sure the needle also enters the right hole of the button. • Continue sewing on the button. The machine will complete the program for you. Buttonhole tips: • A wider, less and durable if a gimp thread is inserted while sewing (see "Keyhole buttonhole with gimp thread"). • Linen buttonholes are - Pfaff ClassicSttyle 2023 | Owner's Manual - Page 41
distortion of your decorative stitches. The following recommendations apply to all decorative sewing: The stitch length and width can be altered as desired. Lower the upper thread tension to between 2-3. Adjust as needed so bobbin thread does not pull to the top side of your project. Your embroidery - Pfaff ClassicSttyle 2023 | Owner's Manual - Page 42
Sewing Free motion embroidery These striking embroidery designs can easily be sewn with your expression. Set your expression as for free motion monograms. Draw the outline of the embroideries on fabric where you want to stitch them. Follow the instructions mm). • Sew the pieces together to sew all - Pfaff ClassicSttyle 2023 | Owner's Manual - Page 43
easier. Special hemstitches No. 25 and 26 are built into your machine. By changing the stitch length and width you can achieve different lovely hemstitched holes. • Sew the appropriate program on a piece of test fabric. For pulled thread hemstitching: • Count the threads of the fabric within the - Pfaff ClassicSttyle 2023 | Owner's Manual - Page 44
off the main switch. • Remove the needle plate and lower the feed dog. Clean the feed dog and hook area with the brush. • Clean the sewing machine every 10 - 15 hours of operation. Cleaning the display Wipe the display with a soft, lint-free dry cloth. DO NOT use aggressive cleansers or solvents - Pfaff ClassicSttyle 2023 | Owner's Manual - Page 45
sewing machine near the needle threader. Bulb removal Push the bulb remover, as shown in the Àgure, up as far as it will go. Now turn the bulb half a rotation counterclockwise and remove the bulb. Insertion of the bulb Insert the bulb in the lamp changer. Guide purchased from your Pfaff dealer. 4:2 - Pfaff ClassicSttyle 2023 | Owner's Manual - Page 46
Maintenance Sewing problems and their solutions Problem/Cause The machine skips stitches The needle is not properly inserted. Wrong needle is in use. Needle is bent or blunt. The machine is not properly threaded. Needle is too small for thread. Remedy Push needle fully upwards. Flat side facing - Pfaff ClassicSttyle 2023 | Owner's Manual - Page 47
Maintenance Problem/Cause The machine does not feed or feeds irregularly Sewing lint has collected between the feed dog teeth rows. Feed dog is lowered. Slide B is at the right (see page 2:20) The needle plate is not lying Áat. The machine is running with difÀculty There are thread remnants in the - Pfaff ClassicSttyle 2023 | Owner's Manual - Page 48
Bobbin thread Bobbin winding Bridging stitch Buttonhole tips: 3:8 G 2:9 General notes on decorative sewing 3:18 2:4-5 3:11 H 3:17 Hemstitching 3:20 Buttonhole with gimp thread 3:16 I Buttonholes 3:13 Inserting the bobbin 2:6 Inserting the sensormatic buttonhole C Carrying case guide - Pfaff ClassicSttyle 2023 | Owner's Manual - Page 49
hemmer No. 7 S Semi-automatic buttonhole Setting the needle thread tension Sewing in zippers Sewing on buttons Sewing problems and their solutions Shell edging Stitch selection Maintenance V 3:3 Voltage Switch 2:2 2:8 W Winding a bobbin through the needle 2:10 3:19 2:3 3:3 3:12 3:14 2:10 - Pfaff ClassicSttyle 2023 | Owner's Manual - Page 50
Stitching width Stitching length Presser foot lift Max. presser foot height Needle system Package contents Sewing machine Carrying case Foot control Lead cord Accessories Instruction manual 408 x 290 x 187 mm 8.3 kg 220 - 240 V / 120 V 75 W 12 V / max. 5 W max. 950 stitches/min min. 80 stitches - Pfaff ClassicSttyle 2023 | Owner's Manual - Page 51
We reserve the right to change the machine equipment and the assortment of accessories without prior notice, or make products. If in doubt please contact your retailer for guidance. Intellectual property PFAFF, EXPRESSION, CLASSICSTYLE and IDT (image) are registered trademarks or trademarks of VSM - Pfaff ClassicSttyle 2023 | Owner's Manual - Page 52
VSM Group AB • SE-561 84 Huskvarna • SWEDEN www.pfaff.com 413 05 21 - 26B • English • Inhouse • © 2006 VSM Group AB • Printed in Sweden on environmental-friendly paper
-
 1
1 -
 2
2 -
 3
3 -
 4
4 -
 5
5 -
 6
6 -
 7
7 -
8
-
9
-
10
-
11
-
12
-
13
-
14
-
15
-
16
-
17
-
18
-
19
-
20
-
21
-
22
-
23
-
24
-
25
-
26
-
27
-
28
-
29
-
30
-
31
-
32
-
33
-
34
-
35
-
36
-
37
-
38
-
39
-
40
-
41
-
42
-
43
-
44
-
45
-
46
-
47
-
48
-
49
-
50
-
51
-
52
 |
 |

Owner’s manual