Pfaff Varimatic 6091 Owner's Manual
Pfaff Varimatic 6091 Manual
 |
View all Pfaff Varimatic 6091 manuals
Add to My Manuals
Save this manual to your list of manuals |
Pfaff Varimatic 6091 manual content summary:
- Pfaff Varimatic 6091 | Owner's Manual - Page 1
01/29/2008 4 • varimatic 6091 - 11 Bodienungsanweisung Instruction Book Mode d'ernploi Gebruiksaanwijzing - Pfaff Varimatic 6091 | Owner's Manual - Page 2
sure you unplug the power cord whenever you have to leave the machine or want to clean it, oil it or change mechanical and accessory parts. ci Be sure to use only a 1 5-watt light bulb in the sewing lamp. dl The drive belt must never be adjusted by anyone but an authorized agent - Pfaff Varimatic 6091 | Owner's Manual - Page 3
10 BoIte de rangement formant surface de travail 11 Plaque a aiguille 12 Support de semelle de pied presseur avec semelle 13 Fentes d'enfilage I 14 18 Plaque de base 19 Capot de fermeture, compartiment du crochet 20 Guide-fit 21 Butée pour reprise 22 Disque sélecteur de motifs 23 Touche - Pfaff Varimatic 6091 | Owner's Manual - Page 4
8OOZ/6/ LO - Pfaff Varimatic 6091 | Owner's Manual - Page 5
ot tne sewing machine 1 Take-up lever 2 Bobbin winder tension 3 Carrying handle 4 Spool pin 5 Bobbin winder 6 Handwheel 7 Stop motion knob 8 Master switch 9 Stitch length control 10 Detachable work support with accessory box 11 Needle plate 12 Sewing foot holder with sewing fo 13 Threading slots 14 - Pfaff Varimatic 6091 | Owner's Manual - Page 6
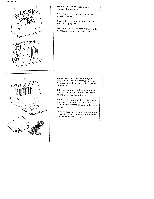
et rabattre a poignée. De koffer van de machine nemen en de handgreep achterwaarts kantelen. Den Anlasser und die Bedienungsanlei tung aus dem Fach P nehmen. So wie die Abbildung oben zeigt, beides wieder einräumen. Take foot control and instruction book Out of compartment P. Put back again as - Pfaff Varimatic 6091 | Owner's Manual - Page 7
die Pfaff. Electronic-Anlasser (Schalter 0) Stellung = halbe Endgeschwin digkeit Stellung 44 = voIle Endgeschwindigkeit Push master switch P; the sewing light goes on. Operating the foot control: The farther you press the pedal down the faster the machine runs. Electronic foot control (slide - Pfaff Varimatic 6091 | Owner's Manual - Page 8
for bobbin winding: Lift detachable work support and free arm cover 19. Ouvrir le capot 19 vers le bas. Klep 19 openen. • Hauptschalter 8 ausschalten. Klappe P anheben und die Spulenkapsel heraus ziehen. • Switch off master switch 8. Raise latch P and pull out the bobbin case. a • Mettre Ia machine - Pfaff Varimatic 6091 | Owner's Manual - Page 9
nach rechts gegen den Anschlag R drücken. Push the bobbin to the right against stop IR. Pousser Ia canette und Scheibe 7 nach vorn drehen. Disengaging the sewing mechanism: Hold handwheel 6 fast and turn knob Garnrolle aufstecken. Pull thread reel pins 4 up completely and place thread reels on them. - Pfaff Varimatic 6091 | Owner's Manual - Page 10
abnehrnen und den Faden abschneiden. Bobbin winding Switch on rnaster switch. Pull thread from thread reel into bobbin winder tension 2, lead to the right and wind a few tirnes around the bobbin in the direction of the arrow. Then press the foot control and wind the bobbin. The hohbin stops as soon - Pfaff Varimatic 6091 | Owner's Manual - Page 11
Dann Handrad nach vor ne drehen, bis es einrastet. Engaging the sewing mechanism Hold the handwheel firmly and turn knob 7 toward the back, Schlitz Q und bis zur Offnung R ziehen. Insert the bobbin P), with the thread unwinding to the rear. Draw the thread into slot Q and eye R. Mise en place de Ia - Pfaff Varimatic 6091 | Owner's Manual - Page 12
= fester). Checking the bobbin thread tension: With a brief, sharp upward movement of your hand, the bobbin must gradually slip downwards. I'ouverture S en haut, a fond sur le tourillon R. Spoelhuls in de machine: • De stroom uitschakelen met hoofdschakelaar 8. Klepie 0 openhouden en de huls zover - Pfaff Varimatic 6091 | Owner's Manual - Page 13
off master switch 8. Both needle and take-up lever must be in the "up" position. Raise sew ing foot. Pull thread from spool and draw it into the bobbin winding tension, through opening N, slot 0, behind guiding piece P, upwards through slot 0, through take-up lever 1, back through slot 0, behind - Pfaff Varimatic 6091 | Owner's Manual - Page 14
Oberfaden den Unterfaden nach oben ziehen. Drawing up the bobbin thread: Hold the needle thread taut. Turn the handwheel towards you and sew a stitch until both needle dud tekeup lever are up. Pull out the bobbin thread by means of the needle thread. Remontée du fil inférieur: Tendre legere ment le - Pfaff Varimatic 6091 | Owner's Manual - Page 15
support against the machine, as shown by the arrow Placer Ia bolte de rangement contre Ia machine, comme le montre Ia flèche. Accessoiresbox in pijlrichting tegen de machine off master switch 8. Place fabric under the sewing foot. • Mettre Ia machine hors circuit a I'in terrupteur general 8. Placer - Pfaff Varimatic 6091 | Owner's Manual - Page 16
the bobbin threarl tension (see p. 81 a correction is necessary, the adjusting screw must only be turned minimally. Checking the needle thread tension: Normal setting is between 3 and 5. The higher the number the tighter the ten sion. To check the tension set a vide zigzag stitch. Sew a short - Pfaff Varimatic 6091 | Owner's Manual - Page 17
1 5. Degager Ic tissu vers l'arriere. Stofdrukker 1 5 omhoog duwen. Stof under do voet wegtrekken. Fadenabschneider 26. Fäden einlegen und nach unten ziehen. Thread cutter 26. Draw the threads into the slot and pull them downwards. Coupe-ill 26, Coucher es fils dans ía fente et lee tirer vers Ic bas - Pfaff Varimatic 6091 | Owner's Manual - Page 18
gegeneinander. Vor dem Ein oder Ausschalten den Nähfuf/ anheben. Dual Feed: It prevents shifting of the fabric plies during sewing. Before engaging or disengaging, raise the presser foot. Entralnement double du tissu: II empêche le decalage des couches de tissu. Avant I'embrayage ou I débra yage - Pfaff Varimatic 6091 | Owner's Manual - Page 19
the stitch length The numbers on stitch length control 9 indicate the stitch length in millimeters. The stitch length range is 0 to 6 milli meters. Turn the control to set the number indicating the stitch length t mark R. Fig. Q (bottom) shows how to set the stitch length control for sewing the - Pfaff Varimatic 6091 | Owner's Manual - Page 20
ücken. Solange die Taste gedrückt wird, näht die Maschine iic k warts. Reverse sewing Press button 23. As long as you hold this buttons the machine sews backwards, Couture en marche arrière Abaisser a touche 23. La machine coud en arrière aussi longtemps que a touche est maintenue en bas. Achteruit - Pfaff Varimatic 6091 | Owner's Manual - Page 21
machine or want to clean it, oil it or change mechanical and accessory parts. c) Be sure to use only a 1 5-watt light bulb in the sewing Toujours débrancher Ia machine du secteur avant de quitter Ia machine, avant les travaux . b) Bij het verlaten van de machine, tijdens het schoonmaken bij het ver - Pfaff Varimatic 6091 | Owner's Manual - Page 22
Chart 1 7. Turn dial 22 until the corresponding letter is positioned below mark P. For sewing stretch-stitch patterns move the stitch length control onto the symbol H as far as it will go. For the various stitch patterns with ex planations see pages 19 20. Disque sélecteur de motif Chaque motif - Pfaff Varimatic 6091 | Owner's Manual - Page 23
Mtte F - Drtfach:rZickzack - Triple zigzag stitch, narrow Tipie straight stitch, right needle position Triple straight stitch, - center needle position TeZiat G ____ H Wabenstich Elastischer Kantenstich Honeycomb stitch --- 1 Elastic edge stitch I Dekorstich KJ Dekoch /\ I WI Stretch - Pfaff Varimatic 6091 | Owner's Manual - Page 24
piqué Steek Knoo psg atensyrn boo! Rechte steek, naaldstand rechts Rochte steek, naaldstanci midden Zigzag - - - - Gestikte zigzag Stitch length Longueur du point Steeklengte HI{tIIIIlifIIflhIIT IIIllhIIIHliIItIlII - 05-6 0,5 6 0,56 05 4 point d'anse Festonsteek 15 point invisible - Pfaff Varimatic 6091 | Owner's Manual - Page 25
the screw. Remplacement de laiguille (système • 130/705 H): Mettre Is machine hors circuità linterrupteur gdndral 8. Des serrer (a vis N et retirer laiguille. feed dog Open free arm cover 1 9. Push the feedlowering control toward R (feed dog lowered) or toward 0 (sewing position). Abaissement de - Pfaff Varimatic 6091 | Owner's Manual - Page 26
and remove the work support. Fitting the sewing foot: lower the presser bar lifter and move the foot so that pins N snap into grooves 0. P and 0 are for attaching accessories. R is the sewing foot retaining screw. Remplacement du pied presseur: Mettre a machine hors circuit a l'interrupteur general - Pfaff Varimatic 6091 | Owner's Manual - Page 27
aansluiten de werkbox in de richting van de pijl tegen de machine schuiven (0). II Zubehörfach Den Deckel der Nâhfläche 10 öffnen. fur Nähzubehär. Open the cover of work support 10. Under this lid there is room for your sewing accessories. Bolte de rangement Ouvrir Ic couvercle du plan de couture - Pfaff Varimatic 6091 | Owner's Manual - Page 28
Sewing feet (standard accessories) 0 Ordinary 4 Zipper and sewing foot edge-stitching 2 Fancy stitch foot foot (without 5 Buttonhole foot Dual Feed) 7 Felt washer 3 Blind stitch 8 Edge guide or overlock foot Rondelle de feutre surjet 8 guide-bord Naaivoetjes )Standaardaccessoires) 0 - Pfaff Varimatic 6091 | Owner's Manual - Page 29
gewunschte Stichlänge, auf dem Stichlàngen-Einsteller 9 an die Einstell markierung P drehen. Sewing straight stitches Set stitch pattern thumb wheel 22 at E or D. Align the required stitch length on stitch length control 9 with setting mark P. Couture au point droit Rdgler le sélecteur de points 22 - Pfaff Varimatic 6091 | Owner's Manual - Page 30
RI. Der Nahtverlauf wird immer ordentlich und korrekt aussehen. Topstitching Sewing-foot: Ordinary sewing foot and edge guide Stitch pattern selector wheel: E Edge guide N can be used with nearly all sewing feet. Fitting the edge guide Push edge guide N through hole 0 and secure it in position with - Pfaff Varimatic 6091 | Owner's Manual - Page 31
motifs: E Le guidedroit N convient a presque tous es pieds presseurs. Fixation du guide-droit Glisser le guide N par le trou 0 et serrer Ia vis P. Suivant 'application, régler le guide sur ('écartement désiré. Le guide-droit facilite considérablement es surpiqüres paralléles et (e surpiquage des - Pfaff Varimatic 6091 | Owner's Manual - Page 32
Thread: ordinary sewing thread Stitch pattern selector wheel: wide I narrow K Stitch length: 3-4 Needle: size 70 or 80 How to regulate the needle penetration Place the prepared hem under the blind stitch foot. The crease line of the outer fabric runs along edge guide 0 of the blind stitch - Pfaff Varimatic 6091 | Owner's Manual - Page 33
01/29/2008 $2 Point invisible Pied presseur: Pied a points invisbies Tension: Eu d'aiguille moms tendu Fil: Eu a coudre Disque sélecteur de motifs: large étroit K Longueur de point: 3à4 Aiguille: Grosseur 70 ou 80 Reglage de Ia jetée de l'aiguille Poser l'ourlet prAparé sous le pied - Pfaff Varimatic 6091 | Owner's Manual - Page 34
01/29/2008 Safety rules valid for United Kingdom only The wires in this mains lead are coloured according to the following code: Blue: Neutral Brown: Live As the colours of the wires in the mains lead of this appliance may not corre spond with the colour coding of the ter minals in your plug, - Pfaff Varimatic 6091 | Owner's Manual - Page 35
feines Nahgarn ver wenden. Buttonhole setting Stitch length control 9 at range 3 for buttonhole sewing. Attach the button hole foot. Set the stitch density at range N. Insert a gimp thread in the sewing foot as shown in the illustration: Place the thread over the back ridge 0, and pull - Pfaff Varimatic 6091 | Owner's Manual - Page 36
thumb wheel at A. Pull the bottom of the buttonhole foot forward nearly to the end of its movement. 1. Sew first buttonhole beach in the length required. 2. Set stitch pattern thumb wheel 22 at B and sew four to six tacking stitches. Raise the needle. 3. Set stitch pattern thumb wheel 22 at C and - Pfaff Varimatic 6091 | Owner's Manual - Page 37
d'exécuter une boutonniere a titre d'essai avant de commencer a coudre es boutonnières. Zeichnungen sind ohne Nthfutt. Drawings do not show sewing foot Las illustrations ne montrent pas Ia semelle du pied presseur. Voor een beter overzicht is de knoopsgatenvoet op de afb, weggelaten. Knoopsgaten - Pfaff Varimatic 6091 | Owner's Manual - Page 38
the left hole of the button. Before lowering the sewing foot place a sewing machine needle shank or a match on the middle of the button (Fig. 01. Sew a few zigzag stitches and leave a thread end, about 6 inches or 1 5 cm long. Pull needle and bobbin threads to the right side (Fig. P1 and wrap the - Pfaff Varimatic 6091 | Owner's Manual - Page 39
le pied presseur. Glisser précautionneusement le tissu et le bouton sous Ia support du pied presseur. Abaisser celui-ci at faire pi quer l'aiguille dans knoop plaatsen. Voor u da naaivoet laat zakken, eerst do koif van aen machine naald of aen lucifer tussan de gaatjas van de knoop leggen. afb. - Pfaff Varimatic 6091 | Owner's Manual - Page 40
lassen. NähfuR anheben und den ReiRverschluP, öffnen (Fig. RI. NähfuR senken. Naht zu Ende nähen. Sewing in zippers Sewing foot: zipper foot 4 Stitch length: 2 to 3 Stitch: E Thread: sewing thread The zipper foot can be engaged on the left or right, as required by the method of insertion - Pfaff Varimatic 6091 | Owner's Manual - Page 41
01/29/2008 a Insertion de fermetures glissière Pied presseur: Pied a fermeture a glissiere 4 Longueur de point: 2 C 3 mm Point: Fil: E FiT a coudre Suivant ('operation, Ta semelle du pied peut être bloquée en position gauche ou droite (fig. N et 0). a Bande de fermeture glissiare couverte - Pfaff Varimatic 6091 | Owner's Manual - Page 42
machine stitch it down at the same time as you sew the zipper. The zipper teeth run along the right-hand edge of the foot foot again and finish sewing the seam. Close the zipper. Pin the overlapping edge along the intended seam line. Baste left zipper edge 1Fig. 0). Open zipper. Attach the edge guide - Pfaff Varimatic 6091 | Owner's Manual - Page 43
fermeture a glissiere. Mettre en place et alignar le guide-droit sur a argeur de Ia piqâre de sorte que le guide droit longe le bord du tissu fig. P1. Peu Ia fin de (a couture, coudre un arrét. Treksluiting in damespantalon Machine instellen zie blz. 36. Verschuif de zool van de treksluiting voet - Pfaff Varimatic 6091 | Owner's Manual - Page 44
time, fork R engages the presser har( and push the foot fully in. Let go of bar P, which then rests on retaining screw 0. Tighten screw 0. Draw up the bobbin thread. Hold both threads until the machine has made a few stitches. First sew a few stitches over the damaged area from one side to the other - Pfaff Varimatic 6091 | Owner's Manual - Page 45
01/29/2008 f-A-19- ------- ft-ti-i-ti-'---' t1tfi-m rti-t-f-H- -, '-t-t-t-ft------ -'----*---, ----% __1 Reprisage au point droit Pied presseur: Pied a repriser (contre supplement) Point: E Tension du til d' aiguille: Fil: moms forte Fil a broder fin Aiguille: Grosseur 70 Gritte: - Pfaff Varimatic 6091 | Owner's Manual - Page 46
of the darning foot and into thread guide P. Place the wool thread under the darning foot. Start at the top left and place the wool thread back and forth across the damaged area (Fig, N). Then cut the woo) thread and sew over the rows of woo) thread with zigzag stitches or an elastic stitch (Fig - Pfaff Varimatic 6091 | Owner's Manual - Page 47
01/29/2008 Reprise a Ia lame Pied presseur: Pied a repriser (contre supplément( Point: F Tension du fil d'aiguille: Fil: Zone boutonnières (31 fil a broder ou a repriser fil de lame Aiguille: Grosseur 70 Griffe: abaissée Butée 21: La glisser vers l'arrière Abaisser le levier - Pfaff Varimatic 6091 | Owner's Manual - Page 48
bobbin case and snap off the sewing foot. Insert the front tab N of the buttonhole foot in opening 0 on the left edge of the needle plate. Push the foot stopkontakt. Naald omhoog en de naaivoet verwijde ren. De spoelhuls uit de machine ne men. Het voorste nokje N van de knoopsgatenvoet in gaatje 0 - Pfaff Varimatic 6091 | Owner's Manual - Page 49
it in direction P. Be sure to use only a 15-watt light bulb in the sewing lamp. Changement de l'ampoule • Débrancher Ia machine du secteur, Placer le guide bord de facon oblique dans l'ouverture N sur a tête de a machine. Descendre et maintonir le boltier de Ia lampe. Pousser l'ampoule vers le haut - Pfaff Varimatic 6091 | Owner's Manual - Page 50
01/29/2008 Die WahI der richtigen Nadel garantiert eine bessere Verarbeitung des Nähmaterials Stoffqualitdt Ieicht Nadel 60 70 75 Stoffqualitdt Stoffqualitat mittel schwer Nadel 80 90 I Nadel 100 110 120 Nadelspitzen Bezeichnung Profit 130/705 H Nadelstdrke: - 70/80 130/705 H-SUK - Pfaff Varimatic 6091 | Owner's Manual - Page 51
01/29/2008 Bezeichnung Stichlange Stichbreite Nadeentfernung Geeignet für jj 130/705 H-ZWI 2,5 mm - Stärke: 80 2,5 mm - 1,6 mm 2,0 mm normale Biesen normale Biesen 130/705 H-ZWI Stàrke: 80 2,5 mm - Stärke: 90 2,5 mm v Stärke: 100 3,0mm - 2,5 mm 3,0 mm 4,0mm breite Biesen - Pfaff Varimatic 6091 | Owner's Manual - Page 52
point Seams topstitched with buttonhole silk iongeye r Nc 30/3 synthetic thread. -- Hernstitching -( point --- -- --- Medium ball point Attractive hemstitching H-M 60-90 -- Small ball pont Especially developed quilt needle. - ---4- -- - Sharp For processing of microfibers. round point - Pfaff Varimatic 6091 | Owner's Manual - Page 53
29/2008 System & No. Stitch length 1 • 130/705 HZWl 2.5mm 80 2.5 mm 130/705 H-ZWI 80 2.5 mm • 90 2.5 mm 100 3.0 mm Stitch width - -. Needle spacing with twin needles Before you start sewing, turn the handwheel and check to make sure the needles stitch into the fabric properly. In this - Pfaff Varimatic 6091 | Owner's Manual - Page 54
01/29/2008 Le choix de (a pointe d'aiguille adequate est tres important et garantit de mei(leurs résu(tats. Matières: légère Aiguilles: 60 70 75 Matières: moyenne Aiguilles: 80 90 Matières: lourdes Aiguilles: 100 110 120 Pointes d'aiguille Designation 130/705 H Grosseur de l'aiguille: 70, 80 - Pfaff Varimatic 6091 | Owner's Manual - Page 55
01/29/2008 Designation iL U 130/705 H-ZWI Grosseur: 80 L 130/705 H-ZWI Grosseur: 80 , Grosseur: 90 Grosseur: 100 Longueur de point 2,5 mm 2,5 mm 2,5 mm 2,5mm 3,0 mm Largeur de point - -- -- Espacement des aiguilles 1,6 mm 2,0 mm Utihsations nervures normales 2,5 mm 3,0 mm 4,0 mm nervures - Pfaff Varimatic 6091 | Owner's Manual - Page 56
01/29/2008 Het gebruk van de juiste naald, garandeerd een betere verwerking van de stot Stofkwaliteit dun naald 60 70 75 - Stofkwahteit middel naald 80 90 Vorm van de Naaldpunt Stofkwaliteit dik naald H Benaming Profiel 130/705 H naalddikte: 70/80 130/705 H-SUK naalddikte: 130/705 H-PS - Pfaff Varimatic 6091 | Owner's Manual - Page 57
01/29/2008 Benammg Steeklengte 130/705 H-ZWI 2.5 mm naa1ddikte: 80 2.5 mm 130705 H-ZWI naaIddkte: 801 naalddikte: 901 naalddikte: 1001 2.5 mm 2,5 mm 3,0 mm Steekbreedte Naald afstand 1.6 mm 2 0 mm 2,5 mm 3,0 mm 4,0 mm Geschikt voor: normale bezen normale biezen brede biezen brede biezen - Pfaff Varimatic 6091 | Owner's Manual - Page 58
01/29/2008 Nahstorungen und ihre Beseitigung Ursache: Beseitigung: 1. Die Maschine Iäft Stiche aus Die Nadel ist nicht richtig eingesetzt. Es st eine falsche Nadel eingesetzt. Die Nadel st verbogen odor stumpf, Die Maschine ist nicht richtig eingefädelt. Die Nadel st für das Garn zu fein. Nadel - Pfaff Varimatic 6091 | Owner's Manual - Page 59
01/29/2008 Ursache: Beseitigung: 5. Die Maschine transportiert nicht oder nur unreqeimäIig Zwischen den Transporteur-Zahnreihen hat sich Nàhstaub festgepre1t. Stichplatte abnehmen, Nähstaub mit Pinsel entfernen. Transporteur ist versenkt, Versenkschieber steht rechts. Versenkschieber nach - Pfaff Varimatic 6091 | Owner's Manual - Page 60
feed the fabric. Only guide the fabric lightly. When inserting the bobbin case, push it in fully. Check upper and lower tensions. Use topquality thread only, During bobbin winding, do not hold thread in hand, but pass it through the bobbin winder tension. Thread machine properly and check both - Pfaff Varimatic 6091 | Owner's Manual - Page 61
drop of oil into hook raceway. 7, Important note: Before changing either sewing foot or needle, switch off master switch 8. Never run a threaded machine unless there is a piece of fabric under the sewing foot. If you leave the machine, even for a short while, be sure to switch off the master switch - Pfaff Varimatic 6091 | Owner's Manual - Page 62
nest pas introduite correctement, Introduire a nouvelle aiguille a fond. Remplacer l'aiguille. Tenir compte du tableau des aiguilles. Laisser Ia machine entramner seule. Guider légerement l'ouvrage, Appuyer sur Ia boite a canette a sa mise en place, jusqu'a I'emboitage perceptible. 4. Couture - Pfaff Varimatic 6091 | Owner's Manual - Page 63
griffe. bourres au pinceau. La gnffe est escarnatée, Le curseur ahaisse-griffe est a droite. Placer le bouton abaisse-griffe a gauche 6. Marche dure de Ia machine Des bribes de hI se sont grises dens a coursière do crochet. Enlever es bribes de fil et rnettre une goutte d'huile dens a coursière - Pfaff Varimatic 6091 | Owner's Manual - Page 64
zover mogelijk naar boven schui ten, met de platte kant van u at. Dc iuiste naald inzetten, zie naaldentabel Nieuwe naaid inzetten. De machine opnieuw inrijgen. Dikkere naaid inzetten. 2. De bovendraad breekt Door dezeifde oorzaken ais boven, Bij sen te zware bovenspanning. Bil slechte kwaliteit - Pfaff Varimatic 6091 | Owner's Manual - Page 65
transporteur zit stof geperst. Steekpaat wegnemen, stof met het stofkwastje weghalen. Transporteur is ungeschakeld. Transporteur inschakelen. 6. De machine loopt zwaar Draadresten in de griperbaan. Draadresten verwijderenen een druppel olie in de grijperbaan doen. 7. Belangrijke aanwijzingen - Pfaff Varimatic 6091 | Owner's Manual - Page 66
01/29/2008 Dos Sonderzubeflor st tur spezielle Nanaroeiten. cs st Dci itireiii ndiiumi yyen oee, erháltlich. -- ZubehOr ApphkationsfuB Bandeinfasser (NähfuBhalter entfernen) , Bestefl-Nr 93-042 941-91 98-053 484-9 1 Naharbeit Zum Applizieren Zum Emfassen von Kanten mit Band BiesenfuR 5 RilIen - Pfaff Varimatic 6091 | Owner's Manual - Page 67
01/29/2008 Inhaitsverzeichnhis: Abstepparbeiten Anlasser Verwandlungsnähflache Elastischer Blindsttch Elektnscher AnschluB Fadenabschneider Geradstichnähen Glühlampe auswechseln Hosenreiiverschiul/, (Damen) Knoptannáhen Knopflochnähen Nade) auswechseln Nadeltabelle Nähfü1/e Nähfü8,e auswechseln - Pfaff Varimatic 6091 | Owner's Manual - Page 68
93035952-45 For cording work (needle size 80, for fine cording needle size 70) Fringe foot 93-042943-91 1 For sewing fringes and for basting Straight stitch foot with round needle hole - Straight stitch needle plate with round needle hole 98-694821-00 93-032087-91 Important) Only for straight - Pfaff Varimatic 6091 | Owner's Manual - Page 69
the bobbin case Lowering the feed dog Needle chart Needle thread tension . . Notes on safety . Operating the foot control Presser bar lifter . Reverse sewing Safety rules lUnited Kingdom onlyl Setting the stitch length . . . Sewing buttonholes Sewing feet Sewing in zippers Sewing - Pfaff Varimatic 6091 | Owner's Manual - Page 70
Pied pour applications Références 93-042 941-91 Operations applications Bordeur (enlever support du pied) 98-053 484-91 bordage ---H- Pied a nervures, 00 ourlage de bords Ourleur 4 mm (pour entrainement supérieur) Pied guide-bord pour tricot Pied semelle Teflon 98-694 823-00 ourlage de bords - Pfaff Varimatic 6091 | Owner's Manual - Page 71
01/29/2008 Table des matières: Bohnage Branchement électrique Causes de derangements et remédes Changement de 'aiguille Changement de l'ampoule Changement des pieds presseurs Coupefit ContrOte de Ia tension du fit d'aiguille ContrOte de a tension du fit de canette Couture au point droit Couture au - Pfaff Varimatic 6091 | Owner's Manual - Page 72
01/29/2008 officidle Pfatf dealer. (ssoires Apphkatievoet Biawboorvoet lschroef Bestelnr. 93-042 941 -91 Toepassen Voor applikabewerk Bezenvoet 5 tunnes Teelingnaald, naaldaf stand 2,0-2,51 Biezenvoet 7 tunnels )Tweetngnaald, nasldaistand 16) 93042 950-91 93-042 953-91 - smaile bles;es naa! - Pfaff Varimatic 6091 | Owner's Manual - Page 73
van storingen Rechte steek Schoonmaken en smeren Spoelen voorbereiden Spoelen Spoel in de spoelhuls Spo&huls in de machine Spoelspanning kontroleren Steeklengte instellen Stekeninsteiwiel Stekentabel Stofaandrukker Stoftoevoerbad Stoppen met de rechte steek Stoppen met wol Transporteur uitschakelen - Pfaff Varimatic 6091 | Owner's Manual - Page 74
UI !LtlUUS G. M. PFAFF AktengeseHschaft Werk Karisruhe Dudach Grtznerstrd6,e 11 D 76227 Karlsruhe Te h oc r A S I Of CreSt ckr p A rt S 0 ten Sutpct to ft roots o lscn ro I' S r Apr mien Si is
-
 1
1 -
 2
2 -
 3
3 -
 4
4 -
 5
5 -
 6
6 -
 7
7 -
8
-
9
-
10
-
11
-
12
-
13
-
14
-
15
-
16
-
17
-
18
-
19
-
20
-
21
-
22
-
23
-
24
-
25
-
26
-
27
-
28
-
29
-
30
-
31
-
32
-
33
-
34
-
35
-
36
-
37
-
38
-
39
-
40
-
41
-
42
-
43
-
44
-
45
-
46
-
47
-
48
-
49
-
50
-
51
-
52
-
53
-
54
-
55
-
56
-
57
-
58
-
59
-
60
-
61
-
62
-
63
-
64
-
65
-
66
-
67
-
68
-
69
-
70
-
71
-
72
-
73
-
74
 |
 |

01/29/2008
4
•
varimatic
6091
Bodienungsanweisung
Instruction
Book
Mode
d’ernploi
Gebruiksaanwijzing
—
11