Pfaff creative 2140 Owner's Manual - Page 119
Sewing, Assistant
 |
View all Pfaff creative 2140 manuals
Add to My Manuals
Save this manual to your list of manuals |
Page 119 highlights
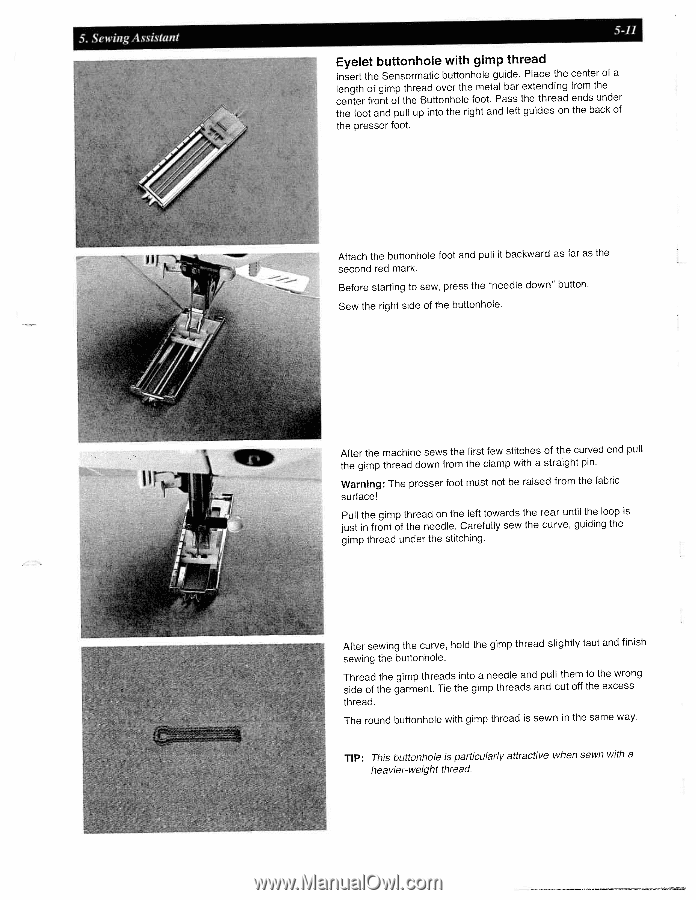
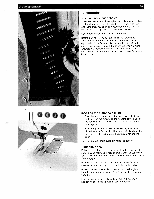
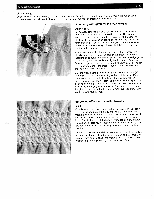
5. Sewing Assistant 5-11 Eyelet buttonhole with gimp thread Insert the Sensormatic buttonhole guide. Place the center of a length of gimp thread over the metal bar extending from the center front of the Buttonhole foot. Pass the thread ends under the foot and pull up into the right and left guides on the back of the presser foot. Attach the buttonhole foot and pull it backward as far as the second red mark. Before starting to sew, press the "needle down" button. Sew the right side of the buttonhole. I' After the machine sews the first few stitches of the curved end pull the gimp thread down from the clamp with a straight pin. Warning: The presser foot must not be raised from the fabric surface! Pull the gimp thread on the left towards the rear until the loop is just in front of the needle. Carefully sew the curve, guiding the gimp thread under the stitching. After sewing the curve, hold the gimp thread slightly taut and finish sewing the buttonhole. Thread the gimp threads into a needle and pull them to the wrong side of the garment. Tie the gimp threads and cut off the excess thread. The round buttonhole with gimp thread is sewn in the same way. TIP: This buttonhole is particularly attractive when sewn with a heavier-weight thread.
-
 1
1 -
2
-
3
-
4
-
5
-
6
-
7
-
8
-
9
-
10
-
11
-
12
-
13
-
14
-
15
-
16
-
17
-
18
-
19
-
20
-
21
-
22
-
23
-
24
-
25
-
26
-
27
-
28
-
29
-
30
-
31
-
32
-
33
-
34
-
35
-
36
-
37
-
38
-
39
-
40
-
41
-
42
-
43
-
44
-
45
-
46
-
47
-
48
-
49
-
50
-
51
-
52
-
53
-
54
-
55
-
56
-
57
-
58
-
59
-
60
-
61
-
62
-
63
-
64
-
65
-
66
-
67
-
68
-
69
-
70
-
71
-
72
-
73
-
74
-
75
-
76
-
77
-
78
-
79
-
80
-
81
-
82
-
83
-
84
-
85
-
86
-
87
-
88
-
89
-
90
-
91
-
92
-
93
-
94
-
95
-
96
-
97
-
98
-
99
-
100
-
101
-
102
-
103
-
104
-
105
-
106
-
107
-
108
-
109
-
110
-
111
-
112
-
113
-
 114
114 -
 115
115 -
 116
116 -
 117
117 -
 118
118 -
 119
119 -
 120
120 -
 121
121 -
 122
122 -
 123
123 -
 124
124 -
125
-
126
-
127
-
128
-
129
-
130
-
131
-
132
-
133
-
134
-
135
-
136
-
137
-
138
-
139
-
140
-
141
-
142
-
143
-
144
-
145
-
146
-
147
-
148
-
149
-
150
-
151
-
152
-
153
-
154
-
155
-
156
-
157
-
158
-
159
-
160
-
161
-
162
-
163
-
164
-
165
-
166
-
167
-
168
-
169
-
170
-
171
-
172
-
173
-
174
-
175
-
176
-
177
-
178
-
179
-
180
-
181
-
182
-
183
-
184
-
185
-
186
-
187
-
188
-
189
-
190
-
191
 |
 |