Pfaff creative 2140 Owner's Manual - Page 140
Hooping, fabric
 |
View all Pfaff creative 2140 manuals
Add to My Manuals
Save this manual to your list of manuals |
Page 140 highlights
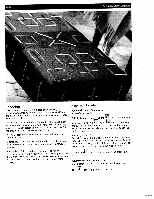
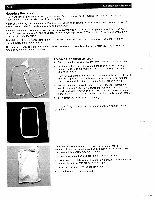
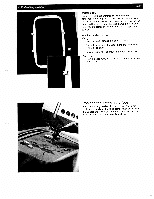
6-14 6. Embroidery Assistant Hooping the fabric Two embroidery hoops are supplied with your machine. One rectangular hoop (140x225 mm). and one circular hoop (120x115 mm). Those are suitable for all embroideries. A circular embroidery hoop with the size 80x80 mm is available as an optional accessory. The size of the embroidery field makes it extra suitable for small embroideries on narrow areas. Note: For better embroidery results. place a layer of stabilizer beneath fabric. For very thin and stretchy fabrics we also recommend placing a the fabric and hoop both the stabilizer and the layer of Water-soluble stabilizer (see Embroidery Assistant 6-2) onto the fabric. The fabric and stabilizer must sit smooth and be securely hooped. Any distortion or slackness in the fabric will impair the finished quality of the embroidery work. This may for instance take the form of areas of color that overlap, contour lines that do not meet up, creases within the embroidery, or areas left unembroidered. The fabric is hooped as follows: 1. Remove the retaining screw (57): the inner hoop can now be removed. 2. Lay the outer hoop in front of you with the guide pins (54) pointing to the right, for fitting to the embroidery unit. The retaining screw is now pointing towards you. 3. Place the stabilizer and then the fabric over the outer hoop, with the right side facing upwards. If Avalon is needed, place it in addition. onto the fabric. Ensure that the fabric is draped over the edge of the hoop. 4. With the inner hoop, press the fabric into the outer hoop. Tighten the retaining screw (57) slightly and tauten the fabric and stabilizer in the hoop by pulling the overhanging fabric. Be sure not to cause any creases in the face fabric or stabilizer. The hoops must be parallel to each other. 5. Then tighten the retaining screw securely. Note: If you lightly tap the hooped fabric with a finger the finger should spring back. If the fabric to be embroidered is too thick and cannot be taut in the embroidery hoop, use Adhesive-backed paper, which is an adhesive reinforcement (see Embroidery Assistant 6-2). • Hoop the Adhesive-backed paper into the embroidery hoop. • Use a needle to lightly scratch the surface in a crossing motion and then remove the paper. A thin adhesive sheet appears. • Now place the fabric onto the adhesive sheet. • Embroider your design as desired.
-
 1
1 -
2
-
3
-
4
-
5
-
6
-
7
-
8
-
9
-
10
-
11
-
12
-
13
-
14
-
15
-
16
-
17
-
18
-
19
-
20
-
21
-
22
-
23
-
24
-
25
-
26
-
27
-
28
-
29
-
30
-
31
-
32
-
33
-
34
-
35
-
36
-
37
-
38
-
39
-
40
-
41
-
42
-
43
-
44
-
45
-
46
-
47
-
48
-
49
-
50
-
51
-
52
-
53
-
54
-
55
-
56
-
57
-
58
-
59
-
60
-
61
-
62
-
63
-
64
-
65
-
66
-
67
-
68
-
69
-
70
-
71
-
72
-
73
-
74
-
75
-
76
-
77
-
78
-
79
-
80
-
81
-
82
-
83
-
84
-
85
-
86
-
87
-
88
-
89
-
90
-
91
-
92
-
93
-
94
-
95
-
96
-
97
-
98
-
99
-
100
-
101
-
102
-
103
-
104
-
105
-
106
-
107
-
108
-
109
-
110
-
111
-
112
-
113
-
114
-
115
-
116
-
117
-
118
-
119
-
120
-
121
-
122
-
123
-
124
-
125
-
126
-
127
-
128
-
129
-
130
-
131
-
132
-
133
-
134
-
 135
135 -
 136
136 -
 137
137 -
 138
138 -
 139
139 -
 140
140 -
 141
141 -
 142
142 -
 143
143 -
 144
144 -
 145
145 -
146
-
147
-
148
-
149
-
150
-
151
-
152
-
153
-
154
-
155
-
156
-
157
-
158
-
159
-
160
-
161
-
162
-
163
-
164
-
165
-
166
-
167
-
168
-
169
-
170
-
171
-
172
-
173
-
174
-
175
-
176
-
177
-
178
-
179
-
180
-
181
-
182
-
183
-
184
-
185
-
186
-
187
-
188
-
189
-
190
-
191
 |
 |
