Pfaff creative 2140 Owner's Manual - Page 156
Embroidery, combinations
 |
View all Pfaff creative 2140 manuals
Add to My Manuals
Save this manual to your list of manuals |
Page 156 highlights
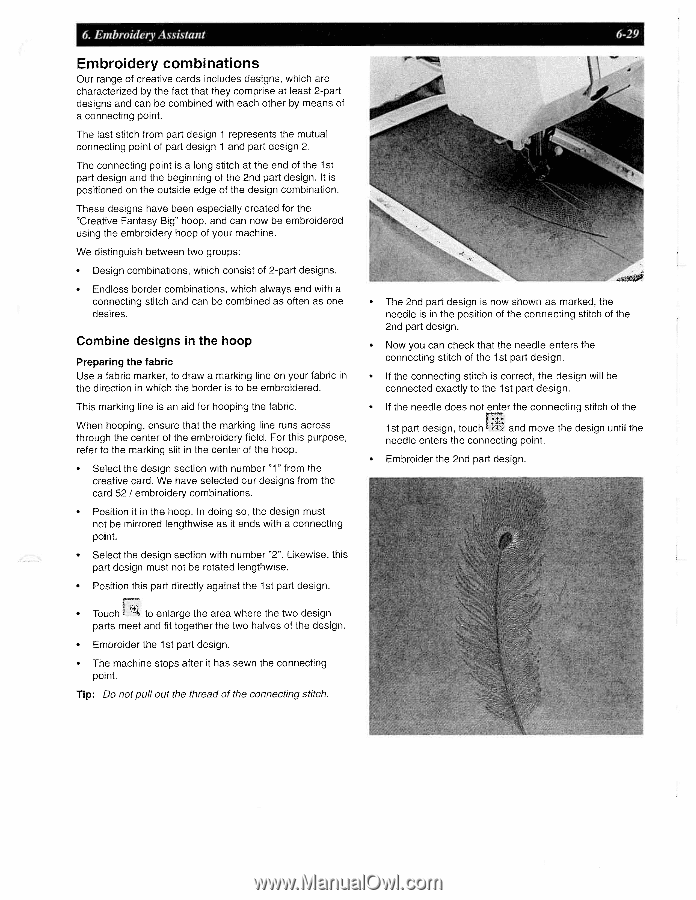
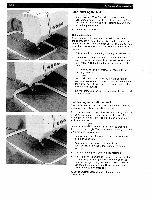
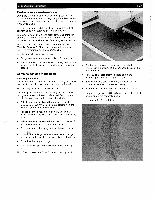
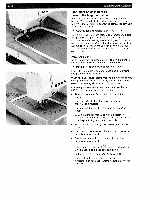
6 Embroidery Assistant Embroidery combinations Our range of creative cards includes designs, which are characterized by the fact that they comprise at least 2-part designs and can be combined with each other by means of a connecting point. The last stitch from part design 1 represents the mutual connecting point of part design 1 and part design 2. The connecting point is a long stitch at the end of the 1st part design and the beginning of the 2nd part design. It is positioned on the outside edge of the design combination. These designs have been especially created for the "Creative Fantasy Big' hoop, and can now be embroidered using the embroidery hoop of your machine. We distinguish between two groups: • Design combinations, which consist of 2-part designs. • Endless border combinations, which always end with a connecting stitch and can be combined as often as one desires. Combine designs in the hoop Preparing the fabric Use a fabric marker, to draw a marking line on your fabric in the direction in which the border is to be embroidered. This marking line is an aid for hooping the fabric. When hooping, ensure that the marking line runs across through the center of the embroidery field. For this purpose, refer to the marking slit in the center of the hoop. • Select the design section with number "1" from the creative card. We have selected our designs from the card 52 I embroidery combinations. • Position it in the hoop. In doing so, the design must not be mirrored lengthwise as it ends with a connecting point. • Select the design section with number "2". Likewise, this part design must not be rotated lengthwise. • Position this part directly against the 1st part design. • Touch - to enlarge the area where the two design parts meet and fit together the two halves of the design. • Embroider the 1st part design. • The machine stops after it has sewn the connecting point. Tip: Do not pull out the thread of the connecting stitch. 6-29 • The 2nd part design is now shown as marked, the needle is in the position of the connecting stitch of the 2nd part design. • Now you can check that the needle enters the connecting stitch of the 1st part design. • If the connecting stitch is correct, the design will be connected exactly to the 1st part design. • If the needle does not enter the connecting stitch of the 1st part design. touch and move the design until the needle enters the connecting point. • Embroider the 2nd part design.
-
 1
1 -
2
-
3
-
4
-
5
-
6
-
7
-
8
-
9
-
10
-
11
-
12
-
13
-
14
-
15
-
16
-
17
-
18
-
19
-
20
-
21
-
22
-
23
-
24
-
25
-
26
-
27
-
28
-
29
-
30
-
31
-
32
-
33
-
34
-
35
-
36
-
37
-
38
-
39
-
40
-
41
-
42
-
43
-
44
-
45
-
46
-
47
-
48
-
49
-
50
-
51
-
52
-
53
-
54
-
55
-
56
-
57
-
58
-
59
-
60
-
61
-
62
-
63
-
64
-
65
-
66
-
67
-
68
-
69
-
70
-
71
-
72
-
73
-
74
-
75
-
76
-
77
-
78
-
79
-
80
-
81
-
82
-
83
-
84
-
85
-
86
-
87
-
88
-
89
-
90
-
91
-
92
-
93
-
94
-
95
-
96
-
97
-
98
-
99
-
100
-
101
-
102
-
103
-
104
-
105
-
106
-
107
-
108
-
109
-
110
-
111
-
112
-
113
-
114
-
115
-
116
-
117
-
118
-
119
-
120
-
121
-
122
-
123
-
124
-
125
-
126
-
127
-
128
-
129
-
130
-
131
-
132
-
133
-
134
-
135
-
136
-
137
-
138
-
139
-
140
-
141
-
142
-
143
-
144
-
145
-
146
-
147
-
148
-
149
-
150
-
 151
151 -
 152
152 -
 153
153 -
 154
154 -
 155
155 -
 156
156 -
 157
157 -
 158
158 -
 159
159 -
 160
160 -
 161
161 -
162
-
163
-
164
-
165
-
166
-
167
-
168
-
169
-
170
-
171
-
172
-
173
-
174
-
175
-
176
-
177
-
178
-
179
-
180
-
181
-
182
-
183
-
184
-
185
-
186
-
187
-
188
-
189
-
190
-
191
 |
 |