Pfaff creative 2140 Owner's Manual - Page 45
Changing, light, needle, plate
 |
View all Pfaff creative 2140 manuals
Add to My Manuals
Save this manual to your list of manuals |
Page 45 highlights
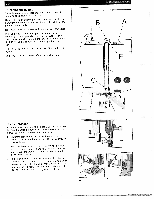
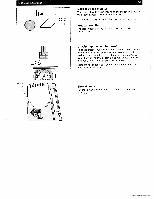
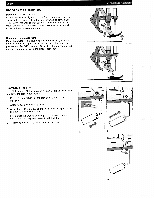
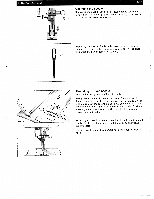
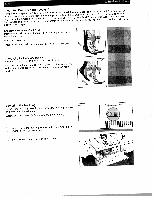
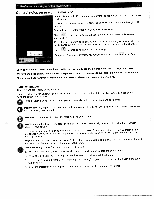
2. Machine Assistant Changing the light bulb Switch off the main switch and allow light bulb to cool. TRm(thheaeemchlmoiignvaheixtn.igbmLuuitlgbhmhetiswbliluagolthcbtatasgtbeceudalnobifn:btsheidepeluitgrhchethabnsueelebddlifesro5hmewayadottusor)f.PthFeAsFeFwdinegaler Push push the light upwards bulb and remover (A) turn it half a upward rotation as far as it will go. counterclockwise. Then Remove the light bulb. tRfIhanerespeasrlsltaoctitthinoewfgilltlihtgghehoet hbaolunilglddbhettriu.nbrtPnouultibsth:hheatblhfuealblrigorehtamt tbioouvnlebri.nuGpawucialdoredcktiwhnetiosleitghdheitrhebocutllidboenirn. taos Take out the bulb remover from the light bulb. Changing the needle plate Switch off the main switch RtRloehnfeaetim.tsfhPeioegovtushlireineetfitgo.panTntrhedhtehsepsenenrnereeseeefseodddolltetehleeappnplnladlaeatteetpeeduclcsaehhnaptnnlhaogetweedrube(petbawueclaahbrsadirbleyflmierrsoewtvmooeornrk)vtesahduse.psrpihgoohrwtt, ntothitenhne Replacing the needle plate Place the needle plate against the rear edge press downwards at the front until you hear It you start sewing, check that the needle plate of the cut-out, snap in place. is lying flat. then Before Tip: Changing the needle plate is even easier with the feed dog lowered!
-
 1
1 -
2
-
3
-
4
-
5
-
6
-
7
-
8
-
9
-
10
-
11
-
12
-
13
-
14
-
15
-
16
-
17
-
18
-
19
-
20
-
21
-
22
-
23
-
24
-
25
-
26
-
27
-
28
-
29
-
30
-
31
-
32
-
33
-
34
-
35
-
36
-
37
-
38
-
39
-
 40
40 -
 41
41 -
 42
42 -
 43
43 -
 44
44 -
 45
45 -
 46
46 -
 47
47 -
 48
48 -
 49
49 -
 50
50 -
51
-
52
-
53
-
54
-
55
-
56
-
57
-
58
-
59
-
60
-
61
-
62
-
63
-
64
-
65
-
66
-
67
-
68
-
69
-
70
-
71
-
72
-
73
-
74
-
75
-
76
-
77
-
78
-
79
-
80
-
81
-
82
-
83
-
84
-
85
-
86
-
87
-
88
-
89
-
90
-
91
-
92
-
93
-
94
-
95
-
96
-
97
-
98
-
99
-
100
-
101
-
102
-
103
-
104
-
105
-
106
-
107
-
108
-
109
-
110
-
111
-
112
-
113
-
114
-
115
-
116
-
117
-
118
-
119
-
120
-
121
-
122
-
123
-
124
-
125
-
126
-
127
-
128
-
129
-
130
-
131
-
132
-
133
-
134
-
135
-
136
-
137
-
138
-
139
-
140
-
141
-
142
-
143
-
144
-
145
-
146
-
147
-
148
-
149
-
150
-
151
-
152
-
153
-
154
-
155
-
156
-
157
-
158
-
159
-
160
-
161
-
162
-
163
-
164
-
165
-
166
-
167
-
168
-
169
-
170
-
171
-
172
-
173
-
174
-
175
-
176
-
177
-
178
-
179
-
180
-
181
-
182
-
183
-
184
-
185
-
186
-
187
-
188
-
189
-
190
-
191
 |
 |
