Pfaff creative 2140 Owner's Manual - Page 75
Operate, multi-color, touch, screen, Altering, stitch, settings, needle, function
 |
View all Pfaff creative 2140 manuals
Add to My Manuals
Save this manual to your list of manuals |
Page 75 highlights
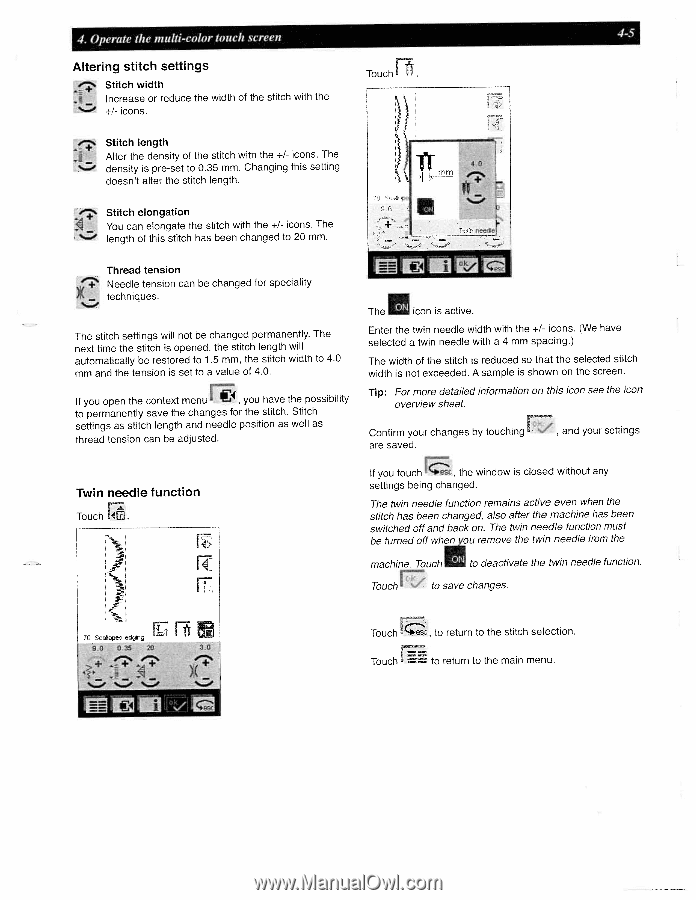
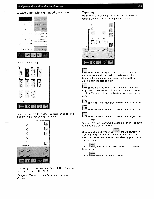
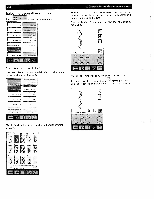
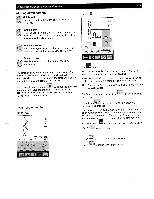
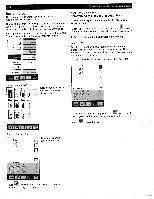
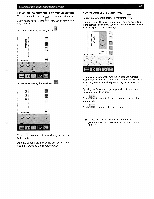
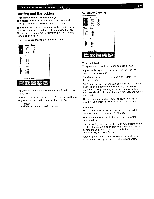
4. Operate the multi-color touch screen 4-5 Altering stitch settings Stitch width Increase or reduce the width of the stitch with the +1- icons. r Touch Stitch length Alter the density of the stitch with the +1- icons. The 4- density is pre-set to 0.35 mm. Changing this setting doesn't alter the stitch length. Stitch elongation You can elongate the stitch with the +1- icons. The length of this stitch has been changed to 20 mm. Thread tension -+4 Needle tension can be changed for speciality techniques. 4-- The stitch settings will not be changed permanently. The next time the stitch is opened, the stitch length will automatically be restored to 1 .5 mm. the stitch width to 4.0 mm and the tension is set to a value of 4.0. €, If you open the context menu you have the possibility to permanently save the changes for the stitch. Stitch settings as stitch length and needle position as well as thread tension can be adjusted. Twin needle function Touch I4f3. H The icon is active. Enter the twin needle width with the +1- icons, (We have selected a twin needle with a 4 mm spacing.) The width of the stitch is reduced so that the selected stitch width is not exceeded. A sample is shown on the screen. Tip: For more detailed information on this icon see the icon overview sheet. Confirm your changes by touching are saved. and your settings If you touch the window is closed without any settings being changed. The twin needle function remains active even when the stitch has been changed. also after the machine has been switched off and back on. The twin needle function must be turned off when ou remove the twin needle from the machine. Touch ' to deactivate the twin needle function. Touch to save changes. 7OIeder, %ZI Touch Touch to return to the stitch selection. to return to the main menu.
-
 1
1 -
2
-
3
-
4
-
5
-
6
-
7
-
8
-
9
-
10
-
11
-
12
-
13
-
14
-
15
-
16
-
17
-
18
-
19
-
20
-
21
-
22
-
23
-
24
-
25
-
26
-
27
-
28
-
29
-
30
-
31
-
32
-
33
-
34
-
35
-
36
-
37
-
38
-
39
-
40
-
41
-
42
-
43
-
44
-
45
-
46
-
47
-
48
-
49
-
50
-
51
-
52
-
53
-
54
-
55
-
56
-
57
-
58
-
59
-
60
-
61
-
62
-
63
-
64
-
65
-
66
-
67
-
68
-
69
-
 70
70 -
 71
71 -
 72
72 -
 73
73 -
 74
74 -
 75
75 -
 76
76 -
 77
77 -
 78
78 -
 79
79 -
 80
80 -
81
-
82
-
83
-
84
-
85
-
86
-
87
-
88
-
89
-
90
-
91
-
92
-
93
-
94
-
95
-
96
-
97
-
98
-
99
-
100
-
101
-
102
-
103
-
104
-
105
-
106
-
107
-
108
-
109
-
110
-
111
-
112
-
113
-
114
-
115
-
116
-
117
-
118
-
119
-
120
-
121
-
122
-
123
-
124
-
125
-
126
-
127
-
128
-
129
-
130
-
131
-
132
-
133
-
134
-
135
-
136
-
137
-
138
-
139
-
140
-
141
-
142
-
143
-
144
-
145
-
146
-
147
-
148
-
149
-
150
-
151
-
152
-
153
-
154
-
155
-
156
-
157
-
158
-
159
-
160
-
161
-
162
-
163
-
164
-
165
-
166
-
167
-
168
-
169
-
170
-
171
-
172
-
173
-
174
-
175
-
176
-
177
-
178
-
179
-
180
-
181
-
182
-
183
-
184
-
185
-
186
-
187
-
188
-
189
-
190
-
191
 |
 |