Pfaff creative 2140 Owner's Manual - Page 93
Select, stitch
 |
View all Pfaff creative 2140 manuals
Add to My Manuals
Save this manual to your list of manuals |
Page 93 highlights
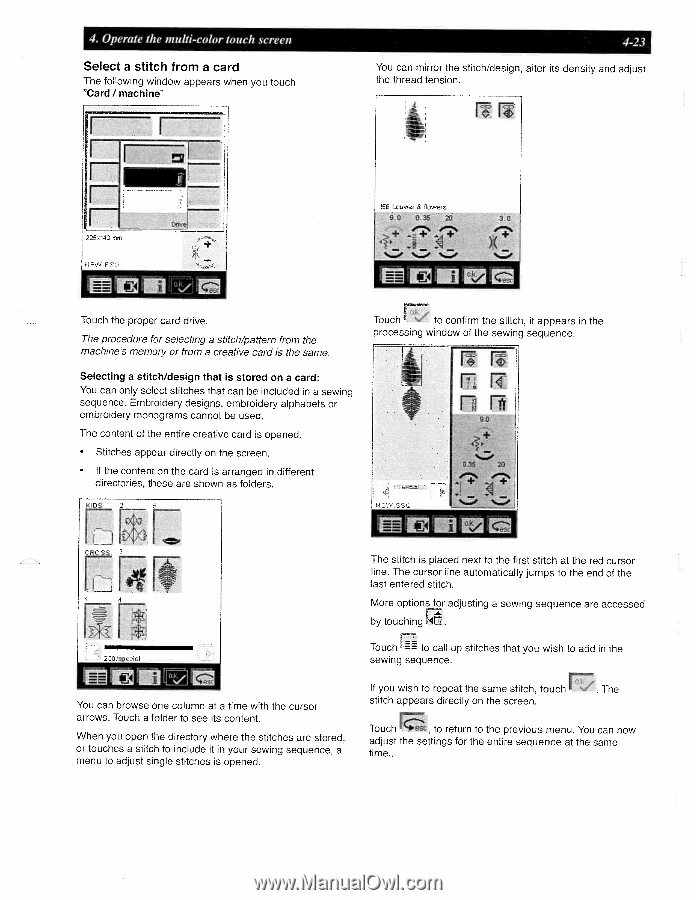
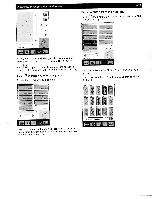
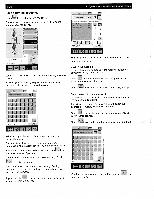
4. Operate the multi-color touch screen Select a stitch from a card The following window appears when you touch 'card i machine' I I 4-23 You can mirror the stitch/design, alter its density and adjust the thread tension. 9.0 05 20 30 I_1 %__ %__ %__ Touch the proper card drive. The procedure for selecting a stitch/pattern from the machine memory or from a creative card is the same. Selecting a stitch/design that is stored on a card: You can only select stitches that can be included in a sewing sequence. Embroidery designs, embroidery alphabets or embroidery monograms cannot be used. The content of the entire creative card is opened. • Stitches appear directly on the screen. • If the content on the card is arranged in different directories, these are shown as folders. Touch to confirm the stitch, it appears in the processing window of the sewing sequence. 2flOj-r,,M You can browse one column at a time with the cursor arrows. Touch a folder to see its content. When you open the directory where the stitches are stored, or touches a stitch to include it in your sewing sequence, a menu to adjust single stitches is opened. The stitch is placed next to the first stitch at the red cursor line. The cursor line automatically jumps to the end of the last entered stitch. More options for adjusting a sewing sequence are accessed by touching Touch to call up stitches that you wish to add in the sewing sequence. If you wish to repeat the same stitch, touch . The stitch appears directly on the screen. Touch c, to return to the previous menu. You can now adjust the settings for the entire sequence at the same time..
-
 1
1 -
2
-
3
-
4
-
5
-
6
-
7
-
8
-
9
-
10
-
11
-
12
-
13
-
14
-
15
-
16
-
17
-
18
-
19
-
20
-
21
-
22
-
23
-
24
-
25
-
26
-
27
-
28
-
29
-
30
-
31
-
32
-
33
-
34
-
35
-
36
-
37
-
38
-
39
-
40
-
41
-
42
-
43
-
44
-
45
-
46
-
47
-
48
-
49
-
50
-
51
-
52
-
53
-
54
-
55
-
56
-
57
-
58
-
59
-
60
-
61
-
62
-
63
-
64
-
65
-
66
-
67
-
68
-
69
-
70
-
71
-
72
-
73
-
74
-
75
-
76
-
77
-
78
-
79
-
80
-
81
-
82
-
83
-
84
-
85
-
86
-
87
-
 88
88 -
 89
89 -
 90
90 -
 91
91 -
 92
92 -
 93
93 -
 94
94 -
 95
95 -
 96
96 -
 97
97 -
 98
98 -
99
-
100
-
101
-
102
-
103
-
104
-
105
-
106
-
107
-
108
-
109
-
110
-
111
-
112
-
113
-
114
-
115
-
116
-
117
-
118
-
119
-
120
-
121
-
122
-
123
-
124
-
125
-
126
-
127
-
128
-
129
-
130
-
131
-
132
-
133
-
134
-
135
-
136
-
137
-
138
-
139
-
140
-
141
-
142
-
143
-
144
-
145
-
146
-
147
-
148
-
149
-
150
-
151
-
152
-
153
-
154
-
155
-
156
-
157
-
158
-
159
-
160
-
161
-
162
-
163
-
164
-
165
-
166
-
167
-
168
-
169
-
170
-
171
-
172
-
173
-
174
-
175
-
176
-
177
-
178
-
179
-
180
-
181
-
182
-
183
-
184
-
185
-
186
-
187
-
188
-
189
-
190
-
191
 |
 |