Pfaff creative 7550 Owner's Manual
Pfaff creative 7550 Manual
 |
View all Pfaff creative 7550 manuals
Add to My Manuals
Save this manual to your list of manuals |
Pfaff creative 7550 manual content summary:
- Pfaff creative 7550 | Owner's Manual - Page 1
1i W L L LIJ Li Li L. 1L L L L L LAJ LA L L L LA LA LáJ LJ LáJ Liii LiLA L LA LJ * x (I) -' C C) 0 D 0) D C 0) (Y1CD 'V O1Ei. I1 •I1 - Pfaff creative 7550 | Owner's Manual - Page 2
cleaning the housing. 1 0. To avoid the risk of electric shock, do not open the machine. There are no parts inside the machine which the user can repair. This is solely the responsibility of our qulified service staff. 11. Be sure to use only original PFAFF parts. r;;j I 1- 'I - - - t- II - ;I - Pfaff creative 7550 | Owner's Manual - Page 3
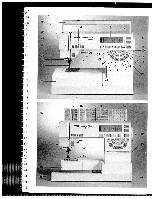
I 35 - 1 2345 ,- * 6 71 W4N P A F c ,ative 7550 U- 9 :25 17 15 36 37 -' 3829 i; creative 7550 ...S R3i rE I PFAFF 51 fl - L' F- - Pfaff creative 7550 | Owner's Manual - Page 4
) "reverse" key and "bartack" buttonhole key (26) Presser foot lifter (27) Needle holder with fixing screw (28) Detachable work support with accessory compartment (29) Sewing foot holder with sewing foot (30) Needle threader (31) Thread guide (32) Threading slots (33) Needle thread tension (34) Take - Pfaff creative 7550 | Owner's Manual - Page 5
LDØ I I a Important safety instructions For the United States only II TaRpheipasldisaeanwlcl eiin,ngsbtarmusicactcihsoainnfseetbyiespfdoreerecsaiguusntiienodgnsathnsidhsosmuelawdniunalfgwacamtyuasrcehbdienfeao.dr hHeOreUdSEtoHaOsLfDolluoswes:only. When you use an electric C.) Ci'- I I DANGER - Pfaff creative 7550 | Owner's Manual - Page 6
PFAFF sewing machine. If you now take time enough to study the instruction book, nothing can go wrong. 11 E2 iK j I El 1I K After all, this is the only way to learn all the things the machine can do, and to ra K make full use of them. If you have any further questions, that is no problem - Pfaff creative 7550 | Owner's Manual - Page 7
as approved by ASTA according or with the corresponding colour code. The plug must never be used without fuse cover. Spare fuse covers to BS 1362 and the fuse cover are available from electrical suppliers or the PFAFF agencies. - Please also observe the general safety notes on the fold out page - Pfaff creative 7550 | Owner's Manual - Page 8
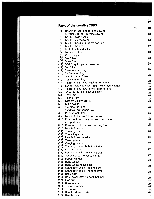
Index AAAdccdcceienssgssoosrrtyiietccsohamensdpanretmedelnets Activating Alphabet the code (entering the code) AAApllppphhliaaqbbueeéttssf/o/MMotoonnooggrraammss, summary Arrowhead bartack Buttonholes with gimp thread Changing the battery Changing Changing the the letter width needle - Pfaff creative 7550 | Owner's Manual - Page 9
hemstitching -- Language selection Letter combinations (letter sequence) Letter selection using the "Creative Designer Linen buttonhole Linen embroidery Linen embroidery example - Light-knit mending stitch Machine binds Machine does not feed or feeds irregularly Machine does not sew the - Pfaff creative 7550 | Owner's Manual - Page 10
the machine Presser foot lifter for bobbin winding Programming a motif Programming sheet Pulling up the bobbin thread Pullover stitch 11 8 89 68-74 46 47 45 21 1 61 96 21 28 95 I - 95 28 6 Quilting 11 8 1 Ram Removing the detachable Reverse feeding work support Reverse - Pfaff creative 7550 | Owner's Manual - Page 11
Index Sewing feet for embroidery Sewing function keys Sewing functions Sewing on buttons Sewing on buttons with stems Sewing on patches Slow sewing Smocking with elastic thread Snap-in/out the sewing foot Sorting the accessories Stabilizing the fabric Standard accessories Standard buttonhole, fully - Pfaff creative 7550 | Owner's Manual - Page 12
patches. Suitable for most fabrics. 7 ( I a 10 04 Blind stitch For securing seams invisibly and for shell-edging. 05 06 07 08 09 10 11 12 13 Elastic blind stitch Closed overlock stitch j 1 For sewing seams invisibly at the same time. Used for and serging an edge stretch materials. For - Pfaff creative 7550 | Owner's Manual - Page 13
Description rn - 1 7 Fagoting stitch Application For joining corsetry parts. Provides a decorative hemstitching effect. Width uptomm 7 1 8 embroidery programs. 21 Stem stitch, wide For embroidering in connection with the embroidery programs. - 22 Stretch triple zigzag stitch For sewing - Pfaff creative 7550 | Owner's Manual - Page 14
stitch Elastic finishing seam. 34 Overlock stitch N ni S; Light-knit mending stitch With edge thread, as closing seam. also suitable For sewing (underwear and darning etc.) light-knit fabrics 36 Closed overlock stitch For decorative serging of seam edges. 37 Pullover stitch 38 Overlock - Pfaff creative 7550 | Owner's Manual - Page 15
/X\X •HII° '°8°8°8c° co k x 4* )>(( 9D9Y cc c*y teL La, Ian La. AA .. U'I " \d ++ oo r3n 0= t {unkffihI CD '4' C, vv 0 3 C', cAd k %- g EH+bHP 88888 B ional embroidery iques Utility stitches Buttonholes Thz - Creative Designer w .. Sewing functions I creative 7550 Technical section - Pfaff creative 7550 | Owner's Manual - Page 16
I Embroidery stitch programs 1119112011211122112311241125 126 127 128 129 130 131 132 V 133 134113511361137 1381139 140 141 142114311441145 146 N Ii S I Li 147 1481149 150 151 152 153 - Pfaff creative 7550 | Owner's Manual - Page 17
Embroidery stitch programs 189 190 191 192 193 194 195196I197I198 199 Alphabets and Monograms I a AO zig I pC Io8 iii Ii LQJ II LO(0 II I ir -Ct L: 1 o1 IH 1 Maxi Stitches 200 201 202 203 204 II 11 >3 > e 205 206 207 208 209 13 rt - Pfaff creative 7550 | Owner's Manual - Page 18
Maxi Stitches 210 211 212 213 214 A F' N m 215 S 217 218 z 6 7 8 9 225 10 14 222 I 228 229 V r The stitches are not shown in their original size. - Pfaff creative 7550 | Owner's Manual - Page 19
*-I ---- r ii i , )CD 1)01 C01 0 ., . 0, Trt1itinnI ømhrnidri I - _!_ - - creative 7550 - Tir'kri,'I +,-r% - Pfaff creative 7550 | Owner's Manual - Page 20
Detachable work support Winding the bobbin Bobbin case Bobbin thread tension Threading the needle thread Needle threader Pulling up the bobbin thread Presser foot lifter Thread trimmer Changing the sewing foot Dual Feed Top feed Changing the needle Needle thread tension Dropping the feed dog Pages - Pfaff creative 7550 | Owner's Manual - Page 21
, fpoaorttcmonetnrtolof ;' - f Top cover Open the folding cover (50) upwards. - Ni1.•i1Jii!i. 4 ItiVe 7550 1ô_j C I Programs eTdheonprtohgerainmssidoefotfhethseetwoipngcomvearc. hine are illustrat Electrical connection tChoensneewctintghemmacahininsecoarndd between the wall the socket - Pfaff creative 7550 | Owner's Manual - Page 22
Connect the plug of the foot control with the It can be rewound into the cord reel automatically, connection socket (44) of the sewing machine. I I 1* 1$ is Main switch When switching on the main switch (24) the sewing lamp lights up. Press the 'ok key and the sewing machine is ready to use. I 19 - Pfaff creative 7550 | Owner's Manual - Page 23
A N IT S Accessory compartment Open the accessory compartment (28). I Detachable work support Swing out the left. the detachable work support (28) to pcAFF c1 e' J 1 ( [ Sorting the accessories Tmbeherens.tesnScoolfrottshtehedeamaccccienestssosootrhryieebscooxar.rreesmpoarnkdeidngwictoh - Pfaff creative 7550 | Owner's Manual - Page 24
I TI' I,' Preparing the machine for bobbin winding Hold the hand wheel (41) release disk (42) towards firmly and turn the you (anti-clockwise). During bobbin winding the needle will - Pfaff creative 7550 | Owner's Manual - Page 25
- a) C c£ . .Q '0 ___ BJ B hft B - ill': t1 t B t1i! 7S5O eteative I 9 qt :: :mn' ?i kj li1Ld - Ia i 1 IIR, ___: Winding the bobbin from the reel holder TtsPhpoleaoocntbehdtriatnehinagedftsorereewetehilmnefgiosrmivtzheleryme, - Pfaff creative 7550 | Owner's Manual - Page 26
CD - - CD CD - D o CD rC)g_. C C DC) C- D a C.) 'I CD Traditional embroidery echniques I Utility stitches Buttonholes Creative Designer .. ,= ç;; S 54;; 54 S%_ .5- 554 S .s; S-'_-- •54S. 4 :-- 4:S4; )RX 4+ • S S5- 4$l S )$(C S 4 4. 4; ,. 41 Sewing Bobbin winding - Pfaff creative 7550 | Owner's Manual - Page 27
A N IT S Switch off the main switch. Hold the hook cover (46) at the side and open it to the front. Taking out the bobbin case Lift the latch of the bobbin case and pull the bobbin case out. Release the empty bobbin. the latch and take out [ C I I E C ic Thread tension - Pfaff creative 7550 | Owner's Manual - Page 28
to increase the bobbin thread tension. I a0) .C 0 Inserting the bobbin case 1 I Lift latch F and push the bobbin case fully onto pin D of the sewing hook. Opening E of the bobbin case must face upwards. Close the hook cover. II i Check: j Pull the bobbin thread sharply; the bobbin case - Pfaff creative 7550 | Owner's Manual - Page 29
the main switch. Raise the presser foot lifter (26). Turn the hand wheel until the takeup lever (34) has reached its highest position. Place the thread on the reel holder (38) and fit the corresponding unwinding disk. Now, using both hands, pull the thread into guide (A). Pass the thread through the - Pfaff creative 7550 | Owner's Manual - Page 30
WI I jI 1 I j 9 I •aaa 4, 1-I a, 4, '1 ;Ø H iI Needle threader In order to make threading of the needle easier and quicker the PFAFF needle threader is provid ed. Lower the sewing foot (see next page). Turn the hand wheel until the needle has reached its highest position. Place the needle thread - Pfaff creative 7550 | Owner's Manual - Page 31
a loop. Pull the needle thread to bring up the bobbin thread. J, 4 C ic Bobbin thread Close the hook cover (46) and pull the thread under the sewing foot to the left. Thread trimmer Pull the threads from the back to the front over the thread trimmer (49). 28 - Pfaff creative 7550 | Owner's Manual - Page 32
(irt2fuwscer9enhoa)wnu.nr.endtiSWnrtsiae.glmhnt iedfttunhossdoentdotainbwsapeeennsendpwdgoulapuaellrgrtedeaidosntsfsgtiatost Engaging the sewing foot lthPihfoletaelcdrseeeirswth(li2eon9wgs)eefwrsoeooidntt.ghhaoftoldtoheteruwpnidhneesnr otthfhetehseperwfeoisonstgesrfnofaoopottinto :f N Check - Pfaff creative 7550 | Owner's Manual - Page 33
Cu to 17 A I I' I U I'I I S Pr T Pt Built-in Dual Feed fpdFeuuodcsr tkasreeciarwcilunisrngaeg.twTedlhiynief.gfOiecmvnuelantlcigmhfheiatnetedoesrirnidaigtilfsffaeiccPeutFdiloAtsnFmtFhaaeltoseofmrfieaaerltnssesrstuihuareclehsfirdaopesmearlsfiteslhkoceltauntmtodiopanrtca:ahynboidnungiblftaoo - Pfaff creative 7550 | Owner's Manual - Page 34
II Disengaging the top feed Hold the top feed with two fingers at the marked places. Push the top feed (51) down a little and out to the rear, and let it move slowly upwards I (see page 30). 0 0 0a) . Cl) ,I- Important! For all sewing jobs with the top feed, only use sewing feet with cutout at - Pfaff creative 7550 | Owner's Manual - Page 35
A N rr S 11 32 30 Changing the needle Switch off the main switch. A ntnTsTnoeecoeoeerteedidhrdnwleleleesme,er(aer2oapnta7tvu:dr).esiTth:tLsahiingeoLnhdhwgoiftgwleepaihrtnetuertluslhsttpihtehtdheeepasesoefAsiiwnxefnaiewotinr.nefgidgNanthlsgsoefecwoifrtoooenwutloweotitealolddn(as2ogdlnee7ownd)i. - Pfaff creative 7550 | Owner's Manual - Page 36
(lAe).thread eTmhebrnooirdmerailngseattnindgbfuotrtosnehwoilneg siesw4intgo 2and3. 5. For between 1WKW 'W -4 Dropping the feed dog tcdFhoooevrgefcreheeaardtsnaditdnoopgsbreeewissdsidrnsorglopidppwepeoedr(d.kBT.,)oef.udglo.lydthatorisn,tinhogep,ertnihgethhtfe.eeNhdooowk ____ ____ 0 a)a) IG - Pfaff creative 7550 | Owner's Manual - Page 37
.1 w A N IT S t - Pfaff creative 7550 | Owner's Manual - Page 38
o ''rrq, i 1 if I - Pfaff creative 7550 | Owner's Manual - Page 39
36 - Pfaff creative 7550 | Owner's Manual - Page 40
Ii II ii p I I i I I I I i I •1 ii - I .1 r. . -' - - - I I F PFAFF creative 7550 ii' ! I ri e', 0 U) 0 \ '- •\ J :- ck 7 \• I 0 I I Contents Start-up functions Pages 38-43 C Sewing function keys Pages 44-45 Pattern selection Pages 46-48 Stitch length and width - Pfaff creative 7550 | Owner's Manual - Page 41
Select the number of your desired language using keys "O-7' From now on, any description on the display will be shown in the selected language. [ [ r Ffl[ff1 [ 1 Battery message Remember! When switching on the sewing machine you will see the message ,,Change batteries" if the batte ries are - Pfaff creative 7550 | Owner's Manual - Page 42
,5aft0eptrtyheb)sey.sWestanhhmteeeren"initneigmfnoate"e. r o.k.) /> The display shows the message: ,,Please enter a code number" **** 3! P1 0- 0 z 'F cJ ;Ij4ii 31 'I Enter your code number using combination will be displayed keys "1-0". Your on the screen. [ o.k. a) C Ua)) I aU - Pfaff creative 7550 | Owner's Manual - Page 43
Every time you switch on the machine, this message will appear: ,,Please enter your code number" fl m "I ::I m i [ I• F Im ; ! I rI HrH L [a I Li i [E1[ L Enter your code number now. The numbers will not be displayed. Only the symbol "*" will change into symbol "+". Providing you have entered - Pfaff creative 7550 | Owner's Manual - Page 44
switches to the the "o.k." key the sewing start-up menue. The sewing machine is again ready to sew. Tcohidneelestweitthcheecsotdoe,thperesstsartth-uep"emsce"nukeayn. dThise ma ready If you wish to change the code press the "info" key. The pressing new code number the "o.k." key. On will the - Pfaff creative 7550 | Owner's Manual - Page 45
(8). After the first 30 programs C you will automatically scroll to buttonholes and embroidery stitches. Select any of these stitches by pressing the key below the desired stitch. Example: L If you wish to sew program number 23, for example, you have to press the cursor key "-p" L twice - Pfaff creative 7550 | Owner's Manual - Page 46
! I - To change these pre-programmed settings, press the key below the pattern again. Now the sewing program is shown on the Using the keys below the arrow symbols ""you can change the length and width. Using the keys below the preset figures, you can select these settings directly. Using - Pfaff creative 7550 | Owner's Manual - Page 47
PFAFF creative 75! 1 Mnda In G Description of the sewing function keys Reverse key (25) By pressing the reverse key the green diode lights up, the machine sews backwards. By pressing this key again, the machine will sew forwards. To tie-off hold this key pressed a little. Additionally, you can use - Pfaff creative 7550 | Owner's Manual - Page 48
pattern start and end, the correct sewing foot and possible special accessories. c) For specific sewing sections (buttonholes, M, P, alphabets and , the balance can be adjusted with these keys. Pattern start (13) a) Using this key you can return to the beginning of an already started program. b) - Pfaff creative 7550 | Owner's Manual - Page 49
of options for pattern selection You have different the creative: options to select a pattern of a) Tmuhsaeetdicbapalsalyitctearmpnpseenacurosm( . pattern is always shown marked. The selected - Fse U I [ 46 Using to the the cursor keys "-b" and "-" next available 10 patterns. you can - Pfaff creative 7550 | Owner's Manual - Page 50
0 Keys : Scroll through patterns - Key "info": Selection by motifs -I 7550 Modo In Cldrmnny ZLHHr [ c) Selection of pattern groups (Groups of ten stitch is Press the"0-9" key. marked and ready to sew. Enter pattern 126 using keys "1-0' Press cursor key"-*' You are now in pattern group 120-129 - Pfaff creative 7550 | Owner's Manual - Page 51
motif groups appear. These can be selected by pressing the respective key from the "1-0" keys. e 7550 Mod,, In G,,,,nnny If you select key "7" ="flowers, leaves", for exam If you wish to change the width and length ple, the respective patterns will be displayed on settings, press the same key - Pfaff creative 7550 | Owner's Manual - Page 52
1!! [!i 1!i I!t L!I 1I I!! I!!] 1!I !!I I!! LI ! !! L ! I! lI I1 hI 11 ti !I II fl -+ Cl) CD Z CD Q - ci, CD z C) Cl) CD C) 30 CDOCl)CD 0 CD< -- 0 0 o3ICD ga' Z0 24 u - Z 0 CD CD • CD OCD Cl) Zco 3c CD - z CD - _0 a O (f0l CD Z) 0) 3 Cl) Cl) ° D) Cl) CU CD 0-4 CD, CC) - Pfaff creative 7550 | Owner's Manual - Page 53
J fly I 1 r 1 I 1i[1H 1n I .,..., I 1 - i / 'i In I Stitch length setting (= pattern density) Select example No. 65. Using the cursor keys you can adjust a pattern more dense without changing the entire pattern length. On the right-hand side of the screen next to the displayed pattern - Pfaff creative 7550 | Owner's Manual - Page 54
the pattern is displayed in the direction as the machine will sew it. Pattern start and end are marked with arrows. The sections next to it provide infor mation on the necessary sewing feet, the Dual Feed, possible required accessories (such as needles, stencil, etc.), pattern mirroring and needle - Pfaff creative 7550 | Owner's Manual - Page 55
U, E Maxi Stitches S - 30 Maxi Stitches are at your disposal, from program 200-229. These large-scale embroidery patterns can be sewn up to a width of 60 mm. 52 - Pfaff creative 7550 | Owner's Manual - Page 56
key. Now you can enter the desired pattern number directly using the num bered keys and confirm it by pressing "o.k.' By pressing the "info" key all pattern groups which can be selected will be displayed. - yy I: -I - GI I: - 7550 de in Germany I:. I, info Press the "0" key for Maxi Stitches - Pfaff creative 7550 | Owner's Manual - Page 57
V p iany L 0 [1! [ 1 Using the cursor keys "-" and "÷-" you can scroll balance settings (see "balance" section). The to the next available patterns. By pressing one of length and width - Pfaff creative 7550 | Owner's Manual - Page 58
creative has a correction system letting you sew optimum embroidery stitches: the balance. With this system the reverse feeding standard setting of the balance is "O' Using the cursor keys "-f" and "-' the reverse feeding s4 I of the machine will be changed from -7 to ÷7. The respective amount - Pfaff creative 7550 | Owner's Manual - Page 59
each other. I r1E1 tI t 1 2) Sideways stitch correction For Maxi Stitches the reverse feeding as well as The centre of the cross represents the starting the sideways feeding can be adjusted. Select a position of the needle. Using cursor keys "-" and pattern from No. 200 on and you will see - Pfaff creative 7550 | Owner's Manual - Page 60
__ __ F * [: I Doing this, the line in the cross will be moved to the left and right and displayed as a figure value between "0-10" next to the "i-" and "-" symbols. This setting is confirmed by pressing "o.k." 3) Correction of pattern and program combinations You can also correct already - Pfaff creative 7550 | Owner's Manual - Page 61
- Pfaff creative 7550 | Owner's Manual - Page 62
SW r Traditional embroidery techniques Utility stitches nholes Creath,e besger - Pfaff creative 7550 | Owner's Manual - Page 63
OVER Contents Alphabets/Monograms Pages 62-64 Changing the letter width Page 63 Switching from upper to lower case letters Page 64 Letter selection using - the Creative Designer Page 65 I C) Creating a letter sequence Pages 65-67 Pattern sequences Correction of pattern sequences - Pfaff creative 7550 | Owner's Manual - Page 64
I C) p.-) I - C 0 D D o- .-+- CD - - :r CD C) CD _ Ct) oC) ?. - 0.3' g. CD CD CD CJ) ' - D) 0'< -C 030 6 CD- 0 C CD CD CD 0 . CD DD) ( C) CD 0 r r -: •= ri , '__i I,. Alphabets! ran CD 0 o Ho 0 C 0 ' •E '-'-..< 01 Q 20CD - Cl) Q) D . -. - 0-+z-' •a0:z _.Dt)) D- - Pfaff creative 7550 | Owner's Manual - Page 65
Any other letters have to be selected with the numbered keys below the arrows. For confir mation, press the "o.k" key, 7550 Mode In Germany r a) / ww To change the letter width (= stitch width) press By pressing the "o.k." key, the selected stitch key "9". A menu appears on the screen displaying - Pfaff creative 7550 | Owner's Manual - Page 66
0 any F Switching from upper case to lower case letters in the script alphabet [ The script alphabet can be sewn in upper and lower case letters. By pressing the "A-z" key all alphabet styles appear on the screen with lines covering two keys each. Select alphabet style "A-a' The menu containing - Pfaff creative 7550 | Owner's Manual - Page 67
, numbers and special marks of an alphabet using the Creative special marks with the adjustable slide of the H' Designer. To do this, connect the CD to your Creative Designer. By pressing the "mem +" key sewing machine (see section ,,Creative Designer"). on the CD the selected letter will - Pfaff creative 7550 | Owner's Manual - Page 68
sequence is empty... rrmi any fr k :' I infá Press the "A-z" key now. Select the desired alphabet style with the keys underneath and enter the required letters using the respective keys ortheCD. 66 :i :i I 31 L I I II H' - Pfaff creative 7550 | Owner's Manual - Page 69
,lytthhteeo a a -J 7550 'a do in Germany I H' H-' :i f H r r [ Fp V a Deleting and inserting letters / I S a With the cursor keys "i-" and changes in an already entered sor keys select the letter to be ter will be marked and can be "clear" key. "-a'" you can make text. Using the cur - Pfaff creative 7550 | Owner's Manual - Page 70
-EiEir1 Pattern sequence When several patterns are combined in a memory, it is called a "pattern sequence' To do this, recall the first 16 of 32 M-Memories by pressing the "r" key. Below the descriptions "M" and nemory numbers you will find the key descriptions "-" and "+' Select a memory by - Pfaff creative 7550 | Owner's Manual - Page 71
'1 I a i I1 If the memory is empty, this message appears: j ,,Empty sequence!" "esc" = Abort 1 Select the patterns to be stored now. I I .1 I J :: H. I Press the "0-9" key. This message appears on the screen I "Pattern No.: 0" Keys: "--÷": Scroll through patterns I Key: "info" : - Pfaff creative 7550 | Owner's Manual - Page 72
__ __ Ic 1L ii rr I For example, you now enter pattern 162 using the keys "1-0" and confirm with the "o.k." key. 'tI I iI Ii r• 11Fifi m\ inf p.c ) ) o 1 This will bring you to the memory screen. In the top right-hand - Pfaff creative 7550 | Owner's Manual - Page 73
iriri You can change the preset stitch width and length by pressing the "1-0" keys located below the settings. I I [21 1 H You have to confirm your selection with the "o.k." key. On the screen the selected pattern appears in the memory. Select the next pattern using the "0-9" keys again and - Pfaff creative 7550 | Owner's Manual - Page 74
manipulate a pattern within a sequence When you select the key below the question using the following symbols: mark, a window appears in which the cursor posi quit this screen. Now press the key below the "sewing machine" IC L [ [ icon and your sewing machine is ready to sew. [ [ [ 72 i - Pfaff creative 7550 | Owner's Manual - Page 75
p Pressing the "K" key will open another menu. Using the cursor keys you can correct the pattern (see section "balance"). Pressing the "o.k." key will bring you back to the programming screen. I R 74 V 'F - Pfaff creative 7550 | Owner's Manual - Page 76
"ZO" several ! times. Pressing the key below"ri 11" you will return to the originally displayed size immediately. ii You will then be in the sewing screen. Pressing the "edt" key will bring you back to the program ming screen, the originally displayed size, how ever, remains. 1 I II LI I [i (I, .cI - Pfaff creative 7550 | Owner's Manual - Page 77
pattern se quence the cursor is always positioned at the end of the sequence. Using the cursor key "-" you can move the cursor to the beginning of the form of a cross. If you wish to delete or insert a pattern, use key "7" below "edt". any rrrn \ I Then move the cursor to the place where you want - Pfaff creative 7550 | Owner's Manual - Page 78
I I I- I Press the "0-9" key and enter the number of your desired motif using the "1-0" keys. Confirm with "o.k." 7i I On the screen the message appears: " a pattern from the sequence, select key"7" below"edt' Using the cursor keys you can move the cursor to the left of the pattern to be deleted - Pfaff creative 7550 | Owner's Manual - Page 79
4* Now press key "4" below '4 The pattern will be deleted. [1F1[1[1 (delete pattern). '- i. •1 nfou Select key"7" below" Your sewing ma chine is now ready to sew. 78 - Pfaff creative 7550 | Owner's Manual - Page 80
you can sew em broidery and utility stitch programs into different directions. By shifting the patterns, new shapes and large-area embroidery motifs will be created. The connecting stitches are stored in the com puter as crosswise, lengthwise and diagonal programs. You may have to use several - Pfaff creative 7550 | Owner's Manual - Page 81
ii Eight-way feed stitches (connecting stitches) Example: Press the "rn)" key. On the screen the M-Memory directory appears. Se'ect an empty M-Memory and confirm with the "o.k." key. - Pfaff creative 7550 | Owner's Manual - Page 82
do CC - D) D CQCCD 'C 0) CD Cl) - -C C 0 DCDC CD D C -C CDCD C C CD -. C - CD ij LiiiLi Li i.J iii L1 L1 :+ itø co Traditional techniques embroidery Utility stitches Buttonholes Creative Designer L1 CD CC CD CDCD Cl) CD-C C CD C CD C C CD - CD Cl) C) CD CD Cl, CD C C CD I Li - Pfaff creative 7550 | Owner's Manual - Page 83
: has 1 38/6x direction j 1 38/6x direction 1 38/6x direction 1 38/6x direction aTpnahotitstehwrenar.ypI,fayytootueurncwani1s3hc8rteoaattctelhoeaseceonundpt.iynouuorupsaettmerbnroaidddery Press the key underneath " pattern is ready to sew. ". Now your 82 'a - Pfaff creative 7550 | Owner's Manual - Page 84
11 Example No. 1: 1 x No. 139 5xN 1 x No. 1 39 5x[ 1 xNo. 139 5x[ 1 x No. 1 39 5x'j 0a) I0 r XX3 0 a) .CU) 1-' >%g Example No. 2: 1 xNo. 138 6xN 1 xNo. 138 6x 1 x No. 138 6x 1 xNo. 138 6x a) 2 aE) - caø) 83 CC) lL - Pfaff creative 7550 | Owner's Manual - Page 85
r Example No. 3: 1 xNo. 162 2xLf] 4x 1 xNo. 162 2 x [Ii 4x[ 1 x No. 1 62 2xW 4xIi Example No. 4: 1 x No. 221 2x m 4 1 xx No. 138 5x 1 x No. 1 38 2xH 1 xNo. 138 5x[i 84 r. - ri iI);5' .::7$ I S I -'I I. 1 x No. 1 62 Leaves: Nr: 190 'I 2xW 4x Pattern length: 20 Pattern width : 6,0 I Bells: - Pfaff creative 7550 | Owner's Manual - Page 86
I- E4 - _a_'_ --. - ' ,'-' -' q ii ii 11 Ji I - IJ .L IJ IJ J - .L -U (aCD-' C CD C') CD - 4c Trr1itt,nT I Ii-H+ e++r'kc - Pfaff creative 7550 | Owner's Manual - Page 87
PFAFF creatvo750 ' A I '' Contents Technical section Pages 88-90 The programming sheet Pages 91-94 Designing a pattern Page 91 Placing the stitch points Page 92 Programming a pattern - Pfaff creative 7550 | Owner's Manual - Page 88
comes as standard equipment with the creative 7550 and enables you to design your own patterns up to a stitch width of 9 mm.The desired motif is drawn on a programming sheet. This template is inserted in the Creative Designer and transferred into the sewing machine's computer by the adjustable slide - Pfaff creative 7550 | Owner's Manual - Page 89
I j I j I- 11 I Parts of the Creative Designer 1 Connection lead with plug 2 Cover I 3 Lead retainer 4 Adjustable slide i 5 Sliding scanner with cross-wire The illustration below shows you how the Crea tive Designer is stored in the carrying case. PFAFF 89 C 0 U) U) .C Cl) 2; Ea) [ _cQa)) - Pfaff creative 7550 | Owner's Manual - Page 90
PA rwavo me - :' Important! To open the unit, fold cover (2) upwards. • • Wsewheinngcomnancehcitnineg,ththeemCacrehaitnievemDuestsibgensewr tiotcthheed off! I .c . Take the connection plug out of the retainer (3) and insert it into socket (10) of the machine. - Pfaff creative 7550 | Owner's Manual - Page 91
!! :;4 L6 411 C) -- 4. 0 = cn- CD 0 B Iar. (n (0 Cl) ±i1+h (DO pu6 aq 0 aleuipJooD 94pIM ewes eq uo paoed eq pnoqs ule44ed snonuquoo e jo qo4i4S ),SeJ JO uioed pue 4SJ!I aqJuJaBed snonu!uoo so 016u!s so peu6!sep eq ueo J140w ala P 6! 01j4 jo 00 aUiI OflO4 PIfl011S woed aqj 05 !I 60 00 11 - Pfaff creative 7550 | Owner's Manual - Page 92
, the length points must be set very densely (see illustration), The ideal distance is 1-2 squares. Make sure to keep a continuous logical sequence [ corresponding to the sewing course of the machine. (Interruptions within the motif will also be embroidered!) 92 1t-i I -I IS I !t! t11 - Pfaff creative 7550 | Owner's Manual - Page 93
1 I I I 1 A Inserting the programming sheet in the Creative Designer Insert the pattern programming sheet in slot (8). Make sure the sheet does not jam and push it in until the edge of the paper - Pfaff creative 7550 | Owner's Manual - Page 94
exactly aligned with point 00. Then clamp the sheet in this position by pushing clip slide (12) to the rear C E E rH ,'-ai-,' H . DCl) 'I PFAFF cve designer 1 Move the adjustable slide (4) fully to the right and magnifier slide (5) fully down. Move the sheet until line 00 aligns with the - Pfaff creative 7550 | Owner's Manual - Page 95
I - Programming a pattern Connect the Creative Designer to your sewing machine. Remember! When connecting the CD to your sewing machine it must be switched off. Open the insertion slot of the Designer by pushing the clip slides to the front. Insert the programming sheet in - Pfaff creative 7550 | Owner's Manual - Page 96
[ r 1 ' C- Selecting a P-Memory To transfer the design to your sewing machine press key"p)" E a) a)' 00.. 1 On the screen the first 10 of 30 P-Memories are displayed. Using cursor key"*" you can scroll to the next page. Press the numbered key below the desired free "P-Memory" I II 96 r - Pfaff creative 7550 | Owner's Manual - Page 97
. If I ,* creative designer Select the stitch points of the motif on the pro gramming sheet with the adjustable slide and confirm stitch point by stitch point by pressing the "mem+" key on the CD, Make sure to keep a consecutive, logical sequence corresponding to the sewing course of the machine - Pfaff creative 7550 | Owner's Manual - Page 98
I \Iflf\ \me\ ) / o.k. 0-9 Jear Pressing the "mem+" key on the Creative Designer the first time will change the programming screen. L 'II 5H I ** ,nfo o.k. After you have entered your pattern completely, you can manipulate it using the following func tions: Select the "m+" symbol with key - Pfaff creative 7550 | Owner's Manual - Page 99
I I If L I If m+d Adding a stitch By moving the adjustable slide and pressing the "mem+" key on the CD you can add one or several stitches at the end of a pattern. m+ Inserting a stitch Select a stitch on the display with the cross and press the "memory" key on the Designer. The stitch number - Pfaff creative 7550 | Owner's Manual - Page 100
m+ • Moving a block If you select wish to move several stitches the edge point of the desired at a time, block using the cross. tBbheyempbroleovscsekidnwtgoilttlhhbeee"ledmfitseapmnladoyrreyidg"hokt.nePytrhoeesnssitnchgreeteDhneesa"inmgdneecmra,+n " key will confirm the new position. 1 E 100 - Pfaff creative 7550 | Owner's Manual - Page 101
this function the last stitch of the menu on the right-hand side of the screen will pattern displayed on the screen will automatically • change. With these functions stitches or patterns be deleted by pressing the "o.k." key. can be deleted. The individual functions can be selected with the - Pfaff creative 7550 | Owner's Manual - Page 102
-1 - SymboIrn-" 0 CD )< .Q Q 5; LI CDCC D D CD -- D :'c') CD 0) CD - CDDgCD .- CD (Do. DCD CD 0 . CDZ CD CD < jcn o ' - Pfaff creative 7550 | Owner's Manual - Page 103
the individual stitches of a pattern and On the top right-hand side of the screen the their sewing direction you can trace the stitches respective stitch number and the length and using the "mem" function. Press key"2" below"mem" and a sub-menu will width coordinates are displayed. L appear on - Pfaff creative 7550 | Owner's Manual - Page 104
symbol"ij your pattern will be ready for sewing. On the screen the following menu appears: On the bottom left are the length and width settings. By pressing key "1" (length) a sub-menu appears under which you can select a different length using the numbered keys "1-O' By pressing key "2" (width - Pfaff creative 7550 | Owner's Manual - Page 105
Within the P-Memory section you have the possibility to manipulate a preprogrammed motif from the Creative's pattern selection by trans ferring it to a P-Memory and changing it with the connected Creative Designer. Press key ")' The P-Memory directory appears on the screen. Select a free P-Memory - Pfaff creative 7550 | Owner's Manual - Page 106
of the pattern you wish to manipulate and confirm with "o.k." J cLk )fo-9 clear '1 I H[11ThTh The pattern will appear in the programming screen and can be changed with any of the functions described so far (delete a stitch, move a stitch, insert a stitch, etc.). 1 [ 106 / ok 1 oa Jøiøai - Pfaff creative 7550 | Owner's Manual - Page 107
I I i fl I 9 i I I i j I H RAM I, With the"ram"function you can copythe contents Press the "n)" key. The P-Memory selection of a P-Memory into another P-Memory. You S need this function if, for example, you wish to appears on the screen. Select a free P-Memory with the numbered keys. - Pfaff creative 7550 | Owner's Manual - Page 108
Jw i: ?: cicj ''tw i; L Using the numbered keys, select the memory containing the pattern you wish to transfer to the free memory. On the display the pattern that has been - Pfaff creative 7550 | Owner's Manual - Page 109
4I wc -.+ CD CO - Pfaff creative 7550 | Owner's Manual - Page 110
a & LsI £ £L4S a aaa r aa a 1 L I Si I ,2 I i I IF 7- V 4- :1' it j 'I Ic 4 I t 'r.!'4-44i•_ ii - Pfaff creative 7550 | Owner's Manual - Page 111
Utility stitches / Buttonholes Pageslll-145 Accessories / Needles Pages 147-158 Maintenance /Trouble shooting Pages 1 59-1 63 '1 (I) 2 a) -U) - 111 • - Pfaff creative 7550 | Owner's Manual - Page 112
• • j j i LI. ).I I L I. I. A I h I. I. a-a a - L I Ii I Al r I 1 - Pfaff creative 7550 | Owner's Manual - Page 113
I 1. I 1 U I 'I I U a a I 1 I I I I I I Contents Utility stitches Buttonholes Sewing feet Needle chart Maintenance Trouble shooting Pages 115-131 Pages 132-145 Pages 148-150 Pages 157-158 Pages 159-162 Page 163 a0) - o .0 E -Q) =4 113 CCC.) - Pfaff creative 7550 | Owner's Manual - Page 114
.ntnrc.aehWmwyhio0lelu7nohynyaolovyuuemcptaoarnkepesbsreaotssnhsteeetshaftoeigtocfathorc.omotFneocntrortonelbtarecofhlore • Lower feed. the bottom feed and disengage the top • • Place the fabric Sew one stitch, by the required under the sewing foot. then pull amount. the - Pfaff creative 7550 | Owner's Manual - Page 115
. • Now unfold the hem again so that the hem edge protrudes by about 1 cm (1/2 inch), • Now place the fabric under the sewing foot so that the crease line runs along edge guide B. • When the needle enters the crease line it must only pick up one fibre of the fabric. Elastic blind stitch Prog - Pfaff creative 7550 | Owner's Manual - Page 116
the ends of the elastic tape overlapping a little and sew over them with elastic stitches. a On skirts or trousers the elastic tape is sewn onto the prepared edge with the elastic stitch. Zigzag stitch Prog. 02 Zigzag stitch 02 is used for trouble-free serging of all edges. While serging an sure - Pfaff creative 7550 | Owner's Manual - Page 117
, we recom mend you use blind stitch foot No. 3. It guides the fabric better and prevents tunneling of the seam at wider stitch widths. Pullover stitch Prog. 31, 36 + 37 Used together with the knit-edge foot (special accessories) this stitch can even be used for sewing open-knit fabrics. Fashion - Pfaff creative 7550 | Owner's Manual - Page 118
covering seams Where seam allowances and serged edges are inconvenient covering seams are used. These seams are particularly flat, join bordering fabric plies and serge . • Place the fabric under the sewing foot with the edges about 3 mm (1/8 of an inch) apart. • Sew on the face side, making sure - Pfaff creative 7550 | Owner's Manual - Page 119
mending stitch Prog. 18 Prog. 35 Fancy elastic stitch is very useful for materials that need a flat seam, e.g. terry-cloth. The and overstitch sportswear. fri each edge with fancy elastic stitches. • Sew the cuff onto the part with an overlock stitch. • Now the seam allowance can be - Pfaff creative 7550 | Owner's Manual - Page 120
program 09 you can sew on two- and four-hole buttons without any problems. • Remove the sewing foot. • Place the button machine sews a tack and the program is completed. TIP: By lowering the feed dog buttons can be sewn on even easier. Sewing on buttons with stems Prog. 09 • Insert the sewing foot - Pfaff creative 7550 | Owner's Manual - Page 121
you choose a larger size bartack, the stitch density will automatically be increased. With program No. 25 you can sew professional pocket bartacks as used in the garment industry. It also provides a highly durable fastening for shoulder straps on handbags. :1 . 0 II t I I 0 a 0 I II CCL - Pfaff creative 7550 | Owner's Manual - Page 122
intended for strengthening -' damaged areas of fabric. • Stitch over the damaged area at the required length. -$ • Press the reverse key; the machine finishes sewing the darning program and the darning length is thus saved. The saved darning often as needed. length can now be repeated as - Pfaff creative 7550 | Owner's Manual - Page 123
at its highest position by turning the handwheel, and push the pin of the darning foot fully into the hole of the sewing foot holder slightly pressing the darning foot between thumb and forefinger. When doing this, the guide fork should place itself around the presser bar and the wire must be behind - Pfaff creative 7550 | Owner's Manual - Page 124
up to the first corner. Fold the corner and stitch over it diagonally. Sew the lace continuously onto the next edge. All other sides are done in the side of the fabric. Stitch both edges of the lace at a narrow margin using straight stitch 00. Cut open the fabric under the lace at the middle and - Pfaff creative 7550 | Owner's Manual - Page 125
a) 0 4 Gatth1 With hA -fl.,'s endSO t e - Pfaff creative 7550 | Owner's Manual - Page 126
Darning with elastic stitch Prog. 03 j The elastic stitch is very suitable for repairing holes, tears and damaged areas. Depending on the size of the damaged area, sew over this area with rows of elastic stitches until it is well covered.When doing so, make sure the - stitch rows overlap each - Pfaff creative 7550 | Owner's Manual - Page 127
I I - Smocking COO D*'03C0 H0) fl CD 0)0 9) CD 5 0 CD 9.ci 0)D-.0 CD D-D. 0)C 0 - 6C DCC DD ZCDcTCD cCDC9. -0-.U) -CD 0 CD - -CD CD 0) 0 U)00 )_ - .,0 . O )Z,30 DøCD C 2 C0 D - Pfaff creative 7550 | Owner's Manual - Page 128
Prog. 00 Hemming secures the edges of chiffon, light-knit U and nylon fabrics in a tidy and durable way. Stretch the fabric before you start sewing. Doing this, has to be sewn on this side. Insert the hemmer. Lower the foot, sew a few stitches and pull the fabric into the scroll of the hemmer - Pfaff creative 7550 | Owner's Manual - Page 129
seam, seam. open the • Close the zipper and baste the overlap evenly onto the other zipper half. • Afterwards stitch along the basted seam. TIP: Using the edge guide you will chieve an accurate second seam. JI foot and open the zipper. H Lower the sewing foot and finish the seam. 130 - Pfaff creative 7550 | Owner's Manual - Page 130
I Sewing on patches Prog. 15 The best way to darn larger holes is to cover the damaged area with a piece of new material. • cut back the damaged material up to the seam on the reverse side. TIP: In order to turn at the corners more easily, use the "needle down" function. 0 - ,-' a) 0 E u oo 131 w - Pfaff creative 7550 | Owner's Manual - Page 131
single buttonhole to measure, the Creative 7550 is equipped with buttonhole guide hole with gimp thread"). • Linen buttonholes look more dense and beautiful when embroidery or darning thread C No. 10 and sensor technology. Using this guide is used. 0 you can sew perfect buttonholes even on the - Pfaff creative 7550 | Owner's Manual - Page 132
: 1. Remove the detachable work support. 2. Push the metal part of the buttonhole guide in the slot below the needle plate from the rear I (between the two arrows marked red). Doing this, the white synthetic part is placed on top of the needle plate. 3. Push the guide to the front until the - Pfaff creative 7550 | Owner's Manual - Page 133
You can choose from the following buttonholes: 1. Standard buttonhole No. 40 II (for blouses, shirts, dresses, etc.) II a) fully automatic 1I b) semi-automatic - 2. Stretch buttonhole No. 41 for highly stretchable materials and heavy knit It fabrics. U a) fully automatic b) semi- - Pfaff creative 7550 | Owner's Manual - Page 134
II -II r '1 -> "0K" drc..:t .orie Läroeniricbe '.'1 . It F. -I, F nrrirwi r info\ / ) o.k. 0-9 I. JI I, Sewing the buttonhole Standard buttonhole,fully automatic • Use buttonhole guide No. 10 or buttonhole foot No. 5 A. • Select buttonhole No. 40. On the display appears the above shown - Pfaff creative 7550 | Owner's Manual - Page 135
any further buttonholes. TIP: You can interrupt the slow sewing at the end of the second buttonhole seam by taking your foot off the foot control a few seconds. When you step on the foot control again, the sewing machine will sew at normal speed and finish the buttonhole. Deleting the programming - Pfaff creative 7550 | Owner's Manual - Page 136
Uve 7550 M,d in Gnnnny F L Using keys "1-5" you can change the standard width of 4.5 mm. Using keys "7 + 8" you can set the stitch length (= density of the buttonhole seams). For the programmed buttonholes a seam F- I LI density of 0.5 is stored in the machine. If you wish to sew an extremely - Pfaff creative 7550 | Owner's Manual - Page 137
Sew the first buttonhole seam at the required length. Watch the red marks on the buttonhole foot while sewing. Press the "reverse" key. The machine now sews , the sewing machine will automatically sew the second bartack and tie-off, Note: This only applies when the buttonhole guide is used. After the - Pfaff creative 7550 | Owner's Manual - Page 138
semi-automatic buttonholes and engaged button hole guide No. 10. • Sew the first seam and the first bartack. can adapt the seam density using the balance. In the programming screen the balance appears • While sewing the second seam adapt the buttonhole foot No, 5A to the front up to the second red mark. a, - Pfaff creative 7550 | Owner's Manual - Page 139
rounding facing the edge. The outwards to the edge. sewing of the buttonhole, however, starts at the The round buttonhole a preset buttonhole length of 22 mm appears. If required you can overwrite this length using keys "1-0' • Press the "o.k." key. On the screen the button H hole appears - Pfaff creative 7550 | Owner's Manual - Page 140
" you can self-define the second bartack. The stitch density cannot be changed for this buttonhole style. Therefore, you should sew this buttonhole with a thicker thread or a gimp thread, if required (see section "Sewing buttonholes with gimp thread"). The stitch density of the second seam can be - Pfaff creative 7550 | Owner's Manual - Page 141
be changed for this buttonhole style.Therefore, you should sew this buttonhole with a thicker thread or gimp thread, if required (see section "Sewing button runner of buttonhole foot No. 5 A to the front up to the second red mark. TIP: Cut open all buttonholes with the seam ripper. Use an awl to - Pfaff creative 7550 | Owner's Manual - Page 142
a gimp thread. Use pearl red mark. TI cotton or a regular gimp thread for this purpose. . Now sew buttonhole No. 40, 41 or 42. . Place the gimp thread over the front ridge of the buttonhole foot and pull the thread ends under the sewing foot to the back into the left and right of the back - Pfaff creative 7550 | Owner's Manual - Page 143
-- - Keyhole buttonholes with gimp thread • Push the runner of the buttonhole foot to the back. Then place the gimp thread over the front ridge. Pull the thread ends under the sewing foot to the back taut into the left and right of the back ridge. a(I)) -= Oh • Push the runner to the front up to - Pfaff creative 7550 | Owner's Manual - Page 144
the machine sews the first stitches of ! the rounding, pull down the gimp thread from the back ridge using a pin. 1 Important! Doing this, the sewing foot must not be raised! • Pull the gimp thread on the left to the back until the loop is placed shortly in front of the needle. • Now sew the - Pfaff creative 7550 | Owner's Manual - Page 145
ii - Pfaff creative 7550 | Owner's Manual - Page 146
ii Accessories and needles Sewing feet (standard accessories) Pages 148-150 Table of special accessories Page 151 Felling foot/Appliqué foot Page 152 Fringe foot/Cording foot Page 153 One-groove cording toot/ Shirring foot Page 154 Knit-edge foot! C Multi-stitch gathering foot Page - Pfaff creative 7550 | Owner's Manual - Page 147
Standard sewing Part No.: 98-694 foot No. 828-00 0 A Fancy-stitch foot Part No.: 98-694 for Dual 836-00 Feed No. 1 A E 1 : . Fancy-stitch No. 2A foot (not suitable for Dual Feed) 1' Part No.: 98-694 838-00 aU)) 0 U, a(I), C., 4-IC.) (0 H 148 : ' / Blind stitch and Part No.: 98- - Pfaff creative 7550 | Owner's Manual - Page 148
Zipper and edge sewing foot No.4 Part No.: 98-694 884-00 Buttonhole foot No. BA Part No.: 98-694 830-00 r Buttonhole guide No.10 A Part No.: 93-037 595-91 0) I Darning foot No.6 Part No.: 93-035 960-91 i1 :4 I I 149 - Pfaff creative 7550 | Owner's Manual - Page 149
Roll Part Nhoe.m: 9m8e-r6f9o4ot81N8o-.070 Embroidery foot Part No.: 98-694 No. 8 840-00 a) 0 CCll,, 4a')cC., I,C I 150 PEadrgt eNgou.:id9e8-N8o0.23422-00 Oil tube Soft brush Seam ripper Third reel holder to pin on (special accessories) t T ri - Pfaff creative 7550 | Owner's Manual - Page 150
mm Hemmer, 4 mm (for Dual Feed) -I Knit-edge foot Teflon foot (for Dual Feed) I stitch width up to 6 mm Teflon embroidery stitch foot I (stitch width up to 9 mm) 93-035 952-45 93-042 943-9 1 For sewing loop embroidery 98-694 821-00 98-694 422-00 Caution! Only use straight stitch in center needle - Pfaff creative 7550 | Owner's Manual - Page 151
(lafdemodfusaroeeatron.lawkitibcegmihlinhsetigthlsWdaeetrnshaeedermnieg'.ashdt • Insert the felling foot. • • Place the fabric reverse side material. on the appliqué parts on the • nyscaAuoounfrurdtefvergeradtw,uhyeieiuandnsrsegndeeestothezhocdieegcvluzewe" - Pfaff creative 7550 | Owner's Manual - Page 152
or • Use a stabilizer and engage the fringe foot. • yEomubhroavideetrothweomrkoftirfo,mrotwhebyourotswid. eFoirnwciarcrdle.s • For thicker threads you may have to choose a - longer stitch length; it is best to sew a test seam first. • When you have finished, pull the the machine carefully - Pfaff creative 7550 | Owner's Manual - Page 153
you achieve. • Be sure you guide the fabric edges evenly through the foot. Program: 32 Stitch length: 0.4-0.6 Stitch width: 1.5-2 Tension: 3 • Disengage the gathering foot by pushing it down at the front, and take it out to the back over the groove of the sewing foot holder. TIP: You can also - Pfaff creative 7550 | Owner's Manual - Page 154
can be used in three different ways: 1. Folding the fabric in pleats. 2. Folding the fabric in pleats and sewing them on in one workstep. 3. Folding the fabric in pleats, sewing them on and sewing on lace at the same time. When you buy the multi-stitch gathering foot from your PFAFF dealer a full - Pfaff creative 7550 | Owner's Manual - Page 155
unfolded bias tape about 24 mm (one inch) wide. • Remove the foot holder with sewing foot and screw on the binder. • Cut the beginning of the bias tape edges. During sewing, the bias tape will enclose the raw edge automatically. TIP: You can obtain an additional effect by using zigzag stitches or - Pfaff creative 7550 | Owner's Manual - Page 156
1, Needle chart r System & No. Stitch length Stitch width ri 130/705 H-ZWI 25mm ' 80 130/705H-ZWI 80 90 2.5 mm 2.5 mm 2.5 mm - - 100 - 3.0 mm - Needle spacing 1.6mm 2.0 mm 2.5 mm 3.0 mm 4.0 mm Suitable for Medium-wide cording Wide cording Extra wide cording Extra-wide cording - Pfaff creative 7550 | Owner's Manual - Page 157
Using chiffon, batiste, organdy. wodlens, velvet, fancy seams and embroidery work. Coarse knitted fabrics, Lastex, doublejersey fabrics, Quiana and ball point Heavy ball point Stretch-fabric needle developed especially for Pfaff. Particularly suitable for delicate stretch and knitted fabrics. Wide- - Pfaff creative 7550 | Owner's Manual - Page 158
F :z_ } LI 1 Contents Changing the battery Page 160 I Changing the needle plate Page 161 Cleaning and oiling Page 161 Changing the sewing lamp Page 162 Sewing faults and their removal Page 163 0 tQ) Q) 2 E coW o- 159 - Pfaff creative 7550 | Owner's Manual - Page 159
Changing the battery: Switch on the sewing machine to avoid dele tion of the memories during the battery change. Tilt the machine over backwards. A battery compartment is installed in the base. Using a screwdriver lift cover B at the catch in recess A and remove the cover. Take out the batteries. - Pfaff creative 7550 | Owner's Manual - Page 160
drop of oil to the hook as shown above. The machine is otherwise maintenance-free and must not be oiled in other places. • Clean and oil the sewing machine every 10 to 15 hours of operation. Cleaning the display To clean the display, use a dry, soft cloth which is free of fluff. Do not - Pfaff creative 7550 | Owner's Manual - Page 161
machiflO. and the foot control • Take off the detaChab work supP0 The sewin9 lamp (bulb) is located inside the needle head of the sewing machin Removal Twmoheemnedal kpaelsaicitlilenuagssttireharetetdose. wainnggemathcheinbeulobnwteherehcaonmd • Hold the sewing machine tightly. • Push the - Pfaff creative 7550 | Owner's Manual - Page 162
tensions. Only use perfect threads. Do not wind thread free-hand, but run it on through the winding tension. Thread up correctly. Check needle and bobbin thread tensions. 5. Machine does not feed or feeds irregularly Sewing lint has collected between the feed dog teeth rows. Feed dog is lowered - Pfaff creative 7550 | Owner's Manual - Page 163
: :' 11 \1\\ - Pfaff creative 7550 | Owner's Manual - Page 164
Traditional embroidery techniques Pages 165-1 83 C I I I j 2 iJ Ii: 4Itz Iv.) C C.) - Pfaff creative 7550 | Owner's Manual - Page 165
'I v Contents General tips on embroidering Cross stitch Linen embroidery Hemstitching Eyelet embroidery Richelieu Quilting Twin needle sewing Pattern stencils Page 1 68 Pages 1 70-173 Page 1 74 Pages 175-177 Pages 178-1 79 Page 180 Page 181 Page 1 82 Page 1 83 2 a, -Q, - CO) ii 167 - Pfaff creative 7550 | Owner's Manual - Page 166
Many types of materials tend to gather parti cularly with dense embroidery stitches. We, there Sewing feet fore, recommend: I For embroidery work sewing feet no. 2A and 8A are most suitable. Remember! For embroidery never engage the top feed as the Apply iron-on or tear-away stabilizer under - Pfaff creative 7550 | Owner's Manual - Page 167
, 4 __4 4 Tradftona em brcde ry - ) •fp / -4t - - Pfaff creative 7550 | Owner's Manual - Page 168
Zstitche V0 CDO 0 - CD CD 0D 33 3 - 0 C,C, < D 0 -3 fl _C, CCD -. C!) DD Ci) Cd) CD C, C Cd)O C5 -* C CO D CD 0D D 0 0D -CD0CD CDcog O(fl-CD (D< -. CD ?' 2 cQ D =. -CD C, -.< 0 CD C'0 O 0 -CD DC)D) -- CD C, C,-< CD Q - Pfaff creative 7550 | Owner's Manual - Page 169
4 S t1 . ç* ;t -. Sewing pre-programmed cross stitch borders ' Embroidery programs No. 90-99 consist of small cross stitches and are especially suitable for border embroideries. They have been pre-pro grammed into the machine with an optimum stitch _i length and width, however you can change these - Pfaff creative 7550 | Owner's Manual - Page 170
You can combine the individual cross stitch pro grams using your imagination to achieve largearea cross stitch motifs or help files. There, you can also find combination possibilities for each cross stitch program. TlP Using key" 'you can transfer starting points from left to right. j ! cI I I -i - Pfaff creative 7550 | Owner's Manual - Page 171
"rn) " key for pattern sequence. Now enter the selected cross stitches into a free M-Memory. • To sew the pattern recall the programmed memories successively. Press key" on fancy-stitch foot No. 2A. They should be aligned with the starting points of the adjoining cross stitches. • Allow the left - Pfaff creative 7550 | Owner's Manual - Page 172
wellknown and popular technique which in earlier times was widely used in bed and table linen production. For this special white-on-white embroidery satin stitches are most suitable to make the embroi dery more prominent. Always use special em broidery threads and tear-away stabilizer as an underlay - Pfaff creative 7550 | Owner's Manual - Page 173
the Creative 7550 you can pro duce hemstitching much quicker and easier. 10 special hemstitching programs are at your disposal, and by changing the stitch lengths and widths you can achieve new effects every time. For hemstitching you need a wing needle. Only for very fine fabrics a normal sewing - Pfaff creative 7550 | Owner's Manual - Page 174
For these programs use wing needle 130/705 H Wing, size 100, without pulling threads from the fabric. Program No. 119 can also be sewn as a curved edge or for securing edges. Ii - width the same as in hand hemstitching. TIP: Use the "slow sewing" function so that the needle stitches evenly and the - Pfaff creative 7550 | Owner's Manual - Page 175
1 a hem Ni This seam provides a k on tab •.pr4oegerdalm e 153t401O7h015Z a hem5t1t seam p ecrleo0thtSendap9fein,isohr and ill. 6 je to hem towei5 • iron hem ove dth. • • Pull one or more threa abo he U1 sin9ofl of the se the rightthaendnebeudniceh lett. tlahiebedopvteheunrltlm - Pfaff creative 7550 | Owner's Manual - Page 176
refines your linens and can be produced very easily with your creative. With the help of an eyelet plate and different utility and embroidery stitches you can produce beautiful embroideries. • Drop the feed dog. • Remove the sewing foot. • Place the eyelet plate on the needle plate making sure the - Pfaff creative 7550 | Owner's Manual - Page 177
0 Pattern examples for eyelet embroidery a> Select pattern No. 32. I Stitch around the cut slowly and evenly. Then sew a second circle using program No. 32, c) Stitch slowly around the cut using the elastic blind stitch No. 05. Tie-off with reverse stitches. E press key" ' For doing this, set - Pfaff creative 7550 | Owner's Manual - Page 178
make with your sewing machine. areas that will form the cutouts at about 2 mm • Transfer your pattern onto the face side of the fabric using the magic pen and backing in an embroidery hoop. • The backing material provides this part of the • To make the embroidery more stable, sew work with much - Pfaff creative 7550 | Owner's Manual - Page 179
of mate Dual Feed is of particular importance when doing rial are sewn together by hand with small this. stitches - but it is quicker and more practical with the sewing machine, e.g. with program II No. 00. There is always stitching about 2 mm beside the seam. Embroidery stitches look very - Pfaff creative 7550 | Owner's Manual - Page 180
of similar shades are chosen. If you wish to sew embroidery programs with the twin needle, press the "twin needle" key. By doing this, the stitch width is automatically reduced to avoid the needle stitching on the sewing foot. . Replace the sewing needle with a twin needle. Place one reel of thread - Pfaff creative 7550 | Owner's Manual - Page 181
actual stitched size. A pattern sewn on cotton will be fed differently by j the machine than on velvet or woollen materials - and will always turn out slightly different. - And this is how the stencil should be used:The pattern start of the respective motif or monogram is marked on the stencil - Pfaff creative 7550 | Owner's Manual - Page 182
1< F N - I' / '4 is 4-. I a 'a !! TvTrwTfrTTrTfl - Pfaff creative 7550 | Owner's Manual - Page 183
PFAFF 'J L 14 h II 'e GM.PFAFF L Aktiengesellschaft Werk Karisruhe-Durlach GritznerstraRe 11 76227 Karlsruhe Printed in Germany Heidelberger Reprographie A. Grosch GmbH 69214 Eppelheim, SeestraRe 72 Subject to technical modifications L Nc 29-629 997-00/000 HR EngI. 10/93 I,
-
 1
1 -
 2
2 -
 3
3 -
 4
4 -
 5
5 -
 6
6 -
 7
7 -
8
-
9
-
10
-
11
-
12
-
13
-
14
-
15
-
16
-
17
-
18
-
19
-
20
-
21
-
22
-
23
-
24
-
25
-
26
-
27
-
28
-
29
-
30
-
31
-
32
-
33
-
34
-
35
-
36
-
37
-
38
-
39
-
40
-
41
-
42
-
43
-
44
-
45
-
46
-
47
-
48
-
49
-
50
-
51
-
52
-
53
-
54
-
55
-
56
-
57
-
58
-
59
-
60
-
61
-
62
-
63
-
64
-
65
-
66
-
67
-
68
-
69
-
70
-
71
-
72
-
73
-
74
-
75
-
76
-
77
-
78
-
79
-
80
-
81
-
82
-
83
-
84
-
85
-
86
-
87
-
88
-
89
-
90
-
91
-
92
-
93
-
94
-
95
-
96
-
97
-
98
-
99
-
100
-
101
-
102
-
103
-
104
-
105
-
106
-
107
-
108
-
109
-
110
-
111
-
112
-
113
-
114
-
115
-
116
-
117
-
118
-
119
-
120
-
121
-
122
-
123
-
124
-
125
-
126
-
127
-
128
-
129
-
130
-
131
-
132
-
133
-
134
-
135
-
136
-
137
-
138
-
139
-
140
-
141
-
142
-
143
-
144
-
145
-
146
-
147
-
148
-
149
-
150
-
151
-
152
-
153
-
154
-
155
-
156
-
157
-
158
-
159
-
160
-
161
-
162
-
163
-
164
-
165
-
166
-
167
-
168
-
169
-
170
-
171
-
172
-
173
-
174
-
175
-
176
-
177
-
178
-
179
-
180
-
181
-
182
-
183
 |
 |
(I)
-‘
C
C)
0
D
0)
D
C
0)
1i
W
L
L
LIJ
Li
Li
L.
1L
L
L
L
L
LAJ
LA
L
L
L
LA
LA
LáJ
LJ
LáJ
Liii
LiLA
L
LA
LJ
*
‘V
(Y1CD
O1Ei.
I1
•I1
x