Pfaff expression 2026 Owner's Manual
Pfaff expression 2026 Manual
 |
View all Pfaff expression 2026 manuals
Add to My Manuals
Save this manual to your list of manuals |
Pfaff expression 2026 manual content summary:
- Pfaff expression 2026 | Owner's Manual - Page 1
e x p r e s s i o n 2026 Owner's manual - Pfaff expression 2026 | Owner's Manual - Page 2
needle, threading bobbin, or changing presser foot, etc. • Always unplug the sewing machine from the electrical outlet when removing covers, lubricating, or when making any other user servicing adjustments mentioned in the instruction manual. • Never drop or insert any object into any opening. • Do - Pfaff expression 2026 | Owner's Manual - Page 3
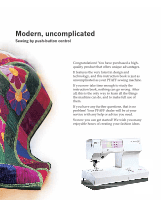
have purchased a highquality product that offers unique advantages. It features the very latest in design and technology, and this instruction book is just as uncomplicated as your PFAFF sewing machine. If you now take time enough to study the instruction book, nothing can go wrong. After all, this - Pfaff expression 2026 | Owner's Manual - Page 4
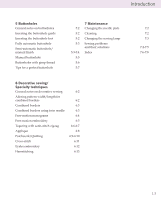
Introduction TABLE OF CONTENTS 1 Introduction Accessories Stitch table 1:4-1:5 1:6-1:8 2 Technical section Parts of the sewing machine 2:2-2:3 Carrying case 2:4 Lid with stitch chart 2:4 Electrical connection 2:5 Voltage switch 2:5 Accessories 2:6 Removable accessory tray 2:7 - Pfaff expression 2026 | Owner's Manual - Page 5
buttonhole Semi-automatic buttonhole/ manual Ànish Manual buttonhole Buttonholes with gimp thread Tips for a perfect buttonhole 5:2 5:2 5:2 5:3 5:3-5:4 5:5 5:6 5:7 7 Maintenance Changing the needle plate Cleaning Changing the sewing lamp Sewing problems and their solutions Index 6 Decorative - Pfaff expression 2026 | Owner's Manual - Page 6
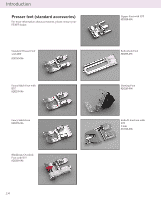
Introduction Presser feet (standard accessories) For more information about accessories, please contact your PFAFF dealer. Standard Presser Foot with IDT 820250-096 Fancy Stitch Foot with IDT 820253-096 Fancy Stitch Foot 820278-096 Blindhem/Overlock Foot with IDT - Pfaff expression 2026 | Owner's Manual - Page 7
Introduction Edge Guide/Quilting Guide 820251-096 Buttonhole Guide 820294-096 Bulb Remover/Needle Plate Changer 820292-096 Second spool holder Seam ripper Brush 93-033 063-44/000 99-053 016-91/000 - Pfaff expression 2026 | Owner's Manual - Page 8
Introduction Utility stitches expression 2026 1 2 3 4 5 6 7 8 9 0 10 11 Stitch No. Description Application Width up to mm 1 Straight stitch For seaming and topstitching up to 6 mm. 13 needle positions - available for edgestitching or sewing in zippers. 2 Stretch triple straight - Pfaff expression 2026 | Owner's Manual - Page 9
Utility stitches expression 2026 Introduction 12 13 14 15 16 17 18 19 20 21 22 23 stitch for ornamental hem Ànishing on 6 stretch fabric, for decorative elastic application and sewing with elastic thread in the bobbin. 17 Stretch triple zigzag stitch Elastic stitch for decorative - Pfaff expression 2026 | Owner's Manual - Page 10
Introduction Decorative stitches expression 2026 24 25 26 27 28 29 30 31 32 33 34 35 36 37 38 39 40 41 42 43 44 45 46 1:8 - Pfaff expression 2026 | Owner's Manual - Page 11
Technical section - Pfaff expression 2026 | Owner's Manual - Page 12
of the sewing machine 1 -/+ button A (stitch width/pattern 17 Threading slots width controls) 18 Needle thread tension 2 -/+ button B (stitch length/pattern length controls) 19 Take-up lever 20 Presser foot lifter 3 -/+ button C (stitch density/balance controls) 21 Thread guide 4 Carrying - Pfaff expression 2026 | Owner's Manual - Page 13
Technical section 19 1 23 4 18 17 5 16 6 15 20 14 13 7 12 8 9 11 10 21 22 23 31 24 25 30 29 28 32 33 27 26 2:3 - Pfaff expression 2026 | Owner's Manual - Page 14
Technical section Carrying case Place the enclosed lead cord, the foot control and instruction book into the compartment of the carrying case. Lid Open the folding lid (24) upwards. The stitches of the sewing machine are illustrated on the inside of the lid. The appropriate presser foot to use - Pfaff expression 2026 | Owner's Manual - Page 15
main switch (10) is switched on (switch function I) the sewing lamp lights up and program No. 1 is indicated in the expression window. The sewing machine is now ready to function. "0" = OFF "I" = ON Voltage Switch 220 - 240V / 120V The sewing machine is set to the voltage 220 - 240V. To change the - Pfaff expression 2026 | Owner's Manual - Page 16
compartments of the accessory tray. Note: Some fabrics have a lot of excess dye which can cause discoloration on other fabric but also on your sewing machine. This discoloring may be very difÀcult or impossible to remove. Fleece and denim fabric in especially red and blue often contain a lot of - Pfaff expression 2026 | Owner's Manual - Page 17
tray, make sure it is Áush with the free arm of the sewing machine. Preparing the machine for bobbin winding Place an empty bobbin so that the black pin of the bobbin winder snaps into the slot of the bobbin. The Pfaff logo is facing up. Push the bobbin to the right. Note: The - Pfaff expression 2026 | Owner's Manual - Page 18
pull it counterclockwise through the pre-tension device B. Pull the thread under the thread guide C (from back to front). Wind A the start of the thread around the bobbin several times in a clockwise direction. Turn on the machine Hold the end of the thread Àrmly and press the foot control. As - Pfaff expression 2026 | Owner's Manual - Page 19
section C Winding from the second spool holder Insert the second spool holder in the hole provided. Threading B Thread as shown on page 2:8. Turn on the machine Hold the end of the thread Àrmly and press the foot control. As soon as the bobbin is full, the winding action will be A stopped - Pfaff expression 2026 | Owner's Manual - Page 20
the latch of the bobbin case and pull the bobbin case out of the machine. Release the latch and take the empty bobbin out of the bobbin case threads evenly meet between the two fabric layers. The following is valid for general sewing: Bobbin thread is visible on the top side of the fabric: The needle - Pfaff expression 2026 | Owner's Manual - Page 21
Inserting the bobbin Insert the full bobbin (with the Pfaff logo facing towards the bobbin case) in the bobbin Inserting the bobbin case Lift latch E and push the bobbin case fully onto pin C of the sewing hook. Opening D of the bobbin case must face upwards. Check: Pull the bobbin thread sharply. - Pfaff expression 2026 | Owner's Manual - Page 22
foot lifter (20). Place the thread on the spool holder and Àt a spool cap of the right size. Using both hands, pull the thread into thread guide A from the front. Place the thread from right to left into the pretension device B. Now pass it through the left threading slot downwards. Pull the - Pfaff expression 2026 | Owner's Manual - Page 23
Technical section E F Integrated Needle threader In order to make threading the needle easier and quicker, use the PFAFF Integrated Needle threader. Lower the presser foot. Press the threader down with the handle. Threader hook F swivels through the needle eye. Place the thread over - Pfaff expression 2026 | Owner's Manual - Page 24
Technical section Presser foot lifter The presser foot is raised or lowered with the presser foot lifter (20). Drawing-up the bobbin thread Raise the presser foot. While holding the end of the needle thread, press the foot control so the needle moves down and up. Pull the needle thread to draw up - Pfaff expression 2026 | Owner's Manual - Page 25
the needle thread tension Set the required amount of the needle thread tension (18) using the markings on the tension dial. The normal setting for sewing is 4 - 5. For decorative sewing, darning and buttonhole - Pfaff expression 2026 | Owner's Manual - Page 26
needle It is possible to wind bobbins even when the machine is fully threaded. Raise the presser foot lifter (20) Important: The take-up lever must be at its highest position. C Guide the thread to the right under thread guide C. Wind the beginning of the thread several times around the bobbin in - Pfaff expression 2026 | Owner's Manual - Page 27
the needle screw (32) Àrmly. B Threading the twin needle: Replace the sewing needle with a twin needle. Insert the second spool holder and place one spool twisted together. Pull the threads right and left into the thread guide and thread the needles (for additional details, see "Embroidering with - Pfaff expression 2026 | Owner's Manual - Page 28
Technical section The IDT (Integrated Dual Feed) For sewing any fabric precisely PFAFF provides the ideal solution: the Integrated Dual Feed, IDT system. As on industrial machines, the IDT feeds the fabric from the top and bottom at the same time. The material is fed precisely. On light fabrics - Pfaff expression 2026 | Owner's Manual - Page 29
Technical section Engaging the IDT Important: For all work with the IDT, use presser feet with the center back cut-out. Raise the presser foot. Press the IDT (14) down until it engages. Disengaging the IDT Hold the IDT with two Àngers at the ribbed ankle. Press the IDT (14) down, then pull it away - Pfaff expression 2026 | Owner's Manual - Page 30
Technical section Lowering the feed dog For certain sewing work such as free-motion quilting or darning and when the machine must be cleaned, the feed dog has to be lowered. To do this, open the bobbin door (26) and press slide B fully to the right. - Pfaff expression 2026 | Owner's Manual - Page 31
Sewing functions - Pfaff expression 2026 | Owner's Manual - Page 32
button 2 then press button 3. The stitch number appears in the expression window. Altering stitches Adjust the length, width, balance, density or needle visible in the window. B C If you tap on your foot control while sewing, the needle can be raised or lowered. This does not change the pre-set - Pfaff expression 2026 | Owner's Manual - Page 33
Sewing functions Altering the stitch width The selected stitch can be sewn in various widths, e.g. zigzag stitch No. 3. Altering the needle position Straight stitch No. 1, stitch - Pfaff expression 2026 | Owner's Manual - Page 34
Sewing functions Altering the stitch length The stitch length of a stitch can be altered using +/button B. Altering the pattern length The pattern length of decorative stitches - Pfaff expression 2026 | Owner's Manual - Page 35
sewn shorter, and thus the overall length will be sewn shorter. In the plus range the stitches are sewn longer or stretched out. Reverse sewing If you press this button while sewing, the machine sews in reverse for as long as you keep the button pressed. If you press the reverse button while the - Pfaff expression 2026 | Owner's Manual - Page 36
the symbol indicating the pattern will be mirrored. "Lock" button "Pattern mirror" button: (30) You can safeguard your sewing machine against the unintentional selection of another sewing program or another pattern sequence by means of the "lock" button. Switching on the "lock" button: Press the - Pfaff expression 2026 | Owner's Manual - Page 37
position or the width of a stitch, the twin needle warning will appear in the window. This symbol indicates that a twin needle cannot be used to sew the stitch at the currently set width. Reduce the pattern width until the warning symbol disappears. The stitch may now be sewn with a twin needle - Pfaff expression 2026 | Owner's Manual - Page 38
Sewing functions Formation of the stitches The stitch formation varies. Some patterns are the right side of the stitch, regardless of any changes in width. Note: Do not use a twin needle to sew patterns that are formed from one side! Do not use a twin needle if this symbol in the window lights up - Pfaff expression 2026 | Owner's Manual - Page 39
Utility stitches - Pfaff expression 2026 | Owner's Manual - Page 40
table In the following table you will Ànd the settings we recommend for different sewing purposes. These tables give you further information required for sewing the selected stitches - whether you should sew with the Integrated Dual Feed (IDT) engaged or disengaged, needle thread tension setting and - Pfaff expression 2026 | Owner's Manual - Page 41
the needle position of the straight stitch to sew in a zipper or topstitch along the edge of a collar. The expression 2026 have 13 needle positions that can be adjusted with the -/+ button A. Sewing in zippers There are different ways to sew in zippers. Follow the directions included with your - Pfaff expression 2026 | Owner's Manual - Page 42
Stitch 10 - 6.0 - 3 0 Basting stitch With stitch 10 you can baste a garment before trying it on. When you press the foot control, the machine will sew one stitch at a time. Press the foot control again for each stitch. • Lower the feed dog and disengage the IDT. • Place the fabric under the - Pfaff expression 2026 | Owner's Manual - Page 43
Place the fabric under the presser foot so that the fold runs along edge guide B. • When the needle swings into the fold it should catch a small fabric. If the stitches are visible on the right side, adjust edge guide B by turning adjusting screw A. Elastic blind hem stitch The elastic blind hem - Pfaff expression 2026 | Owner's Manual - Page 44
decorative threads on denim. • Fold up a hem the correct width. • Topstitch the hem from the right side, or thread the top with decorative thread and sew. Tip: Lower needle thread tension for decorative threads. Stitch 2 - 3.0 3-5 0 Stretch triple straight stitch This stitch is used for - Pfaff expression 2026 | Owner's Manual - Page 45
0.2-1 3-5 0 Darning with the elastic stitch Use the elastic stitch to repair holes, tears and damaged areas. • If the area is only slightly damaged, sew over it with several rows of stitching until it is well covered. • For tears, frayed edges or small holes, place a piece of fabric, slightly - Pfaff expression 2026 | Owner's Manual - Page 46
and ensures perfect repair. • Lay a piece of fabric underneath the damaged fabric. It must be a little larger than the damaged area. • Now sew over the damaged area. • Cut the under layed piece of material back to the seam. Stitch 16 6.0 2.0 3-5 0/1 Honeycomb stitch The honeycomb stitch - Pfaff expression 2026 | Owner's Manual - Page 47
, your expression 2026 provides a selection of overlock stitches. These stitches join multiple layers of fabric and overcast them in one operation. These stitches can stretch and are more durable than standard stitches. Tip: Use blind stitch foot No. 3 when sewing overcast seams. This guides the - Pfaff expression 2026 | Owner's Manual - Page 48
Utility stitches Prog. 0 4.0 - 2-3 -/0 Sewing on buttons With Button sewing program 0 you can easily sew on two and four-hole buttons. • Remove the presser foot and also enters the right hole of the button. • Continue sewing on the button. The machine will complete the program for you. 4:10 - Pfaff expression 2026 | Owner's Manual - Page 49
thread tension is engaged for darning. • Lower the feed dog. • Draw up the bobbin thread and hold the threads when you start sewing. • Repair the damaged area/hole by guiding the fabric evenly forwards and backwards. The length of the seam is determined by the size of the hole. • When you have - Pfaff expression 2026 | Owner's Manual - Page 50
tension to 3. • Mark the Àrst gathering line on the right side of the fabric. Sew along this line. Leave about 4 - 5 inches (1013 cm) of thread at the beginning and end of the seam. • Sew 1 or 2 more rows of stitching, using the edge of the presser foot as a guide. • Gather the fabric by pulling the - Pfaff expression 2026 | Owner's Manual - Page 51
catches the fabric on the right and left sides. Tip: To make guiding the fabric easier, use the bridging guide (special accessory). It is available in 3 mm and 5 mm widths. The small post on the bottom of the guide is inserted in the small hole at the front of the needle - Pfaff expression 2026 | Owner's Manual - Page 52
/ 2 mm per fold). • Place the folded fabric edge under the hemmer and sew a few stitches to secure. • Turn the handwheel towards you until the needle is at the scroll of the hemmer. • Lower the presser foot and while sewing, guide the fabric edge evenly into the hemmer. When rollhemming, make sure - Pfaff expression 2026 | Owner's Manual - Page 53
Add a colored pearl cotton thread on the folded edge as you sew the shell tuck. This creates a pretty contrast and strengthens the hem. . • Finish the raw edge and press the seam allowance to the left. • While sewing, make sure the fabric runs under the presser foot at half of the foot width, and - Pfaff expression 2026 | Owner's Manual - Page 54
- Pfaff expression 2026 | Owner's Manual - Page 55
Buttonholes - Pfaff expression 2026 | Owner's Manual - Page 56
as velvet, plush, knitted fabrics and heavy knits. Your expression offers you three ways of sewing a buttonhole: • fully automatically • semi-automatically • manual Inserting the sensormatic buttonhole guide: Push the metal part of the buttonhole guide into the slot (between the two arrows) on the - Pfaff expression 2026 | Owner's Manual - Page 57
or back bartack where you want it. The word "man" appears in the expression window, after you have touched reverse. This indicates a manual Ànish of the buttonhole is desired. Before the left side of the buttonhole ends, the machine will slow down. When the left side of the buttonhole is the same - Pfaff expression 2026 | Owner's Manual - Page 58
Buttonholes The second bartack will be sewn and complete the buttonhole. The word "auto" appears in the window. All remaining buttonholes will now be sewn automatically. Note: If the length or stitch density of a programmed buttonhole is changed, the programming is cancelled. Reprogramming with a - Pfaff expression 2026 | Owner's Manual - Page 59
has been programmed. Press the "reverse sewing" button one time after you have stitched the Àrst bartack. The word "man" appears in the window. This indicates a manual Ànish of the buttonhole is desired. Before the left side of the buttonhole ends, the machine will slow down. When the left side - Pfaff expression 2026 | Owner's Manual - Page 60
cotton or a regular gimp thread approximately the same color as the sewing thread to stitch over. Place the center of a length of guides on the clamp at the back of the presser foot. Guide the gimp thread along the foot at the side. Sew the right-hand seam of the buttonhole. After the machine sews - Pfaff expression 2026 | Owner's Manual - Page 61
buttonholes are particularly stable and durable if a gimp thread is inserted while sewing (see "Keyhole buttonhole with gimp thread"). • Linen buttonholes are particularly dense the button diameter. It is important to always sew a test buttonhole on the same fabric/stabilizer as your project 5:7 - Pfaff expression 2026 | Owner's Manual - Page 62
- Pfaff expression 2026 | Owner's Manual - Page 63
Decorative sewing/ Specialty techniques - Pfaff expression 2026 | Owner's Manual - Page 64
/Specialty techniques General notes on decorative sewing To enhance your own home textiles or garments your expression offers you a wide variety of fancy and decorative stitches. Create a greater variety of embellishments by combining different patterns, colors and sizes. Use specialty decorative - Pfaff expression 2026 | Owner's Manual - Page 65
and come in many colors and weights. Place stabilizer under fabric. Mark the center of your fabric with a fabric marking pen/ pencil. Sew stitch 43; stitch width 6 mm along your line. Next press the "Pattern mirror button" (30). Position your fabric even with the top of the Àrst row of stitching - Pfaff expression 2026 | Owner's Manual - Page 66
hoop and use the zigzag stitch, in varying widths, to follow your traced lines. Do not forget to use the darning position. Knot the threads on the stabilizers. The remaining water-soluble stabilizer will dissolve in water. Tip: Sewing at a medium to fast speed will allow you to move the fabric more - Pfaff expression 2026 | Owner's Manual - Page 67
Decorative sewing/Specialty techniques Free motion embroidery These striking embroidery designs can easily be sewn with your expression. Set your expression as for free motion monograms. Draw the outline of the embroideries on fabric where you want to stitch them. Follow the instructions and tips - Pfaff expression 2026 | Owner's Manual - Page 68
Decorative sewing/Specialty techniques Tapering with the satin-stitch zigzag With your expression you also have the option of increasing or decreasing the width of the zigzag stitch in 0.5 mm increments. This technique of adjusting the width of a - Pfaff expression 2026 | Owner's Manual - Page 69
Decorative sewing/Specialty techniques Manual change/ Regular pattern • Place stabilizer under fabric. • Set used when a center (B) needle position motif is desired. • Set stitch length to 0.2 - 0.3 mm. Begin sewing. • With -/+ button A increase the width from 0 to 6 mm and reduce it again to 0 mm. - Pfaff expression 2026 | Owner's Manual - Page 70
right-hand position. Turn the fabric 90° and sew one stitch. • Increase the width by 0.5 mm to 1 mm. Sew one stitch. • Increase the width by 0.5 mm again and sew one stitch. Continue until the starting width is reached. • Continue embroidering a straight line at the 6.0 mm width. If the corner is - Pfaff expression 2026 | Owner's Manual - Page 71
Decorative sewing/Specialty techniques Appliqué designs Appliqués are easily created and produce a beautiful effect. By using a variety of materials and patterns you can obtain many different effects. - Pfaff expression 2026 | Owner's Manual - Page 72
quilting the three layers are joined together with small hand stitches to create beautiful family heirlooms. The sewing machine makes accomplishing this technique much easier and faster! The expression 2026 have quilt stitch No. 11, which enables you to quickly and easily achieve a hand-quilted look - Pfaff expression 2026 | Owner's Manual - Page 73
top, making sure to include a seam allowance of 1/4 inch (6 mm). • Sew the pieces together as required by the block chosen. These squares will then be the quilt onto the batting and the bottom quilt layer. • Use your expression to sew all layers together. Work from the center of the quilt out. Use - Pfaff expression 2026 | Owner's Manual - Page 74
linen, towels or garments. Tips for cross-stitching: • Sew slowly. • Use foot No. 2. • Place stabilizer under the fabric. • You can embroider on Aida cloth as used for hand cross-stitching. The length and width of the cross-stitches of your expression can be altered depending on the count/size of - Pfaff expression 2026 | Owner's Manual - Page 75
Decorative sewing/Specialty techniques Eyelet embroidery Eyelet embroidery enhances your linens and blouses. Using an eyelet plate (special accessory) and various utility and decorative stitches beautiful embroidery - Pfaff expression 2026 | Owner's Manual - Page 76
, are very suitable. With the hemstitches on your expression, various techniques can be applied. Traditional hemstitching • Use stitches No. 22 and 23 to create lovely hemstitched holes. • Sew the appropriate program on a piece of test fabric. For pulled thread hemstitching: • Count the threads - Pfaff expression 2026 | Owner's Manual - Page 77
Maintenance - Pfaff expression 2026 | Owner's Manual - Page 78
off the main switch. • Remove the needle plate and lower the feed dog. Clean the feed dog and hook area with the brush. • Clean the sewing machine every 10 - 15 hours of operation. Cleaning the display Wipe the display with a soft, lint-free dry cloth. DO NOT use aggressive cleansers or solvents - Pfaff expression 2026 | Owner's Manual - Page 79
sewing machine near the needle threader. Bulb removal Push the bulb remover, as shown in the Àgure, up as far as it will go. Now turn the bulb half a rotation counterclockwise and remove the bulb. Insertion of the bulb Insert the bulb in the lamp changer. Guide purchased from your PFAFF dealer. 7:3 - Pfaff expression 2026 | Owner's Manual - Page 80
Sewing problems and their solutions Problem/Cause The machine skips stitches The needle is not properly inserted. Wrong needle is in use. Needle is bent or blunt. The machine different type of needle. Insert different type of needle. Only guide the fabric lightly. When you insert the bobbin case, - Pfaff expression 2026 | Owner's Manual - Page 81
Maintenance Problem/Cause The machine does not feed or feeds irregularly Sewing lint has collected between the feed dog teeth rows. Feed dog is lowered. Slide B is at the right (see page 2:20) The needle plate is not lying Áat. The machine is running with difÀculty There are thread remnants in the - Pfaff expression 2026 | Owner's Manual - Page 82
Bobbin winding through the needle Bridging Buttonhole, fully-automatic Buttonholes Buttonholes with gimp thread Buttonhole tips Buttons, sewing on 3:5 4:2 4:3 2:10-11 2:11 2:14 2:7-9 2:16 4:13 5:3 5:2-8 5:6 5:7 4:10 C Carrying case 2:4 Cleaning 7:2 Combined borders 6:3 Combined borders with - Pfaff expression 2026 | Owner's Manual - Page 83
O Overlock stitches P Parts of the sewing machine Patchwork and quilting Pattern length/pattern width, changing switch Z Zippers, sewing in 1:6-7 2:5 4:3 R Removable accessory tray Repairing tears Reverse sewing Roll hemming S Sewing problems and their solutions Sewing programs, selecting Shell - Pfaff expression 2026 | Owner's Manual - Page 84
Stitching width Stitching length Presser foot lift Max. presser foot height Needle system Package contents Sewing machine Carrying case Foot control Lead cord Accessories Instruction manual 408 x 290 x 187 mm 8.3 kg 220 - 240 V / 120 V 75 W 12 V / max. 5 W max. 950 stitches/min min. 80 stitches - Pfaff expression 2026 | Owner's Manual - Page 85
We reserve the right to change the machine equipment and the assortment of accessories without prior notice, or make modiÀcations to the performance or design. Such modiÀcations, however, will always be - Pfaff expression 2026 | Owner's Manual - Page 86
VSM Group AB • SE-561 84 Huskvarna • SWEDEN www.pfaff.com 412 93 26 - 26B • English • Inhouse • © 2005-2007 VSM Group AB • Printed in Sweden on environmental-friendly paper
-
 1
1 -
 2
2 -
 3
3 -
 4
4 -
 5
5 -
 6
6 -
 7
7 -
8
-
9
-
10
-
11
-
12
-
13
-
14
-
15
-
16
-
17
-
18
-
19
-
20
-
21
-
22
-
23
-
24
-
25
-
26
-
27
-
28
-
29
-
30
-
31
-
32
-
33
-
34
-
35
-
36
-
37
-
38
-
39
-
40
-
41
-
42
-
43
-
44
-
45
-
46
-
47
-
48
-
49
-
50
-
51
-
52
-
53
-
54
-
55
-
56
-
57
-
58
-
59
-
60
-
61
-
62
-
63
-
64
-
65
-
66
-
67
-
68
-
69
-
70
-
71
-
72
-
73
-
74
-
75
-
76
-
77
-
78
-
79
-
80
-
81
-
82
-
83
-
84
-
85
-
86
 |
 |
expression
2026
Owner’s manual