Pfaff hobby 350p Owner's Manual
Pfaff hobby 350p Manual
 |
View all Pfaff hobby 350p manuals
Add to My Manuals
Save this manual to your list of manuals |
Pfaff hobby 350p manual content summary:
- Pfaff hobby 350p | Owner's Manual - Page 1
Owner's manual Manuel d'utilisation Gebrauchsanleitung Manuale d'istruzioni Handleiding hobby™ 350 p punching machine - Pfaff hobby 350p | Owner's Manual - Page 2
- Pfaff hobby 350p | Owner's Manual - Page 3
English 2-11 French 12-21 German 22-31 Italian 32-41 Dutch 42-51 - Pfaff hobby 350p | Owner's Manual - Page 4
area, such as threading needle, changing needle, threading bobbin, or changing presser foot, etc. • Always unplug sewing machine from the electrical outlet when removing covers, lubricating, or when making any other user servicing adjustments mentioned in the instruction manual. • Never drop or - Pfaff hobby 350p | Owner's Manual - Page 5
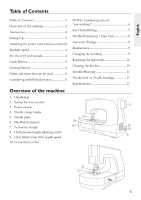
Presser 5 Getting Started 6 Fabric and trims that can be used 6 Laundering embellished projects 6 Overview of the machine 1. Handwheel 2. Socket for foot control 3. Power switch 4. Needle clamp holder 5. Needle plate 6. Flat Bed Extension 7. Accessory storage 8. Cloth presser height adjusting - Pfaff hobby 350p | Owner's Manual - Page 6
Needles 4. Cleaning brush 5. Machine cover 6. Instruction book Setting Up Attaching the power cord and foot control Plug the power cord into machine damage to the foot control or motor. For the USA and Canada This sewing machine has a polarized plug (one blade wider than the other). To reduce the - Pfaff hobby 350p | Owner's Manual - Page 7
English Cloth Presser The cloth presser is to prevent cloth/fabric/ materials from lifting during the felting process. 1. Place the cloth/fabric/materials on the needle plate and under the cloth presser. 2. Loosen the cloth presser height adjusting screw to adjust the height of the cloth presser. - Pfaff hobby 350p | Owner's Manual - Page 8
your imagination soar to create beautiful felted embellishment on your garments, arts and crafts, home decorating, quilting, sewing, scrap booking and much more. Fabric and trims that can be used Just about any fabric can be felted with the needle felting machine, however, some fabrics tend to have - Pfaff hobby 350p | Owner's Manual - Page 9
can mesh the layers together. When you have finished embellishing the needle stop position will automatically be up and out of the project. Because the needles always stop in the highest up position, your projects are very easy to place into the felting area and very easy to remove. You will never - Pfaff hobby 350p | Owner's Manual - Page 10
to the left and the machine will convert to a free arm. This will allow you to embellish sleeves, pant legs, and small areas that are sewn in the round. This will also give you access to the free arm door to clean out the lint that has accumulated from felting - Pfaff hobby 350p | Owner's Manual - Page 11
English Maintenance Changing the needle(s) Use #S1037 needles for the needle felting machine. Do not use any other type of needles. Note: #S1037 needle is a very special needle and is exclusive for the needle felting machine. Purchase these needles at the same authorized dealer where you purchased - Pfaff hobby 350p | Owner's Manual - Page 12
clamp screw clockwise with 1.5mm Allen wrench. Note: Replace the clear fabric cover with needle guard and presser height adjusting screw before continuing to use the machine. Replacing the light bulb For safety reasons, unplug main power cord prior to replacing light bulb. 1. Make sure that the - Pfaff hobby 350p | Owner's Manual - Page 13
? 4. Does the lint box area need to be cleaned? For problems other than bent needles or needle breakage, please contact your retailer. Specifications Needle: #S1037 Number of needles: 5 Needle Clamp: Round type Feeding: Manual Light bulb: MAX 15 W Measurement: 435mm x 189mm x 292mm Weight: 5.6 kg - Pfaff hobby 350p | Owner's Manual - Page 14
de la canette, changement de pied presseur, etc. • Débranchez toujours la machine à coudre pour retirer les couvercles, pour le graissage, ou pour tout autre réglage de service par l'utilisateur, mentionné dans le manuel d'instructions. • Ne faites jamais tomber ou ne glissez aucun objet dans les - Pfaff hobby 350p | Owner's Manual - Page 15
à peluches ... 20 Dépannage 21 L'aiguille est pliée ou se casse 21 Caractéristiques techniques 21 Vue d'ensemble de la machine 1 Volant à main 2. Prise de la pédale de commande 3. Interrupteur d'alimentation 4. Pince-aiguille 5. Plaque à aiguille 6. Extension à plateau étendu 7. Rangement des - Pfaff hobby 350p | Owner's Manual - Page 16
sur la pédale de commande afin d'éviter tout dommage de la pédale de commande ou du moteur. Pour les Etats Unis et le Canada Cette machine à coudre est équipée d'une prise polarisée (une fiche est plus large que l'autre). Afin de réduire le risque d'électrocution, cette prise est destinée à être adapt - Pfaff hobby 350p | Owner's Manual - Page 17
French Pied-de-biche Le pied-de-biche sert à empêcher le vêtement / tissu / matériau de se soulever pendant le processus de feutrage. 1. Placez le vêtement / tissu / matériau sur la plaque à aiguille et sous le pied-debiche. 2. Desserrez la vis de réglage en hauteur du pied-de-biche pour ajuster la - Pfaff hobby 350p | Owner's Manual - Page 18
préserver l'ouvrage terminé. NOTE : Règles de lavage avec prélavage : Il est inutile de prélaver tous les tissus avant de coudre. Avec la machine à feutrer à aiguilles, l'ouvrage terminé doit « rétrécir » pour que les fibres feutrées restent ensemble. En gardant ceci en tête, assurez-vous de réaliser - Pfaff hobby 350p | Owner's Manual - Page 19
French Commencer à coudre Étalez le tissu de l'ouvrage avec le matériau qui sera feutré pour créer la décoration. Veillez à ce que le morceau le plus petit à feutrer soit placé du bon côté de l'ouvrage (endroit ou envers). Le tissu de décoration peut être placé sur l'endroit ou sur l'envers de l' - Pfaff hobby 350p | Owner's Manual - Page 20
Extension à plateau étendu / bras libre Tirez l'extension à plateau étendu en la glissant sur la gauche et la machine se transforme en bras libre. Cela vous permet de décorer des manches, des jambes de pantalon et des petites zones à coudre en rond. Vous pouvez é - Pfaff hobby 350p | Owner's Manual - Page 21
la vis de réglage en hauteur du pied-de-biche et retirez avec précaution le protège-tissu transparent avec protègeaiguille de la machine. 3. Desserrez la vis de fixation du pinceaiguille à l'avant en la faisant tourner dans le sens inverse des aiguilles d'une montre à l'aide de la clé Allen - Pfaff hobby 350p | Owner's Manual - Page 22
avec protège-aiguille et la vis de réglage en hauteur du pied-de-biche avant de continuer à utiliser la machine. Rainure (à l'intérieur du support) Remplacement de l'ampoule Pour des raisons de sécurité, débranchez le cordon d'alimentation avant de remplacer l'ampoule. 1. Assurez-vous que - Pfaff hobby 350p | Owner's Manual - Page 23
sans avis préalable, la fabrication, l'aspect extérieur, l'équipement, ainsi que les accessoires spéciaux de la machine tant que ce changement n'influence pas négativement les fonctions de la machine. Pièces et accessoires non conformes La garantie ne couvre pas les pannes et dommages survenus suite - Pfaff hobby 350p | Owner's Manual - Page 24
SICHERHEITSHINWEISE Diese Haushaltsnähmaschine wurde im Einklang mit IEC/EN 60335-2-28 entwickelt und konstruiert. Netzanschluss Die Nähmaschine muss an eine Netzspannung angeschlossen werden, die auf dem Elektrokennschild angegeben ist. Sicherheitshinweise • Diese Nähmaschine ist nicht für die - Pfaff hobby 350p | Owner's Manual - Page 25
Inhaltsverzeichnis Übersicht über die Maschine 23 Zubehör 24 Vorbereitung 24 Fußanlasser anschließen 24 Maschinengeschwindigkeit 24 Druckfu 25 Erste Schritte 26 Geeignete Stoffe und Applikationen......... 26 Waschen gefilzter Projekte 26 ANMERKUNG: Regeln für die „Vorwäsche 26 Filzarbeiten - Pfaff hobby 350p | Owner's Manual - Page 26
Zubehör 1. Schraubendreher 2. 1,5 mm Imbusschlüssel 3. Nadeln 4. Reinigungsbürste 5. Maschinenabdeckung 6. Handbuch Vorbereitung Fußanlasser anschließen Das Netzkabel des Fußanlassers in die Buchse an der Maschine und dann in die Steckdose stecken. Die Maschine immer ausgeschalten und den Stecker - Pfaff hobby 350p | Owner's Manual - Page 27
German Druckfuß Der Druckfuß verhindert, dass der Stoff und Applikationen während des Filzprozesses angehoben werden. 1. Den Stoff und Applikationen auf die Stichplatte und unter den Druckfuß legen. 2. Die Schraube zur Einstellung der Druckfußhöhe lösen und die Höhe einstellen. 3. Die - Pfaff hobby 350p | Owner's Manual - Page 28
Erste Schritte Lassen Sie mit dieser Nadelfilzmaschine Ihrer Kreativität freien Lauf! Jetzt können Sie Ihre Projekte noch einfallsreicher gestalten. Ihrer Fantasie sind keine Grenzen gesetzt - kreieren Sie gefilzte Verzierungen auf Ihren Kleidungsstücken, auf Handarbeiten, Heimdekorationen, Quilt- und - Pfaff hobby 350p | Owner's Manual - Page 29
German Filzarbeiten Den Stoff für das Projekt und die Applikationen aufeinanderlegen, die zur Verzierung zusammengefilzt werden sollen. Sicherstellen, dass sich das kleinere Stück, das aufgefilzt werden soll, auf der richtigen Seite des Projekts befindet (rechte oder linke Stoffseite). Die Applikation - Pfaff hobby 350p | Owner's Manual - Page 30
Arbeitsflächenerweiterung / Freiarm Die Arbeitsflächenerweiterung kann durch Schieben nach links abgenommen werden. Die Maschine hat dann einen Freiarm. Es können also auch Ärmel, Hosenbeine und kleine Bereiche auf Schlaufen verziert werden. Sie erhalten auf diese Weise auch Zugang zur Freiarmöffnung, - Pfaff hobby 350p | Owner's Manual - Page 31
Pflege Nadel(n) auswechseln Für die Nadelfilzmaschine Nadeln #S1037 verwenden. Keine anderen Nadeltypen verwenden. Hinweis: #S1037 ist eine hochspezialisierte Nadel, die ausschließlich für die Nadelfilzmaschine gedacht ist. Kaufen Sie diese Nadeln bei dem gleichen Fachhändler, von dem Sie Ihre Maschine - Pfaff hobby 350p | Owner's Manual - Page 32
6. Beim Wiedereinsetzen der Nadelklemme darauf achten, dass sich die Nadelstange in der höchsten Position befindet. Die Nadelklemme in die Nadelstange einstecken und leicht drehen und nach oben drücken, bis der Stift in die Nadelstange einrastet. Die Nadelklemmschraube mit dem 1,5 mm Imbusschlüssel - Pfaff hobby 350p | Owner's Manual - Page 33
Flusen an den Kanten der Nadeln, des Druckfußes oder in den Löchern der Stichplatte? 4. Muss der Flusenbehälter geleert werden? Sollten Sie andere Probleme (außer verbogenen und brechenden Nadeln) haben, wenden Sie sich bitte an Ihren Fachhändler. Technische Daten Nadel: #S1037 Anzahl der Nadeln - Pfaff hobby 350p | Owner's Manual - Page 34
prossimità dell'ago della macchina. • Utilizzare la macchina solo per l'uso descritto nel presente manuale. Utilizzare solo gli accessori raccomandati dal produttore, come descritto nel manuale. • Scollegare sempre l'apparecchiatura prima di sostituire la lampadina. Sostituire la lampadina con una - Pfaff hobby 350p | Owner's Manual - Page 35
Sommario Vista d'insieme della macchina 33 Accessori 34 Impostazione 34 Velocità della macchina 34 Piedino per stoffa 35 Per iniziare 36 Tessuti e rifiniture utilizzabili 36 Lavaggio dei lavori decorati 36 NOTA: Regole di "prelavaggio 36 Iniziare a decorare 37 Piano di lavoro estensibile / - Pfaff hobby 350p | Owner's Manual - Page 36
Accessori 1. Cacciavite 2. Chiave a testa esagonale da 1,5 mm 3. Aghi 4. Pennellino 5. Copertina antipolvere 6. Libretto di istruzioni Impostazione Collegamento del pedale Inserire il cavo di alimentazione del pedale nella presa sulla macchina e nella presa a muro. Verificare sempre che l' - Pfaff hobby 350p | Owner's Manual - Page 37
Piedino per stoffa Il piedino per stoffa serve per evitare che stoffa, tessuto o altro materiale si sollevino durante il processo di feltratura. 1. Posizionare la stoffa, il tessuto o il materiale sulla placca ago e sotto il piedino per stoffa. 2. Allentare la vite di regolazione dell'altezza del - Pfaff hobby 350p | Owner's Manual - Page 38
Per iniziare Date libero sfogo alla vostra creatività grazie a questa macchina per feltratura ad aghi! Adesso potrete rendere i vostri lavori ancora più creativi. Liberate la fantasia per creare bellissime decorazioni feltrate su indumenti, creazioni, decorazioni per la casa, trapunte, lavori di - Pfaff hobby 350p | Owner's Manual - Page 39
Iniziare a decorare Disporre a strati il tessuto del lavoro e il materiale che verrà feltrato per creare la decorazione. Verificare che il pezzo più piccolo da feltrare sia posizionato sul lato corretto del lavoro (dritto o rovescio). Il tessuto della decorazione può essere posizionato sul dritto o - Pfaff hobby 350p | Owner's Manual - Page 40
Piano di lavoro estensibile / Braccio libero Rimuovere il piano di lavoro estensibile facendolo scorrere verso sinistra per convertirlo in braccio libero, che consentirà di decorare maniche, gambe di pantaloni e aree di piccole dimensioni che necessitano di cuciture lungo la circonferenza e darà - Pfaff hobby 350p | Owner's Manual - Page 41
Manutenzione Sostituzione dell'ago o degli aghi Con questa macchina per feltratura ad aghi, utilizzare aghi #S1037. Non utilizzare altri tipi di aghi. Nota: L'ago #S1037 è un ago speciale, prodotto appositamente per la macchina per feltratura ad aghi. Acquistare gli aghi presso lo stesso rivenditore - Pfaff hobby 350p | Owner's Manual - Page 42
6. Quando si sostituisce il blocca ago, verificare che la barra dell'ago si trovi nella posizione di sollevamento massimo. Inserire il blocca ago nella barra dell'ago, ruotare e premere leggermente verso l'alto finché il perno non si inserisce nella barra dell'ago. Stringere la vite del blocca ago - Pfaff hobby 350p | Owner's Manual - Page 43
diversi dal piegamento o dalla rottura degli aghi, rivolgersi al proprio rivenditore. Dati tecnici Ago: #S1037 Numero di aghi: 5 Blocca ago: rotondo Alimentazione: manuale Lampadina: MAX 15 W Dimensioni: 435 mm x 189 mm x 292 mm Peso: 5,6 kg La società si riserva il diritto di apportare alla - Pfaff hobby 350p | Owner's Manual - Page 44
. • Een naaimachine mag nooit zonder toezicht met de stekker in het stopcontact blijven staan. • Verwijder direct na gebruik en voordat u de machine schoonmaakt de stekker van de naaimachine uit het stopcontact. • Schakel de naaimachine uit ("0") wanneer u iets wilt veranderen in de omgeving van de - Pfaff hobby 350p | Owner's Manual - Page 45
49 De gloeilamp vervangen 50 Stofbox reinigen 50 Het verhelpen van storingen 51 Specificaties 51 Overzicht van de machine 1. Handwiel 2. Aansluiting voor voetpedaal 3. Aan/Uit knop 4. Naaldklemhouder 5. Steekplaat 6. Aanschuiftafel 7. Doos met toebehoren 8. Afstelschroef voor kledingvoet - Pfaff hobby 350p | Owner's Manual - Page 46
en het andere uiteinde in het stopcontact. Controleer of de schakelaar op OFF staat en neem dan pas de stekker uit het stopcontact wanneer de machine niet wordt gebruikt, of wanneer u bijv. de naald of gloeilamp wilt vervangen. Let op: Controleer of het voetpedaal van het type "4C-337G" of "C-9000 - Pfaff hobby 350p | Owner's Manual - Page 47
Kledingvoet De kledingvoet voorkomt dat kleding/ stof/materiaal omhoog komt tijdens het verviltproces. 1. Leg het kledingstuk/stof/materiaal op de steekplaat en onder de kledingvoet. 2. Draai de afstelschroef voor de kledingvoet los om de juiste hoogte van de voet in te stellen. 3. Breng de - Pfaff hobby 350p | Owner's Manual - Page 48
Aan de slag Laat uw creativiteit de vrije loop met verviltmachine! U kunt uw projecten er nog creatiever uit laten zien. Laat uw fantasie de vrije loop en maak de mooiste versiersels op uw kleding, kunstwerken, woondecoraties, quilts, naaiwerk, plakboeken en nog veel meer. Geschikte stoffen en - Pfaff hobby 350p | Owner's Manual - Page 49
Beginnen met versieren Leg de stof van het project op het materiaal dat moet worden vervilt voor een creatieve versiering. Controleer of het kleinste deel dat moet worden vervilt aan de juiste zijde van het project zit (voor of achterkant). De versierselstof kan zowel aan de goede als aan de - Pfaff hobby 350p | Owner's Manual - Page 50
Verwijder de aanschuiftafel door deze naar links te schuiven, dan heeft de machine alleen nog een vrije arm. Zo kunt u gemakkelijker versiersels rondom door dit te openen kunt u de viltresten verwijderen uit de machine. Doos met toebehoren Open de doos met toebehoren door de hendel naar voren te - Pfaff hobby 350p | Owner's Manual - Page 51
#S1037 naald is een heel speciale naald en is exclusief voor de verviltmachine ontwikkeld. Koop deze naalden bij dezelfde leverancier als waar u de machine heeft aangeschaft. Trek altijd eerst de stekker uit het stopcontact voordat u de naald(en) vervangt. 1. Draai het handwiel tot de naaldstang in - Pfaff hobby 350p | Owner's Manual - Page 52
met de klok mee draaien). Let op: Breng de transparante stofkap met naaldgeleider en de stelschroef voor de naaivoethoogte weer aan voordat u de machine weer in gebruik neemt. Gleuf (binnen in de houder) De gloeilamp vervangen Trek uit veiligheidsoogpunt altijd eerst de stekker uit het stopcontact - Pfaff hobby 350p | Owner's Manual - Page 53
Aanvoer: Handmatig Gloeilamp: MAX 15 W Afmetingen: 435 mm x 189 mm x 292 mm Gewicht: 5,6 kg Wij behouden ons het recht voor de machine-uitrusting en het assortiment toebehoren zonder voorafgaande kennisgeving te wijzigen of wijzigingen aan te brengen in de prestaties of het ontwerp. Dergelijke - Pfaff hobby 350p | Owner's Manual - Page 54
52 - Pfaff hobby 350p | Owner's Manual - Page 55
Intellectual property PFAFF and HOBBY are trademarks of KSIN Luxembourg II, S.ar.l. All trademarks are used under license by VSM Group AB. - Pfaff hobby 350p | Owner's Manual - Page 56
VSM Group AB • SE-561 84 Huskvarna, Sverige www.pfaff.com 413 15 96-91D • Inhouse production • © 2009 KSIN Luxembourg II, S.ar.l. • All statements valid at time of printing • Printed in Taiwan on environmentally-friendly paper
-
 1
1 -
 2
2 -
 3
3 -
 4
4 -
 5
5 -
 6
6 -
 7
7 -
8
-
9
-
10
-
11
-
12
-
13
-
14
-
15
-
16
-
17
-
18
-
19
-
20
-
21
-
22
-
23
-
24
-
25
-
26
-
27
-
28
-
29
-
30
-
31
-
32
-
33
-
34
-
35
-
36
-
37
-
38
-
39
-
40
-
41
-
42
-
43
-
44
-
45
-
46
-
47
-
48
-
49
-
50
-
51
-
52
-
53
-
54
-
55
-
56
 |
 |

Owner’s manual
Manuel d’utilisation
Gebrauchsanleitung
Manuale d’istruzioni
Handleiding
hobby
™
350 p
punching machine