Pfaff hobby serger Owner's Manual
Pfaff hobby serger Manual
 |
View all Pfaff hobby serger manuals
Add to My Manuals
Save this manual to your list of manuals |
Pfaff hobby serger manual content summary:
- Pfaff hobby serger | Owner's Manual - Page 1
41P PFAFF HOBBY SERGER - Pfaff hobby serger | Owner's Manual - Page 2
ow po - Pfaff hobby serger | Owner's Manual - Page 3
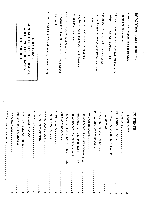
bend needle and cause needle breakage or damage to machine. INSTRUCTION SYMBOLS 3 CONNECTING AND RUNNING MACHINE 3 TRIAL SEWING 3 ADJUSTING THREAD TENSION 4 PFAFF DEALER DECORATIVE FLATLOCK 12 WHERE YOU PURCHASED THIS PRODUCT. JOIN TWO PIECES OF FABRIC 12 CARING FOR YOUR MACHINE - Pfaff hobby serger | Owner's Manual - Page 4
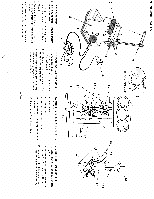
PRINCIPAL PARTS 77 3 5- 4 Remove Front Cover 6 1/16 12 17 I tCT) . 14 10 18 N \ 12 13 - 17 1. Thread guide holder .II 7 7-1 7. Foot switch (#287597) runs machine. 2. Thread guide helps to ensure a smooth flow of thread. 3. Spool pin and cap holds top thread supply and prevents - Pfaff hobby serger | Owner's Manual - Page 5
out of carton. 2 x Threaders #287824 2 x Needles (1 in machine) #2020-014 3 x Demo thread spool (on machine) INSTRUCTION SYMBOLS To simplify understanding, the following symbols are used throughout operator's manual. • Swing thread guide holder up to op erating position until two bar sym bols - Pfaff hobby serger | Owner's Manual - Page 6
on low speed. Internal threading light turns ott when switch is plugged into machine. • Press foot switch to continue sewing fabric ( under presser foot). • Lightly guide fabric while sewing. Note: Seam guide is preset for proocr width and sewing angle. MLJJUIIrIU IMHLAU ItNSIUN • Thread tension - Pfaff hobby serger | Owner's Manual - Page 7
it is necessary to rethread machine. (refer to Page 6) • Unplug foot switch. • Swing thread guide holder up to operating position. • Remove front cover by lifting gently at tab on right side. • Connect AC adaptor (only) to turn on light for threading. • For best sewing performance use proper spool - Pfaff hobby serger | Owner's Manual - Page 8
lower looper. • Insert threader into left side hole (A-4). • Hold tweezers in right hand and guide thread through threader. • Pull threader towards you threading looper from back to front. • Use tweezers to guide thread. Place thread between two loopers. Dj Use tweezers to place thread into two - Pfaff hobby serger | Owner's Manual - Page 9
clamp body • Turn handwheel toward Lower needle clamp body to lowest position. This is optimum position for threading guide (B-3). -7- Di /T • Guide thread down through rear guide (B-3). needle clamp body Place needle clamp body to highest position. This is optimum position for threading upper - Pfaff hobby serger | Owner's Manual - Page 10
THREAD CHAIN 9 (,c/ • Lower needle clamp body to lowest positon. • Use tweezers to place thread into two discs. • Pull thread down through guide (0-3), then up and down through it again. LI • Collect threaded threads and place under presser foot. // FORMING THREAD CHAIN • Hold thread ends - Pfaff hobby serger | Owner's Manual - Page 11
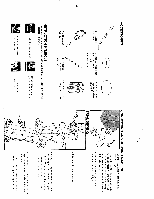
needle and thread chains under stitches. • Place fabric under presser foot touching needle and against seam guide. TURNING SQUARE CORNER • Select High or Low sewing speed. • Stan stitching. \ • Lightly guide fabric. • When seam is complete continue sewing, forming thread tail for next sewing - Pfaff hobby serger | Owner's Manual - Page 12
IH (I nside Corner - c \ .Raise presser foot. down on lever) • Pivot fabric. • Insert needle at edge. • Continue stitching. • Stitch, stopping on point B. • Leave needle in fabric. RESTITCH PART OF SEAM 4 N. '% • Place fabric under presser foot. • Adjust fabric to overlap previous • Lower - Pfaff hobby serger | Owner's Manual - Page 13
just barely catches the fold. wrong skie I \M Fold fabric in half with wrong side facing up. LkI • Place fabric under presser foot and align seam guide. • Sew one or more lines of decorative flatlock stitches. • Turn fabric to right side and press. -11 • Pull fabric open and press stitching flat - Pfaff hobby serger | Owner's Manual - Page 14
side of fabric together. • Start sewing fabric. cz Important: For best results. use only Needle style 2020 size 14. • Insert flat ) • Do not pull the fabric by hand. Use hand only to guide the fabric. • Tighten screw firmly. • Thread machine correctly. (page 6,7 & 8) • Replace needle. (page 12)
-
 1
1 -
 2
2 -
 3
3 -
 4
4 -
 5
5 -
 6
6 -
 7
7 -
8
-
9
-
10
-
11
-
12
-
13
-
14
 |
 |

PFAFF
41P
HOBBY
SERGER