Pfaff hobbylock 797 Owner's Manual
Pfaff hobbylock 797 Manual
 |
View all Pfaff hobbylock 797 manuals
Add to My Manuals
Save this manual to your list of manuals |
Pfaff hobbylock 797 manual content summary:
- Pfaff hobbylock 797 | Owner's Manual - Page 1
IflUW UO!TDflJTSUI - Pfaff hobbylock 797 | Owner's Manual - Page 2
on safety A) Owing to the up and down movement of the needle, the user must take sufficient care to avoid injury and observe the sewing area continuously while sewing. B) When leaving the machine, changing parts or accessories, the machine must be disconnected from the power source. C) The maximum - Pfaff hobbylock 797 | Owner's Manual - Page 3
seam Inserting the workpiece guide plate Adjusting the seam width Changing the sewing foot Sewing rolled hems Changing the needles Changing the lower knife Changing the upper knife Changing the light bulb Cleaning the thread tensions Oiling the machine Sewing problems and their removal Accessories - Pfaff hobbylock 797 | Owner's Manual - Page 4
- Pfaff hobbylock 797 | Owner's Manual - Page 5
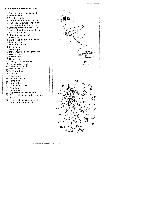
Controls of the sewing machine 1 Foot pressure regulating dial 2 Thread guide 3 Carrying handle 4 Left needle thread tension dial 5 Right needle thread tension dial 6 Right looper thread tension dial 7 Left looper thread tension dial 8 Looper thread tension dial for two- thread chainstitch 9 Thread - Pfaff hobbylock 797 | Owner's Manual - Page 6
support and pull out the accessory box. To replace the accessory box, slide it into the grooves and push it in as far as it will go. The accessories are illustrated on page 41. Electrical connection Use this machine only on a flat surface or on a special sewing table. Connecting the foot control - Pfaff hobbylock 797 | Owner's Manual - Page 7
are switched on. Switching off: Press switch again. Machine and sewing light are switched off. Foot control The speed of the Hobbylook is regulated as follows: The more you press the foot control down, the faster the machine will sew, Electronic toot control Maximum speed can be preselected in two - Pfaff hobbylock 797 | Owner's Manual - Page 8
the top. Tighten clamp screw. Insert the five thread spool holders. Push the thread guiding part into the guide bar. Pull up guide bar and align it so that the thread guides are exactly above the spool holders. Carrying handle and thread guides behind it: Insert fingers into groove of the carrying - Pfaff hobbylock 797 | Owner's Manual - Page 9
to the left. To close the work support, push it to the right until it locks. Selecting the stitch type: Behind the looper cover, the individual stitch types from 1 to 6 are shown. The respectively necessary needle combinations (A, B. and C) and the thread tensions to be used are indicated by colors - Pfaff hobbylock 797 | Owner's Manual - Page 10
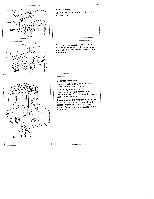
obtain a well-formed seam. Thread the machine in the following sequence: 1. Right looper (green) 2. Left looper (yellow) 3. Chainstitch looper (mauve) 4. Needle thread tension (blue) 5. Needle thread tension (pink) Diagram B shows threading of the thread guides behind the carrying handle. Diagram - Pfaff hobbylock 797 | Owner's Manual - Page 11
the nght looper: Thread the right looper in sequence 1 to 9 and pull approximately 10 cm (4") of thread through the looper eye (the thread path is marked green). Important: In order to obtain perfect sewing results, the thread must be pulled between the tension discs when threading the tensions. 9 - Pfaff hobbylock 797 | Owner's Manual - Page 12
(Mo{jeA pew s qd peiq tg) eAe iedooi eq q6noi peiq o o wo (j7) AIew!XoJdd md pue L[ O oouenbes ui peiq Jedool aq psuj :JadooI aI eqj Buipeoiqj - Pfaff hobbylock 797 | Owner's Manual - Page 13
(weJ6Eip 6uipeaJq4 aqj ui eAnw pepew si qwd peiq eij) eAa iodooj aq qbnojig peij o (p) wo noq md pue 6 oi . ounbes U! Jadool qo!iSU!qo pBeJqj-oM e pEo.iq .IadooI LpsuIeq peaiL-oM aig 6uipeaiq - Pfaff hobbylock 797 | Owner's Manual - Page 14
the right behind the black thread retainer and the thread guide wire above it. Then pull about 5 cm (2") of thread through the needle eye. - Threading overedge needles B and C (without needle A). Thread overedge needles B and C in sequence 1 to 6. The thread path for needle B is marked blue (point - Pfaff hobbylock 797 | Owner's Manual - Page 15
work support (1), push the handle down (2) and close the looper cover (3). Inserting the lint box: Insert the tabs of the lint box into the slots (4) of the front cover. Seam depth scale Example: If the seam depth of the cutting is to be 20 mm, the cut fabric edge must be guided - Pfaff hobbylock 797 | Owner's Manual - Page 16
color symbol. Only for the blue thread tension there are two standard settings: When using needle A (only for two-thread chainstitch), the N must be set opposite the blue triangular symbol. Only for stitch type 6 (needles B and C), the standard thread tension N for needle B must be set opposite the - Pfaff hobbylock 797 | Owner's Manual - Page 17
to the upper knife and lower the sewing foot. Hold thread ends with your left hand while turning hand wheel with your right hand in the direction ndicated by the arrow. In doing so. the threads must be guided to the rear, under the presser foot Make sure that threads have inter locked correctly. Ic - Pfaff hobbylock 797 | Owner's Manual - Page 18
S flD O 10ü4 JOSSOid 551 PU!15C 511 551 955 1559 11.1 55 13 S '* os soouions .o s SL .•.iii. 5555 94 J 5 1i'. 35 04 S4d - Pfaff hobbylock 797 | Owner's Manual - Page 19
needle can be used to pull the thread chain into the seam. Or: Sew about 5 cm (2) beyond the end of seam. Then turn the workpiece around and sew a few stitches over the seam just sewn without cutting the thread chain. On this machine to tighten or loosen the horizontal guide of the upper knife. 17 - Pfaff hobbylock 797 | Owner's Manual - Page 20
Overedge stitch top side Overedge stt h underside '- Two-thread Cli a n at t cii Reverse side underside 5-thread safety seam Two-thread chainstitch with overedge stitch (narrow) Stitch type 2, sewn with needles A and C Thread tensions: blue = triangular symbol pink = point symbol green = point - Pfaff hobbylock 797 | Owner's Manual - Page 21
symbol Application example: For serging all kinds of fabric. Overedge stitch underside -jz: - J top side 4-thread overedge seam Stitch type 6, sewn with needles B and C Thread tensions: blue = point symbol pink = point symbol green point symbol yellow = point symbol Application examples: For - Pfaff hobbylock 797 | Owner's Manual - Page 22
tension Two-thread chainstitch The thread tension of needle A is too weak. The blue thread tension must be turned in direction +. 3-thread overedge seam (wide) The thread tension of needle B is too weak. The pink thread tension must be turned in direction +. Needle thread B or C Left looper thread - Pfaff hobbylock 797 | Owner's Manual - Page 23
40 so green tenson) It a also possthle hat Doth tensons are ncorrectly set. EnSons accordinglyl 4 thread overedge seam rr e e I uper thread s too loose w t iion) or the nght looper 0 thrc i too hght (green tensofl) a also ossbIe that both tensions are flCThPty set. j r.oons accor r gly! - Pfaff hobbylock 797 | Owner's Manual - Page 24
overedge seam The thread tension of needle C is too weak. The pink thread tension must be turned in direction +. Needle thread C 4-thread overedge seam The thread tension of needle B is too weak The blue thread tension must be turned in direction +. thread B Sewing foot pressure Position N on - Pfaff hobbylock 797 | Owner's Manual - Page 25
is possible by using either only needle B or needle C (see page 12). Remove either needle B or C (see page 35). Needle Thread tension 3thread overedge seam Needle B Marked pink Needle C Marked pink Pull thread behind thread retainer and thread guide wire. I l Standard seam width Maximum . seam - Pfaff hobbylock 797 | Owner's Manual - Page 26
FaoJc wegrt Thead at F '- ti. •er Ir N ts't t Vntne - Pfaff hobbylock 797 | Owner's Manual - Page 27
140 Cotton No. 40-60 Silk No. 40-60 Synthetic thread No, 70-140 Polyester thread No. 100-140 Mercerized thread (bulk thread> Stitch length 2.0 to 4.0 mm 2.0 to 4.0 mm 2.0 to 40 mm 2.0 to 4.0 mm 1.0 to 1.5mm Adjusting the stitch length Open work support 15. Press main feed dog stop (see arrow - Pfaff hobbylock 797 | Owner's Manual - Page 28
handwheel can not be turned past stitch length numbers 1 and 4, respectively. When the desired stitch length s set, release main feed dog stop and close work support 15 - Pfaff hobbylock 797 | Owner's Manual - Page 29
Adjusting the differential feed The differential feed prevents inter-ply shift. It consists of two feed dogs, arranged one behind the other, which both pick up and move the workpiece at the same time The feed amount of either feed dog can be set separately. It is possible to have the workpiece moved - Pfaff hobbylock 797 | Owner's Manual - Page 30
is table indicates possible settings of the differential feed. In order to make sure about the setting iuired for the fabric you wish to process. a sewing test has to be made. e differential feed can also be set during sewing. Setting of dif ferential feed Illustration O.5to- 1 1 2 1.5 3 - Pfaff hobbylock 797 | Owner's Manual - Page 31
ttw marh!ne for two tflead ha sttch seams. stitch type 1 i ye nt ho o e age 13 open ocr vr 1. Puit ne 10 forward to Insert needle A. sergagemg the upper krfe 0 hand when, tO t he pper -' r, rest pot non 't t'e tcv' kr°ie etanrg oi or :e uuer nfe hoaer o o or jht O 00t pnrp - Pfaff hobbylock 797 | Owner's Manual - Page 32
. When inserting the workpiece guide plate, make sure it is level with the needle plate. Close the looper cover and the work support. Now the two-thread chainstitch seam can be sewn I After sewing the two-thread chainstitch seam, the following adjustments must be made to the machine: Open the looper - Pfaff hobbylock 797 | Owner's Manual - Page 33
basic position again and close the looper cover. Sew a test seam. Note: After adjusting the seam width, it may be necessary to re-adjust the thread tension. 31 - Pfaff hobbylock 797 | Owner's Manual - Page 34
'I G Changing the sewing foot Disengage the sewing foot. Push in lever F at the sewing foot holder as shown in the illustration. The sewing foot disengages. Engage the sewing foot. Place the sewing foot under the sewing foot holder so that when you lower the sewing foot lifting lever, crosspiece G - Pfaff hobbylock 797 | Owner's Manual - Page 35
Rolled hem sewn with polyester thread 100-140. A rolled hem is used for light, delicate fabrics and is an attractive finish tor open edges. Without any effort you can sew professional rolled hems on neck scarves, shawls and valances. A rolled hem is sewn with three threads (see page 34). Face side - Pfaff hobbylock 797 | Owner's Manual - Page 36
of the sewing machine: Needle: remove needle A and B Sewing foot: engage rolled hem foot 'R" Seam width, from 25 to 3.0 mm (depending on material) Stitch length: from 1 0 to 1 5 (short stitch length) Thread: polyester thread 100-140 for pink, green, and yellow thread tensions Threading path - Pfaff hobbylock 797 | Owner's Manual - Page 37
machines: System 130/705 H or 15 x 1 H Although the correct needle size depends on the material and the thread size used, we recommend needle size 14. An incorrectly inserted needle will cause thread breakage and skipped stitches. 'i Changing the knives Knives are available as spare parts Changing - Pfaff hobbylock 797 | Owner's Manual - Page 38
of the lower knife holder with the cutting edge facing right. Set the knife so that the cutting edge aligns with the surface of the needle plate. -j - After accurate adjustment of the lower knife, firmly tighten the clamp screw. Push the upper knife fully to the right. In this position, turn - Pfaff hobbylock 797 | Owner's Manual - Page 39
upper knife, insert the retaining screw through cutout (1) of the knife. Screw it into threaded hole (2) of the knife holder. Tighten slightly and set the upper knife in the this position than the surface of the needle plate. Adjust the upper knife accurately and tighten the retaining screw securely. - Pfaff hobbylock 797 | Owner's Manual - Page 40
upwards and turn it in direction 1. Inserting the light bulb: Insert the new bulb (15 Watt max.) with pins into slots 3, push it up and turn in direction 2. Close and fasten housing cover. Cleaning thread tensions: Fold the tension cover down. Use the brush provided with the accessories to - Pfaff hobbylock 797 | Owner's Manual - Page 41
time before you take the machine into operation, you should apply a little oil to the places indicated. The bushings and other important moving parts are made of special material and need to be oiled only once or twice a month. One to two drops of high-quality sewing machine oil are sufficient for - Pfaff hobbylock 797 | Owner's Manual - Page 42
easily be corrected by following the instructions below. Problem Material is not fed correctly Needle breakage Cause Sewing foot pressure too weak Needle bent or point damaged. Needle not fully inserted. Material pulled. Solution Turn foot pressure regulating dial clockwise to increase pressure - Pfaff hobbylock 797 | Owner's Manual - Page 43
knife 6 Thread unreeling disc 7 Needles 8 Sewing machine oil 9 Rolled hem presser foot 10 Thread spool net (see page 42) Optional accessories, see pages 42 to 44, available against extra charge Blindhem foot Part No. 29-924993-68/001 Elastic foot Part No. 29-924993-67/001 Pearl sewing foot Part No - Pfaff hobbylock 797 | Owner's Manual - Page 44
for blind-hemming operations Prepanng the sewing machine Differential feed setting: set at - (see page 27) Needle: remove needles A and B Sewing foot: engage blind-hemming foot Seam width: "N" Stitch length: longest stitch length Thread tension: "N" (pink, green and yellow) The hem is - Pfaff hobbylock 797 | Owner's Manual - Page 45
Engage pearl sewing foot. 3, For small pearls, remove needle B. 4. 5. For big pearls, remove needle C. Pass the pearl tape through guides 1 and 2 edge, needle C must be removed (disengage upper knife). Thread tension: pink = -3 to -5 green = -1 to-3 yellow = +2 to +3 The needle should enter - Pfaff hobbylock 797 | Owner's Manual - Page 46
time the material is gathered and the excess fabric cut off. Preparing the machine: Differential feed setting: set at - (see page 27) Sewing foot: engage tape attaching foot Thread tension: "N" (3 or 4 x) Seam width: approx 4 to 4.5 mm Stitch length: approx. 4 mm Elastic tape insertion - Pfaff hobbylock 797 | Owner's Manual - Page 47
jo PFAFF-HANDELSGESELLSCHAFT für Haushaltnähmaschinen m.bH. 7500 Karlsruhe 41 West Germany Subject to technicai ajterabons. Prjnted West Germany. DrNr,3O163RD7/89
-
 1
1 -
 2
2 -
 3
3 -
 4
4 -
 5
5 -
 6
6 -
 7
7 -
8
-
9
-
10
-
11
-
12
-
13
-
14
-
15
-
16
-
17
-
18
-
19
-
20
-
21
-
22
-
23
-
24
-
25
-
26
-
27
-
28
-
29
-
30
-
31
-
32
-
33
-
34
-
35
-
36
-
37
-
38
-
39
-
40
-
41
-
42
-
43
-
44
-
45
-
46
-
47
 |
 |

IflUW
UO!TDflJTSUI