Pfaff hobbymatic 904-1 Owner's Manual
Pfaff hobbymatic 904-1 Manual
 |
View all Pfaff hobbymatic 904-1 manuals
Add to My Manuals
Save this manual to your list of manuals |
Pfaff hobbymatic 904-1 manual content summary:
- Pfaff hobbymatic 904-1 | Owner's Manual - Page 1
- 11 14 hobbymatic 904-i - 946-i 91 9-i ef Bedienu ngsanweisung Instruction Book Mode d'emploi Gebruiksaanwijzing - Pfaff hobbymatic 904-1 | Owner's Manual - Page 2
Be sure to use only a 1 5-watt light bulb in the sewing lamp. di The drive belt must never be adjusted by anyone but an authorized Pfaff agent. Special safety rules for United Kingdom see page 40. 4 Mesures de sécurité IEC 335-2-28 a) Toujours faire preuve de prudence et continuellement surveiller - Pfaff hobbymatic 904-1 | Owner's Manual - Page 3
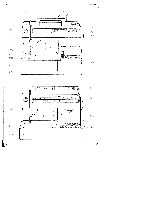
de rangement avec bolte a accessoires 109 Plaque a aiguille 110 Support avec pied presseur 111 Fentes d'enfilage 112 Tension du fil d' 11 7 Touches de commande 118 Plaque de base 119 Compartiment du crochet 1 20 Guide-fil 1 21 Butée pour travaux de reprisage 1 22 Disque de reglage des - Pfaff hobbymatic 904-1 | Owner's Manual - Page 4
- Pfaff hobbymatic 904-1 | Owner's Manual - Page 5
Stop motion knob 107 Stitch length control 108 Detachable work support with accessory compartment 109 Needle plate 110 Sewing foot holder controls 118 Bedplate 11 9 Free arm cover lenclosing sewing hook) 1 20 Thread guide 121 Stop for darning operations 1 22 Fancy-stitch thumb wheel 1 23 Reverse-feed - Pfaff hobbymatic 904-1 | Owner's Manual - Page 6
- Pfaff hobbymatic 904-1 | Owner's Manual - Page 7
bobbin, or changing 16. Aplurlbewrsaiscyeasrtifnuogno,pt,louergtcw.sehweningmamkiancghinaneyfrootmhetrheuseelrecsterircvaicl inogutlaedt jwushtemnenretsmomveinngtiocnoevderisn, the instruction manual. winding. SAVE THESE INSTRUCTIONS 17. Hold plug when rewinding into cord reel. Do not allow - Pfaff hobbymatic 904-1 | Owner's Manual - Page 8
Anlasser und die Bedienungsanlei N tung aus dem Fach N nehmen. So wie die Abbildung oben zeigt, beides wieder einräumen. Take foot control and Instruction Book out of compartment N. Put back again as shown in the illustration above. Retirer le rheostat a pedale et Ia notice d'emploi de a case - Pfaff hobbymatic 904-1 | Owner's Manual - Page 9
ten. Je tiefer man drückt, urn so schnel er näht die Pfaff. Electronic-Anlasser (Schalter QI Stellung = halbe Endgeschwin digkeit Stellung 44 = Ia pedale du rheostat. Plus Ia pedale sera abaissée, plus (a Pfaff> coudra vite. Rheostat electronique (interrupteur 0) Position demi-vitesse maximale - Pfaff hobbymatic 904-1 | Owner's Manual - Page 10
Spulen vorbereiten: Verwandlungsnahfläche etwas anheben und herausnehmen. Preparation for bobbin winding: Lift detachable work support and remove it. Preparation des canettes: Lever quelque peu a bolte de range ment et a sortir. Spoelen voorbereiden Dc werkbox jets optillen en naar voren wegtrekken. - Pfaff hobbymatic 904-1 | Owner's Manual - Page 11
4Spule auf den Spuler 104 stecken. Stift N mu6 in Schlitz 0. Place a bobbin on spindle 104, making sure pin N enters slot 0. Mettre Ia canette sur le dévidoir 104; le tenon N doit s'engager dans Ia fente 0. Steek de spoel op de spoelas 104, en draai hem tot gleuf 0 over stift N valt. Spule nach - Pfaff hobbymatic 904-1 | Owner's Manual - Page 12
___ __ I______ I L1L\ N Spulen Hauptschalter einschalten. Den Faden von der Garnrolle in die Spulervorspannung 102 ziehen, nach rechts führen und einige Male in Pfeil richtung urn die Spule wickeln. Dann den Fulanlasser betätigen und spulen. 1st die Spule voll, bleibt sie stehen. Die voIle Spule - Pfaff hobbymatic 904-1 | Owner's Manual - Page 13
______ 4U - 'I'l Nähwerk einschalten: Handrad festhal ten und Scheibe 106 nach hinten dre hen. Dann Handrad nach vorne drehen, bis es einrastet. Engaging the sewing mechanism: Hold the hand wheel firmly and turn knob 106 toward the back, then turn the hand wheel forward again until it snaps in. - Pfaff hobbymatic 904-1 | Owner's Manual - Page 14
UImsecniuhctthre,atrsufrtabuudecfeeknNnaswrptnieaagincsnhaeuulnfniwngiekadsprertdrüssbrfieeenhnwke:enenKg.eanp(Es.leoilSnsiseetre, ll nach rechts drehen = fester). CWoslfhiipetyhcodkuaoirnwbghnraiwtenhfda,er, sdbhtsoha.berbp(TbinuourbptnbhwirsnaecrardmdewumtseotnNvsgeicromaondue:unnattlelry- - Pfaff hobbymatic 904-1 | Owner's Manual - Page 15
phsnwid"rlnebooitSenefoutpdwrhdgoo0liithiesmnnh,tidcgetasihtoshlngtropnedrioutogo.nfiohudsft0Raltigi,omnkahtangeihbnas,-rteedsuapehttpkaiehsieddnerrecrl-odaeewuuvwpgePrh, guide S on the needle holder, EhLdldfRdpgeoeon'aeuaaernifnpiissvmidtgsifsaeeieueteocgnsd-irinleaft1rlitNecpl0despdur1ereadreeeir - Pfaff hobbymatic 904-1 | Owner's Manual - Page 16
4 UhehOiaennblbteteeeenrlrnff.aaSwddtHieieecnandhneddhrnereäanorhdabeUuennfnnhatbcoseihltrseefnahvNd:eoaenrOdnn.ebldMneraruiefctnhahdddeeneoFmnbauedtnnedesnt ziehen. Dntntoheerweeaedwdabllrieeondbgstabhniuyrndepoauttdthahakreteneaad-ubdutops.bebbTwyeiunvmreantrehsatrathnieretseacdhhou:afpunH. - Pfaff hobbymatic 904-1 | Owner's Manual - Page 17
4Ndhflhche, wie der Pfeil zeigt, an die Maschine schieben. Push work support against the machine, as shown by the arrow. Placer Ia machine, boite de comme rangement contre a le montra Ia flèche. Werkbox in pijlrichting tegen - Pfaff hobbymatic 904-1 | Owner's Manual - Page 18
you press down the pedal, the faster the machine runs. Abaisser Ia pedale du rheostat. Plus a pédale sera abaissée, plus Ia Pfaff>> coudra vite. Voetpedaal intrappen. De voetdruk op het pedaal regelt de snelheid van de machine 4 Oberfadenspannung 112 N Einstellmarkierung. Needle thread tension - Pfaff hobbymatic 904-1 | Owner's Manual - Page 19
Important: Veillez a ceci pour obtenir une bonne couture: 1 Utiliser une aiguille impeccable et 2. Des tensions de fils bien réglees. La tension inférieure est correctement réglée a l'usine. Si, après contrOle, a tension inférieure (voir pag. 8) doit étre ralustée, ne tour ner que très peu a vis de - Pfaff hobbymatic 904-1 | Owner's Manual - Page 20
- Pfaff hobbymatic 904-1 | Owner's Manual - Page 21
Stichlänge einstellen Die Zahlen auf dem Stichlängen-Ein steller 107 geben die Stichlange in mm an. Der Einstellbereich st 0 his 6 mm. Die gewunschte Stichlänge wird an die Einstellmarkierung N gedreht. Die Abbildung 0 unten zeigt die Einstel lung des Stichlangen-Einstellers zum Nähen der - Pfaff hobbymatic 904-1 | Owner's Manual - Page 22
4 Rückwärtsnähen Die Taste 123 niederdrücken. Solange die Taste gedruckt wird, näht die Maschine rückwärts. Reverse sewing Press button 1 23. As long as you hold this button the machine sews back wards Couture en marche arrière Abaisser a touche 1 23. La machine coud en arrière aussi longtemps que a - Pfaff hobbymatic 904-1 | Owner's Manual - Page 23
Zweiter Garnrollenstift Für Näharbeiten mit zwei Nadein den zweiten Garnrollenstift aus dem Zubehör verwenden. Tragegriff 103 hochstellen den zweiten Garnrollenstift aufstecken und bis zurn Anschlag nach rechts schwenken. Danach den Tragegriff 103 wieder urn kiappen. Filzscheibe einsetzen Die rn - Pfaff hobbymatic 904-1 | Owner's Manual - Page 24
caniques ou d'accessoires. ci Puissance maximale admissible de l'ampoule: 15 Watts. dl Confier le reglage de a tension de a courroie d'entraInement au mécani cien Pfaff. Some safety rules IEC 335-2-28 a) Take care to avoid injury to your fingers by the needle during sewing. b) Make sure you unplug - Pfaff hobbymatic 904-1 | Owner's Manual - Page 25
Tipptasten (Modelle ohne Stretchstiche> Die verschiedenen Modeile haben eine unterschiedliche Anzahl von Tipptasten und Programmen. A, B, C Knoptiochtasten Die Taste B ist gleichzeitig die Aus schaittaste zum Lösen der getippten Tasten und (irike Stichlage (siehe Seite 27). D Zickzackstich 2 mm E - Pfaff hobbymatic 904-1 | Owner's Manual - Page 26
Touches de commande (modèles sans points elastiquesl Le nombre des touches et des program mes vane selon le modèle de machine. Touches boutonnières: A, B, C La touche boutonniere B sert en même temps a annuler es touches activées et a deporter l'aiguille a gauche (page 27). D Point zigzag 2 mm E - Pfaff hobbymatic 904-1 | Owner's Manual - Page 27
_ N 1 fl F OULUJL Tipptasten (Modelle mit Stretchstichen) Die verschiedenen Modelle haben eine unterschiedliche Anzahl von Tipptasten und Programmen. A, B, C Knopflochtasten Die Taste B ist g)eichzeitig die Aus schalttaste zum Lösen der getippten Tasten und linke Stichiage (siehe Seite 27). D - Pfaff hobbymatic 904-1 | Owner's Manual - Page 28
Finger-tip controls (Tbmehreosdveoalfsrifowinuigsthemr-stotirpdeetclcsohnhtsartvoieltschdaeinfsfd)erpinrgognraumms. A, B, C; Buttons Button B is also for releasing the for buttonholing used as clearing pushed buttons button and for setting the left needle position (see page 27). O 2-mm zigzag - Pfaff hobbymatic 904-1 | Owner's Manual - Page 29
Touches de commande (Lmmeeosndovèmlaenbsereasvdeelecosnptooleiuncmthsoeédslèalesettiddqeeusemsp)arcohginraem. Touches boutonnières: La touche boutonniere A, B, C B sert en méme temps a annuler es a déporter I'aiguille touches a gauche activées et (page 27). 0 Point zigzag 2 mm Triple point - Pfaff hobbymatic 904-1 | Owner's Manual - Page 30
Nutzstiche einstellen Taste tippen und die gewünschte Stich lange zwischen 1 und 6 mnstellen. Alle Zickzackstiche werden durch zu sätzliches Tippen der Taste G in der Breite halbiert. 4 Selecting utility stitches Push the button required and set the stitch length between 1 and 6. All zigzag - Pfaff hobbymatic 904-1 | Owner's Manual - Page 31
nSlaitsrsetzetucmhtisptApicenhnsecuhenliadngstSeatluilcfehnSläynmgebno-lEinstesltleerl AwlelerdSetnredtcuhrc-h3fazuchsäZtziclikczhaecsk-TSiptipcehne der Taste G in der Breite halbiert. Selecting stretch stitches Push stitch the button required and length control as far as turn the it will go - Pfaff hobbymatic 904-1 | Owner's Manual - Page 32
, with some useful sewing tips, can be found in the program table as well as at the end of this Instruction Book. Combinaisons de points elastiques et utiitaires Pour combiner plusieurs types de point, acpesputyoeurchsiems.ulLtaesnécmomenbtinsäuirsopnlussipeourssside bles figurent dans - Pfaff hobbymatic 904-1 | Owner's Manual - Page 33
_ N4 L1 J1 H I N tichiage einsteDen bel Geradstich: tichiage inks: Taste B tippen uchlage Mitte: Taste G tippen tichlage rechts: Taste H und tippen 4 N Selecting the needle position for straight stitching: Left needle position: push button B Central needle position: push button G Right - Pfaff hobbymatic 904-1 | Owner's Manual - Page 34
N /_ . Einstellrad für Zierstiche Jedem Zierstich ist em Buchstabe zuge ordnet. Den Zierstich auf der Tabelle auswählen. Mit dem Einsteflrad N" den entsprechenden Buchstaben unter die Einstellmarkierung 0" drehen. Die Stichldnge zwischen 0,5 und 1 wdhlen. Zum Nähen der Stiche auf den Tipp tasten mu - Pfaff hobbymatic 904-1 | Owner's Manual - Page 35
ZM DdzTzweeiwareeuinüsgriiscstsstteZkcteindhe,irc,ekneeshrznotnesurdmteiSe0uctdbrctn,hrii5hdcüenT"hncaauKktsniSuehotodnentenmindrces1bshntdiiilennwnäaldlanlrdaVe.utgshinenoesDl.reentnbienn-eeDriE.nn,iSseidBniwtuciseTcnhetiamehgibclldldeheumHlnerrligecitanheuf drehen. PLpLda - Pfaff hobbymatic 904-1 | Owner's Manual - Page 36
Nadel auswechseln (System 130/705 H): • Hauptschalter 125 ausschalten. Schraube N lösen. Nadel herausnehmen. Neue Nadel Iflache Kolbenseite nach hinten( ganz nach oben schieben. Schraube festdrehen. • Changing the needle (System 130/705 H): Switch off master switch 125. Loosen screw N. Take out the - Pfaff hobbymatic 904-1 | Owner's Manual - Page 37
hors. S St die NähfuRhalterschraube. P and Q are for fitting accessories. S is the sewing foot retaining screw. R et Q servent a fixer les accessoires. S est a vis de fixation du support de semel le. R en Q zijn voor toebehoren. S is het bevestigen van het naaivoethouderschroef. 31 - Pfaff hobbymatic 904-1 | Owner's Manual - Page 38
de machine schuiven (01. Zubehörfach Den Deckel der Nähfläche 108 dffnen. Darunter ist Platz für Nähzubehör. Accessory box Open the cover of work support 108. Under this lid there is room for your sewing accessories. Boite de rangement Ouvrir Ic couvercle du plan de couture 108. L'espace en dessous - Pfaff hobbymatic 904-1 | Owner's Manual - Page 39
8 Filzscheibe Sewing feet (standard accessories> 1 Buttonhole foot 4 Blindstitch foot 2 Zipper foot 5 Clear-view foot 3 Ordinary sewing 7 Edge guide foot 8 Felt washer Pieds presseurs 1 Semelle a (accessoires standardsl 4 Semelle a point boutonnières invisible 2 Semelle pour 5 Semelle - Pfaff hobbymatic 904-1 | Owner's Manual - Page 40
Zubehörfach für Normalzubehör Den Klappdeckel 126 für das Zubehdr fach 127 äffnen. Das Zubehdr muB, wie in der Abbildung gezeigt, in die Fächer eingeordnet warden. Unter den Fächern sind die NähfüIe abgebildet und die Spulen 1 = KnopflochfuR 2 ReiBverschIu6fuR 3 = NormalnähfuI? 4 = BlindstichfuB 5 - Pfaff hobbymatic 904-1 | Owner's Manual - Page 41
Accessory box for standard accessories Open lid 126 of accessory box 127. The accessories should be placed in the individual compartments as shown in the illustration. The compartments are identified by illustrations of the respective sewing feet and bobbins. 1 = Button-hole sewing foot 2 = Zipper - Pfaff hobbymatic 904-1 | Owner's Manual - Page 42
: Ordinary sewing foot or clear view foot and edge guide Stitch: Button G Edge guide N can be used with nearly all sewing feet. Fitting the edge guide Push edge guide N through hole 0 and secure it in position with screw P. The guide can be adjusted to the desired stitching margin for various - Pfaff hobbymatic 904-1 | Owner's Manual - Page 43
es surpiqures paralleles et le surpiquage des bords. Ce faisant, le bord du tissu (fig. 01 ou bien (a piqére précedente Suit le guide-droit (fig. RI. La couture sera toujours nette et reguliere. Watteren Naaivoetje: Normale-naaivoet of borduurvoet en geleide (ineaal Steek: Toets G De lineaal - Pfaff hobbymatic 904-1 | Owner's Manual - Page 44
penetration Place the prepared hem under the blindstitch sewing foot. The crease line of the outer fabric runs along edge guide 0 of the blindstitch sewing foot. Turn screw N to adjust edge guide 0 so far to the left that the needle picks up only one thread of the outer fabric when penetrating on - Pfaff hobbymatic 904-1 | Owner's Manual - Page 45
2 -J N -j 2 N -j Point invisible Pied presseur: Tension: Fit: Point: Longueur de point: Aiguille: Pied a points invisibles Fit d'aiguille moms tendu Fit a coudre large touche H dtroit touches H et L 3a4 Grosseur 70 ou 80 Reglage de Ia Poser lourlet jetée de I'aiguille préparé sous le pied a - Pfaff hobbymatic 904-1 | Owner's Manual - Page 46
• Safety rules valid for United Kingdom only The wires in the mains lead are coloured according to the following code: Blue: Neutral Brown: Live As the colours of the wires in the mains lead of this appliance may not correspond with the colour coding of the terminals in your plug, proceed as follows - Pfaff hobbymatic 904-1 | Owner's Manual - Page 47
KTdKKeannnnsoootpeppKffflnlColoooccchtphihfpblfepoeuiecnrlenhsia.tbcenehlObrleerbNiinncehgrefeianbndse.etienSl3sltepicsnath.nedlnEliuecinnhn.gtteauinfrn fFsPPkdatafaerdeednaneiielfn.nnfnk0ZdzlwüueiieareirbennnheKmerfKdnnoedeonlnirgupeo.tnfpSlBhdfkorlienaconiilhnrtcanNelhardänRenNehä - Pfaff hobbymatic 904-1 | Owner's Manual - Page 48
Knopflochnahen Schiene his zum Anschlag nach vorne ziehen 1 Erste Raupe in der gewunschten Lange nähen. Nadel hochstellen. 2 Taste B tippen und festhalten, 4 his 6 Riegelstiche nähen. Den Stoff dabei festhalten, Nadel hochstellen. Taste loslassen. 3 Taste A tippen. Zweite Raupe in der gleichen Lange - Pfaff hobbymatic 904-1 | Owner's Manual - Page 49
Zeii:hiiuiigen sind onne NbhfulL. Drawings do not show the sewing foot. Los illustrations ne montrent pas a sernelle do pied presseur. Vow eon beter overzicht is do knoopsgatenvoet op do afbeeldingen weggelaten. écution de boutonnières er a semelle mobile vers 'avant ;qu'à a butée. Executer Ia - Pfaff hobbymatic 904-1 | Owner's Manual - Page 50
Knopt annähen Nahfug ohne Nähful?, oder mit Klarsichtfu1, Stich: Taste E TGDdirareaerrnhNi:sepandoerSltieeuinrd:laisnvfkeeHiernrsaeenSsndtkiNrceahdndlhagagauerfnasibcwh äzruts, bis gLmKNdsNsreeeietndaehaignkocrhdte.ktp.lhfeuniuifntlHerf. - Pfaff hobbymatic 904-1 | Owner's Manual - Page 51
se trouve en e gauche. ser le bouton a 'emplacement voulU le tissu et sous le pied presseur. sser précautionneuSement te tjssu et jouton sous le support du pied sseur. Abaisser celui-ci et faire Pi sr l'aiguille dans le trou gauche du jton. Continuer a tourner (e volant qua ce que l'aiguille - Pfaff hobbymatic 904-1 | Owner's Manual - Page 52
foot to the left as far as it will go. Place the open zip under the foot so that its teeth run along the right guiding edge on the sole of the foot (Fig. 01. Sew about half the length of the zip at the required width. Leave the needle down - Pfaff hobbymatic 904-1 | Owner's Manual - Page 53
,f_ / 7 / / / / ,// ,/ ,,/ // / I I 1/1' 'I nsertion de fermetures a glissière ied presseur: Pied a fermeture a glissière .ongueur de point: 2 a 3 mm oint: il: Boutonpoussoir G Fil a coudre ,lise en place du pied a fermeture a Iissière ccrocher le pied avec sa tige arrière ans a - Pfaff hobbymatic 904-1 | Owner's Manual - Page 54
the same time as you sew the zip. The zip teeth run along the right guiding edge of the foot (Fig. N>. Shortly before the end of the seam. leave seam line. Baste left zip edge (Fig. 01. Open zip. Attach the edge guide and position it for the desired seam margin so that it moves along the edge of - Pfaff hobbymatic 904-1 | Owner's Manual - Page 55
Bâtir Ia partie gauche de Ia fermeture a glissiere (fig. 01. Ouvrir (a fermeture a glissière. Mettre en place et aligner (e guide-droit sur Ia (argeur de Ia piqüre de sorte que le guide-droit Ionge le bord dii tissu (fig. P(. Peu avant (a fin de (a couture, laisser l'aigui(Ie dans le tissu, remonter - Pfaff hobbymatic 904-1 | Owner's Manual - Page 56
Stopfen mit Geradstich NähfuR: StopffuR (Sonderzubehörl Stich: Taste G Oberfadenspannung: etwas )eichter Garn: feines Maschinen stickgarn Nadel: Stärke 70 Transporteur: versenkt Stopfanschlag 121: nach hinten schieben Stoff drückerhebel senken Stopffu1 anbringen Die Nadel - Pfaff hobbymatic 904-1 | Owner's Manual - Page 57
('frt-I I-l-IH1-i--1 --- 4-$-t-1-f-i-t- - -J 'rfftM1m ---------, ,rj-tttt -, l"--tt-tj-M r-r J-t -4 -, 1 N RPieepdripsaregseseauur:poiPniteddraoirtepriser (contre supplement) Point: Boutonpoussoir G Tension du fit d'aiguilte: Fit: moms forte Fit a broder fin Aiguille: Grosseur 70 - Pfaff hobbymatic 904-1 | Owner's Manual - Page 58
: lowered Darning stop 121: push backwards, lower presser bar lifter Draw the woo) thread through the needle hole of the darning foot and into thread guide P. Place the wool thread under the darning foot. Start at the top left and place the wool thread back and forth across the damaged area - Pfaff hobbymatic 904-1 | Owner's Manual - Page 59
eprise a Ia lame ed presseur: Pied a repriser (contre supplement) oint: Bouton-poussoir E ension du fil 'aiguille: Zone boutonnières (3) fil a broder ou a repriser fil de lame iguille: Grosseur 70 riffe: utée 121: abaissée La glisser vers arrière Abaisser le levier presse-tissu nfi(er - Pfaff hobbymatic 904-1 | Owner's Manual - Page 60
Reinigen und Olen • Netzstecker ziohen. Nadel hochstei en. Spulenkapsel herausnehmen und Nähful ausrasten. Die vordere Nocke N des Knopfiochfufes in die Offnung 0 an der linken Kante der Stichplatte stecken. Den Ful. nach unten drücken, wobei sich die Stichplatte lost. Stich platte herausnehmen. Mit - Pfaff hobbymatic 904-1 | Owner's Manual - Page 61
it back in place after having exchanged the light bulb. Hold the edge guide slightly tilted and push it into opening N in the head of the 'enlever et Ia remettre en place après ivoir remplace l'ampoule. 'lacer le guide-bord de facon oblique lans l'ouverture N sur Ia tête de Ia nachine. Descendre - Pfaff hobbymatic 904-1 | Owner's Manual - Page 62
Nadel-Tabelle Die WahI der richtigen Nadel garantiert eine bessere Verarbeitung des Nähmaterials Stoffqualitat[fqlItatStoffqualitat Ieicht mitt& schwer Nadel 60 Nadel Nadel 120 Nadelspitzen 1 Bezeichnung 130/705 H Nadelstärke: 70/80 130/705 H-SUK Nadelstärke: 70/110 130/705 H-PS Nadelstärke - Pfaff hobbymatic 904-1 | Owner's Manual - Page 63
3deI-Tabelle Bezeicirnung Stichlange 130/705 H-ZWI 2,5 mm Stdrke: 80 2,5 mm Stichbreite - Nadelentfernung 1,6 mm 2,0 mm Geeignet für normale Biesen normale Biesen 130/705 H-ZWI Stärke: 80 2,5 mm - Stärke: 90 2,5 mm - Stdrke: 100 3,0 mm - 2,5 mm 3,0 mm 4,0 mm breite Biesen extra - Pfaff hobbymatic 904-1 | Owner's Manual - Page 64
Needle chart Use of the correct needle ensures better processing of the material. Fabric weight: light Needle size: 60 70 75 :. Fabric weight: medium Needle size: 80 90 Fabric weight: heavy Needle size: 100 110 120 Needle points I System & No. Profile 1 Point & eye Suitable for 130/705 H - Pfaff hobbymatic 904-1 | Owner's Manual - Page 65
edIe chart System & No. Stitch length 1 130/705 H-ZWI 2.5 mm I 80 2.5 mm 130/705 H-ZWI 80 90 100 2.5 mm 2.5 mm 3.0 mm Stitch width Needle spacing 1.6mm -- 2.0 mm - - 2.5 mm - 3.0 mm 4.0_mm - Suitable for Mediumwide cording Wide cording Extra wide cording Extra wide cording ) - Pfaff hobbymatic 904-1 | Owner's Manual - Page 66
, grande maille, tissus Interlock, Quiana, Simplex pointe bite moyenne grande pointe bille pour tissus Aiguife Stretch, machines Pfaff. spCésoctniraveliteecmnhtenettot udmtéavpielalloerptidpcéeuleilcipèaortesu.r Lycra grande maille (gaines, combines, etc.) Lycra, Simplex, Lastex pointe ronde - Pfaff hobbymatic 904-1 | Owner's Manual - Page 67
bIeau des aiguilles Designation 9 Longueur de point 130/705 H-ZWI 2,5 mm Grosseur: 80 2,5 mm Largeur de point - - Espacement des aiguilles 1,6 mm 2,0 mm Utilisations nervures normales 130/705 H-ZWI Grosseur: 80 2,5 mm - Grosseur: 90 2,5 mm Grosseur: 100 3,0 mm - 2,5 mm 3,0 mm 4,0 mm - Pfaff hobbymatic 904-1 | Owner's Manual - Page 68
Naaldentabel Het gebruik van de juiste naald, garandeert een betere verwerking van de stof StofkwaliteiJ dun naald 60 70 75 Stofkwaliteit middel naald 80 90 Stofkwaliteit dik naatd 100 110 120 Vorm van de Naaldpunt Benaming Profi& 130/705 H naalddikte: 7080 13O/705HSUK naalddikte: 70/110 1 - Pfaff hobbymatic 904-1 | Owner's Manual - Page 69
aaldentabel Benaming q Steeklengte Steekbreedte Naaldafstand 1301705 H-ZWI 2,5 mm - ! naalddikte: 80 2,5 mm -- - 130/705 H-ZWI naalddikte: 80 2,5 mm - naalddikte: 90 2,5 mm - naalddikte: 100 3,0 mm 1.6 mm 2,0 mm 2,5 mm 3,0 mm 4,0 mm Geschkt voor: normale biezen normale biezen brede - Pfaff hobbymatic 904-1 | Owner's Manual - Page 70
Nähstörungen und ihre Beseitigung Ursache: Beseitigung: 1 Die Maschine IäIt Stiche aus Die Nadel st nicht richtig eingesetzt, Es ist eine falsche Nadel eingesetzt. Die Nadel 1st verbogen oder stumpf. Die Maschine 1st nicht richtig eingefädelt. Die Nadel 1st tür das Garn zu fein. Nadel his zum - Pfaff hobbymatic 904-1 | Owner's Manual - Page 71
Ursache: Beseitigung: 5. De Maschine transportiert nicht oder nur unregelmaaig Zwischen den lransporteur-Zahnreihen hat sich Nàhstaub festgepreft. Stichplatte abnehmen, Nähstaub mit Pinsel entfernen. Transporteur st versenkt. Versenkschieber steht rechts. Versenkschieber nach links stellen 6. - Pfaff hobbymatic 904-1 | Owner's Manual - Page 72
. Insert new needle and push it up as far as it will go. Insert new needle. See Needle Chart. Let machine feed the workpiece. Only guide the material lightly. When inserting the bobbin case, push it in as far as it will go. 4. Seam is not uniform Tension out of adjustment - Pfaff hobbymatic 904-1 | Owner's Manual - Page 73
Cause: Remedy: 5. Machine feeds irregularly or not at all Lint has accumulated between tooth rows of feed dog. Feed dog lowered. (Feed-lowering control is at right.( Remove needle plate and clean out lint. Push feed-lowering control to the left. 6. Machine runs with difficulty Thread ends in - Pfaff hobbymatic 904-1 | Owner's Manual - Page 74
Causes de derangements et remèdes Causes: Remèdes: 1. Points manqués L'aiguille n'est pas placee selon es prescriptions L'aiguille n'est pas du système prescrit. L'aiguille est déformée ou Opointée. Lenfilage nest pas correct. L'aiguille est trop fine pour to fit. Engager l'aiguille a fond, le mé - Pfaff hobbymatic 904-1 | Owner's Manual - Page 75
Causes: Remèdes 5. La machine n'entraIne pas ou entralne irregulierement Bourres agglomérees entre les dents de Enlever Ia plaque a aiguille, ôter es a griffe. bourres au pinceau. Griffe abaissée Iglissiare abaisse-griffe Placer Ia glissière abaisse-griffe a en position droite). gauche. 6. - Pfaff hobbymatic 904-1 | Owner's Manual - Page 76
Opheffen van kleine storingen Oorzaak Opheffen 1. De machine slaat steken over De naald is niet goed ingezet. U gebruikt een verkeerd systeem naald. De naald is krom of stomp. De machine is niet goed ngeregen. De naald is te dun voor het garen. Naald zover mogeiijk naar boven schuifen, met de - Pfaff hobbymatic 904-1 | Owner's Manual - Page 77
Oorzaak Opheffen 5. De machine transporteert net of onregelmatig Tussen de tandjes van de transporteur zit stof geperst. Steekplaat wegnemen, stof met het stofkwastje weghalen. Transporteur is uitgeschakeld Transporteur inschakelen. 6. De machine loopt zwaar Draadresten in de grijperbaan. - Pfaff hobbymatic 904-1 | Owner's Manual - Page 78
onderzubehör as Sonderzubehör st für spezielle Näharbeiten. Es st bei )hrem Handler gegen Berechnung hä)thch. Zubehdr Beste)l-Nr. Näharbeit ApplikationsfuB, Bandeinfasser lNähfu1!halter entfernenl BesenfuR 5 Riflen lZwiflingsnadeln mit Nadelabstand 2,012, BiesenfuR 7 Rillen (Zwiflingsnadeln - Pfaff hobbymatic 904-1 | Owner's Manual - Page 79
Inhaltsverzeichnis Abstepparbeiten Anlasser Blindstich Einstellrad für Zierstche Elektrischer Anschlu8, Glühlampe auswechseln Hosenrei1,verschIu6, (Damen) Knopfannähen Knopflochnähen Nadel auswechseln Nadeltabelle NähfüRe NähfüRe auswechseln Nähstorungen und ihre Beseitigung Nàhwerk aus- und - Pfaff hobbymatic 904-1 | Owner's Manual - Page 80
)ecial accessories te special accessories listed below are intended for special sewing jobs. They can be obtained m your dealer at an extra charge. Accessory Appliqué foot Binder (remove sewing foot holder) Cording foot, 5 grooves (twin needle with 20-2.5 mm needle gauge) - Pfaff hobbymatic 904-1 | Owner's Manual - Page 81
Sewing buttonholes Sewing feet Sewing in zippers Sewing on buttons Thumb wheel for fancy stitches Topstitching Upper threading Utility- and stretch-stitch combinations Work support/accessory box Zippers for ladies' slacks 34 38, 39 6 4, 5 55 30 31 8 12 54 50, 51 52, 53 5, 7 10 3 29 66, 67 19 22 - Pfaff hobbymatic 904-1 | Owner's Manual - Page 82
positaire. Accessoires Références Operations Pied pour applications Bordeur lenlever support du pied) 93-035 920-91 98-053484-91 de tissus élastiques Ourleur Ibord roulé) 2 mm Ourleur 3 mm Pied a repriser Pied guide-bord pour tricot P.ied a semelle Te. flon L Pied pour points décoratifs 76 - Pfaff hobbymatic 904-1 | Owner's Manual - Page 83
Table des matieres Abaissement de a griffe Bobinage Boite de rangement des accessoires Branchement electrique Changement de l'aiguille Changement de l'ampoule Changement du pied presseur Combinaisons de points elastiques et utilitaires ContrOle de Ia tension du fil d'aiguille ContrOle de a tension - Pfaff hobbymatic 904-1 | Owner's Manual - Page 84
Extra accessoires )e accessoires zijn voor bijzondere werzaarnheden. Ze zijn verkrijgbaar bij de officiële Pfaff dealer. Accessoires Applikatievoet Blaisbandvoet naaivoethouder afnemen Biezenvoet 5 rillen ltweetngnaald, naaldafstand 2, 0-2, 5) Biezenvoet 7 rillen (tweeiingnaald, - Pfaff hobbymatic 904-1 | Owner's Manual - Page 85
Inhoud Aansluiten van de machine Accessoiresbox tevens stoftoevoerb(ad Accessoiresvak Afhechten, achterwaarts stikken Blindzomen Bovendraad innjgen Sovendraadspanning kontroleren Draadafsnijder Knopen aanzetten Knoopsgaten istellen Knoopsgaten maken Lampje wisselen Naaimechanisme uit- en inschakelen - Pfaff hobbymatic 904-1 | Owner's Manual - Page 86
PwdDerieeorigcTSrhaateimbceThmlllaaetsantbzegeeneilnglez-tuEdiidnersütPectrkeoergnrbaismsinmzdu.nmuBmeAimnaeslirce,hnldaePgnroadguarfazmugme,eh,snötrremetncitdhed"nemzSutiHdcrhinehwuenenids. darunter, stretch" st Bei alien übri 02 III III I I I I CD CD CD GH I 03 / - \ / ,- \ -•-. - Pfaff hobbymatic 904-1 | Owner's Manual - Page 87
ien 1st die Stichlänge nach Wunsch zu wählen. In der Texttabelle sind Bezeichnung nd Anwendung der einzelnen Programme angegeben. 07 08 09 10 ." \/\ - \I\ -ll - \/\ -JI 11 II II Ii 12 13 14 15 16 17 \' /\ 1 > M is. L-9 I ' -' \/\ '- is. \/\ r'- iiis. L-I i-j rm 18 19 20 N .,.- - Pfaff hobbymatic 904-1 | Owner's Manual - Page 88
tch program chart ted in this chart are the stitch lower half, the buttons to be program pressed number, the corresponding stitch and, to sew this seam pattern. For all stitch in programs rked stretch", turn the stitch control toward stretch" as far as it will go. 02 III I I c I I I I I - Pfaff hobbymatic 904-1 | Owner's Manual - Page 89
all other grograms, select the stitch length as desired. The individual stitch grams and their application are described in detail in the table below. - 07 08 09 10 11 12 /\/ \/\ -..J Af Ii \/\ /\/ \/\ ..fl /\/ -fl \/\ ' H -I II \/\ Wi-K -, -, C) C) - C) C) 13 14 15 16 17 - Pfaff hobbymatic 904-1 | Owner's Manual - Page 90
seaebtaI!daebiaflmufeéaerdnueetnisoitnsnpdrriqoegugelrsaagtlmereemsntueacsmheéf,rfoelcedtuurèegrplreso-ugprroaianmtmmeaesc,t hlaienteso.cuhrPenomeurra du point tous es C correspondant et programmes pourvus 02 III III I I I I I I ED CD C) 03 / \ / \ / \ - -.-.. -- s-.. --- -.-- .-- - Pfaff hobbymatic 904-1 | Owner's Manual - Page 91
______ ond sur Ia position . Pour las autres programmes, tre choisie a volonté. Dans le tableau descriptif figurent les a lonquour lu point desiqndnons ni put ipplications des différents points. 07 08 \I\ /\/ \/\ i".' \/\ H . C) 09 10 '-i - I K -, C) 11 12 13 14 15 16 17 ' Ii Ii i - Pfaff hobbymatic 904-1 | Owner's Manual - Page 92
PsnIntureomdkgeemrznaeemrmtmamebttaeebtldeedilsevoedprawaoirjvbzeiijrnzgbicehhtoerl,i,esjnktrdeeetwcshitj"zeeemkh,oeedt tasadtreeoknesdtneeperrkowlgeernalgkmteemktonaeotapsfgtmeobtoeeheteldtw. sotBrudoietvpneunninthgevetadnprurkosytg.mraBbmioj omalllae 02 03 04 05 06 III III €1) ciII ) c / \ / - Pfaff hobbymatic 904-1 | Owner's Manual - Page 93
:tretCh" gedraaid worden. Rij de ovenge steken kunt u de steeklengte zeif kiezen. In de teksttabel de benaming en de toepassing in afzonderlijke programma's aangegeven. I 07 08 09 10 /\/ I \/\ '-U ii I " /\/ "--' -U \/\ I '-.ll M. H H. K -, (D ol .-.. 0 ' 11 12 13 14 Ii S-I' \/' - Pfaff hobbymatic 904-1 | Owner's Manual - Page 94
' i1F G. M. PFAFF Aktiengesellschaft Werk Karisruhe-Durlach GritznerstraBe 11 D 76227 Karlsruhe Tec hrrrsrrhe Arrderrrnqen sorbehafterr (3edrurkt r Do tschhrrrd Suhh t to hrrrrt errs ii desgrr ft ered n Gerrrrany hoes
-
 1
1 -
 2
2 -
 3
3 -
 4
4 -
 5
5 -
 6
6 -
 7
7 -
8
-
9
-
10
-
11
-
12
-
13
-
14
-
15
-
16
-
17
-
18
-
19
-
20
-
21
-
22
-
23
-
24
-
25
-
26
-
27
-
28
-
29
-
30
-
31
-
32
-
33
-
34
-
35
-
36
-
37
-
38
-
39
-
40
-
41
-
42
-
43
-
44
-
45
-
46
-
47
-
48
-
49
-
50
-
51
-
52
-
53
-
54
-
55
-
56
-
57
-
58
-
59
-
60
-
61
-
62
-
63
-
64
-
65
-
66
-
67
-
68
-
69
-
70
-
71
-
72
-
73
-
74
-
75
-
76
-
77
-
78
-
79
-
80
-
81
-
82
-
83
-
84
-
85
-
86
-
87
-
88
-
89
-
90
-
91
-
92
-
93
-
94
 |
 |

—
11
14
hobbymatic
904-i
-
946-i
91
9-i
ef
Bedienu
ngsanweisung
Instruction
Book
Mode
d’emploi
Gebruiksaanwijzing