Pfaff synchrotronic 1229 Owner's Manual
Pfaff synchrotronic 1229 Manual
 |
View all Pfaff synchrotronic 1229 manuals
Add to My Manuals
Save this manual to your list of manuals |
Pfaff synchrotronic 1229 manual content summary:
- Pfaff synchrotronic 1229 | Owner's Manual - Page 1
:- UO!DflJSU I n 11kZJ - Pfaff synchrotronic 1229 | Owner's Manual - Page 2
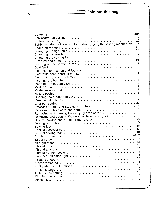
disengaging the sewing mechanism 4 Changing the fuse 25 Changing the light bulb 24 Changing the needle 15 Changing the sewing foot 14 Cleaning and detachable work support Reverse sewing and dropping the feed dog Sewing buttonholes Sewing feet Special accessories Special sewing feet Stitch - Pfaff synchrotronic 1229 | Owner's Manual - Page 3
- Pfaff synchrotronic 1229 | Owner's Manual - Page 4
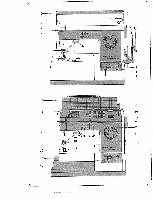
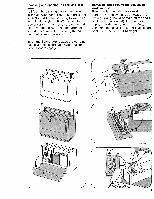
4 Parts of your sewing machine 1 Detachable work support with accessory compartment 2 Sewing foot 3 Sewing foot holder 4 Needle threader 5 Needle threader control 6 Needle thread tension 7 Take-up lever 8 Hinged top cover 9 Carrying handle 10 Hand wheel 11 Thread guide 12 Second (detachable) spool - Pfaff synchrotronic 1229 | Owner's Manual - Page 5
the catch and ld down the lid (0). The compartment ehind it accommodates sewing thread, ot control and power cord. nportant: Before you replace the carrying (page 2). Removing and opening the detachable work support Reach under the detachable work support (K) and swing it out toward the left (L). - Pfaff synchrotronic 1229 | Owner's Manual - Page 6
thread. Accessory compartment (33) The illustration below shows how to arrange the snap-on feet in the corn partrnent: o = darning foot 1 = clear-view sewing foot 2 = overlock foot 3 = blindstitch foot 4 = zipper foot 5 = buttonhole foot The normal sewing foot is fitted to the sewing foot holder. 4 - Pfaff synchrotronic 1229 | Owner's Manual - Page 7
Il the cord out of the foot control and sh plug M into the machine socket. ace the foot control under the table, as own. ush power cord plug K into the machine )cket and plug L into the wall socket. ress master switch 14 (page 4). Press wn foot control N. The machine starts wing. The more you press - Pfaff synchrotronic 1229 | Owner's Manual - Page 8
. Electronic top speed selector When slide 15 is pushed toward the machine sews faster, when it is pushed toward , it sews slower. The piercing power of the needle remains the same, regardless of the machine speed. Bobbin thread monitor The red bobbin thread monitor 38 starts tc flash when the - Pfaff synchrotronic 1229 | Owner's Manual - Page 9
Stopmatic control raises the needle (for needle threading, bobbin winding and removing the work). = The sewing foot is raised (for turning the work). = The sewing foot is lowered for sewing. = The Stopmatic control raises the needle (for basting). Removing bobbin case and bobbin Raise the needle - Pfaff synchrotronic 1229 | Owner's Manual - Page 10
pin K enters slot L. Pull the thread from the spool, pass it through guides 11 and 32, counter-clockwise around retainer stud 34, and then to the bobbin cut thc thread. Winding through the needle eye (only when a metal sewing foot is fitted) Raise presser bar lifter 37 to its horizonta (K) position. - Pfaff synchrotronic 1229 | Owner's Manual - Page 11
, making sure cutout L points upwards. Release latch K. Latch K and stud M must be flush. Close free arm cover 28. It must always be kept closed during sewing so that the photo-electronic bobbin thread monitor can function properly. L M 7 - Pfaff synchrotronic 1229 | Owner's Manual - Page 12
the small one. Pull the thread from the spool and draw it into thread guide 11, slot K, thread guide 31, take-up lever 7, thread guide 30 and the right guide of needle holder 16. Note on twin needles For two-needle sewing jobs attach the second spool holder for the second spool of thread (page - Pfaff synchrotronic 1229 | Owner's Manual - Page 13
draws up the bobbin thread. Pull the bobbin thread out of the needle hole and lay both threads toward the left and back under the sewing foot. - Pfaff synchrotronic 1229 | Owner's Manual - Page 14
Jpper tension (6) = Setting mark. The normal tension setting is in the light-coloured range between 3 and 5. The higher the number, the tighter the tension. ower tension = Regulating screw. Turn it left for a looser tension, or right for a tighter tension. 1 = Both tensions are correct. = Upper - Pfaff synchrotronic 1229 | Owner's Manual - Page 15
is engaged. o disengage: Push the top feeding foot own slightly, then pull it out and let it Ning up. Thread cutter The thread cutter is located at the back of top feeding foot 36. Remove the work by pulling it backwards out of the machine. Place the threads over thread cutter K and pull - Pfaff synchrotronic 1229 | Owner's Manual - Page 16
ilaster selector dial (24) Furn the outer ring until the symbol of the traight or zigzag stitch desired is )ositioned above mark K. Hraight stitch traight stitche. are located in the range rom 0 to 4 Zigzag stitch Setting mark = K Zigzag stitches are sewn in the ranges marked 5, 6, 7, 8 and 9. The - Pfaff synchrotronic 1229 | Owner's Manual - Page 17
-feed control 17 has the following positions: K = Normal position L As long as the control is pressed, the machine sews backwards (for backtacking the end of a seam). M Vertical position. The machine sews permanently in reverse. N = The feed dog is dropped (for embroidering, darning, etc.) CF A 13 - Pfaff synchrotronic 1229 | Owner's Manual - Page 18
holder and hold it in place with your eft hand. Lower the presser bar litter and t the same time reposition the sewing cot so that studs L fit in slots M. It the 3ewing foot does not readily snap in lace, press against screw N lightly. Slot 0 and screw P are used for attaching an edge - Pfaff synchrotronic 1229 | Owner's Manual - Page 19
hanging the needle aise the needle bar. Then hold the edle, loosen screw K and pull the ?edle out of the needle holder. Insert a w System 130/705 H needle (with the t side of its shank facing toward the ck) and push it up into the needle Dlder as far as it will go. Tighten screw K. Utility stitches - Pfaff synchrotronic 1229 | Owner's Manual - Page 20
Utility-stitch setting The setting of master selector dial 24/25 which is required for a specific utility stitch is indicated on the respective button. K = Press the button L = Turn the master selector dial Utility-stitch combinations Pushing two buttons simultaneously prodi ices new utility-stitch - Pfaff synchrotronic 1229 | Owner's Manual - Page 21
(When turned to symbol he ornamental stitches are disengaged.) Vheel 20 serves to set the machine at the eginning of the pattern. (For setting see I rawi ng.) etters K and Half the pattern • Beginning of small square when sewing ornamental stitch H 4IIIJ1 Three quarters of pattern Ornamental- - Pfaff synchrotronic 1229 | Owner's Manual - Page 22
ewing feet = Normal sewing foot: For all sewing jobs which require no special sewing foot. = Darning foot = Clear-view foot: For ornamental sewing and sewing on buttons. = Overlock foot: To be used together with the overlock-stitch attachment. If used alone, the overlock foot is ideally suited for - Pfaff synchrotronic 1229 | Owner's Manual - Page 23
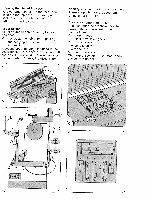
central position. The zipper chain moves along the grooves in the sole of the sewing foot. Illustrations Top: When the blindstitch foot is used, guide the folded edge of the material along edge guide K. The needle position is regulated by turning the needle position knob accordingly. Bottom: Push - Pfaff synchrotronic 1229 | Owner's Manual - Page 24
)verlock setting ttach overlock foot K (top ill.). Leave the Dot in its lowered position. Turn screw L ut a few turns. Attach overlock-stitch ttachment is sewn with the top feed disengaged. Important: The overlock-stitch attach ment must only be used with the machine set as described on these pages. - Pfaff synchrotronic 1229 | Owner's Manual - Page 25
e uoisue4 jeddn eq ies Mojeq pe4U.i1SflhI! S! bu!fles ebu oqj ,,peoJq4 e6po,, u seqwesei OS qOIiM weos 6U!qsiU-O6pO ut sMes euiqow eq ebui u s'op 0M4 eq o euo 01 peUJfl4 Si l!P ioioeles J84SW eq pu pesoOJ s! uonq NOOPOAO eq ueq weeS 6uqSu!-e6p3 speiq eq wu pu (4qbu do4 jji) ieei 0q4 PJMO1 4! - Pfaff synchrotronic 1229 | Owner's Manual - Page 26
uttonhole setting [tach the buttonhole foot. Release the sh buttons. insert a filler cord as Ilows: Place it over rear lug K (top ill,), ll it taut, and clamp it in front lug L. As u sew, arrow M moves along scale N. his serves to determine the buttonhole ngth (bottom ill.). Turn knob 25 to the - Pfaff synchrotronic 1229 | Owner's Manual - Page 27
0 -H CI) LI ' LIQ CC0m II II C) CD D CD C CD D D 0CtD3D ccoO C (I) c. D CD D CD D D D - Pfaff synchrotronic 1229 | Owner's Manual - Page 28
remove the latter. Open free arm cover 28 and remove the bobbin case. Clean the feed dog and the parts in the vicinity of the sewing hook with a soft brush. Do not oil the machine because it requires no maintenance. All you have to do is put a drop of oil in the hook - Pfaff synchrotronic 1229 | Owner's Manual - Page 29
obtained om your local Pfaff dealer. lachines with 11OV are without fuse. 4 Some safety rules 1. Be careful when sewing that your fingers will change needle, sewing foot, bobbin or needle plate, when you clean and oil the machine, or when you have to interrupt sewing and leave the machine for a - Pfaff synchrotronic 1229 | Owner's Manual - Page 30
Trouble shooting Cause: Remedy: 1. Machine skips stitches Needle not inserted correctly. Wrong needle used. Needle bent or blunt. Machine Insert new needle. See Needle and Thread Chart. Let machine feed the work alone. Only guide the material lightly. When inserting the bobbin case, press against - Pfaff synchrotronic 1229 | Owner's Manual - Page 31
L securely (page 20). Check thread tensions. 11. Fundamental rules During sewing never operate the Stopmatic control. Never run a threaded machine unless there is a piece of fabric under the sewing foot. If you have to leave the machine, even for a short while, be sure to switch off the master - Pfaff synchrotronic 1229 | Owner's Manual - Page 32
rips on elastic fabrics. 05 Scallop stitch Decorating handkerchiefs, for instance. 06 Viennese stitch 07 Honeycomb stitch Decorating napkins, for instance. Sewing on elastic threads or covering terry cloth seams. 08 Cord stitch A loose decorative seam for dainty clothing. 09 Feather stitch - Pfaff synchrotronic 1229 | Owner's Manual - Page 33
under stress. Flat, elastic reinforcing seams, for instance, on corsetry. Elastic assembly and edge finishing seams on knitted fabrics. Resembling manual embroidery. 19 Cross stitch Reinforcing flat edges of ornamental borders. 20 Looped stitch Ornamental stitch suitable for long fabric panels - Pfaff synchrotronic 1229 | Owner's Manual - Page 34
for jersey. 22 E stitch 23 W sti. tch 24 Balcony sti. tch 25 Lattice stitch 26 Hemmi.ng sti. tch 27 Greek stitch, narrow Sewing on borders and lace. Decorative seam for instance for decorating place mats. Decorative stitch, for instance for embroidered blouses. Decorative stitch, for instance, for - Pfaff synchrotronic 1229 | Owner's Manual - Page 35
borders, for instance, on bed room fabrics. 39 Ladder stitch, left Fancy stitch, for instance, for national costumes. 40 Domino stitch Sewing over multi-coloured wool threads. 41 Ladder stitch, right Border pattern, for instance, for place mats. 42 Scallop stitch, small Ornamental borders - Pfaff synchrotronic 1229 | Owner's Manual - Page 36
43 44 45 46 47 48 49 50 51 52 53 7 .7 - A % 't F 7 .7 -= Trr -rrr II V J 11411111 16 I+J -r i'.iiua hniiil 10 F+J i.".'i lisinil - 10 H+J p,,uI. lanud - 12 Fc+I pueeq ll,.n.I 13 F÷I c hijuil - 11 Fc+I lenhill luhuil 11 F+l i n..,q Ia,uul 11 G÷J D 11111111 IIii.,.I 10 - Pfaff synchrotronic 1229 | Owner's Manual - Page 37
can be btained from your Pfaff dealer. Not all the sewing feet listed below are at present ailable as snap-on feet. To attach a conventional sewing foot, remove the sewing foot older. 5/0 .- Accessory Ordering No. Sewing Operation Cording set Cording foot, 3 grooves (twin needle with 2.5 or - Pfaff synchrotronic 1229 | Owner's Manual - Page 38
DFAFFHAN DELSG ESELLSCHAFT tü r Haushaltnähmaschinen m.b.H. 5OO Karlsruhe 41 West Germany Subject to alterehons in design No. 22403R 1082 engl.
-
 1
1 -
 2
2 -
 3
3 -
 4
4 -
 5
5 -
 6
6 -
 7
7 -
8
-
9
-
10
-
11
-
12
-
13
-
14
-
15
-
16
-
17
-
18
-
19
-
20
-
21
-
22
-
23
-
24
-
25
-
26
-
27
-
28
-
29
-
30
-
31
-
32
-
33
-
34
-
35
-
36
-
37
-
38
 |
 |

UO!DflJSU
I
n
11kZJ
:-