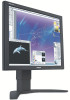
Philips 32MF605W/17 User Manual
Philips 32MF605W/17 Manual
 |
View all Philips 32MF605W/17 manuals
Add to My Manuals
Save this manual to your list of manuals |
Philips 32MF605W/17 manual content summary:
- Philips 32MF605W/17 | User Manual - Page 1
Owner`s Manual 26MF605W/32MF605W Series LCD TV NEED HELP?CALL US! MAGNAVOX REPRESENTATIVES ARE READY TO HELP YOU WITH ANY QUESTIONS ABOUT YOUR NEW PRODUCT. WE CAN GUIDE YOU THROUGH CONNECTIONS, FIRST-TIME SETUP, AND ANY OF THE FEATURES. WE WANT YOU TO START ENJOYING YOUR NEW PRODUCT RIGHT AWAY. CALL - Philips 32MF605W/17 | User Manual - Page 2
your model with MAGNAVOX makes power to keep you happy with your purchase for many years to come. As a member of the MAGNAVOX "family," you're entitled to protection by one of the most comprehensive warranties and outstanding service prevent operating and maintenance problems. WARNING: To reduce - Philips 32MF605W/17 | User Manual - Page 3
. 7. Do not block any of the ventilation openings. Install in accordance with the manufacturers instructions. 8. Do not install near any heat sources such org 16. Damage Requiring Service - The appliance should be serviced by qualified service personnel when: A. The power supply cord or the plug - Philips 32MF605W/17 | User Manual - Page 4
/Registration of Your TV 2 IMPORTANT SAFETY INSTRUCTIONS 3 Table of Content 4 Getting Started Before Installation 5 Installing LCD TV on The Wall 6 Basic TV and Remote Control Operations 7 Remote Control 8 Antenna Connection 9 Connecting the Power cord 9 Basic Cable TV Connection 9 Cable - Philips 32MF605W/17 | User Manual - Page 5
your LCD TV is displaying CVBS or RF signals. video equipment. 2 AV IN 2 Connects to the output jacks of your VCR or other video equipment. 6 VHF/UHF Connect to your VHF/UHF antenna or cable 7 AC IN Connects the supplied AC power supports YPbPr HD (High Definition) video equipment. format. 5 - Philips 32MF605W/17 | User Manual - Page 6
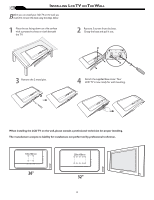
base. Grasp the base and pull it out. 3 Remove the 2 metal pins. 2 1 3 4 Attach the supplied base cover. Your LCD TV is now ready for wall mounting. When installing the LCD TV on the wall, please consult a professional technician for proper installing. The manufacture accepts no liability for - Philips 32MF605W/17 | User Manual - Page 7
BASIC TV AND REMOTE CONTROL OPERATIONS TELEVISION AND REMOTE CONTROL 1 Press POWER to turn on the LCD TV. 2 Press VOLUME + to increase the sound level. Or, press VOLUME - to lower the sound level. 3 Press CH+ or CH- to select channels. 4 Point the remote control toward on the front of the LCD TV - Philips 32MF605W/17 | User Manual - Page 8
REMOTE CONTROL Number buttons Press to select TV channels. When selecting single-digit channels, press the number of the desired channel. The LCD TV will pause for a few seconds then tune to the selected channel. Mute button Press to eliminate or restore the LCD TV sound. Mute will appear on the - Philips 32MF605W/17 | User Manual - Page 9
(not supplied). 2 Connect the antenna (or adapter) to the TV jack (marked 75 Ω) on the rear of the LCD TV. If POWER CORD Complete other connections prior to connecting the power cord. 1 Connect the power cord to the AC IN connector of the LCD TV. 2 Connect the other plug of the power cord to a wall - Philips 32MF605W/17 | User Manual - Page 10
power sources before making any connections. Cable Box with RF In/Out Jacks This connection will not supply Stereo sound to the LCD TV. 1 Connect the Cable TV AV IN 3 located on the rear of the TV to connect your Cable Box. 3. Use the SOURCE button on the remote control to select AV 1 (or AV2, AV3, - Philips 32MF605W/17 | User Manual - Page 11
its AV mode. Disconnect all power sources before making any connections. 1 Using an RCA-type Video and Audio cable (usually marked yellow, red, and white), connect the VCR's Video and Audio Out jacks to the TV's Video and Audio In jacks. 2 Use SOURCE button on the remote control to select AV 1 (or - Philips 32MF605W/17 | User Manual - Page 12
color and picture resolution in the playback of digital signal source material, such as with DVD player. Disconnect all power sources before making any connections. 1 Using a Component Video cable (not supplied), connect the DVD player's Y, Pb, Pr jacks to the Y, Pb, Pr jacks on the TV. Use the - Philips 32MF605W/17 | User Manual - Page 13
that the Component Video Input in AV IN 3 Connections can only support 480i format. 2 Using an Audio cable, connect the Digital TV Receiver's AUDIO OUT jacks to the TV's AUDIO IN jacks in HD IN connections. 3 Use Source button on the remote control to select HD to watch DVD. Note: 1. The Y, Pb, Pr - Philips 32MF605W/17 | User Manual - Page 14
TV, creating a more vibrant image. DVI HDCP technology allows content providers the ability to utilize the full bandwidth of high definition signals. Disconnect all power Use Source button on the remote control to select DVI to watch to LCD TV via DVI connection, since the LCD TV may not support the - Philips 32MF605W/17 | User Manual - Page 15
(not supplied), connect the PC's AUDIO OUT connector to the AUDIO connector on the TV. Use the PC IN connections. 3 Use Source button on the remote control to select PC to use your LCD TV as a PC monitor. Note: 1. Please refer to "Setting Up the PC Mode" section for all the supported PC display - Philips 32MF605W/17 | User Manual - Page 16
VCR or used to connect an external audio system for better audio. Disconnect all power sources before making any connections. For VCR Connection/Recorder: 1 1 Connect one end 's being viewed on the TV screen. Note: The Program recording is only possible when the input signal is SD (480i). 16 - Philips 32MF605W/17 | User Manual - Page 17
French or Spanish text. It does not change the other onscreen text features, such as Closed Captioning (CC), with TV shows. � � � MAIN CONTROLS PICTURE AUDIO FEATURES INSTALL LANGUAGE TUNER MODE AUTO PROGRAM CHANNEL EDIT MANUAL FINE TUNE FACTORY RESET MENU �� SOURCE CC � PIP � INSTALL LANGUAGE - Philips 32MF605W/17 | User Manual - Page 18
button on your remote control to switch your LCD TV to the TV MODE. 1 Press the Menu MENU button to see the onscreen menu. � 2 Press the (CH-) INSTALL menu. button to highlight the � MAIN CONTROLS PICTURE AUDIO FEATURES INSTALL LANGUAGE TUNER MODE AUTO PROGRAM CHANNEL EDIT MANUAL FINE TUNE - Philips 32MF605W/17 | User Manual - Page 19
. Remember, an antenna or cable TV signal must first be connected to your LCD TV (see pages 9-10 of this owner's manual). INSTALL LANGUAGE TUNER MODE AUTO PROGRAM CHANNEL EDIT MANUAL FINE TUNE FACTORY RESET ENGLISH INSTALL LANGUAGE TUNER MODE AUTO PROGRAM CHANNEL EDIT MANUAL FINE TUNE FACTORY RESET - Philips 32MF605W/17 | User Manual - Page 20
add or remove a channel in the LCD TV's memory. 1 Press the Menu MENU button to see the onscreen menu. 2 Press the (CH-) INSTALL menu. button to highlight the MAIN CONTROLS PICTURE AUDIO FEATURES INSTALL LANGUAGE TUNER MODE AUTO PROGRAM CHANNEL EDIT MANUAL FINE TUNE FACTORY RESET 3 Press the - Philips 32MF605W/17 | User Manual - Page 21
's default settings. However, your AutoLock access code will not be erased. Please refer to page 25 for details. MAIN CONTROL PICTURE AUDIO FEATURES INSTALL LANGUAGE TUNER MODE AUTO PROGRAM CHANNEL EDIT MANUAL FINE TUNE FACTORY RESET � � MENU OK SOURCE CC � PIP � � � INSTALL LANGUAGE - Philips 32MF605W/17 | User Manual - Page 22
user presets(News, Music, and Theatre) enable you to tailor the TV sound so as to enhance the particular program you are watching. Following these steps to select any of the options. Personal 1 Press the Sound button on the remote control. The current Smart Sound setting will appears on the screen - Philips 32MF605W/17 | User Manual - Page 23
TV PICTURE MENU CONTROLS T o adjust your LCD TV picture, select a channel and follow these steps. 1 Press the MENU MENU button to see the onscreen menu. 2 When PICTURE menu is highlighted,press the (VOL+) button to enter the PICTURE menu. 3 Press the (CH+) or (CH-) button to choose the item you - Philips 32MF605W/17 | User Manual - Page 24
TV SOUND MENU CONTROLS T o adjust your LCD TV Sound, select a channel and follow these steps. 1 Press the MENU MENU button to see the menu. 2 Press the (CH-) AUDIO menu. button to highlight the MAIN CONTROL PICTURE AUDIO FEATURES INSTALL SMART SOUND S E T T I N GS STEREO VIRTUAL SURROUND AVL - Philips 32MF605W/17 | User Manual - Page 25
. AUTO Lock offers various BLOCKING controls from which to choose: Access user setting. Movie Ratings - Certain blocking options exist which will block programming based on ratings patterned by the Motion Pictures Association of America. TV dialog. NC-17: No children under the age of 17 will be - Philips 32MF605W/17 | User Manual - Page 26
onscreen menu. MAIN CONTROLS PICTURE AUDIO FEATURES INSTALL SOURCE PICTURE FORMAT PICTURE ALIGNMENT AUTOLOCK CLOSED CAPTION screen. MENU OK SOURCE CC � PIP � FEATURES SOURCE PICTURE FORMAT PICTURE ALIGNMENT AUTOLOCK CLOSED CAPTION LOCK PROGRAM CHANG CODE CLEAR ALL BLOCK OPTION MOVIE RATING TV - Philips 32MF605W/17 | User Manual - Page 27
PICTURE ALIGNMENT AUTOLOCK CLOSED CAPTION LOCK PROGRAM CHANG CODE CLEAR ALL BLOCK OPTION MOVIE RATING TV RATING AUTOLOCK ACCESS CODE ---- AUTOLOCK LOCK PROGRAM 18 CHANGE CODE CLEAR ALL BLOCK OPTION MOVIE RATING TV RATING 8 Press MENU MENU repeatedly to remove the menu from the screen - Philips 32MF605W/17 | User Manual - Page 28
the screen: 1 Press the MENU MENU button to see the onscreen menu. MAIN CONTROLS PICTURE AUDIO FEATURES INSTALL SOURCE PICTURE FORMAT PICTURE FEATURES SOURCE PICTURE FORMAT PICTURE ALIGNMENT AUTOLOCK CLOSED CAPTION LOCK PROGRAM CHANG CODE CLEAR ALL BLOCK OPTION MOVIE RATING TV RATING AUTOLOCK - Philips 32MF605W/17 | User Manual - Page 29
Press the (VOL+) button, INPUT USER CODE will appear on the screen. 6 Use the Number buttons to enter your access code. 7 Press the (CH-) RATING. buttons to select TV MAIN CONTROLS PICTURE AUDIO FEATURES INSTALL SOURCE PICTURE FORMAT PICTURE ALIGNMENT AUTOLOCK CLOSED CAPTION 6 FEATURES SOURCE - Philips 32MF605W/17 | User Manual - Page 30
to eliminate1t6h:e9 upper and lower part of the image. Ideal for displaying picture recorded in 2.35 :1 aspect ratio change the picture format by pressing the FORMAT button on your remote control. 2. The Picture Format Function is not accessible in PC MODE. 3. In HD and DVI MODE, the Picture Format - Philips 32MF605W/17 | User Manual - Page 31
TV screen. Designed to help the hearing impaired, this feature uses onscreen "text boxes" to show dialogue and conversations while the TV by pressing CC button on your remote control. MAIN CONTROLS PICTURE AUDIO FEATURES INSTALL SOURCE PICTURE FORMAT PICTURE ALIGNMENT AUTOLOCK CLOSED CAPTION 1 6 - Philips 32MF605W/17 | User Manual - Page 32
TV will go into standby mode. The PC Picture controls allow you to adjust the picture. Note: Make sure you are in PC mode. 1 Press the MENU MENU button on the remote control to see the onscreen menu. MAIN CONTROLS PICTURE AUDIO FEATURES INSTALL SMART PICTURE BRIGHTNESS CONTRAST AUTO ADJUST MANUAL - Philips 32MF605W/17 | User Manual - Page 33
be present or the TV will go into standby mode. The AUDIO controls allow you to adjust the sound. Note: Make sure you are in PC mode. MAIN CONTROL PICTURE AUDIO FEATURES INSTALL SMART SOUND S E T T I N GS STEREO VIRTUAL SURROUND AVL 1 Press the MENU MENU button on the remote control to show the - Philips 32MF605W/17 | User Manual - Page 34
feature allows you to call up a subscreen when you are using your TV as a monitor. Note: Make sure you are in PC mode. 1 Press the MENU MENU button to see the onscreen menu. MAIN CONTROL PICTURE AUDIO FEATURES INSTALL PIP SOURCE FEATURES PIP SOURCE SIZE VIDEO AUDIO DISPLAY 2 Press (CH -) button - Philips 32MF605W/17 | User Manual - Page 35
UP THE PC MODE (PERSONAL COMPUTER MONITOR) 26MF Series (26" LCD TV) No Resolution Mode 1 640 x 480 VGA VESA 60 2 SVGA 000 H. Frequency (kHz) 31.469 35.156 37.897 48.363 44.772 47.700 32MF Series (32" LCD TV) No Resolution Mode 1 640 x 480 VGA VESA 60 2 SVGA VESA 56 800 x 600 3 - Philips 32MF605W/17 | User Manual - Page 36
a wall switch. • Make sure a fuse has not blown at the power outlet. • Always point the remote control toward the front of the TV (toward the remote sensor). • Make sure that you use the supplied Magnavox Remote control, only the supplied Magnavox Remote control can be used with this LCD-TV set. TV - Philips 32MF605W/17 | User Manual - Page 37
station logos cause a problem if they are bright and stationary. Moving or low-contrast graphics are less likely to damage the picture tube. • Stock market tickers may appear at the bottom of the TV screen if the TV programming covers this news. • Shopping channel logos, pricing displays may be - Philips 32MF605W/17 | User Manual - Page 38
23 F Factory Service 41.42 Factory Service Information 41 Factory reset 21 I Index 38 L Language 4.17 Limited Warranty 42 M Mono 8.24.33 P PC (Monitor) Connection 15 R Regulatory 39. 40 S Sound 4.8.22.24.33.36 Stereo 4.8.10.24.33 T Tint 23 Treble 4.24.33 Troubleshooting 33 W Warranty - Philips 32MF605W/17 | User Manual - Page 39
Center. • The RF shield cable with ferrite core part number is 3138 198 71441. • If your RF shield cable without ferrite core, you can obtain the ferrite core from Philips Factory Service Center, installation as following. 1. Open the ferrite core. 2. Locate the video connector that goes - Philips 32MF605W/17 | User Manual - Page 40
Rules, Part 15, Subpart B. This kit must be utilized when "non-ferrited" video cables are used with this unit. This instruction sheet gives the details for proper installation. Additional FCC information may be found in the radio frequency interference statement located in the user's manual. Cable - Philips 32MF605W/17 | User Manual - Page 41
systems outside of the product. • Product repair and/or part replacement because of improper installation, connections to improper voltage supply, abuse, neglect, misuse, accident, unauthorized repair or other cause not within the control of Magnavox. • A product that requires modification or
-
 1
1 -
 2
2 -
 3
3 -
 4
4 -
 5
5 -
 6
6 -
 7
7 -
8
-
9
-
10
-
11
-
12
-
13
-
14
-
15
-
16
-
17
-
18
-
19
-
20
-
21
-
22
-
23
-
24
-
25
-
26
-
27
-
28
-
29
-
30
-
31
-
32
-
33
-
34
-
35
-
36
-
37
-
38
-
39
-
40
-
41
 |
 |

N
EED
H
ELP
?C
ALL
US
!
M
AGNAVOX
REPRESENTATIVES ARE READY TO HELP YOU WITH
ANY QUESTIONS ABOUT YOUR NEW PRODUCT.
W
E CAN GUIDE
YOU THROUGH CONNECTIONS, FIRST-TIME SETUP, AND ANY OF
THE FEATURES.
W
E WANT YOU TO START ENJOYING YOUR NEW
PRODUCT RIGHT AWAY.
C
ALL US BEFORE YOU CONSIDER RETURNING THE PRODUCT.
1-800-705-2000
O
R VISIT US ON THE WEB AT WWW.USASUPPORT.MAGNAVOX.COM
26MF605W/32MF605W Series
LCD TV
Owner`s Manual
Important!
Return your Warranty Registration Card within 10 days.
3138 155 23445