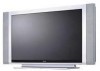
Philips 42MF231D User Manual
Philips 42MF231D - 42" Plasma TV Manual
 |
View all Philips 42MF231D manuals
Add to My Manuals
Save this manual to your list of manuals |
Philips 42MF231D manual content summary:
- Philips 42MF231D | User Manual - Page 1
User Manual 42MF231D/331D Plasma TV S M A R T. V E R Y S M A R T. Thank you for choosing Magnavox. Need help fast? Read your user Manual and/or Quick-Use Guide first for quick tips that make using your Magnavox product more enjoyable. If you have read your instructions and still need assistance, - Philips 42MF231D | User Manual - Page 2
MAGNAVOX makes you eligible for all of the valuable benefits listed power to keep you happy with your purchase for many years to come. As a member of the MAGNAVOX "family," you're entitled to protection by one of the most comprehensive warranties and outstanding service maintenance problems. WARNING - Philips 42MF231D | User Manual - Page 3
in accordance with the manufacturers instructions. 8. Do not install near Service - The appliance should be serviced by qualified service personnel when: A. The power supply 17. Tilt/Stability - All televisions must SERVICE EQUIPMENT POWER SERVICE GROUNDING ELECTRODE SYSTEM (NEC ART 250, PART H) 3 - Philips 42MF231D | User Manual - Page 4
when temperature changes occur. Condensation can cause damage to the Plasma screen and electrically parts. After condensation fades, spots or blemishes will be present on the Plasma screen. POSITIONING THE PLASMA TELEVISION • Place the Plasma TV on a solid, sturdy base or stand. Be sure the stand - Philips 42MF231D | User Manual - Page 5
instruction manual does not give an answer or if 'Trouble shooting tips' does not solve your TV problem, you can call your Local Magnavox Customer or Service Center. Please, have the Model and Serial number which you can find at the back of your television 19 TV menu 20 Picture menu 20 Sound - Philips 42MF231D | User Manual - Page 6
TV requires special skill that should only be performed by qualified personnel. You should not attempt to do the work yourself. Magnavox scan) video. - HDTV (High-Definition TV) are broadcast either in the 1080i or 720p formats, always with a widescreen picture. Note: Progressive scan video (p) is - Philips 42MF231D | User Manual - Page 7
A/V cables (not supplied) to the VIDEO and AUDIO L and R outputs on the back of the cable box and to the AV2 video (labeled VIDEO) and AUDIO (labeled L and R) jacks on the back of the TV. • To view programs from your cable box, first press the AV button on the remote control. • Press the cursor - Philips 42MF231D | User Manual - Page 8
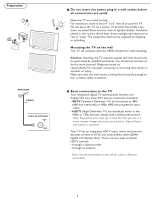
dealer if your main power supply voltage is different than that indicated for the TV. Never place the TV on top of the (AC) cord. Placing the TV at top the AC cord could cause a fire or electric shock. 5 Remote control: Insert the two supplied AAA batteries. The batteries supplied do not contain - Philips 42MF231D | User Manual - Page 9
, Soft, Multimedia or Eco picture settings. INFO button Display information: Press to display (when available) information about the selected TV channel and program or accessory device. POWER Press to turn on/off the TV from or to standby mode. Note: The TV is never powered off completely unless it - Philips 42MF231D | User Manual - Page 10
FORMAT Press this button to display a list of available display formats. Available display formats Automatic Super zoom 4:3 Movie expand 14:9 Movie expand 16:9 16:9 subtitle Widescreen Automatic makes the picture fill the screen as much as possible. It is recommended to press the cursor up/down - Philips 42MF231D | User Manual - Page 11
buttons on the top of your TV. Press the power switch to switch the TV on. Press: •the + VOL -button to adjust to volume; •the + CH -buttons to select the TV channels or sources. The MENU button can be used to display the Settings menu without the remote control. Use: •the + VOL - buttons and the - Philips 42MF231D | User Manual - Page 12
the remote control to perform the required action on a selected device. Settings TV Setup Installation Exit Settings TV Setup Installation Info Exit Settings TV Picture Info Sound Features Channels Settings TV Picture Sound Features Info Channels Info TV Picture Sound Features Channels TV Picture - Philips 42MF231D | User Manual - Page 13
, the TV will detect cable company supplied signal sand will search for cable TV (NTSC, ATSC, QAM modulated) channels available in your area. Make sure that registration with your cable TV provider and connection of equipment are completed. 5 Press the green button "Next" on the remote control. Note - Philips 42MF231D | User Manual - Page 14
use: Weak Signal Installation feature. Here's how: 1 In the antenna mode, select a channel from the displayed list of TV channels. Select the "Start" by red button on the remote control; TV set will detect the signal. 2 The signal strength is continuously displayed and updated as the antenna rotates - Philips 42MF231D | User Manual - Page 15
TV listings with service marks such as I'nCfoC'. This menu is used to control the settings of special TV guide, schedules, bulletin board information for Closed Captions programs, news, weather informations or stock market reports. Not all Caption services are necessarily being used by a TV - Philips 42MF231D | User Manual - Page 16
not pre-assigned. It is up to the discretion of the individual caption provider to utilize the remaining service channels. Digital caption options This allows you to modify how digital captions are displayed on your TV. Select from the following options to change the visual characteristics of your - Philips 42MF231D | User Manual - Page 17
TV channel and program information on screen. For example, information on the main or auxiliary program, input signal quality of connected accessory devices, the display format, sound mode, availability of Closed Caption service PIN. Follow the instructions on screen. If a PIN-code has previously been - Philips 42MF231D | User Manual - Page 18
L R VIDEO HDMI HDMI AV1: DVI Audio L/R Reset AV settings This function allows you to reset most of the picture and sound settings to their or Analog Audio In, a list appears allowing you to identify which type of accessory device is attached to this input. The TV detects the presence of the - Philips 42MF231D | User Manual - Page 19
in the Setup menu. 2 Press the cursor right key to select the Auto clock mode. 3 Press the cursor right key to instruct the TV to get the time automatically or manually. Auto clock channel (only available when Auto clock mode is set to Automatic) With the cursor buttons, select the channel number - Philips 42MF231D | User Manual - Page 20
Installation Exit Info Settings TV Picture Sound Features Channels Info TV Picture Sound Features Channels Picture Smart Picture Contrast Brightness Color Sharpness Color temperature Tint Picture format Press the MENU button on the remote control to display the Settings menu. The TV menu gives you - Philips 42MF231D | User Manual - Page 21
colors a blue tint, Normal to give the white colors a neutral tint, Warm to give the white colors a red tint. Tint Allows you to select the picture 's color mix or hue. Picture format This menu item performs the same as the FORMAT button on the remote control. See Use of the remote control, p. 9. 21 - Philips 42MF231D | User Manual - Page 22
Settings Info TV Picture Sound SetFteinagtusres TCVhannels Picture Sound Features Channels Info Settings InfoTV Picture Sound SetFteinagtusres TCVhannels Picture Sound Features Channels Info Info TV Picture Sound Features TCVhannels Picture Sound Features Channels Sound Smart Sound Volume Balance - Philips 42MF231D | User Manual - Page 23
TV Picture Sound Features Channels Info Features Closed captions Sleeptimer Features menu 1 Select Features in the TV assuming that the service is available in TV automatically turns to standby. 1 Select Sleeptimer. 2 Press the cursor right key. 3 Select a value with the cursor up/down key. The list - Philips 42MF231D | User Manual - Page 24
TV Picture Sound Features Channels Info Settings/TV Channels Lock after Channel lock TV ratings lock Movie ratings lock Prefered channels Region ratings lock Clear region ratings Info Channels Lock after Channel lock TV (See Set/Change PIN, p. 17). Follow the instructions on screen. 2 Select Time - Philips 42MF231D | User Manual - Page 25
TV-G none TV-PG (D) Dialog (L) Language (S) Sex (V) Violence TV-14 (D) Dialog (L) Language (S) Sex (V) Violence TV-MA (D) Dialog (L) Language (S) Sex When All has been selected, all items in the age-based and in the contents-based lists on the age-based list is selected, all . TV-Y TV-Y7 - Philips 42MF231D | User Manual - Page 26
enter your PIN Movie Ratings Lock This function allows you to control access to individual movies based on their MPAA ratings (Motion Picture Association of America). 1 Select Movie ratings lock with the cursor down. A list appears, showing all valid MPAA content ratings. 2 Press the cursor right - Philips 42MF231D | User Manual - Page 27
Settings/TV Channels Lock after Channel lock TV ratings you to control access to individual programs base on enter your PIN-code (see Set/Change PIN, p. 17). If the code is correct, the Region ratings lock lock/unlock any number of ratings on the list without re-entering your code. Each ratings item - Philips 42MF231D | User Manual - Page 28
to the TV. AV1 YPbPr, VIDEO and L/R Audio, AV2 YPbPr, VIDEO and L/R Audio, AV3 VIDEO, S-VIDEO, L/R Audio and Digital Audio out (SPDIF OUT) SIDE VIDEO, S-VIDEO and L/R Audio, Headphone SPEAKERS HDMI 75 Don't insert any cable here. This area is for repair center use only. VIDEO L R S-VIDEO L S-VIDEO - Philips 42MF231D | User Manual - Page 29
(not supplied) outputs to the cable box's IN jack. 3 Connect the other cable TV signal splitter output to the CABLE/ANTENNA 75 plug on the bottom of the TV. 4 Connect the cable box's OUT jack to the recorders RF IN socket. 5 Connect the Video, Audio Left and Right (only for stereo sound - Philips 42MF231D | User Manual - Page 30
AV3 jacks as described above. 4 Connect another RF cable from the output out of your recorder to the TV's input CABLE/ANTENNA jack. L S-VIDEO R DIGITAL AUDIO OUT Digital Surround receiver Connect a Digital Multi Channel Surround receiver to the DIGITAL AUDIO OUT (SPDIF OUT) connector at the bottom - Philips 42MF231D | User Manual - Page 31
TV accordingly to where you connected the S-Video cable. Notes: - If necessary, you can center your screen picture position with the cursor keys. - Labels for the component video DVD player's or devices instructions for definitions and connection details. - This television is designed to accept high - Philips 42MF231D | User Manual - Page 32
- Your TV supports HDCP (High- VIDEO input and AUDIO inputs . Do not connect cable and at the same time. This may cause picture distortion ! Headphone 1 Insert the plug into the headphone socket as shown. 2 Press the MUTE button on the remote control to switch off the internal loudspeakers of the TV - Philips 42MF231D | User Manual - Page 33
VIDEO Recorder TV Record a TV program You can record a TV program using your recorders tuner without affecting your TV to part 15 of the instructions, may or an experienced radio or television technician for help. ModificationsThe not expressly approved by Magnavox Consumer Electronics may - Philips 42MF231D | User Manual - Page 34
the picture is correctly positoned, the receiver box controls will need to be adjusted. No photo, music or video play or in poor quality only No sound • Check if the source complies with a supported code. • Increase the VOLUME. • Check that the TV is not muted, press the MUTE button on the remote - Philips 42MF231D | User Manual - Page 35
Plasma panel. Normal use of the TV Video game images and scoreboards • Television station logos cause a problem if they are bright and stationary. Moving or low-contrast graphics are less likely to damage the picture tube. • Stock market tickers may appear at the bottom of the TV screen if the TV - Philips 42MF231D | User Manual - Page 36
is supported. New software can be obtained from your dealer or can be downloaded from the www.usasupport.magnavox.com web site: 1 Go to www.usasupport.magnavox.com (not supplied). Note: Only use software upgrades that can be found on the www. usasupport.magnavox.com web site. Settings TV Setup - Philips 42MF231D | User Manual - Page 37
restart your TV with the power switch at the right side of the TV. Your TV will start up with the new software. Note: Once the upgrade is finished use your PC to remove the TV software from your USB portable memory (not supplied). Manual software upgrade procedure For a manual software upgrade copy - Philips 42MF231D | User Manual - Page 38
Class B digital device,pursuant to Part 15 of the FCC Rules.These in accordance with the instructions,may cause harmful interference cause harmful interference to radio or television reception,which can be determined by the dealer or an experienced radio/TV technician for help. Changes or - Philips 42MF231D | User Manual - Page 39
repair facility. After the period of one (1) year, Magnavox will no longer be responsible for charges incurred. PARTS: For a period of one (1) year from date of purchase, Magnavox will supply, at no charge, new or rebuilt replacement parts in exchange for defective parts. Magnavox authorized service
-
 1
1 -
 2
2 -
 3
3 -
 4
4 -
 5
5 -
 6
6 -
 7
7 -
8
-
9
-
10
-
11
-
12
-
13
-
14
-
15
-
16
-
17
-
18
-
19
-
20
-
21
-
22
-
23
-
24
-
25
-
26
-
27
-
28
-
29
-
30
-
31
-
32
-
33
-
34
-
35
-
36
-
37
-
38
-
39
 |
 |

3138 155 24392
SMART. VERY SMART.
User Manual
Read your user Manual and/or
Quick-Use Guide first for quick tips
that make using your Magnavox
product more enjoyable.
If you have read your instructions and
still need assistance,
you may access our online help at:
www.usasupport.magnavox.com
or call
1-800-705-2000
while with your product
(and Model / Serial number)
Thank you for choosing Magnavox.
Need help fast?
Model No: Serial No:
42MF231D/331D
Plasma TV