Philips 52PFL7422D37 User Guide
Philips 52PFL7422D37 - 52" LCD TV Manual
 |
UPC - 609585131507
View all Philips 52PFL7422D37 manuals
Add to My Manuals
Save this manual to your list of manuals |
Philips 52PFL7422D37 manual content summary:
- Philips 52PFL7422D37 | User Guide - Page 1
power to keep you happy with your purchase for many years to come. As a member of the PHILIPS "family," you're entitled to protection by one of the most comprehensive warranties and outstanding service -SERVICEABLE PARTS INSIDE. REFER SERVICING TO QUALIFIED SERVICE and maintenance problems. Warning:To - Philips 52PFL7422D37 | User Guide - Page 2
an electrician for replacement of the obsolete outlet. information, please contact your local authorities or the Electronic Industries Alliance: www.eiae.org. 16. Damage Requiring Service - The appliance should be serviced by qualified service personnel when: A. The power supply cord or the plug - Philips 52PFL7422D37 | User Guide - Page 3
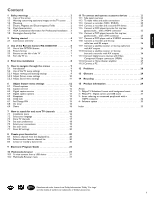
PC 27 12 Problems 28 13 Glossary 29 14 Recycling 29 15 Product information 29 Annex 1 - Philips TV Slideshow Format with background music 30 2 - Philips TV - Digital camera and USB issues 31 3 - Issues referring to connected peripherals with a HDMI connector 32 4 - Software update 33 Index - Philips 52PFL7422D37 | User Guide - Page 4
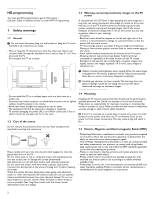
. Philips bears no responsibility for improper mounting or mounting that results in accident or injury. Make sure that the wall mount is being fixed securely enough so that it meets safety standards. ) If the TV is mounted on a swivel base or swivel arm, ensure no strain is placed on the power cord - Philips 52PFL7422D37 | User Guide - Page 5
TV display is made with high-precision technology with a high number of color pixels. Although it has effective pixels of 99,999% or more, black dots or bright points of light (red, green or blue) may appear constantly on the screen Philips Electronics Corporation with issued registrations - Philips 52PFL7422D37 | User Guide - Page 6
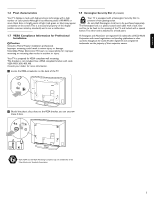
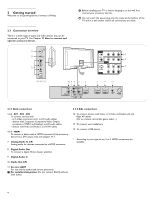
the power plug into the mains at the bottom of the TV and in a wall socket before all connections are made. USB 14 13 R AUDIO L 12 VIDEO S VIDEO 42"-47"-52" 10 9 8 7 6 L R AUDIO OUT DISPLAY SYNCHRONIZED DISPLAY SYNC. OUT L IN DIGITAL AUDIO + AV 1 HDMI 1 AV 2 HDMI 2 AV 3 HDMI 3 R ANALOG - Philips 52PFL7422D37 | User Guide - Page 7
TV. Contact your local dealer if your power supply is different. ) Ensure the power cord is fully inserted in the TV mains socket and the wall socket. 2.1.5 Remote ANTENNA CABLE OUT Set top box RF IN 2.1.3.2 Via a cable box or Satellite box ‡ Maintain the connection of the TV cable of your - Philips 52PFL7422D37 | User Guide - Page 8
remote control, you may experience a delayed operation at start up of the TV. After a short while your remote control will work smoothly. 1 POWER Press to turn the TV picture menu settings. 5 Color buttons When functions are attached to the color buttons, the color buttons are shown on screen. - Philips 52PFL7422D37 | User Guide - Page 9
the left of the TV Should your remote be lost or broken you can still change some of the basic settings with the buttons on the left side of your TV. - VOLUME Clock Select to activate/deactivate the clock display on the screen. + MENU 3.2 Widescreen picture format + CHANNEL - Avoid black - Philips 52PFL7422D37 | User Guide - Page 10
consists of a series of screens that will guide you through the installation of your TV. Follow the instructions on screen. Step 3 - Settings assistant: select your TV settings The Settings assistant will help you to select your preferred picture and sound settings. Finally you will arrive at - Philips 52PFL7422D37 | User Guide - Page 11
button on the remote control. VIEW DEMO OPTION INFO OK EXIT MENU EXIT MENU FORMAT > The main menu appears on the screen. Television Multimedia TV menu Channel list Program guide USBdevice 1 ◊Press the MENU button to exit the main menu. 5.2 Use of the TV menu settings The TV menu allows you - Philips 52PFL7422D37 | User Guide - Page 12
settings. 5.2.2 Adjust Picture menu settings The picture menu contains the settings that affect the quality of the picture. ‡ Press the MENU button on the remote control. > The main menu appears. ® Select TV menu and press the cursor right. > The TV menu is moved to the left. Ò Select TV settings - Philips 52PFL7422D37 | User Guide - Page 13
3.2 Widescreen picture format above. Volume Allows you to adjust the sound output level. 5.2.3 Adjust sound menu settings The sound menu contains the settings that affect the quality of the sound. ‡ Press the MENU button on the remote control. > The main menu appears. ® Select TV menu and - Philips 52PFL7422D37 | User Guide - Page 14
on the remote control. > The main menu appears. ® Select TV menu and press the cursor right. > The TV Menu is moved to the left. Ò Select Features and press the cursor right. > The Features menu is moved to the left panel. TV menu TV settings Features Installation Software update Info Features - Philips 52PFL7422D37 | User Guide - Page 15
remaining service channels. ç - This television provides display of television TV menu Features Closed captions Caption service Digital caption service Digital caption options Sleeptimer Child lock Set/Change PIN On timer Demo Info Child lock Lock after Channel lock TV ratings lock Movie ratings - Philips 52PFL7422D37 | User Guide - Page 16
programs carrying that rating are currently locked. TV ratings 6.6.3 TV ratings lock Your TV is equipped with a V-chip. This allows you to control access to individual programs based on their movie and TV ratings. All settings apply to all AV inputs, except HDMI.The program content advisory - Philips 52PFL7422D37 | User Guide - Page 17
. TV menu Features Closed captions Caption service Digital caption service Digital caption options Sleeptimer Child lock Set/Change PIN On timer Demo Info Set/Change PIN Please enter yoru current PIN. > If no PIN-code exists yet, the menu item is set to Set PIN. Follow the instructions on screen - Philips 52PFL7422D37 | User Guide - Page 18
menu will adjust settings related to the installation of the TV channels. DEMO OPTION INFO OK EXIT MENU EXIT MENU FORMAT ‡ Press the MENU button on the remote control. > The main menu appears. Television Multimedia TV menu Channel list Program guide USBdevice 1 ® Select TV menu and press - Philips 52PFL7422D37 | User Guide - Page 19
the green corresponding color button on the remote control for "Start" to start autoprogramming. > The menu screen disappears and the progress of autoprogramming is displayed. The progress bar indicates the number of analog and digital TV channels found. > When Autoprogramming is complete, a message - Philips 52PFL7422D37 | User Guide - Page 20
screen instructions. TV menu / Installation Channel installation Autoprogram Installation update on your remote control. Ò rating table Info 7.4.1 Select your location This allows you to select the location of your TV. If you choose for Retail shop it will result in fixed settings of picture - Philips 52PFL7422D37 | User Guide - Page 21
is necessary for the correct working of Lock after (See Chapter 6 Adjust feature menu settings) features. ENGLISH TV menu / Installation Preferences Location Volume bar Show emergency alerts Downloaded rating table Downloaded rating table Off On Info ) Before activating, please ensure regional - Philips 52PFL7422D37 | User Guide - Page 22
based on the specially broadcasted signals. ç Changes in Clock settings are only activated after turning the set off and on again 7.7 Reset AV settings it will bring up the last selected channel list. All channels AV1 AV2 HDMI A 1 Analog channel 1 2 Digital channel 1 3 Digital channel 2 4 - Philips 52PFL7422D37 | User Guide - Page 23
The Multimedia browser lets you display pictures or play audio files stored on a USB device.The Multimedia browser application is invoked from the main menu. ‡ Press the MENU button on the remote control. Television Multimedia TV menu Channel list Program guide USBdevice 1 ® Select Multimedia and - Philips 52PFL7422D37 | User Guide - Page 24
you can shift the selected zoom window over the screen with the cursor buttons ç To rotate a picture or to select one of the zoom magnifications, one of the color buttons on the remote control to perform the corresponding function mentioned at the bottom of the screen. à The blue color button can - Philips 52PFL7422D37 | User Guide - Page 25
connecting a PC, set the PC monitor refresh rate to 60Hz. 11.2.2 Headphone Select Headphone volume in the Sound menu to adjust the headphone volume. See Chapter 5.2.3 Adjust sound menu settings. ) Press MUTE on the remote control to turn off the internal loudspeakers of the TV. 11.2.3 USB See - Philips 52PFL7422D37 | User Guide - Page 26
experience a discolored line on the left or right side of the set, adjust the picture position to the center of the screen with the cursor buttons. - Cables are often color-coded to may cause difficulties for the television to properly display. à DVI to HDMI - Your TV comes with all types of - Philips 52PFL7422D37 | User Guide - Page 27
Connect a DVD player/DVD recorder, Set top box, game console,... with a HDMI (High Definition Multimedia Interface) connector à HDMI is the leading new standard for Digital Video and audio interconnection. Sound and picture interruptions ? See Chapter 12 Problems. DISPLAY SYNC. OUT L IN DIGITAL - Philips 52PFL7422D37 | User Guide - Page 28
Output connectors (YPbPr) This TV is capable of displaying HDMI 1 AV 2 HDMI 2 AV 3 DIGITAL AUDIO IN AV 3 L AUDIO R Y VIDEO AV 2 VIDEO S VIDEO Y AV 1 Pb Pr L AUDIO R L AUDIO R Pb Pr AV1 / AV3 : YPbPr 1 2a DVD / Set top box If your device has an S-VHS video jack: For improved picture - Philips 52PFL7422D37 | User Guide - Page 29
device connected to the HDMI input, the Digital audio signal is muted. DISPLAY SYNC. OUT L IN DIGITAL AUDIO + AV 1 HDMI 1 AV 2 HDMI 2 AV 3 R ANALOG AUDIO IN + HDMI 1 HDMI 2 HDMI 1 HDMI 2 HDMI 3 à If necessary you can adjust the picture position to the center of the screen with the cursor - Philips 52PFL7422D37 | User Guide - Page 30
antenna may improve the picture. No power • Verify that the TV's AC power cord is plugged into the mains socket. • Unplug the television, wait for 60 seconds.Then re-insert plug into the mains socket and turn on the television again. No sound when using DVI to HDMI connection • Verify whether you - Philips 52PFL7422D37 | User Guide - Page 31
modelnumber to view: - FAQ (Frequently Asked Questions) - Latest updated user manuals - Firmware upgrade files for your TV - Product information 15.2 Open source software This television contains open source software. NV Philips Innovative Applications hereby offers to deliver or make available - Philips 52PFL7422D37 | User Guide - Page 32
, test.alb, ... ‡ Press the MENU button on the remote control after having inserted a USB device and turned on the TV. The following syntax should be used to create the text file: Television Multimedia TV menu Channel list Program guide ® Select Multimedia and press the cursor right. Ò Go to - Philips 52PFL7422D37 | User Guide - Page 33
Philips TV - Digital camera and USB issues ç - The software of your TV is updatable. If you have problems first check if you have the latest software installed on your TV. The latest software, together with instructions, can be found on the Philips support website. Use the type number of your TV to - Philips 52PFL7422D37 | User Guide - Page 34
60 Hz - If necessary, you can adjust the picture position to the center of the screen with the cursor buttons. - Due to legal requirements, it is possible that with certain copy protected PCM audio qualities from a an accessory device connected to the HDMI input, the Digital audio output signal is - Philips 52PFL7422D37 | User Guide - Page 35
The Software update menu appears. TV menu Software update Update assistant Current software info Local updates Update assistant Start now ‡ Insert the USB memory device in the USB slot of the TV. ® The TV turns off.The screen stays black for about 10 seconds. Please, wait and do not use the POWER - Philips 52PFL7422D37 | User Guide - Page 36
. Local updates For Service use only. POWER POWER ç Do not use the POWER switch on the TV. ‹ The TV turns off.The screen stays black for about 10 seconds. Please, wait. ≈The TV turns back on again. The update is done. ÚOnce the upgrade is finished, use your PC to remove the TV software from - Philips 52PFL7422D37 | User Guide - Page 37
11 O On timer 16 Overview side panel 23 P PC 27 Picture menu 10 Problems 28 R Recorder 25 Remote control 6 Recycling 29 Reset AV settings 20 S Safety warnings 2 Satellite receiver 26 Set top box 25 Sharpness 10 Sleeptimer 13 Software update 33 Sound menu 11 mode 12 T Time zone selection 19 Tint - Philips 52PFL7422D37 | User Guide - Page 38
help ? Online help www.philips.com/welcome www.philips.com/support (outside USA) USA 1 888 PHILIPS (744 5477) Mo-Sat 7am-11pm, Sun 8am-11pm 7 days a week, except public holidays. Canada 01 800 363 7278 English 01 800 661 6162 Français Please, have the Model and Serial Number ready before your call - Philips 52PFL7422D37 | User Guide - Page 39
the Warranty Period. At its option, Philips will either (1) repair the product at no charge, sing new or refurbished replacement parts, or (2) exchange the product with a product that is new or which has been manufactured from new, or serviceable used parts and is at least functionally equivalent or - Philips 52PFL7422D37 | User Guide - Page 40
38
-
 1
1 -
 2
2 -
 3
3 -
 4
4 -
 5
5 -
 6
6 -
 7
7 -
8
-
9
-
10
-
11
-
12
-
13
-
14
-
15
-
16
-
17
-
18
-
19
-
20
-
21
-
22
-
23
-
24
-
25
-
26
-
27
-
28
-
29
-
30
-
31
-
32
-
33
-
34
-
35
-
36
-
37
-
38
-
39
-
40
 |
 |

Return your Product Registration Card or register online at
www.philips.com/welcome today to get the very most from your purchase.
Registering your model with PHILIPS makes you eligible for all of the valuable benefits listed below, so don’t miss out.
Complete and return your Product Registration Card at once, or register online at
www.philips.com/welcome
to ensure:
* Proof of Purchase
Returning the enclosed card guarantees that
your date of purchase will be on file, so no
additional paperwork will be required from
you to obtain warranty service.
* Product Safety Notification
By registering your product you’ll receive
notification - directly from the manufacturer -
in the rare case of a product recall or safety
defect.
* Additional Benefits of
Product Ownership
Registering your product guarantees that
you’ll receive all of the privileges to which
you’re entitled, including special money-saving
offers.
Congratulations on your purchase, and
welcome to the “family!”
Dear PHILIPS product owner:
Thank you for your confidence in PHILIPS.You’ve selected one of
the best-built,best-backed products available today.We’ll do
everything in our power to keep you happy with your purchase for
many years to come.
As a member of the PHILIPS “family,” you’re entitled to protection
by one of the most comprehensive warranties and outstanding
service networks in the industry.What’s more, your purchase
guarantees you’ll receive all the information and special offers for
which you qualify, plus easy access to accessories from our
convenient home shopping network.
Most importantly, you can count on our uncompromising
commitment to your total satisfaction.
All of this is our way of saying welcome - and thanks for investing in
a PHILIPS product.
P.S. To get the most from your PHILIPS purchase,be
sure to complete and return your Product
Registration Card at once, or register online at:
www.philips.com/welcome
For Customer Use
Enter below the Serial No., which is located on the rear of the
cabinet. Retain this information for future reference.
Model No.
Serial No.
Know these
safety
symbols
This “bolt of lightning” indicates uninsulated material within your
unit may cause an electrical shock. For the safety of everyone in
your household, please do not remove product covering.
The “exclamation point” calls attention to features for which you
should read the enclosed literature closely to prevent operating
and maintenance problems.
Warning
:To reduce the risk of fire or electric shock, this apparatus
should not be exposed to rain or moisture and objects filled with
liquids, such as vases, should not be placed on this apparatus.
CAUTION
:To prevent electric shock, match wide blade of plug to
wide slot, fully insert.
ATTENTION
: Pour éviter les chocs électriques, introduire la lame la
plus large de la fiche dans la borne correspondante de la prise et
pousser jusqu’au fond.
CAUTION
RISK OF ELECTRIC SHOCK
DO NOT OPEN
CAUTION: TO REDUCE THE RISK OF ELECTRIC SHOCK, DO NOT
REMOVE COVER (OR BACK). NO USER-SERVICEABLE PARTS
INSIDE. REFER SERVICING TO QUALIFIED SERVICE PERSONNEL.
t
s
Visit our World Wide Web Site at http://www.philips.com/welcome