Philips AEA3100 Short User Manual
Philips AEA3100 Manual
 |
View all Philips AEA3100 manuals
Add to My Manuals
Save this manual to your list of manuals |
Philips AEA3100 manual content summary:
- Philips AEA3100 | Short User Manual - Page 1
support at www.philips.com/welcome Question? Contact Philips AEA3100 Short User Manual Manual Safety Instructions a Read these instructions. b Keep these instructions. c Heed all warnings. d Follow all instructions. e j Refer all servicing to qualified service personnel. Servicing is required when - Philips AEA3100 | Short User Manual - Page 2
utilisé conformément aux instructions. Cependant, l'absence d'interf prevent operating and maintenance problems. WARNING: To reduce recibo. • No operar según el Manual del propietario. LO QUE NO SE CUBRE VIERGES AMÉRICAINES ... Communiquez avec le centre de service à la clientèle de Philips au: 1-866
-
 1
1 -
 2
2
 |
 |
EN
1
Important
Safety
Important Safety Instructions
a
Read these instructions.
b
Keep these instructions.
c
Heed all warnings.
d
Follow all instructions.
e
Do not use this apparatus near water.
f
Clean only with dry cloth.
g
Do not block any ventilation openings. Install in accordance with the manufacturer’s
instructions.
h
Do not install near any heat sources such as radiators, heat registers, stoves, or
other apparatus (including amplifiers) that produce heat.
i
Only use attachments/accessories specified by the manufacturer.
j
Refer all servicing to qualified service personnel. Servicing is required when the
apparatus has been damaged in any way, such as liquid has been spilled or objects
have fallen into the apparatus, the apparatus has been exposed to rain or moisture,
does not operate normally, or has been dropped.
k
Battery usage CAUTION – To prevent battery leakage which may result in bodily
injury, property damage, or damage to the unit:
•
Install all batteries correctly, + and - as marked on the unit.
•
Remove batteries when the unit is not used for a long time.
•
Perchlorate Material-special handling may apply. See www.dtsc.ca.gov/
hazardouswaste/perchlorate.
l
Apparatus shall not be exposed to dripping or splashing, keep it away from direct
sunlight,naked flames or heat.
Information about the use of batteries:
Caution
•
Risk of leakage: Only use the specified type of batteries. Do not mix new and used batteries. Do not mix
different brands of batteries. Observe correct polarity. Remove batteries from products that are not in use for a
longer period of time. Store batteries in a dry place.
•
Risk of injury:Wear gloves when handling leaking batteries. Keep batteries out of reach of children and pets.
•
Risk of explosion: Do not short circuit batteries. Do not expose batteries to excessive heat. Do not throw
batteries into the fire. Do not damage or disassemble batteries. Do not recharge non-rechargeable batteries.
Notice
Notice of compliance
Modifications
The user is cautioned that changes or modifications not expressly approved by the party
responsible for compliance could void the user’s authority to operate the equipment.
FCC & RSS compliance statement
This device complies with Part 15 of the FCC Rules and Industry Canada licence-exempt
RSS standard(s). Operation is subject to the following two conditions:
a
This device may not cause harmful interference, and
b
This device must accept any interference received, including interference that may
cause undesired operation.
FCC Radiation Exposure Statement
This equipment complies with FCC’s and IC’s RF radiation exposure limits set forth for an
uncontrolled environment.The antenna(s) used for this transmitter must be installed and
operated to provide a separation distance of at least 20 cm from all persons and must not
be collocated or operating in conjunction with any other antenna or transmitter. Installers
must ensure that 20cm separation distance will be maintained between the device (excluding
its handset) and users.
FCC rules
This equipment has been tested and found to comply with the limits for a Class B digital
device, pursuant to Part 15 of the FCC Rules.These limits are designed to provide reasonable
protection against harmful interference in a residential installation.This equipment generates,
uses and can radiate radio frequency energy and, if not installed and used in accordance with
the instructions, may cause harmful interference to radio communications. However, there is
no guarantee that interference will not occur in a particular installation.
If this equipment does cause harmful interference to radio or television reception, which can
be determined by turning the equipment off and on, the user is encouraged to try to correct
the interference by one or more of the following measures:
•
Reorient or relocate the receiving antenna.
•
Increase the separation between the equipment and receiver.
•
Connect the equipment into an outlet on a circuit different from that to which the
receiver is connected.
•
Consult the dealer or an experienced radio/TV technician for help.
Canada:
This Class B digital apparatus complies with Canadian ICES-003.
Disposal of your old product and batteries
Your product is designed and manufactured with high quality materials and components,
which can be recycled and reused.
Never dispose of your product with other household waste. Please inform yourself about the
local rules on the separate collection of electrical and electronic products and batteries.The
correct disposal of these products helps prevent potentially negative consequences on the
environment and human health.
Your product contains batteries, which cannot be disposed of with normal household waste.
Please inform yourself about the local rules on separate collection of batteries.The correct
disposal of batteries helps prevent potentially negative consequences on the environment
and human health.
Please visit www.recycle.philips.com for additional information on a recycling center in your area.
Environmental information
All unnecessary packaging has been omitted.We have tried to make the packaging easy to
separate into three materials: cardboard (box), polystyrene foam (buffer) and polyethylene
(bags, protective foam sheet.)
Your system consists of materials which can be recycled and reused if disassembled by a
specialized company. Please observe the local regulations regarding the disposal of packaging
materials, exhausted batteries and old equipment.
“Made for iPad” means that an electronic accessory has been designed to connect specifically
to iPad, and has been certified by the developer to meet Apple performance standards.
Apple is not responsible for the operation of this device or its compliance with safety and
regulatory standards. Please note that the use of this accessory with iPad may affect wireless
performance.
iPad is a trademark of Apple Inc., registered in the U.S. and other countries.
The Bluetooth
®
word mark and logos are registered trademarks owned by Bluetooth SIG,
Inc. and any use of such marks by Philips is under license.
All registered and unregistered trademarks are property of
their respective owners.
© 2012 Koninklijke Philips Electronics N.V.
All rights reserved.
AEA3100_17_Short User Manual_V1.1
www.philips.com/welcome
Always there to help you
AEA3100
Register your product and get support at
Question?
Contact
Philips
www.philips.com/welcome
Always there to help you
AEA3100
Register your product and get support at
Question?
Contact
Philips
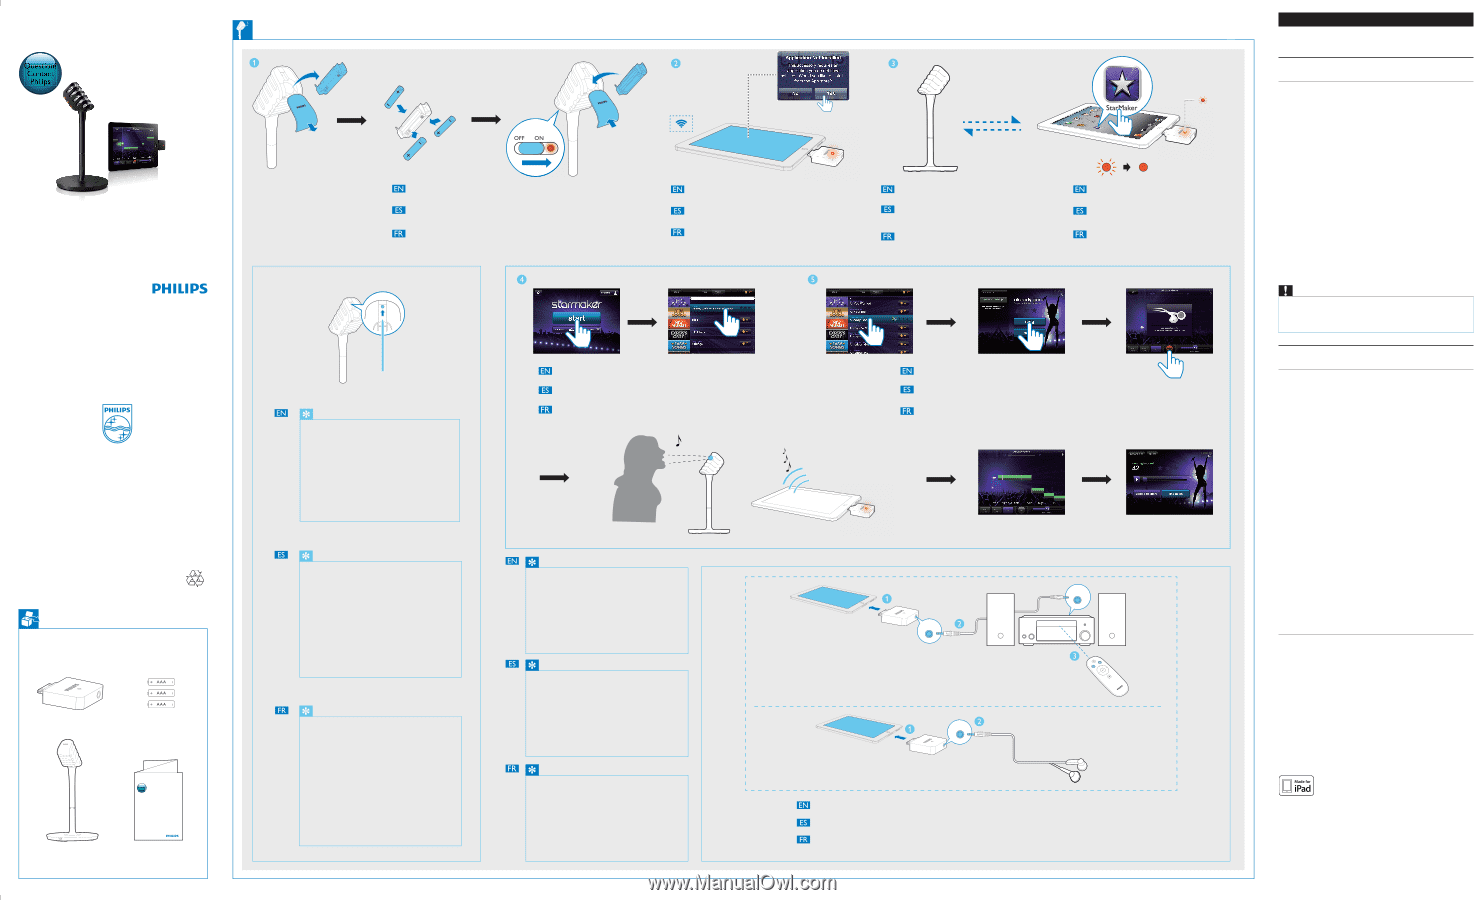
Prepare the microphone.
Prepare el micrófono.
Préparez le microphone.
Connect your iPad to the receiver, then follow the
prompt to install
StarMaker Karaoke + Auto-Tune
®
.
Conecte el iPad al receptor y, a continuación, siga las
indicaciones para instalar
StarMaker Karaoke + Auto-Tune
®
.
Connectez votre iPad au récepteur, puis suivez l'invite pour
installer
StarMaker Karaoke + Auto-Tune
®
.
Tap
Start
, find and download the tutorial, then follow the tutorial for
detailed usage of the app.
Toque
Start
(Iniciar), busque y descargue el tutorial y sígalo para conocer
el uso detallado de la aplicación.
Appuyez sur
Start
(Démarrer), recherchez et téléchargez le didacticiel, puis
suivez le didacticiel sur l'utilisation détaillée de l'application.
Run
StarMaker Karaoke + Auto-Tune
®
to start automatic
pairing and connection between the microphone and receiver.
Ejecute
StarMaker Karaoke + Auto-Tune
®
para iniciar
automáticamente el emparejamiento y la conexión entre el
micrófono y el receptor.
Lancez
StarMaker Karaoke + Auto-Tune
®
pour démarrer le
couplage automatique et la connexion entre le microphone et
le récepteur.
When you exit
StarMaker Karaoke + Auto-Tune
®
or
disconnect the iPad, the wireless microphone is
disconnected from the receiver automatically.
If the wireless microphone remains disconnected for more
than 15 minutes, it switches to standby mode automatically.
To switch it on from standby mode again, you need to slide
the
OFF/ON
switch on the microphone to the
OFF
position and then back to the
ON
position.
Select a song from the list, tap
SING->RECORD
, and then sing along.
Seleccione una canción de la lista, toque
SING->RECORD
(Cantar >
Grabar) y comience a cantar.
Sélectionnez une chanson dans la liste, appuyez sur
SING>RECORD
(CHANTER-> ENREGISTREMENT), puis chantez au son de la musique.
Al salir de
StarMaker Karaoke + Auto-Tune
®
o desconectar
el iPad, el micrófono inalámbrico se desconecta del receptor
automáticamente.
Si el micrófono inalámbrico sigue desconectado durante más
de 15°minutos, se activa el modo de espera
automáticamente.
Para volver a encenderlo desde el modo de espera, debe
deslizar el interruptor
OFF/ON
del micrófono a la posición
OFF
y, a continuación, de nuevo a la posición
ON
.
Lorsque vous quittez
StarMaker Karaoke + Auto-Tune
®
ou
déconnectez l'iPad, le microphone sans fil se déconnecte
automatiquement du récepteur.
Si le microphone sans fil reste déconnecté pendant plus de
15°minutes, il bascule automatiquement en mode veille.
Pour le réactiver et quitter le mode veille, vous devez faire
glisser le commutateur
OFF/ON
du microphone sur
OFF
puis le faire basculer à nouveau sur
ON
.
Wait until the Bluetooth
®
indicator turns
solid red.
Espere hasta que el indicador de Bluetooth
®
se ilumine en rojo de forma permanente.
Attendez jusqu'à ce que le voyant Bluetooth
®
s'allume en rouge.
PO Box 2248
Alpharetta, GA 30023-2248
Phone: 1-866-309-0845
Imported for USA/ Importé pour les
États-Unis / Importado para Estados Unidos P&F USA Inc.
For optimal sound effect, connect the receiver to an existing Hi-Fi system (cable not supplied).
Para obtener un efecto de sonido óptimo, conecte el receptor a un sistema Hi-Fi existente (cable no incluido).
Pour un effet sonore optimal, connectez le récepteur à une chaîne hi-fi existante (câble non fourni).
If the Bluetooth
®
indicator stays flashing, that is, the
microphone fails to pair with the receiver, follow the
procedures below to start manual pairing:
1. Reconnect the receiver to your iPad.
2. Remove the battery cover on the microphone.
3. Insert a thin object (such as a straightened paper clip)
into the pinhole and hold for more than 5 seconds until
the Bluetooth
®
indicator flashes faster.
4. Wait until the Bluetooth
®
indicator turns solid red.
Make sure that both the wireless microphone and receiver
are powered on during this process.
Si le voyant Bluetooth
®
continue de clignoter, c'est-à-dire que
le microphone ne parvient pas réaliser le couplage avec le
récepteur, suivez les procédures ci-dessous pour démarrer le
couplage manuel°:
1. Reconnectez le récepteur à votre iPad.
2. Retirez le couvercle de la pile sur le microphone.
3. Insérez un objet fin (comme une attache trombone
redressée) dans l'orifice et maintenez-le enfoncé pendant plus
de 5°secondes jusqu'à ce que le voyant Bluetooth
®
clignote
plus rapidement.
4. Attendez jusqu'à ce que le voyant Bluetooth
®
s'allume en
rouge.
Assurez-vous que le microphone sans fil et le récepteur sont
alimentés durant ce processus.
Si el indicador de Bluetooth
®
sigue parpadeando, es decir,
si el micrófono no se empareja con el receptor, siga los
procedimientos siguientes para iniciar el emparejamiento
manual:
1. Vuelva a conectar el receptor al iPad.
2. Quite la tapa de las pilas del micrófono.
3. Inserte un objeto estrecho (como un clip enderezado)
en el orificio y manténgalo durante 5°segundos hasta que
el indicador de Bluetooth
®
parpadee más rápido.
4. Espere hasta que el indicador de Bluetooth
®
se ilumine
en rojo de forma permanente.
Asegúrese de que el micrófono inalámbrico y el receptor
están encendidos durante este proceso.
MP3 LINK
LINE-OUT
LINE-OUT
Short User Manual
Manual de usuario corto
Bref mode d'emploi
Short User Manual
Manual de usuario corto
Bref mode d'emploi