Philips BDL4230E User manual
Philips BDL4230E Manual
 |
View all Philips BDL4230E manuals
Add to My Manuals
Save this manual to your list of manuals |
Philips BDL4230E manual content summary:
- Philips BDL4230E | User manual - Page 1
BDL4230E www.philips.com/welcome EN User manual Cleaning and troubleshooting - Philips BDL4230E | User manual - Page 2
BDL4230E SAFETY AND TROUBLESHOOTING INFORMATION Safety precautions and maintenance WARNING: Use of controls, adjustments or procedures other than those specified in this documentation may result in exposure to shock, electrical hazards and/or mechanical hazards. Read and follow these instructions - Philips BDL4230E | User manual - Page 3
service technician if the monitor does not operate normally when you have followed the instructions in this manual. • The casing cover should be opened only by qualified service personnel. • Keep the monitor caused by the shortcomings inherent in the LCD technology. In most cases the afterimage will - Philips BDL4230E | User manual - Page 4
Manual BDL4230E Only) This equipment has been tested and found to comply with the accordance with the instructions, may cause or an experienced radio/TV technician for help. Changes was supplied with the monitor when connecting this monitor to a computer Trade Name: Philips Declaration of Conformity - Philips BDL4230E | User manual - Page 5
User Manual BDL4230E POLISH CENTER FOR TESTING AND CERTIFICATION NOTICE The equipment should draw power from a socket with an attached protection circuit (a three-prong socket). All equipment that works together (computer, monitor, printer, and so on) should have the same power supply source. The - Philips BDL4230E | User manual - Page 6
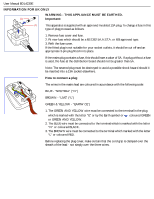
User Manual BDL4230E INFORMATION FOR UK ONLY WARNING - THIS APPLIANCE MUST BE EARTHED. Important: This apparatus is supplied with an approved moulded 13A plug. To change a fuse in - Philips BDL4230E | User manual - Page 7
User Manual BDL4230E RoHS 䚼ӊৡ⿄ 䪙 ∲ 䬝 (Pb) (Hg) (Cd) (Cr 6+) (PBB) (PBDE) O O O O O O X X O O O O X O O O O O X O O O O O X O O O O O O SJ/T11363-2006 X SJ/T11363-2006 - Philips BDL4230E | User manual - Page 8
User Manual BDL4230E NORTH EUROPE the local regulations on how to dispose of your old monitor from your local Philips dealer. (For customers in Canada and U.S.A.) This product - RECYCLING Your new TV/Monitor contains several materials that can be recycled for new uses. Like all LCD products, this set - Philips BDL4230E | User manual - Page 9
SPEAKERS 3.5.2. CONNECTING EXTERNAL AUDIO DEVICE 3.6. CONNECTING ANOTHER BDL4230E MONITOR 4. OSD MENU 4.1. NAVIGATING THE OSD MENU 4.1.1. NAVIGATING THE OSD MENU USING THE REMOTE CONTROL 4.1.2. NAVIGATING THE OSD MENU USING THE MONITOR'S CONTROL BUTTONS 4.2. OSD MENU OVERVIEW 4.2.1. PICTURE MENU - Philips BDL4230E | User manual - Page 10
User Manual BDL4230E 6.2. TYPES OF PIXEL DEFECTS + DOT DEFINITION 6.3. BRIGHT DOT DEFECTS 6.4. DARK DOT DEFECTS 6.5. PROXIMITY OF PIXEL DEFECTS 6.6. PIXEL DEFECT TOLERANCES 7. CLEANING AND TROUBLESHOOTING 7.1. CLEANING 7.2. TROUBLESHOOTING 8. TECHNICAL SPECIFICATIONS - Philips BDL4230E | User manual - Page 11
Manual BDL4230E 1. LCD monitor 2. Remote control with batteries 3. CD-ROM (EDFU and SICP) 4. Quick Start Guide 5. Logo guider 6. PHILIPS logo box and packing material for shipping the monitor. • External speakers and table so as not to shorten the service life of the electronic components. • - Philips BDL4230E | User manual - Page 12
User Manual BDL4230E 1.4. PORTRAIT MOUNTING Wall mounting holes Notes: • Metric 6 (10mm) screws are needed for wall mounting (not included). • The mounting interface should comply with the UL1678 standard in North America. The mounting means should strong enough to bear the weight of the monitor ( - Philips BDL4230E | User manual - Page 13
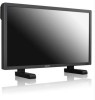
User Manual BDL4230E 2. PARTS AND FUNCTIONS 2.1. FRONT VIEW 1 1. Remote control sensor, ambient light sensor and power indicator • Receives command signals from the remote control. • Detects the ambient lighting condition around the monitor. • Indicates the operating status of the monitor: - lights - Philips BDL4230E | User manual - Page 14
280 mm 290.4 mm User Manual BDL4230E 2.2. REAR VIEW 9 8 100 mm Dent depth: 6mm 35 mm 200 mm 7 210.4 mm 100 mm 100 mm 12 3 4 56 1. ENTER/VIDEO SOURCE button • Use this button to select the input source. • When the On Screen Display menu is active, use this as the SET button. 2. MENU button - Philips BDL4230E | User manual - Page 15
User Manual BDL4230E 2.3. INPUT/OUTPUT TERMINALS 7 12 12 3 4 5 6 8 9 10 11 13 14 15 16 output of an AV device or another connect to the DVI-D output of a PC. (Using a DVI- BDL4230E monitor. HDMI cable) 14. Main power switch 6. VIDEO IN (DVI-D) Press to switch the main power on/off - Philips BDL4230E | User manual - Page 16
User Manual BDL4230E 2.4. REMOTE CONTROL 2.4.1. GENERAL FUNCTIONS POWER button Press to switch on the monitor from standby mode. Press again to turn it off to standby mode. SMART button To select smart picture mode from: • HIGHBRIGHT: for moving image such - Philips BDL4230E | User manual - Page 17
User Manual BDL4230E DISPLAY button To turn on/off the setting information displayed on the upper right corner of the screen. MENU button To turn the OSD menu on/off. UP button • To move the highlight bar up - Philips BDL4230E | User manual - Page 18
User Manual BDL4230E 2.4.2. INSERTING THE BATTERIES IN THE REMOTE CONTROL 1. Remove the cover on the rear of the remote control. 2. Insert two AAA size 1.5V batteries ensuring that the "+" and "-" ends of the batteries are correctly aligned. 3. Replace the cover. Note: Do not mix - Philips BDL4230E | User manual - Page 19
User Manual BDL4230E 3. CONNECTIONS TO EXTERNAL EQUIPMENT 3.1. USING THE CABLE RETAINER 3.2. USING THE SWITCH COVER You can use the switch cover to prevent the monitor from being turned on or off accidentally. 3.3. CONNECTING EXTERNAL EQUIPMENT (DVD/VCR/VCD) 3.3.1. USING COMPONENT VIDEO INPUT 1. - Philips BDL4230E | User manual - Page 20
User Manual BDL4230E 3.3.2. USING S-VIDEO INPUT 1. Connect the S-Video connector of the external device to the S-VIDEO input of the monitor. 2. Connect the red (R) and white (L) audio jacks of the device to the AUDIO IN (AUDIO2 or AUDIO3) jacks of the monitor. DVD/VCR/VCD 3.3.3. USING VIDEO INPUT 1. - Philips BDL4230E | User manual - Page 21
User Manual BDL4230E 3.3.4. USING HDMI INPUT Connect the HDMI connector of the external device to the HDMI input of the monitor. DVD/VCR/VCD 3.4. CONNECTING A PC 3.4.1. USING VGA INPUT 1. Connect the 15-pin VGA connector of the PC to the VGA IN connector of the monitor. 2. Connect the audio cable to - Philips BDL4230E | User manual - Page 22
Manual BDL4230E 3.4.2. USING DVI INPUT 1. Connect the DVI-D connector of the PC to the DVI-D connector of the monitor. 2. Connect the audio cable to the AUDIO IN (AUDIO1) input of the monitor. PC 3.4.3. USING HDMI INPUT 1. Connect the DVI-D connector of the PC to the HDMI connector of the monitor - Philips BDL4230E | User manual - Page 23
User Manual BDL4230E 3.5. EXTERNAL AUDIO CONNECTION 3.5.1. CONNECTING EXTERNAL SPEAKERS 1. Connect the speaker wires to the external speaker (SPEAKERS) output of the monitor. 2. Turn on the monitor. Note: Before connecting the speaker wires to the monitor, turn off your monitor. External speaker - Philips BDL4230E | User manual - Page 24
User Manual BDL4230E 3.6. CONNECTING ANOTHER BDL4230E MONITOR You can interconnect multiple BDL4230E monitors to create a daisy-chain configuration for applications like a TV wall. Note: The number of displays that can be used in a daisy-chain configuration will depend on the resolution of the input - Philips BDL4230E | User manual - Page 25
User Manual BDL4230E 4. OSD MENU An overall view of the On-Screen Display (OSD) structure is shown below. You can use it as a reference for further adjusting your monitor. 4.1. NAVIGATING THE OSD MENU 4.1.1. NAVIGATING THE OSD MENU USING THE REMOTE CONTROL 1. Press the MENU button on the remote - Philips BDL4230E | User manual - Page 26
User Manual BDL4230E 4.1.2. NAVIGATING THE OSD MENU USING THE MONITOR'S CONTROL BUTTONS 1. Press the MENU button to display the OSD menu. 2. Press button to enter the submenu. 5. Press the MENU button on the remote control to return to the previous menu, or press the MENU button several times to - Philips BDL4230E | User manual - Page 27
User Manual BDL4230E 4.2. OSD MENU OVERVIEW 4.2.1. PICTURE MENU PICTURE BRIGHTNESS Sel Adjust Enter Back Quit BRIGHTNESS Adjust the overall image brightness by changing the intensity of the LCD panel's backlight. Use the PLUS/MINUS button to adjust. CONTRAST Adjust to sharpen the picture - Philips BDL4230E | User manual - Page 28
User Manual BDL4230E COLOR CONTROL Note: This function is only available when COLOR button to make selection. SMART CONTRAST When turned on, this function helps enhance image contrast when displaying dark scenes. Use the PLUS/MINUS button to make selection. VIDEO SOURCE Select a video input - Philips BDL4230E | User manual - Page 29
User Manual BDL4230E 4.2.2. SCREEN MENU SCREEN H POSITION V POSITION CLOCK CLOCK PHASE ZOOM MODE top and bottom of the screen (letterbox format). This function allows you to optimize the picture display on screen. The following zoom modes are available: • FULL - This mode restores the correct - Philips BDL4230E | User manual - Page 30
User Manual BDL4230E • REAL - This mode displays the image pixel-by-pixel on screen without scaling the original image size. • 21:9 - The picture is enlarged to 16:9 format. This mode is recommended when displaying pictures that have black bands at the top and bottom (letterbox format). CUSTOM ZOOM - Philips BDL4230E | User manual - Page 31
User Manual BDL4230E 4.2.3. AUDIO MENU AUDIO VOLUME MUTE AUDIO SOURCE SPEAKER AUDIO RESET audio input source according to the audio signal source connected to the audio input and HDMI sockets on the monitor. AUDIO 3 AUDIO 1 AUDIO 2 HDMI Press the SET/PLUS button to open the submenu, and then - Philips BDL4230E | User manual - Page 32
User Manual BDL4230E 4.2.4. PIP MENU Note: For COMPONENT, VGA, DVI-D and HDMI inputs only. PIP PIP SIZE PIP AUDIO PIP RESET SMALL MAIN Sel Adjust Enter Back Quit - Philips BDL4230E | User manual - Page 33
User Manual BDL4230E 4.2.5. CONFIGURATION 1 MENU CONFIGURATION 1 AUTO ADJUST POWER SAVE LANGUAGE PANEL SAVING COLOR SYSTEM CONFIGURATION RESET FACTORY RESET ENGLISH AUTO Sel Adjust Enter Back Quit AUTO ADJUST Note: For the VGA input only. Use this function to let the monitor automatically - Philips BDL4230E | User manual - Page 34
User Manual BDL4230E Press the SET/PLUS button to open the submenu, and then press the UP/DOWN button to make selection. Select YES and press the SET - Philips BDL4230E | User manual - Page 35
Manual BDL4230E 4.2.6. CONFIGURATION 2 MENU CONFIGURATION 2 OSD TURN OFF OSD MODE INFORMATION OSD SLEEP TIMER OSD H POSITION OSD V POSITION MONITOR the PLUS/MINUS button to adjust. MONITOR INFORMATION Displays the information about your monitor, including model name, serial number, operating hours - Philips BDL4230E | User manual - Page 36
Manual BDL4230E 4.2.7. ADVANCED OPTION MENU ADVANCED OPTION INPUT RESOLUTION BLACK LEVEL EXPANSION GAMMA SELECTION SCAN MODE SCAN CONVERSION FILM MODE IR CONTROL KEYBOARD CONTROL TILING HEAT STATUS DATE AND TIME SCHEDULE MONITOR • HIGH GAMMA SELECTION Select a display gamma value to best suit the - Philips BDL4230E | User manual - Page 37
Manual BDL4230E FILM for TV broadcasting and VCR signals. IR CONTROL Select the operation mode of the remote control when multiple BDL4230E monitors are create a single large screen matrix (display wall) that consists of up to 25 BDL4230E monitors (5 monitors each on the vertical and horizontal - Philips BDL4230E | User manual - Page 38
User Manual BDL4230E • H MONITORS - Select the number of monitors on the horizontal side. • V MONITORS - Select the number of monitors on the vertical side. • POSITION - Select the position of this monitor in the screen matrix. • FRAME COMP - Choose to turn on or off the frame compensation - Philips BDL4230E | User manual - Page 39
AUTO SIGNAL DETECTION Choose to let the monitor detect and display available signal sources automatically. • ON - Set the monitor to display the image automatically once a signal is connected. • OFF - Once a signal is connected, it can only be selected manually. Use the PLUS/MINUS button to make - Philips BDL4230E | User manual - Page 40
User Manual BDL4230E 5. INPUT MODE VGA Resolution Standard Active Resolution Resolution x 1080, 60Hz). • Your PC display screen might appear different depending on the manufacture (and your particular version of Windows). Check your PC instruction book for information about connecting your PC - Philips BDL4230E | User manual - Page 41
User Manual BDL4230E • If a vertical and horizontal frequency-select mode exists, select 60Hz ( or cable connections. • The display settings table complies to the IBM/VESA standards, and based on the analog input. • The DVI support mode is regarded as same to the PC support mode. • The best timing - Philips BDL4230E | User manual - Page 42
Manual BDL4230E 6. PIXEL DEFECT POLICY Philips strives to deliver the highest quality products. We use some of the industry's most advanced manufacturing processes and practice stringent quality control. However, pixel or sub-pixel defects on the PDP / TFT panels used in Plasma- & LCD- displays - Philips BDL4230E | User manual - Page 43
Manual BDL4230E pair of dark dots Two dark dots, specifications defines the minimum distance between dark dots Philips Plasma / LCD- display must have pixel or sub-pixel defects exceeding the tolerances listed in the following table. BRIGHT DOT EFFECT MODEL 1 lit sub pixel ACCEPTABLE LEVEL BDL4230E - Philips BDL4230E | User manual - Page 44
Manual BDL4230E 7. CLEANING AND TROUBLESHOOTING 7.1. CLEANING Cautions When Using the Display • Do not bring your hands, face or objects close to the ventilation holes of the display. Top of display Cleaning Instructions • If display. If water or moisture gets inside the unit, operating problems - Philips BDL4230E | User manual - Page 45
User Manual BDL4230E 7.2. TROUBLESHOOTING Symptom Possible Cause Remedy No picture is displayed 1. The power cord is disconnected. 1. Plug in the power cord. 2. The main power switch on the back of 2. Make sure the power switch is switched on. the monitor is not switched on. 3. Connect a - Philips BDL4230E | User manual - Page 46
User Manual BDL4230E 8. TECHNICAL SPECIFICATIONS Display Item Screen Size (Active Area) Aspect ratio Number of pixels Pixel pitch Displayable colors Brightness Dynamic contrast ratio Contrast ratio (typical) Viewing angle Specifications 42" LCD 16:9 1920 (H) x 1080 (V) 0.4845 (H) x 0.4845 (V) [ - Philips BDL4230E | User manual - Page 47
User Manual BDL4230E Dimension [W x H x D mm] With Stand Without Stand x 119.6 mm 26.4 Kg 24.5 Kg Specifications 0 ~ 40 C -20 ~ 60 C 20 ~ 80% RH (No condensation) 5 ~ 95% RH (No condensation) 800 ~ 1100 hPa (Altitude: 0 ~ 2,000 m) 700 ~ 1100 hPa (Altitude: 0 ~ 3,000 m) 1 Way 1 Speaker 12 W (RMS - Philips BDL4230E | User manual - Page 48
-
 1
1 -
 2
2 -
 3
3 -
 4
4 -
 5
5 -
 6
6 -
 7
7 -
8
-
9
-
10
-
11
-
12
-
13
-
14
-
15
-
16
-
17
-
18
-
19
-
20
-
21
-
22
-
23
-
24
-
25
-
26
-
27
-
28
-
29
-
30
-
31
-
32
-
33
-
34
-
35
-
36
-
37
-
38
-
39
-
40
-
41
-
42
-
43
-
44
-
45
-
46
-
47
-
48
 |
 |
BDL4230E
www.philips.com/welcome
EN
User manual
Cleaning and troubleshooting