Philips DVDR3506 User manual - Page 11
Recording, Playback, Editing, Connections, Basic Setup, Function Setup, Others - hdmi dvd recorder
 |
UPC - 609585155190
View all Philips DVDR3506 manuals
Add to My Manuals
Save this manual to your list of manuals |
Page 11 highlights
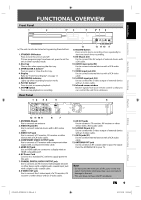
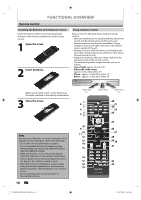
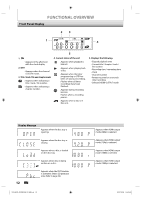
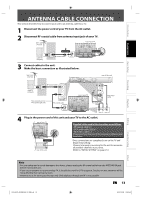
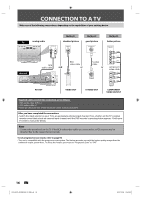
Introduction Connections Basic Setup Recording FUNCTIONAL OVERVIEW (*) The unit can also be turned on by pressing these buttons. 1. STANDBY-ON y button Press to turn the unit on and off. If timer programmings have been set, press to set the unit in timerstandby mode. 2. ZOOM button During playback, press to enlarge the picture on the TV screen. 3. SOURCE button Press to select the appropriate input. 4. REC MODE button Press to switch the recording mode. 5. DISC MENU button Press to display the disc menu. 6. AUDIO button • Press to switch the audio language for digital TV. • Press to display the audio menu during playback. 7. Cursor K / L/ { / B buttons Press to select items or settings. 8. PLAY B button* Press to start playback or resume playback. 9. BACK button Press to return to the previously displayed menu screen. 10. REW E button • During playback, press to fast reverse playback. • When playback is in pause, press to slow reverse playback. 11. PAUSE F button Press to pause playback or recording. 12. PREV button • During playback, press to return to the beginning of the current chapter, track or file. • When playback is in pause, press repeatedly to reverse the playback step by step. 13. REC I button • Press once to start a recording. • Press repeatedly to start the one-touch timer recording. 14. SKIP button During playback, press to skip 30 seconds. 15. RAPID PLAY button During playback, press to play back in a slightly faster/slower mode with keeping the audio quality. 16. Number/Character buttons • Press to select channel numbers. • Press to select a title/chapter/track/file on display. • Press to enter values for the settings in the main menu. • Press to enter title names. 17. CLEAR button Press to clear the password once entered or to cancel the programming for CD or to clear the selected marker number, etc. 18. REPEAT button Press to display the repeat menu. 19. MUTE button Limited to the Philips brand TV products, you can mute the TV volume with these buttons. 20. HDMI button Press to set the HDMI connector's video signal output mode . 21. DTV/TV button Press to switch between digital TV (DTV) mode and analog TV (TV) mode. 22. OPEN/CLOSE A button* Press to open or close the disc tray. 23. TITLE button Press to display the title list. 24. SETUP button • Press to display the main menu. • During DVD playback, press and hold for more than 3 seconds to switch the progressive scanning mode to the interlace mode. 25. OK button Press to confirm or select menu items. 26. INFO button Press to display the display menu on or off. 27. FFW D button • During playback, press to fast forward playback. • When playback is in pause, press to slow forward playback. 28. NEXT button • During playback, press to skip to the next chapter, track or file. • When playback is in pause, press repeatedly to forward the playback step by step. 29. STOP C button • Press to stop playback or recording. • Press to exit from the title list. 30. TIMER button Press to display the timer programming list. 31. CH / buttons Press to change the channel up and down. 32. Confirm ( • ) button Analog mode: Press to confirm the channel selection made by [the Number buttons]. Digital mode: Press to confirm the major / minor channel selection made by [the Number buttons]. 33. TV VOL / button Limited to the Philips brand TV products, you can adjust the TV volume with these buttons. Playback Editing Function Setup Others EN 11 E7H42UD_DVDR3506-37_EN.indd 11 2007/12/28 10:52:47
-
 1
1 -
2
-
3
-
4
-
5
-
 6
6 -
 7
7 -
 8
8 -
 9
9 -
 10
10 -
 11
11 -
 12
12 -
 13
13 -
 14
14 -
 15
15 -
 16
16 -
17
-
18
-
19
-
20
-
21
-
22
-
23
-
24
-
25
-
26
-
27
-
28
-
29
-
30
-
31
-
32
-
33
-
34
-
35
-
36
-
37
-
38
-
39
-
40
-
41
-
42
-
43
-
44
-
45
-
46
-
47
-
48
-
49
-
50
-
51
-
52
-
53
-
54
-
55
-
56
-
57
-
58
-
59
-
60
-
61
-
62
-
63
-
64
-
65
-
66
-
67
-
68
-
69
-
70
-
71
-
72
-
73
-
74
-
75
-
76
-
77
-
78
-
79
-
80
-
81
-
82
-
83
-
84
-
85
-
86
-
87
-
88
-
89
-
90
-
91
-
92
-
93
-
94
-
95
-
96
-
97
-
98
-
99
-
100
-
101
-
102
-
103
-
104
-
105
-
106
-
107
-
108
 |
 |