Philips DVDR3506 User manual - Page 14
Rf Modulator Connection
 |
UPC - 609585155190
View all Philips DVDR3506 manuals
Add to My Manuals
Save this manual to your list of manuals |
Page 14 highlights
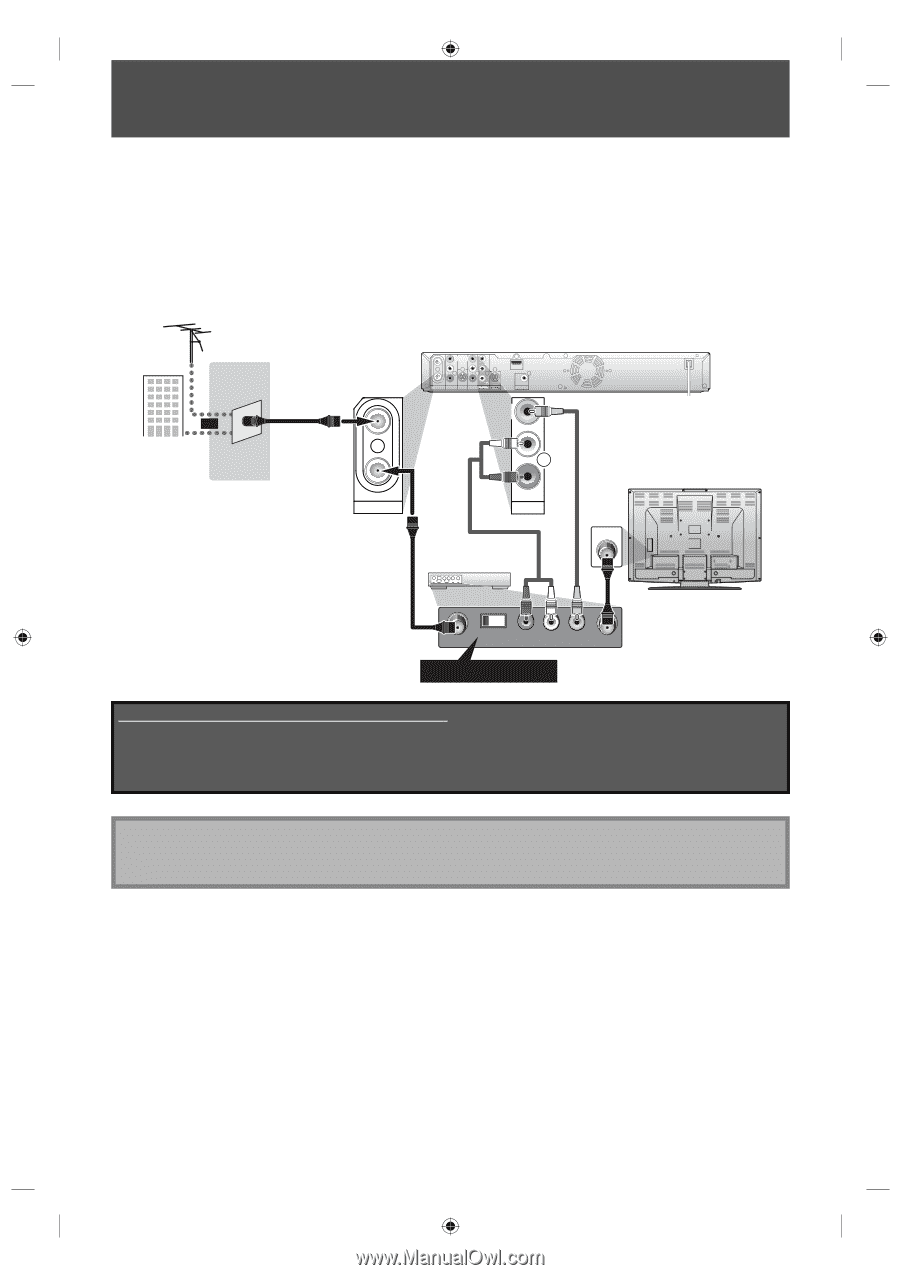
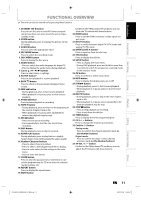
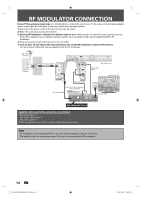
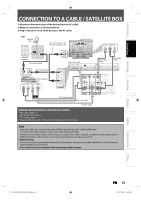
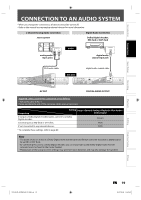
RF MODULATOR CONNECTION If your TV has antenna in jack only, it is still possible to connect this unit to your TV by using a commercially available stereo audio/video RF modulator. In this case, follow the instructions below. 1) Disconnect the power cords of the devices from the AC outlet. 2) Make the connection as illustrated below. 3) Set your RF modulator's channel 3/4 switch to either 3 or 4, whichever the TV channel is least used in your area. If your RF modulator has a modulator/antenna switch, set it according to the manual supplied with the RF modulator. 4) Plug in the power cords of the devices to the AC outlet. 5) Turn on your TV and choose the same channel as you set the RF modulator's channel 3/4 switch to. For more details, follow the manual supplied with the RF modulator. VHF / UHF antenna or cable TV company RF coaxial cable IN IN VIDEO VIDEO IN OUT Y L PB/CB L R OUT ANTENNA AV IN IN R PR/CR OUT S-VIDEO AV OUT COMPONENT VIDEO OUTPUT S-VIDEO HDMI OUT COAXIAL DIGITAL AUDIO OUTPUT PCM / BITSTREAM VIDEO OUT L rear of this unit RCA video cable OUT ANTENNA R AV OUT RCA audio cable rear of your RF modulator (not supplied) RF coaxial cable ANT. IN rear of your TV RF coaxial cable 3 4 ANT. IN CHANNEL R L AUDIO IN VIDEO IN TO TV Set channel 3 or 4 Supplied cables used in this connection are as follows: • RF coaxial cable x 1 • RCA audio cable (L/R) x 1 • RCA video cable x 1 Please purchase the rest of the necessary cables at your local store. Note • RF modulator is not supplied with this unit. You need to purchase it at your local store. • The quality of picture may become poor if this unit is connected to an RF modulator. 14 EN E7H42UD_DVDR3506-37_EN.indd 14 2007/12/28 10:52:51
-
 1
1 -
2
-
3
-
4
-
5
-
6
-
7
-
8
-
 9
9 -
 10
10 -
 11
11 -
 12
12 -
 13
13 -
 14
14 -
 15
15 -
 16
16 -
 17
17 -
 18
18 -
 19
19 -
20
-
21
-
22
-
23
-
24
-
25
-
26
-
27
-
28
-
29
-
30
-
31
-
32
-
33
-
34
-
35
-
36
-
37
-
38
-
39
-
40
-
41
-
42
-
43
-
44
-
45
-
46
-
47
-
48
-
49
-
50
-
51
-
52
-
53
-
54
-
55
-
56
-
57
-
58
-
59
-
60
-
61
-
62
-
63
-
64
-
65
-
66
-
67
-
68
-
69
-
70
-
71
-
72
-
73
-
74
-
75
-
76
-
77
-
78
-
79
-
80
-
81
-
82
-
83
-
84
-
85
-
86
-
87
-
88
-
89
-
90
-
91
-
92
-
93
-
94
-
95
-
96
-
97
-
98
-
99
-
100
-
101
-
102
-
103
-
104
-
105
-
106
-
107
-
108
 |
 |