Philips DVDR615 User manual
Philips DVDR615 Manual
 |
UPC - 037849945629
View all Philips DVDR615 manuals
Add to My Manuals
Save this manual to your list of manuals |
Philips DVDR615 manual content summary:
- Philips DVDR615 | User manual - Page 1
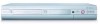
DVD Recorder DVDR615 User manual Thank you for choosing Philips. Need help fast? Read your Quick-Use Guide and/or Owner's Manual first for quick tips that make using your Philips product more enjoyable. If you have read your instructions and still need assistance, you may access our online help at - Philips DVDR615 | User manual - Page 2
so no additional paperwork will be required from you to obtain warranty service. *Product Safety Notification By registering your product, you'll receive notification and welcome to the "family!" Dear PHILIPS product owner: Thank you for your confidence in PHILIPS.You've selected one of the best- - Philips DVDR615 | User manual - Page 3
Do not block any ventilation openings. Install in accordance with the manufacturer´s instructions. 8. of time. 14. Refer all servicing to qualified service personnel. Servicing is required when the apparatus shall not be exposed to dripping or splashing. 17.Do not place any sources of danger on the - Philips DVDR615 | User manual - Page 4
OF 525 OR 625 PROGRESSIVE SCAN PICTURE PROBLEMS, IT IS RECOMMENDED THAT THE USER SWITCH THE CONNECTION TO THE 'STANDARD DEFINITION' OUTPUT. IF THERE ARE QUESTIONS REGARDING OUR TV SET COMPATIBILITY WITH THIS MODEL 525p AND 625p DVD PLAYER, PLEASE CONTACT OUR CUSTOMER SERVICE CENTER.' For Customer - Philips DVDR615 | User manual - Page 5
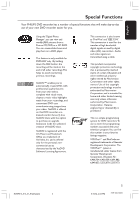
Your PHILIPS DVD recorder has a number of special functions that will make day-to-day use of your new DVD recorder easier for you. Using the 'Digital Photo Manager', you can view and modify JPEG pictures from a Picture CD, DVD, or a CD ROM. You can create slide shows and play them on a DVD player - Philips DVDR615 | User manual - Page 6
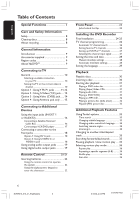
/ Cable Box 16 Connecting a VCR/DVD player 17 Connecting a camcorder to the front jacks 18 Option 1: Using DV In jack 18 Option 2: Using S-VIDEO In or VIDEO In jack 18 Using analog audio output jacks 19 Using digital audio output jacks 19 Remote Control 20-21 Inserting batteries 22 Using - Philips DVDR615 | User manual - Page 7
47 Deleting a programmed recording ........ 47 Editing/Finalizing Recording About editing 48 Color coded buttons functions 48 Index Picture screen 48 Changing the disc/title name 49 Making the editing compatible (DVD+RW 49 Finalizing disc (DVD+R 49 Video editing 50 Hiding unwanted chapter - Philips DVDR615 | User manual - Page 8
not contain any user-serviceable parts. Please leave all DVD recorder operates at a higher power than regular DVD or CD players, cleaning CDs intended for DVD or CD players may damage the optical unit (laser).Therefore, refrain from using a cleaning CD. About recycling These operating instructions - Philips DVDR615 | User manual - Page 9
manual before using your DVD recorder. It contains important information and notes regarding operation. Helpful Hints: - If you have questions or if problems come up during operation, please see the chapter 'Troubleshooting'. - If you need further assistance, please call the customer support service - Philips DVDR615 | User manual - Page 10
In channel. ➜ Or, the TV remote control may have a button or switch that chooses different video modes. ➜ Or, set the TV to channel 3 or 4 if you are using an RF modulator. If the TV shows a blank screen or distorted picture, it may be due to the DVD recorder's video output setting does not match - Philips DVDR615 | User manual - Page 11
's TV output jack to the antenna input jack at the back of your TV set. 3 Use the component video cable to connect the DVD recorder's COMPONENT VIDEO (OUT 1) jacks to the corresponding component video input jacks (or labeled as YUV or Y Pb/Cb Pr/Cr) at the back of your TV set. 4 Use an audio - Philips DVDR615 | User manual - Page 12
installation (see page 61.) - Before enabling the progressive scan function, you must ensure that your TV progressive scan function is turned on (refer to your TV owner's manual.) Helpful Hint: - To switch between interlaced and progressive scan output, press and hold ∞ while reconnect its ~ MAINS - Philips DVDR615 | User manual - Page 13
input jack at the back of the DVD recorder. 2 Use the supplied antenna cable to connect the DVD recorder's TV input jack to the antenna input jack at the back of your TV set. 3 Use an S-Video (SVHS) cable to connect the DVD recorder's S-VIDEO (Y/C) (OUT 2) jack to the S-Video In jack at the back of - Philips DVDR615 | User manual - Page 14
at the back of your TV set. 3 Use the supplied AV cables (yellow plug) to connect the DVD recorder's VIDEO (CVBS) (OUT 2) jack to the Video In jack at the back of your TV set (or labeled as Video In,AV In or Composite.) 4 Use the supplied AV cables (red/white plugs) to connect the - Philips DVDR615 | User manual - Page 15
-ON 2 on the DVD recorder to turn it on. ➜ The message 'IS THE TV ON?' appears on the display panel. 5 Turn on the TV power. Select the correct Video In channel at the TV (see page 10.) ➜ To switch between channel 3 and 4, hold down button {3} or {4} on the remote control to select the respective - Philips DVDR615 | User manual - Page 16
used for connecting to external devices, the signal from S-Video socket has priority. The COMPONENTVIDEO (IN-EXT1) jacks are designed only for 'interlaced' signals. Progressive Scan input signals cannot be processed by the DVD recorder. Satellite Receiver/ Cable Box 2 For complete connection to - Philips DVDR615 | User manual - Page 17
. 2 Use an audio cable (red/white) to connect the DVD recorder's AUDIO L/R (IN-EXT2) input jacks to the audio output jack on the VCR/DVD player. VCR/DVD player Y Pr Pb COMPONENT VIDEO OUT Before start operating, press TUNER on the remote control, then press 3 4 to select 'EXT1' as the input channel - Philips DVDR615 | User manual - Page 18
4-pin cable to connect the DVD recorder's DV IN jack to the appropriate DV output jack on the camcorder. Before start operating, select 'CAM 2' as the input channel. For recording, see pages 39~40. Helpful Hints: - The DV IN jack is not support the connection to a Personal Computer. - The DV jack on - Philips DVDR615 | User manual - Page 19
no sound at all. Helpful Hints: - Digital multi-channel sound offers the best possible sound quality. You will need a multichannel A/V receiver or amplifier that supports at least one of the audio formats of the DVD recorder (MPEG2, Dolby Digital.) See your receiver's manual for details. - Playback - Philips DVDR615 | User manual - Page 20
English Remote Control CH+ CH- 1 STANDBY-ON 2 - Turn on or off the DVD recorder. 2 TIMER - Access or exit the timer recording menu. 3 SYSTEM-MENU - previous menu on a video CD (VCD) or some DVDs. 9 Color coded buttons - A number of functions are available via the color coded button. These functions - Philips DVDR615 | User manual - Page 21
bar. ™ TV VOL + / - Adjust the volume of the TV set (for Philips TV with RC5 code only.) £ DVD MODE - Switch to DVD source mode. After that, you cannot use the buttons on the remote control to operate your Philips TV. 13 14 15 CH+ 16 17 CH- 18 19 20 21 22 23 24 ≤ TV MODE - Switch to - Philips DVDR615 | User manual - Page 22
remote control to operate the system 1 Aim the remote control directly at the remote sensor (iR) on the front panel. 2 Select the source you wish to control by pressing one of the source select buttons on the remote control {1.} 22 DVDR610_615_37_Engfinal434 22 8/16/04, 4:05 PM 3139 246 14221 - Philips DVDR615 | User manual - Page 23
number 'CAM 1'.) @ L/R AUDIO - Audio input for camcorders or video recorders (input channel number 'CAM 1'.) # DV IN - Input for digital camcorders or other suitable devices using this connector (input channel number 'CAM 2'.) DVDR610_615_37_Engfinal434 23 23 8/16/04, 4:05 PM 3139 246 14221 - Philips DVDR615 | User manual - Page 24
the DVD recorder. These settings will help you set up the basic DVD recorder features easily, including TV channels and language options. IMPORTANT! - You have to turn on your TV and select the correct Video to previous menu item. DVDR610_615_37_Engfinal434 24 8/16/04, 4:05 PM 3139 246 14221 - Philips DVDR615 | User manual - Page 25
to the DVD recorder, the TV 00 PM Date 06.30.2004 Done OK Helpful Hints: - If the DVD recorder DVD recorder and TV set. - If the sound or picture is distorted on any of the stored TV channels, see pages 26~27 "TV channel programming" for manual channel appears. The DVD recorder is ready for - Philips DVDR615 | User manual - Page 26
the DVD recorder. Automatic TV channel search This will erase and replace all previously stored TV channels. 1 Press SYSTEM-MENU on the remote control. ➜ The system menu appears on the TV. 2 Press 4 repeatedly to select { Set-up .} 3 Press 2 repeatedly to select { Analog Ch. } DVD-VIDEO-TITLE - Philips DVDR615 | User manual - Page 27
a three-digit number. For example, for channel 18, press 0, 1, 8. ➜ Refer to the list from your local newspaper or TV guide for the to select the type of connection you are using and allow the DVD recorder to reset the channels. 1 Press SYSTEM-MENU. ➜ The system menu appears 05 PM 3139 246 14221 - Philips DVDR615 | User manual - Page 28
'd) Setting the time and date Manual time/date settings If the DVD recorder has not set the time and date correctly, set the clock manually by following the steps below. Manual clock setting overrides automatic clock setting. 1 Press SYSTEM-MENU on the remote control. ➜ The system menu appears on - Philips DVDR615 | User manual - Page 29
for the system will remain as you set it. 1 Press SYSTEM-MENU on the remote control. ➜ The system menu appears on the TV. 2 Press 4 repeatedly to select { Set-up .} 3 Press 2 repeatedly to select { Language .} DVD-VIDEO-TITLE 04|CO1 Language Set-up Menu Audio Subtitle Country STOP 4 Press 3 4 to - Philips DVDR615 | User manual - Page 30
disc tray. It may cause the disc player to malfunction. Inserting a disc 1 Press STANDBY-ON 2 to turn on the DVD recorder. 2 Press OPEN/CLOSE / on the front of the DVD recorder. ➜ The disc tray opens. G You can also hold down the STOP 9 button on the remote control to open and close the disc tray - Philips DVDR615 | User manual - Page 31
disc (see pages 62~64.) ➜ Use the alphanumeric keypad 0-9 on the remote control to enter your pin code (password.) G For more playback features, see pages 33~36 "Additional Playback Features." Playing a DVD video disc Normally the DVD disc is formatted with a disc menu. You may have to make your - Philips DVDR615 | User manual - Page 32
, you can select to zoom, flip or rotate the picture. Press EDIT and followed by the matching color coded button on the remote control. 5 To stop playback, press STOP 9. ➜ The picture overview appears. Playable JPEG picture disc This DVD recorder can read JPEG pictures stored on a CD-ROM, Picture CD - Philips DVDR615 | User manual - Page 33
remote control. ➜ The system menu appears on the TV. 2 At { Toolbar ,} press 2 to select { Options .} DVD-VIDEO-TITLE 04|CO1 Options Toolbar Subtitle Audio Angle Zoom Time search [PLAY] [EDIT instead. Helpful Hint: - Some DVDs discs allow subtitle language changes only via the DVD disc menu - Philips DVDR615 | User manual - Page 34
remote control. 1 Press 4 to select { Audio } and press 2 to enter its options. 2 For DVD Helpful Hint: - Some DVDs allow soundtrack language changes only via the DVD DVD recorder is turned off and on again, the recording instructions supplied with the discs. DVDR610_615_37_Engfinal434 34 8/16/04, - Philips DVDR615 | User manual - Page 35
number. OR G Press T/C on the remote control to select "T" (title) or "C" (chapter.) OR G Press BROWSER on the remote control to display the titles list. Then not be possible for certain discs. Always refer to the instructions supplied with the discs. 35 DVDR610_615_37_Engfinal434 35 8/16/04, - Philips DVDR615 | User manual - Page 36
to preview the first 10 seconds of each track (CD, VCD DVD+RW only) on the disc. 1 During playback, press Red button { SCAN } on the remote control. ➜ The DVD recorder skips to the next track after 10 seconds of playback. 2 To exit Scan disc mode, press Red button again. ➜ Normal playback resumes at - Philips DVDR615 | User manual - Page 37
. 1 Press SYSTEM-MENU on the remote control. ➜ The system menu appears on TV. 2 Press 4 to select { Preferences .} 3 Press 2 to select { Recording .} DVD-VIDEO-TITLE 04|CO1 Recording Preferences Record mode M2 Language Chapters Filter [PLAY] [EDIT] [OK] = PLAY STOP 4 Press 3 4 to - Philips DVDR615 | User manual - Page 38
the REC MODE button on the remote control. 1 Press 4 to select { Record mode } and press 2 to enter its options. 2 Press 3 4 to select one of the following record modes. Record Mode M1 M2 M2x M3 M4 M6 M8 Picture Quality High quality DVD quality-Standard Play DVD quality-Standard Play Plus S-VHS - Philips DVDR615 | User manual - Page 39
from external device, press button {0} on the remote control and followed by 4 to select the correct input channel that matches the socket to which you connected to the DVD recorder. ➜ { CAM 2 } : DV IN socket at the front ➜ { CAM 1 } : S-VIDEO or VIDEO with AUDIO L/R sockets at the front ➜ { EXT - Philips DVDR615 | User manual - Page 40
an entry in the menu. 3 Press the matching color coded button on the remote control to select { Delete .} ➜ The current recording will be deleted. ➜ For DVD+RW only, a new recording can now be made here. G To delete all the recordings, see pages 57~58 "Accessing to the Preferences options - Disc - Philips DVDR615 | User manual - Page 41
your DVD recorder: 1 Remove the YesDVD disc from the DVD recorder. 2 Insert the YesDVD disc into the DVD disc drive tray on your personal computer. 3 A Web page will automatically launch on your computer with step-by-step instructions on how to print your customized YesDVD case coversheet. Helpful - Philips DVDR615 | User manual - Page 42
will also be emailed to you. 8. On your DVD recorder, select { Register } and press OK. 9. Use the remote control to enter the YesDVD Activation Code, then press OK to proceed. TIPS: The YesDVD disc is playable on other DVD players. 42 DVDR610_615_37_Engfinal434 42 8/16/04, 4:33 PM 3139 246 - Philips DVDR615 | User manual - Page 43
receive a unique 16-digit YesDVD Activation Code. Print out a copy of your Activation Code and invoice. If you provide your email address, your YesDVD Activation Code will also be emailed to you. 8. On your DVD recorder, select { Register } and press OK. 9. Use the remote control to enter the YesDVD - Philips DVDR615 | User manual - Page 44
recordings 1 Turn on the TV power. Select the correct Video In channel at the TV. 2 Press TIMER on the remote control. ➜ The timer overview appears. G If the time has not set yet, the { Time and Date } menu will appear on the screen, see page 28. 3 Press the matching color coded button on the remote - Philips DVDR615 | User manual - Page 45
. 6 Press the matching color coded button on the remote control to select { Store .} ➜ The system will store the timer entry and return to the timer overview screen. 7 To exit, press TIMER. 8 Insert a DVD+R(W). 9 Press STANDBY-ON to switch off the DVD recorder. ➜ The DVD recorder must be in standby - Philips DVDR615 | User manual - Page 46
needed by the DVD recorder for programming is contained in the programming number. 1 Turn on the TV power. Select the correct Video In channel at the TV. 2 Press TIMER on the remote control. ➜ The timer overview appears. TIMER TIMER OVERVIEW 10:55PM CNBC Weekly 23:45 Disco 12.04 21:00 BBC2 Daily 06 - Philips DVDR615 | User manual - Page 47
which you want to delete. 4 Press the matching color coded button on the remote control to select { Delete .} ➜ The current selected timer program is deleted from the list. TIPS: To play a DVD+R on other DVD players, see "Finalizing disc (DVD+R)." During timer recording, press STANDBY-ON will stop - Philips DVDR615 | User manual - Page 48
for the DVD recorder, but may not be accessible when you play the disc on other DVD player. The edit menu contains the following editable items : - Disc name of a DVD+R(W) - Make DVD compatible (DVD+RW only) - Finalize disc (DVD+R only) - Title name of a title on a DVD+R(W) - Video editing +RW Disc - Philips DVDR615 | User manual - Page 49
to be seen on other DVD players. 1 Insert a recorded DVD+RW. ➜ The Index Picture screen or disc content menu appears on the TV. 2 Press EDIT on the remote control. ➜ The edit menu appears. 3 Press 3 4 to select { Compatible } in the menu and press OK to confirm. Helpful Hint: - If the {Compatible - Philips DVDR615 | User manual - Page 50
on the remote control. ➜ The edit menu appears. 4 Press 3 4 to select { Video edit } in the menu and press OK to confirm. ➜ The video edit menu appears. OR G While playing the recorded DVD+R(W), you can press EDIT to direct access to the video edit menu. +RW | SHREK | EDIT MODE PAUSE 00:00 00:01 - Philips DVDR615 | User manual - Page 51
picture) 1 Start playback a recorded DVD+RW or an unfinalized DVD+R. 2 Press EDIT on the remote control. 3 Press the matching color coded button on the remote control to select { Title .} ➜ The title editing menu appears. +RW | SHREK | EDIT MODE PAUSE 00:00 00:01:02 [EDIT] = Exit Merge Back - Philips DVDR615 | User manual - Page 52
the current recording. 1 Follow the steps 1~3 of "Video editing" on page 50. 2 Press the matching color coded button on the remote control to select { No Chapters .} Photo editing The Photo (JPEG picture) recordings on a DVD+R(W) are limited to edit the information. The editable information items - Philips DVDR615 | User manual - Page 53
the Rings, The T Habla Con Ella The Ring ... 00:00 [PLAY] [EDIT][OK] = PLAY Delete STOP 00:22:08 M4 14:01:03 01:20:00 M4 21:02:03 00:32:02 M4 28:06:03 02:20:16 Protect G Alternatively, you can press BROWSER on the remote control to access the disc content menu. 2 Press 2 to - Philips DVDR615 | User manual - Page 54
DVD+RW or DVD+R from this DVD recorder, depends on the JPEG file parameters. The supported functions are shown at the bottom of the disc content menu via the color coded buttons on the remote control DVD / Photo / Rolls / Roll KYZ 06/06/2004 00:00 [PLAY] [OK] [RETURN] [EDIT album. Helpful Hint: - Philips DVDR615 | User manual - Page 55
. DVD / Photo / Albums / Album XYZ 06/06/2004 AUS 00:00 [PLAY] [OK] [RETURN] [EDIT] [BROWSER] Remove Move Select Rotate 4 Use 1 2 3 4 to select the photo which you wish to move to a different position. ➜ To make a multiple selection, press the matching color button on the remote control to - Philips DVDR615 | User manual - Page 56
slide show settings to your individual needs. 1 Press BROWSER on the remote control. ➜ The disc content menu appears. 2 Press 1 2 to folder. 3 Press PLAY 2 to start slide show play. Album 001/Photo 001 [PAUSE] [EDIT] [RETURN] [STOP] [BROWSER] Zoom Repeat Speed Up Speed Down { Zoom } - Select - Philips DVDR615 | User manual - Page 57
on the TV set. Select the correct Video In channel at the TV. 2 Press SYSTEM-MENU on the remote control. ➜ The system menu appears on TV. 3 Press 4 to select { Preferences .} Recording For more information on this menu, please see pages 37~39 "Recording settings." YesDVDTM For more information on - Philips DVDR615 | User manual - Page 58
Dolby Digital Audio on DVDs. - Control." Features DVD-VIDEO-TITLE 04|CO1 Features Preferences Auto resume Auto play Dealer demo STOP DVD-VIDEO-TITLE 04|CO1 Disc Preferences Adapt menu Delete all STOP { Adapt menu } If a DVD+RW has been recorded in a computer drive or in another DVD recorder - Philips DVDR615 | User manual - Page 59
to control the DVD recorder with a second remote control (not supplied.) - { On } : Enable second RC control. - { Off } : Disable second RC control. { OSD } Select the level of On-screen display information. - { Full } : Complete information always display during use. - { Reduced } :The help text - Philips DVDR615 | User manual - Page 60
DVD recorder display panel. - { Bright } : Normal brightness. - { Dimmed } : Medium brightness. - { Off } :Turn off the display. { PBC } - Video CDs only Play Back Control allows you to play Video Video output DVD-VIDEO-TITLE 04|CO1 Video output Set-up TV shape Black level Horizontal Progressive - Philips DVDR615 | User manual - Page 61
the DVD recorder is connected to a TV with progressive scan. - { On } : Select this to enable progressive scan function. - { Off } : Select this to disable the progressive scan function. Audio output After connecting the DVD recorder to your TV and other devices, you may need to change the digital - Philips DVDR615 | User manual - Page 62
0-9 to enter your four-digit pin code (see page 62 "Setting and changing the pin code".) 5 Press 4 to select { DVD country } and press 2 to enter its options. DVD-VIDEO-TITLE 04|CO1 Access Preferences Child lock Level DVD country Change pin American Samoa [PLAY] [EDIT] [OK] = PLAY STOP 6 Press - Philips DVDR615 | User manual - Page 63
the child lock This function can prevent children from viewing discs. This DVD recorder can memorize settings for 50 discs. When in use, a four-digit pin code must be entered in order to play a disc. 1 Press SYSTEM-MENU on the remote control. ➜ The system menu appears on the TV. 2 Press 4 to select - Philips DVDR615 | User manual - Page 64
keypad 0-9 to enter your four-digit pin code (see page 62 "Setting and changing the pin code".) 5 Press 4 to select { Level } and press 2 to enter its options. DVD-VIDEO-TITLE 04|CO1 Access Preferences Child lock Level DVD country Change pin Level 1 2 3 4 [PLAY] [EDIT] [OK] = PLAY STOP 6 Press - Philips DVDR615 | User manual - Page 65
installation again and reset any items you have adjusted during your use of the recorder. Remote control does not work. - Aim the remote control directly at the sensor on the front of the DVD recorder (not towards TV). If the DVD recorder receives a signal from the remote control, icon D will - Philips DVDR615 | User manual - Page 66
up. - The child lock is on. Read chapter "Setting Access Control - Activating/Deactivating the child lock" for details. - Wrong region code. The DVD must be coded for ALL regions or Region 1 in order to play on this DVD recorder. - There is no recording on the disc or wrong disc type. Read chapter - Philips DVDR615 | User manual - Page 67
minutes. - Some DVD players cannot playback DVD+RW recordings. You can solve this problem by using a special function : 1) Press OPEN/CLOSE on the DVD recorder to open the disc tray. 2) Insert the disc but do not close the tray. 3) Hold down the number button {2} on the remote control until the tray - Philips DVDR615 | User manual - Page 68
function: 1) Press OPEN/CLOSE on the DVD recorder to open the disc tray. 2) Insert the disc but do not close the tray. 3) Hold down button number {4} on the remote control until the tray closes. 'FINALIZING' appears on the display panel. 4) If finalizing has been successful, the Picture Index screen - Philips DVDR615 | User manual - Page 69
DV in (IEEE 1394 4-pin) - S-video in - Video in - Audio left/right in Timer Recording - 1-month timer programming, 6 events - weekly repeat recording - VCR Plus+® programming Video Editing Functions - Automatic/Manual Chapter Marker insertion - Append - Divide Digital Photo Manager - Create albums - Philips DVDR615 | User manual - Page 70
signal) is only connected to the TV when the modulator is turned off. GD Remote control command for the DVD recorder has been received. G X TIMER A timer recording has been programmed or is active. G BLOCKED The disc tray cannot be opened or closed due to some mechanical obstruction. G COMPATIBLE - Philips DVDR615 | User manual - Page 71
. G PROTECTED Disc is copy-protected and cannot be recorded. G READING Disc is being recognized by the DVD recorder. G RECORDING A recording is currently in progress. G SAFE RECORD The new recording will be added to the end of all recordings. G INSTALL After the automatic channel search, the menu - Philips DVDR615 | User manual - Page 72
picture or a music piece on a DVD that are smaller than titles. A title recorded on a Video CD or SVCD that supports PBC, you can enjoy interactive playback and searching. PCM: Pulse Code Modulation. A digital audio encoding system. Parental control: Limits Disc play according to the age of the users - Philips DVDR615 | User manual - Page 73
for defective parts. Philips authorized repair facility will provide removal and installation of the part under the specified labor warranty. EXCLUDED FROM WARRANTY COVERAGE Your warranty does not cover: • Labor charges for installation or setup of the product, adjust- ment of customer controls on - Philips DVDR615 | User manual - Page 74
PHILIPS CONSUMER ELECTRONICS NORTH AMERICA Knoxville,Tennessee 37914-1810, USA DVDR615 CLASS 1 LASER PRODUCT 3139 246 14221 74 DVDR610_615_37_Engfinal434 74 Print in China SgpJP-0434-37-1 8/16/04, 4:12 PM 3139 246 14221
-
 1
1 -
 2
2 -
 3
3 -
 4
4 -
 5
5 -
 6
6 -
 7
7 -
8
-
9
-
10
-
11
-
12
-
13
-
14
-
15
-
16
-
17
-
18
-
19
-
20
-
21
-
22
-
23
-
24
-
25
-
26
-
27
-
28
-
29
-
30
-
31
-
32
-
33
-
34
-
35
-
36
-
37
-
38
-
39
-
40
-
41
-
42
-
43
-
44
-
45
-
46
-
47
-
48
-
49
-
50
-
51
-
52
-
53
-
54
-
55
-
56
-
57
-
58
-
59
-
60
-
61
-
62
-
63
-
64
-
65
-
66
-
67
-
68
-
69
-
70
-
71
-
72
-
73
-
74
 |
 |

1
3139 246 14221
DVD
Recorder
DVDR615
User manual
Thank you for choosing Philips.
Need help fast?
Read your Quick-Use Guide and/or Owner’s Manual first for quick
tips that make using your Philips product more enjoyable.
If you have read your instructions and still need assistance,
you may access our online help at
www.p4c.philips.com
or call
1-800-PHILIPS (744-5477)
while with your product.
Make your own DVD
DVDR610_615_37_Engfinal434
8/16/04, 4:03 PM
1