Philips DVDR985A99 User manual
Philips DVDR985A99 Manual
 |
View all Philips DVDR985A99 manuals
Add to My Manuals
Save this manual to your list of manuals |
Philips DVDR985A99 manual content summary:
- Philips DVDR985A99 | User manual - Page 1
! Return your Warranty Registration Card within 10 days. See why inside. Read this manual first! Congratulations on purchasing this Philips product. We've included everything you need to get started. If you have any problems, Philips Representatives can help you get the most from your new product by - Philips DVDR985A99 | User manual - Page 2
As a member of the PHILIPS "family," you're entitled to protection by one of the most comprehensive warranties and outstanding service networks in the industry. should read the enclosed literature closely to prevent operating and maintenance problems. WARNING: TO PREVENT FIRE OR SHOCK HAZARD, DO NOT - Philips DVDR985A99 | User manual - Page 3
Playback and Features Quick Disc Playback 18 Quick Recording 19 DVD Recorder Controls Remote Control Buttons 20-21 Front Panel 22 Display 23 Rear Panel 24 Timer Recordings, Error Messages 43 Title Settings Menu 44 Manual Recording Volume, Append Recording 45 Record Settings, Chapter Markers - Philips DVDR985A99 | User manual - Page 4
qualified service person should remove the cover or attempt to service this with the instructions, may cause electronic devices. If you have any problems 40 of the National Electrical Code (NEC), which provides guidelines Philips Responsible Party: Philips Consumer Electronics P.O. Box 14810, - Philips DVDR985A99 | User manual - Page 5
is provided or the manufacturer's instructions have been adhered to. Code, ANSI/NFPA 70, provides information with regard to proper grounding of the mast and supporting overhead power lines or other electric light or power circuits, or where it any service or repairs to this product, ask the service - Philips DVDR985A99 | User manual - Page 6
quality you have had with video cassette tapes. Read this manual carefully to understand the latest features, then enjoy your Programming Package Contents q DVD Recorder q Remote control with two AA batteries q AC power cord q One blank Philips DVD+RW q One RF coaxial Philips Consumer Electronics. - Philips DVDR985A99 | User manual - Page 7
determine whether the Disc will or will not play or record on the Philips DVD Recorder. Discs for Recording and Playing DVD+RW (Digital Video Disc only Audio CD contents) ReWritable Region Codes and Color Systems DVDs must meet the requirements for Region Codes and Color Systems before you can use - Philips DVDR985A99 | User manual - Page 8
some DVD+Recordable Discs. DVD Disc Menus... Some explanations in this manual describe the DVD Disc Menus, which vary among DVDs. Movie producers pressing the DISC MENU button on the remote control. Details are on page 28. DVD Recorder Menus... Some instructions explain how to use the DVD Recorder - Philips DVDR985A99 | User manual - Page 9
the instructions to the separate Quick Start Guide for details. Remember... remote control may have a button or switch that lets you choose the Video In channel directly. See your TV manual for details. Or, go to your lowest TV channel and change channels down until you see the blue Philips - Philips DVDR985A99 | User manual - Page 10
front of the DVD Recorder to turn on the DVD Recorder. The STANDBY-ON light will turn green. If "TURN ON TV" appears on the display panel, picture. Only use these connections if your TV has Progressive Scan. Check your TV manual for details. • On the TV, the Component Video In jacks may be labeled - Philips DVDR985A99 | User manual - Page 11
the front of the DVD Recorder to turn on the DVD Recorder. The STANDBY-ON light will turn green. If "TURN ON TV" appears on the display panel, you need 3 or 4 as it might be when using a VCR. See your TV owner's manual for details. Or, go to your lowest TV channel and change channels down until you - Philips DVDR985A99 | User manual - Page 12
the front of the DVD Recorder to turn on the DVD Recorder. The STANDBY-ON light will turn green. If "TURN ON TV" appears on the display panel, you need 3 or 4 as it might be when using a VCR. See your TV owner's manual for details. Or, go to your lowest TV channel and change channels down until you - Philips DVDR985A99 | User manual - Page 13
the Stereo owner's manual. 6 Press the STANDBY-ON y button on the front of the DVD Recorder to turn on the DVD Recorder. The STANDBY-ON light will turn green or 4 as it might be when using a VCR. See your TV owner's manual for details. Or, go to your lowest TV channel and change channels down until - Philips DVDR985A99 | User manual - Page 14
owner's manual. 6 Press the STANDBY-ON y button on the front of the DVD Recorder to turn on the DVD Recorder. The STANDBY-ON light will turn no sound at all. • Your Stereo must support MPEG2, Dolby DigitalTM or Digital Theater System (DTS). Check the Stereo's manual. • To use the VIDEO OUT (CVBS - Philips DVDR985A99 | User manual - Page 15
TOR on the Recorder's remote.) Change TV channels at tracking. See your VCR owner's manual for details on tracking adjustment. etc. If you have trouble finding the right channel, videotapes, see the Quick Start Guide. Helpful Hints • You also PC applications may be supported. • To access the - Philips DVDR985A99 | User manual - Page 16
channel to see the Initial Setup messages. See pages 9-14 to determine the correct Video In channel for your connection. Or, check your TV owner's manual for details. Follow the steps below to set up the Recorder as directed on the TV screen. You can not turn off the Recorder until - Philips DVDR985A99 | User manual - Page 17
Initial Setup (cont'd) 17 Continued from previous page 4 The Subtitle Language menu appears next. Press 98 to choose the language you prefer for subtitles, then press OK. The Recorder will automatically show subtitles in the language you selected if subtitles are available in that language on the - Philips DVDR985A99 | User manual - Page 18
light will Philips DVD Or, follow the on-screen instructions as detailed in the DVD code or authorize the Disc. Details are on pages 49-53. • DVDs have a region code. Your Recorder will not play Discs that have a region code different from the region code of your Recorder. The Recorder's region code - Philips DVDR985A99 | User manual - Page 19
to open the disc tray. Or, press and hold STOP C on the remote control for about three seconds to open or close the Disc tray. 2 Insert both audio and video (sound and picture). • Refer to the separate Quick Start Guide for details on recording from a VCR or Camcorder (copying videotapes to a DVD+R - Philips DVDR985A99 | User manual - Page 20
of the DVD Recorder. The STANDBY-ON light on the front of the Recorder is green when the power is on. The light is red when the power is off Details are on page 46. TV Switch Press and hold while using buttons on the remote control that operate your TV. Details are on page 60. AUDIO Y Button Press to - Philips DVDR985A99 | User manual - Page 21
Button Press to set up Repeat A-B playback, in which a certain segment of the Track or Chapter plays repeatedly. Details are on page 34. Remote Control Buttons (cont'd) 21 MONITOR ON/OFF PREVIOUS REC/OTR NEXT REVERSE PAUSE SLOW FORWARD STOP FSS PLAY CLEAR VOL TIMER SELECT CH MUTE - Philips DVDR985A99 | User manual - Page 22
light will be green when the power is on. IR (infrared) remote sensor The sensor receives signals from the remote. Point the remote here, not at your TV, when using the remote button (Automatic/Manual Recording Volume) Press to adjust the recording volume automatically or manually. Details are - Philips DVDR985A99 | User manual - Page 23
Details are on page 46. CHAPTER Current Chapter number Display 23 D Remote Control command received TRACK TIME Elapsed playing time of the current Track in page 58. dB scale Indicates the recording volume when using the manual recording volume controls. Details are on page 45. Disc bar Displays - Philips DVDR985A99 | User manual - Page 24
your dealer for details on compatible remotes. The first signals from the remote control may be lost. The remote control supplied with the DVD Recorder VIDEO OUT jacks instead. Details are on page 10. Also see your TV manual for details. DIGITAL AUDIO OUT COAX (coaxial) jack Connect a digital audio - Philips DVDR985A99 | User manual - Page 25
a Menu Bar is on the screen, press the 98 ; : buttons on the remote control to select an item or to change the setting of an item. The 98; DVD Recorder. Also set up Languages, Access Control, Record Settings, Remote Control settings, Installation features, and other DVD Recorder features. W Title - Philips DVDR985A99 | User manual - Page 26
26 On-screen Symbols, Status Box On-screen Symbols The following symbols will appear briefly on the TV screen when you activate some Disc features. scan Scan The first 10 seconds of each Chapter/Track will play. Details are on page 33. repeat Repeat All The entire Disc will play repeatedly. - Philips DVDR985A99 | User manual - Page 27
Information Boxes 27 Warning box Appears near the bottom of the screen when appropriate. Examples and details are on page 43. Disc locked Tuner Information box Appears on the left side of the TV screen and identifies the current TV channel or Video source in Monitor mode. For example, if EXT1 - Philips DVDR985A99 | User manual - Page 28
28 Title/Disc Menus, Chapter/Track Selection DVD+RW DVD+R DVD Title/Disc menus 1 Press DISC MENU during Disc playback. For a DVD, if the current Title has a menu, the Title menu will appear on the screen. Otherwise, the Disc menu will appear. The menu may list language and subtitle options, - Philips DVDR985A99 | User manual - Page 29
Audio Language, Subtitles 29 DVD Audio Language Some DVDs are recorded in different languages. For example, you may be able to watch the same movie in French, Spanish, etc. The movie may have special audio features, such as a director's commentary or music soundtrack. If these are available on the - Philips DVDR985A99 | User manual - Page 30
30 Zoom, Camera Angle DVD+RW DVD+R DVD VIDEO CD Zoom Zooming lets you enlarge the video image during playback and pan through the enlarged image. 1 Press ZOOM a during Disc playback. a Zoom will be selected in the Menu Bar. 2 Within five seconds, press 8 or 9 to choose 1.33, 2 or 4. Playback - Philips DVDR985A99 | User manual - Page 31
TIMER SELECT CH MUTE DVD+RW DVD+R DVD VIDEO CD Still Picture/Frame-by-frame Playback To quickly pause playback, press PAUSE k on the remote control during playback. To advance the still picture one frame at a time, press PAUSE k repeatedly. To resume play, press PLAY :. Or, to freeze the - Philips DVDR985A99 | User manual - Page 32
, for example, one-half as fast as normal (1/2). Select 1 to play the Disc at normal speed again. Select 0 or press PAUSE k on the remote control to pause the picture. d HE st K L F -1 -1/2 -1/4 -1/8 s0 B 1/8 1/4 1/2 1 RW pause 0:00:22 0:00:05 MONITOR ON/OFF PREVIOUS REVERSE 4REC/OTR PAUSE - Philips DVDR985A99 | User manual - Page 33
DVD+RW DVD+R DVD VIDEO CD Time Search Time Search lets you choose a specific elapsed playing time at which you want to begin playback. This feature may not be available on all Discs. 1 Press SYSTEM MENU during Disc playback. 2 Press : repeatedly to select . 3 Press 9. Playback will pause. A - Philips DVDR985A99 | User manual - Page 34
34 Repeat, Repeat A-B DVD+RW DVD+R DVD VIDEO CD AUDIO CD Repeat You may play a Chapter, Track, Title or entire Disc repeatedly. All Discs may not allow all the repeat options. Check your Disc for details. 1 During Disc playback, press REPEAT repeatedly to choose a Repeat option. Depending on - Philips DVDR985A99 | User manual - Page 35
several minutes of no use. This prevents damage to your TV screen. To brighten the Index Picture Screen again, use the DVD Recorder or its remote control to access the regular features of the Index Picture Screen. Titles A maximum of three Index Pictures appears on the screen at once. Press 89 - Philips DVDR985A99 | User manual - Page 36
36 Installation: Automatic Channel Programming Although the DVD Recorder selects available TV channels during Initial Setup, you may want to repeat the process later if more channels become available in your area. This will erase and replace all previously stored channels. To update the available - Philips DVDR985A99 | User manual - Page 37
buttons, enter the channel number as a three-digit number. For example, for channel 18, press 0,1,8. Refer to the list from your local newspaper or TV guide for the VCR Plus+ channels and corresponding TV channel numbers for your area. These are the numbers you will enter as the Channel number as - Philips DVDR985A99 | User manual - Page 38
PBS channel, you may see an error message when you turn on the Recorder. Check the PBS channel and try again. Or, set the clock manually; details are on page 39. MONITOR ON/OFF PREVIOUS REC/OTR NEXT REVERSE PAUSE SLOW FORWARD STOP FSS PLAY 2-7 8 1,8 CLEAR VOL TIMER SELECT CH MUTE - Philips DVDR985A99 | User manual - Page 39
setting is stored. 11 Press SYSTEM MENU repeatedly to remove all menus. Helpful Hints • In order for the clock to remain set as you specified manually, you may need to set Daylight Saving to Off. • If you set up channels again as described on page 36, you may need to reset - Philips DVDR985A99 | User manual - Page 40
40 One-Touch Recording DVD+RW DVD+R 1 Insert a recordable DVD+RW or DVD+R into the Recorder. 2 In the Index Picture Screen of a DVD+RW, press 89 to select an Empty Title (or empty Index Picture box) on the Disc that has enough time for the recording. Or, select the place at which you want to - Philips DVDR985A99 | User manual - Page 41
End information with the Number buttons. Enter channel numbers as a three-digit number. For example, for channel 15, press 0,1,5. • Press ON/OFF y on the remote to turn off the Recorder and stop a timer recording that is in progress. • Use HQ when recording from digital sources, such as a digital - Philips DVDR985A99 | User manual - Page 42
printed in most TV guides next to the start time of a TV program. You can program a timer recording quickly by simply entering the code for your program. Before you begin, complete the VCR Plus+® channel setup. Details are on page 37. 1 Press TIMER on the remote control. - Philips DVDR985A99 | User manual - Page 43
Erasing Timer Recordings, Error Messages 43 DVD+RW DVD+R Erasing Timer Recordings 1 Press TIMER. 2 Press 89 to choose Timer list, then press :. 3 Press 89 to highlight the timer recording you want to clear. MONITOR ON/OFF PREVIOUS REC/OTR NEXT REVERSE PAUSE SLOW FORWARD STOP FSS PLAY - Philips DVDR985A99 | User manual - Page 44
44 Title Settings Menu DVD+RW DVD+R The Title Settings Menu lets you rename a Title or recording on a DVD+RW/DVD+R. From the same menu, you can play the entire selected Title or erase the chosen Title from the Disc. 1 When playback is stopped and a DVD+RW or DVD+R is in the DVD Recorder, the - Philips DVDR985A99 | User manual - Page 45
front of the DVD Recorder. The display will show the current audio level. MANUAL appears on the display. 2 Press REC VOLUME 89 on the front of return to automatic audio level control, press AUTO/MAN REC VOLUME again. MANUAL will disappear 1,3 2 from the display. DVD+RW Append recording To add - Philips DVDR985A99 | User manual - Page 46
every five to six minutes during recording. To disable this feature, select Off. You can manually insert Chapter markers after recording. Details are on page 48. You also may insert Chapter markers manually during recording. See Chapter Markers below. q LP/EP rec mode (recording mode) Press ; : to - Philips DVDR985A99 | User manual - Page 47
Editing: Disc Information Screen 47 You can change Disc settings for a DVD+RW/DVD+R from the Disc Information Screen. 1 When in the Index Picture Screen, press STOP C to select the first Title on the DVD+RW/DVD+R. 2 Press 8 to enter the Disc Information Screen. 3 In the Disc Information Screen, - Philips DVDR985A99 | User manual - Page 48
48 Editing DVD+R DVD+RW Although all editing changes may not be accessible when you play the Disc on other DVD Players, these editing changes are available for the DVD Recorder. 1 On the Index Picture Screen, press 89 to select the Title you want to edit, then press PLAY : to begin playback. 2 - Philips DVDR985A99 | User manual - Page 49
limits viewing of Discs that exceed the limits you set. This feature will not limit viewing if the Disc manufacturer did not code the Disc. Philips cannot guarantee the availability of Access Control with all Discs, and therefore denies any liability associated with unintended watching of Discs - Philips DVDR985A99 | User manual - Page 50
9 repeatedly to select will be highlighted. , then press :. Access control 3 Press : again, then press the Number buttons to enter your four-digit code. Details are on page 49. W X YZ a ~ 1 2 1en off no off s G Access control Status box r Auto resume Low power standby [] [] [] [] Enter - Philips DVDR985A99 | User manual - Page 51
of the rating of the DVD. You will need to know your 4-digit code in order to view the Disc. 1 Insert a Disc. The Access Control message screen will appear. The Disc will not play unless you enter the four-digit code. CLEAR TIMER SELECT VOL CH MUTE 2 T/C A/CH Helpful Hints • The Access - Philips DVDR985A99 | User manual - Page 52
the Disc. The alternative must have the same rating or a lower one. If no suitable alternative is found, playback will stop. Enter the 4-digit code to play the Disc. W X YZ a ~ 1 2 1en off no off Child lock 2 G Access control Status box r Auto resume Parental level Change country Change - Philips DVDR985A99 | User manual - Page 53
select trol will be highlighted. , then press :. Access con- 3 Press : again, then press the Number buttons to enter your four-digit code. Child lock will be highlighted. 4 Press 9repeatedly to select Change country, then press :. W X YZ a ~ 1 2 1en off no off s American Samoa L G Access - Philips DVDR985A99 | User manual - Page 54
for details. The Video CD will show instructions or options on the TV screen. Use the Recorder's remote buttons as directed by the Video CD. the Philips Recorder. If the Disc is unprotected, you can adapt the disc format by selecting Adapt Disc Format and following the on-screen instructions. - Philips DVDR985A99 | User manual - Page 55
during playback. • Some widescreen TVs may show only part of the DVD Recorder's menu. Adjust the screen mode on your TV. See your TV owner's manual for details. - Philips DVDR985A99 | User manual - Page 56
56 Digital Output After connecting the DVD Recorder to your TV and other equipment, you may need to change the DVD Recorder's Digital Output setting. Look to see which DVD Recorder audio jacks you connected to your other equipment, then set your Digital Output accordingly. The information in step 4 - Philips DVDR985A99 | User manual - Page 57
If you connected the DVD Recorder's red and white AUDIO OUT jacks to a Stereo (or Stereo TV) as shown on pages 10-13, choose a setting for Analog Output. You do not need to adjust this setting if you used the DIGITAL AUDIO OUT (OPTICAL or COAX) jacks on the DVD Recorder. Check your Stereo and see if - Philips DVDR985A99 | User manual - Page 58
58 Language Settings, Recording Audio DVD Language Settings Select a different language for the Disc Menu, Audio soundtrack, or Subtitles if multiple languages are available on the DVD. 1 Press SYSTEM MENU. to select it. may be selected. If it is not, press ; 2 Press 9 repeatedly to select r, - Philips DVDR985A99 | User manual - Page 59
2 Press 9 repeatedly to select , then press :. 3 Press 89 to select Key sound or Remote control used. Then, press : and follow step 4 according to your choice. 4 q If this book). However, if you have another Philips DVD Player and want to use that remote to also control the DVD Recorder, you may - Philips DVDR985A99 | User manual - Page 60
If the TV does not turn off after two minutes, release the ON/OFF y button. The code for your TV could not be found. 4 Make sure your remote works your TV as described above. Manual Remote Setup MONITOR ON/OFF PREVIOUS REC/OTR NEXT REVERSE PAUSE SLOW FORWARD STOP FSS PLAY 3 2 2 CLEAR - Philips DVDR985A99 | User manual - Page 61
Recorder's Remote Control with 099,064,291,321 Liesenk &Tter 064 Luma 233 Luxman 083 M M Electronic........132,244 036,064,136,401 MGA.......177,046,057,205 MTC087,057,046 ,066,046,083,183 Perdio 347 Philco 172,046 057,081,490 Philips 064,039 081,401,581 Phonola 064,039 Pilot 046,057,066 - Philips DVDR985A99 | User manual - Page 62
are having problems with your product, check this list of problems and possible solutions before requesting service. You may be able to solve the problem yourself. have a button on the TV remote control that selects an Auxiliary or A/V IN channel. See your TV owner's manual for details. Or, go to - Philips DVDR985A99 | User manual - Page 63
Recorder can play on the Philips DVD Recorder, but all remote control. • Aim the remote control directly need to access system information for service reasons. • Press SYSTEM MENU. may Messages or strange codes appear on the manual for details. • There are error messages that apply to recording problems - Philips DVDR985A99 | User manual - Page 64
or Super VCD that enables interactive use. PBS: Public Broadcast System. The PBS channel transmits data for Automatic clock setting. PCM: Pulse Code Modulation. A digital audio encoding system. RGB: Red-Green-Blue. A top-quality video connection where red, green and blue components of a video signal - Philips DVDR985A99 | User manual - Page 65
trouble with the Recorder after checking Helpful Hints and other information in this manual Philips Customer Care Center for the Authorized Service Center nearest you. If "PASS" appears, the Recorder apparently has no failure. The problem may be incorrect interpretation of the operating instructions - Philips DVDR985A99 | User manual - Page 66
66 Specifications DISC FORMATS SUPPORTED Disc type DVD+RW DVD+R DVD-RW (Video format) DVD-R DVD-Video SVCD Video CD Audio CD CD-R CD-RW Playback Recording DVD+REWRITABLE DISC - Philips DVDR985A99 | User manual - Page 67
RENEWED 90 DAY LIMITED WARRANTY - Philips DVDR985A99 | User manual - Page 68
low power standby 54 lp/ep rec mode 46 make edits compatible 47 manual recording volume........45 menu bars 25 menu language 16, 58 menus 8, 58 region codes 7 remote control, buttons ...20-21 remote control, settings..........59 remote control, tv operation 60-61 remote sensor 22 repeat
-
 1
1 -
 2
2 -
 3
3 -
 4
4 -
 5
5 -
 6
6 -
 7
7 -
8
-
9
-
10
-
11
-
12
-
13
-
14
-
15
-
16
-
17
-
18
-
19
-
20
-
21
-
22
-
23
-
24
-
25
-
26
-
27
-
28
-
29
-
30
-
31
-
32
-
33
-
34
-
35
-
36
-
37
-
38
-
39
-
40
-
41
-
42
-
43
-
44
-
45
-
46
-
47
-
48
-
49
-
50
-
51
-
52
-
53
-
54
-
55
-
56
-
57
-
58
-
59
-
60
-
61
-
62
-
63
-
64
-
65
-
66
-
67
-
68
 |
 |

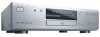
DVDR985
Digital Video Disc Recorder
Owner's Manual
Read this manual first!
Congratulations on purchasing this Philips product.
We’ve included everything you need to get started.
If you have any problems, Philips Representatives can
help you get the most from your new product by explaining:
• Hookups,
• First Time Setup, and
• Feature Operation.
Do not attempt to return this product to the store.
For fast help, call us first!
1-800-531-0039
Thank you for making Philips a part of your home!
Important!
Return your
Warranty
Registration Card
within 10 days.
See why inside.
®