Philips HTS3051BV User manual - Page 49
EasyLink (HDMI CEC), Network Connection
 |
View all Philips HTS3051BV manuals
Add to My Manuals
Save this manual to your list of manuals |
Page 49 highlights
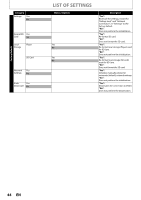
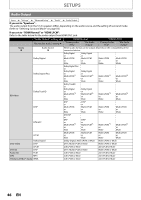
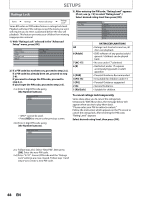
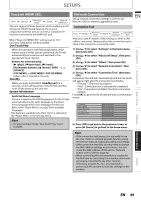
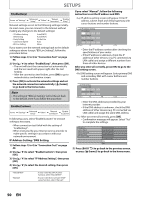
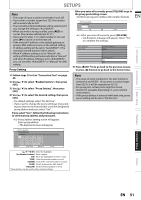
SETUPS EasyLink (HDMI CEC) home A "Settings" A "Advanced Setup" A "Others" A "EasyLink (HDMI CEC)" This unit supports Philips EasyLink, which enables your TV (limited to PHILIPS brand EasyLink TV) to act in conjunction with this unit, or vice versa. Compliant TV must be connected to the HDMI OUT jack. When "EasyLink (HDMI CEC)" setting is set to "On", functions listed below will be available. One Touch Play When the operations with following buttons of the remote control of this unit are performed, the TV will automatically be turned on and switched to the appropriate input channel. Buttons for one touch play: - [B (play)], [S (previous)], [T (next)], [the Number buttons], [ (home)], [INFO ], or [SOURCE] - [TOP MENU], or [DISC MENU / POP-UP MENU] (when a disc is inserted in the unit) Standby When you press and hold [Q (standby/on)] for 2 seconds, it turns off the power of the TV first and then turns off the power of this unit also. System Information Get & Set Menu Language The unit recognizes the OSD language set for the TV and automatically sets the same language as the player menu language (OSD menu language) for this unit. Refer to the "Player Menu" on page 39 for available languages. • This feature is available only when "Auto" is selected in the "Player Menu" in the settings menu. Note • For external input mode, "One Touch Play" is not available. Network Connection Set up network connection settings in order to use BD-Live, VUDU or network upgrade function. Connection Test EN Introduction home A "Settings" A "Advanced Setup" A "Others" A "Network Connection" A "Connection Test" After you made IP address / DNS settings or when a LAN cable is connected, always perform the connection test to check if the connection is correctly made. 1) Use [K / L] to select "Settings" in the home menu, then press [OK]. 2) Use [K / L] to select "Advanced Setup", then press [OK]. 3) Use [K / L] to select "Others", then press [OK]. 4) Use [K / L] to select "Network Connection", then press [OK]. 5) Use [K / L] to select "Connection Test", then press [OK]. Connection test will start automatically and the test result will appear right after the connection test finishes. • "Testing..." : The test is in progress. • "Pass" : Connection test is successfully completed. • "Fail" : Connection test failed. Check the connection settings. Press [OK] to go to the list of network status confirmation screen. Connections Basic Setup IP Address Subnet Mask Default Gateway Primary DNS Secondary DNS xxx.xxx.xxx.xxx xxx.xxx.xxx.xxx xxx.xxx.xxx.xxx xxx.xxx.xxx.xxx xxx.xxx.xxx.xxx then press 'OK'. Playback 6) Press [OK] to go back to the previous screen, or press [ (home)] to go back to the home menu. Function Setup Note • If the connection test passes, you are ready to use BD-Live, VUDU or network upgrade function using the Internet without making any additional settings. • If the connection test fails, you may need to change the MAC address settings on your router. You can check the MAC address of this unit on "Network Status" screen (refer to page 52). • When connecting this unit directly to a modem for the first time or connecting it to a modem which was previously connected to any other network device(e.g. a router, PC, etc.), you may have to power cycle the modem to reset the settings on the modem. Others EN 49
-
 1
1 -
2
-
3
-
4
-
5
-
6
-
7
-
8
-
9
-
10
-
11
-
12
-
13
-
14
-
15
-
16
-
17
-
18
-
19
-
20
-
21
-
22
-
23
-
24
-
25
-
26
-
27
-
28
-
29
-
30
-
31
-
32
-
33
-
34
-
35
-
36
-
37
-
38
-
39
-
40
-
41
-
42
-
43
-
 44
44 -
 45
45 -
 46
46 -
 47
47 -
 48
48 -
 49
49 -
 50
50 -
 51
51 -
 52
52 -
 53
53 -
 54
54 -
55
-
56
-
57
-
58
-
59
-
60
-
61
-
62
-
63
-
64
 |
 |