Philips LC4341 User Guide
Philips LC4341 - cBright XG1 XGA LCD Projector Manual
 |
UPC - 037849911808
View all Philips LC4341 manuals
Add to My Manuals
Save this manual to your list of manuals |
Philips LC4341 manual content summary:
- Philips LC4341 | User Guide - Page 1
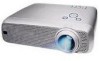
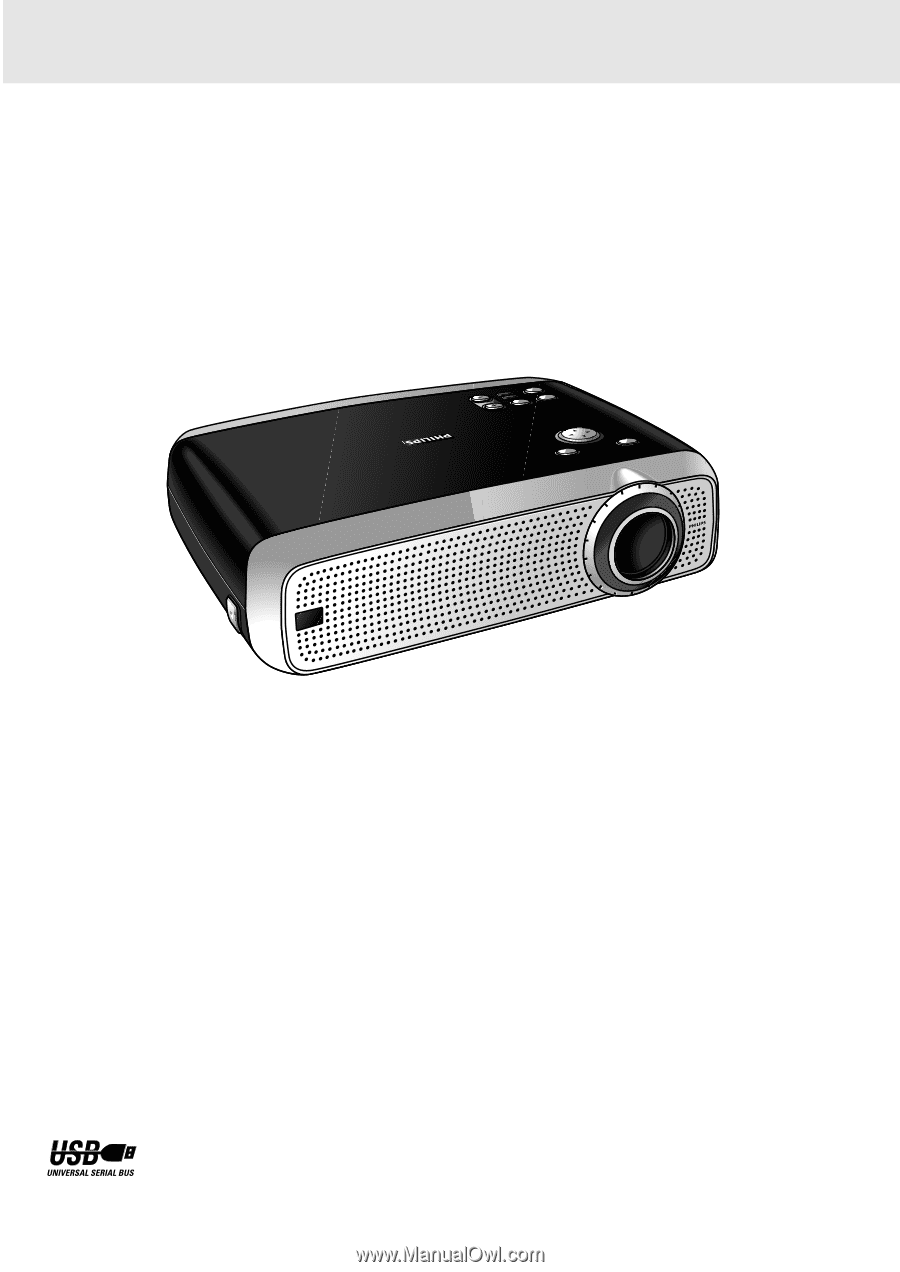
Stabnyd A MVute Volume Lamp RC Keystone Menu OK Philips Multimedia projector cBright Series LC4345, LC4341, LC4331 User guide English - Philips LC4341 | User Guide - Page 2
RC Stabnyd A MVute OK 1 2 3 4 Menu OK AV Mute Stand by On Source Lamp RC Keystone 5 6 7 8 9 Menu 0 ! @ # @ $ LC4341/4331 1 2 3 4 5 6 7 Stand by On Left g fig. 1 ! 0 9 8 fig. 3 Audio out USB RL Audio in RL Video S-Video DDaatataoiunt DDaattaaoinut k j i h 2 fig. 4 - Philips LC4341 | User Guide - Page 3
remote control 20 Lamp 21 Lamp replacement 21 Resetting the lamplife time 22 10. Troubleshooting 23 projector. - Projector - Mains lead - Audio/Video RCA Cable - Scart/RCA Audio Video adapter (not for USA version) - Remote control + batteries - Soft bag - Integrated VGA/USB cable - User Guide - Philips LC4341 | User Guide - Page 4
18. Upon completion of any service or repairs to the projector, ask the service technician to perform a routine safety check to check that the projector is in safe operating condition. 19. When replacement parts are required, be sure the service technician has used replacement parts specified by the - Philips LC4341 | User Guide - Page 5
. By connecting USB, the mouse function on the Remote Control automatically gets installed. 8. Excellent video quality The projector accepts the input signal of all major video formats, including PAL, SECAM, NTSC and S-Video signals. The projector will recognize these standards and adapt to them - Philips LC4341 | User Guide - Page 6
lamp start has failed 9 R(emote) C(ontrol) indicator Flashes green when the remote control is operated and the projector projector (or an externally connected sound amplifier). 6 Source To select the current projection source (Data, S-Video or Video . The cursor control works with up/down and left - Philips LC4341 | User Guide - Page 7
to always switch off the remote control after use. 2 Cursor video recorder, a VCR, Laser Disc player, video camera or TV with AV output socket. Other connections f Data out To connect to an external monitor (or a second projector). The image projected is simultaneously shown on the monitor. h Lamp - Philips LC4341 | User Guide - Page 8
projection' under 'Operation - Display and picture control' for further instructions. • Choose a screen size suitable for the number of viewers that the cooling fan has stopped (about 3 minutes after the projector has been switched to Power Standby). Stabnyd A MVute Volume Lamp RC Adjusting the - Philips LC4341 | User Guide - Page 9
Replace the lid and snap it into place. Caution! Do not mix old and new batteries (also never mix alkaline and manganese batteries). Note: The maximum range of the remote control is approximately 20 m (± 65 feet). Stabnyd A MVute Volume Lamp RC Keystone Menu OK Note: Never place the projector - Philips LC4341 | User Guide - Page 10
/AV products side Mini D-Sub 15P (male) USB connector 4P (female) RCA pin (male) x 3 Video/computer cables and adapter These accessories (1 to 3) are supplied with the product for connecting the projector to computer/AV equipment. The numbers in the left-hand column correspond with the numbers in - Philips LC4341 | User Guide - Page 11
on the projector flashes green when you move the trackball. - If it does not: Check that you have switched on the remote control. If you have, check that the batteries are installed properly and/or replace the batteries. - If it does: Make sure that the USB cable has been properly connected. 11 - Philips LC4341 | User Guide - Page 12
(d) Audio out USB RL Audio in RL Video S-Video DDaatataoiunt DDaattaaoinut Projector (2) (optional) Projector (2) (3) S-Video VCR Video out R Audio L out Scart adapter S-Video (not for USA version) (3) VCR RL Audio RL out Video out Scart adapter (not for USA version) 1. Connect - Philips LC4341 | User Guide - Page 13
RL Audio in RL Video S-Video DDaatataoiunt Projector (optional) Amplifier L projector. Insert the white plug into the L socket and the red plug into the R socket. Note: When the projector is connected to an external audio amplifier, you cannot control the volume via the projector or the remote - Philips LC4341 | User Guide - Page 14
and projector before making projector to a Macintosh computer use the VGA/MAC adaptor (optional). 2. Connect the Data out terminal (f) of the projector projector: • Connect the Audio in sockets of the monitor to the Audio out socket (a) of the projector external monitor or projector can be connected - Philips LC4341 | User Guide - Page 15
are displayed in the centre of the screen. The problem is Fan error described in the header of The projector will switch off automatically. the message display. Suggestion(s) to solve the Please contact a service centre for repair. problem are displayed in the gray part of the message - Philips LC4341 | User Guide - Page 16
cool; - Mirror mirrors the picture for use of the projector in various positions with respect to the user(s) and the projection screen (for further explanation see 'Display and picture control' - 'Mirror'). Video/S-Video only For Video/S-Video signal input, the following adjustments can be made - Philips LC4341 | User Guide - Page 17
8. Operation Display and picture control Note: A(audio)/V(video)-mute can only be selected with the AV mute button on the projector or on the remote control. A/V mute then appears on the screen. For example: Data A/V Muted Shift The Shift function adjusts the computer image in horizontal and - Philips LC4341 | User Guide - Page 18
Control The projector's sound is set to standard specifications at the of the projector (or an externally connected loudspeaker). 1. Select the required input (Data, Video or S-Video). 2. Press Volume + buttons or on the remote control. - When the projector is connected to an amplifier or stereo - Philips LC4341 | User Guide - Page 19
the default Philips start-up screen upon the projector's start up suppress OSD messages. Warning or error messages however are never suppressed. activate all remote and local controls. You have to switch the projector off -) for 3 seconds to reset all user settings. 5. Select the next item to - Philips LC4341 | User Guide - Page 20
upside down. Cleaning the dust filter 1. Press the Stand by On button to switch off the projector. 9. Replace the cover. - The standby indicator lights up red. 2. Wait until the cooling fan has stopped (about 3 minutes and disconnect the mains lead and all other cables. LLAAMMPP 3. Turn the - Philips LC4341 | User Guide - Page 21
is suggested to have a spare lamp available. The lamp type is indicated in the user guide. Lamp Replacement 1. Press the Stand by On button to switch off the projector. - The standby indicator lights up red. 2. Wait 5 minutes for the lamp to cool down and the cooling fan to stop and disconnect the - Philips LC4341 | User Guide - Page 22
. Do not drop, as the impact may cause the lamp to break. 9. Place the lamp holder in the guiding slots and insert into the lamp compartment. Settings FILTER 10. Tighten the screws. 11. Replace the cover and tighten the screws. 12. Plug the projector back in by inserting the mains lead in the - Philips LC4341 | User Guide - Page 23
10. Troubleshooting If a fault occurs, first check the points listed below before taking the projector for repair. If you are unable to remedy a problem by following these hints, consult your dealer or service organisation. Warning: Under no circumstances should you try to repair the projector
-
 1
1 -
 2
2 -
 3
3 -
 4
4 -
 5
5 -
 6
6 -
 7
7 -
8
-
9
-
10
-
11
-
12
-
13
-
14
-
15
-
16
-
17
-
18
-
19
-
20
-
21
-
22
-
23
 |
 |
Philips Multimedia projector
cBright Series
LC4345, LC4341, LC4331
User guide
English
Menu
OK
AV
Mute
Keystone
Volume
Stand
by
Lamp
RC