Philips MMS231 User Manual
Philips MMS231 Manual
 |
View all Philips MMS231 manuals
Add to My Manuals
Save this manual to your list of manuals |
Philips MMS231 manual content summary:
- Philips MMS231 | User Manual - Page 1
with the manufacturers Instructions. Do not block servicing to qualified service personnel. Servicing philips.c0m/pcstutt Multimedia Speaker System MMS 231 PHILIPS PHILIPS MUDS Wanes 4340 704 50191 PHILIPS PHILIPS PHILIPS PHILIPS parer de la carte son du PC on dune autre source auto. teReglez
-
 1
1
 |
 |
Je)leods
apples
Ile'
eqj
peuuog
of
aunion
peilsep
of
lanai
sseq
)snipe
1"O
•WS
lial
0
loiluo0
sees
O
Jaidepe
eq
ioeuuoo
01
ui
Jemod
0
.
eainos
punosipueo
punos
ar
yl
will
elqe0
cull
eyl
peuuoo
01,
eun
Joloeuuoo
NI4
!u!w
all
u!
6
nld
IN)
10S
g
(up
s!
Jemod
ay;
3513
seleogou!
031
enlq
)
iemod
Jio
JO
uo
1401.1AAS
of
UO/UO
Jemod
Jamoi
Jo
Jey6p4
ewnion
ar
yl
isnrpe
lalwoo
atunioA
belou
aj
11101
5
For
US/Canada
only
IMPORTANT
SAFETY
INSTRUCTIONS
-
Read
before
operating
equipment
This
product
was
designed
and
manufactured
to
meetstrict
quality
and
safety
standards.
There
are,
however,
some
installation
and
operation
precautions
which
you
should
be
particularly
aware
of.
1.
Read
these
Instructions
-
All
the
safety
and
operating
instructions
should
be
read
before
the
appliance
is
operated.
2.
Keep
these
Instructions
-
The
safety
and
operating
instructions
should
be
retained
for
future
reference.
3.
Heed
all
warnings
-
All
warning
on
the
appliance
and
in
the
operating
Instructions
should
be
adhered
to.
4.
Follow
all
Instructions
-
All
operating
and
use
instructions
should
be
followed.
5.
Do
not
use
this
apparatus
near
water
•
for
exempla
near
a
bathtub,
washbowl,
kitchen
sink,
laundry
tub,
Ina
wet
basement
or
near
a
swimming
pool,
etc.
6.
Clean
only
with
a
damp
cloth.
The
appliance
should
be
cleaned
only
as
recommended
by
the
manufacturer.
7.
Instal
In
accordance
with
the
manufacturers
Instructions.
Do
not
block
any
of
the
ventilation
openings.
For
example,
the
appliance
should
not
be
situated
on
a
bed,
sofa.
rug,
or
similar
surface
or
placed
in
a
bull
-in
installation,
such
as
a
bookcase
or
cabinet
that
may
impede
the
flow
of
air
through
the
ventilation
openings.
8.
Do
not
install
near
any
heat
sources
such
as
radiators,
heat
registers,
stoves,
or
other
apparatus
(including
amplifiers)
that
produce
heat.
9
Do
not
defeat
the
safety
purpose
of
,
1
the
polarized
or
grounding
-type
plug.
-
A
polarized
plug
has
two
blades
with
"'
Ac
one
wider
than
the
other.
Match
wide
P‘Aathad
Plug
blade
of
Plug
to
wide
slot,
fully
insert.
A
grounding
type
plug
has
two
blades
and
a
third
grounding
prong.The
wide
blade
or
the
third
prong
are
provided
for
your
safety.
When
the
provided
plug
does
not
fit
into
your
outlet.
consult
an
electrician
for
replacement
of
the
obsolete
outlet.
10.
Protect
the
power
cord
from
being
walked
on
or
pinched
particular
,
/
at
plugs,
convenience
receptacles
and
the
point
where
they
exit
from
the
apparatus.
11.
Only
use
attachments/accessories
speaks:I
by
the
manufacturer.
2.
Use
only
with
a
cart,
stand.
tripod,
bracket,
table
specified
by
the
manufacturer,
or
sold
with
the
apparatus.
When
a
cart
is
used,
use
caution
when
moving
the
curt/apparatus
combination
to
avoid
injury
from
tip
-over.
13.
Unplug
this
apparatus
during
lightning
storms
or
when
unused
for
long
periods
of
lime.
14.
Refer
all
servicing
to
qualified
service
personnel.
Servicing
is
required
when
the
apparatus
has
been
damaged
in
any
way,
such
as
power
-supply
cord
or
plug
is
damaged.
liquid
has
been
spilled
or
objects
have
fallen
into
the
apparatus,
the
apparatus
has
been
exposed
to
rain
or
moisture,
does
not
operate
normally,
or
has
been
dropped.
15.
Warning!
To
reduce
the
risk
of
fire
or
electric
shock,
do
not
expos
this
appliance
to
rain
or
moisture.
The
Socket
outlet
shall
be
installed
near
the
equipment
and
shall
be
easily
accessible.
PHILIPS
4340
704
50191
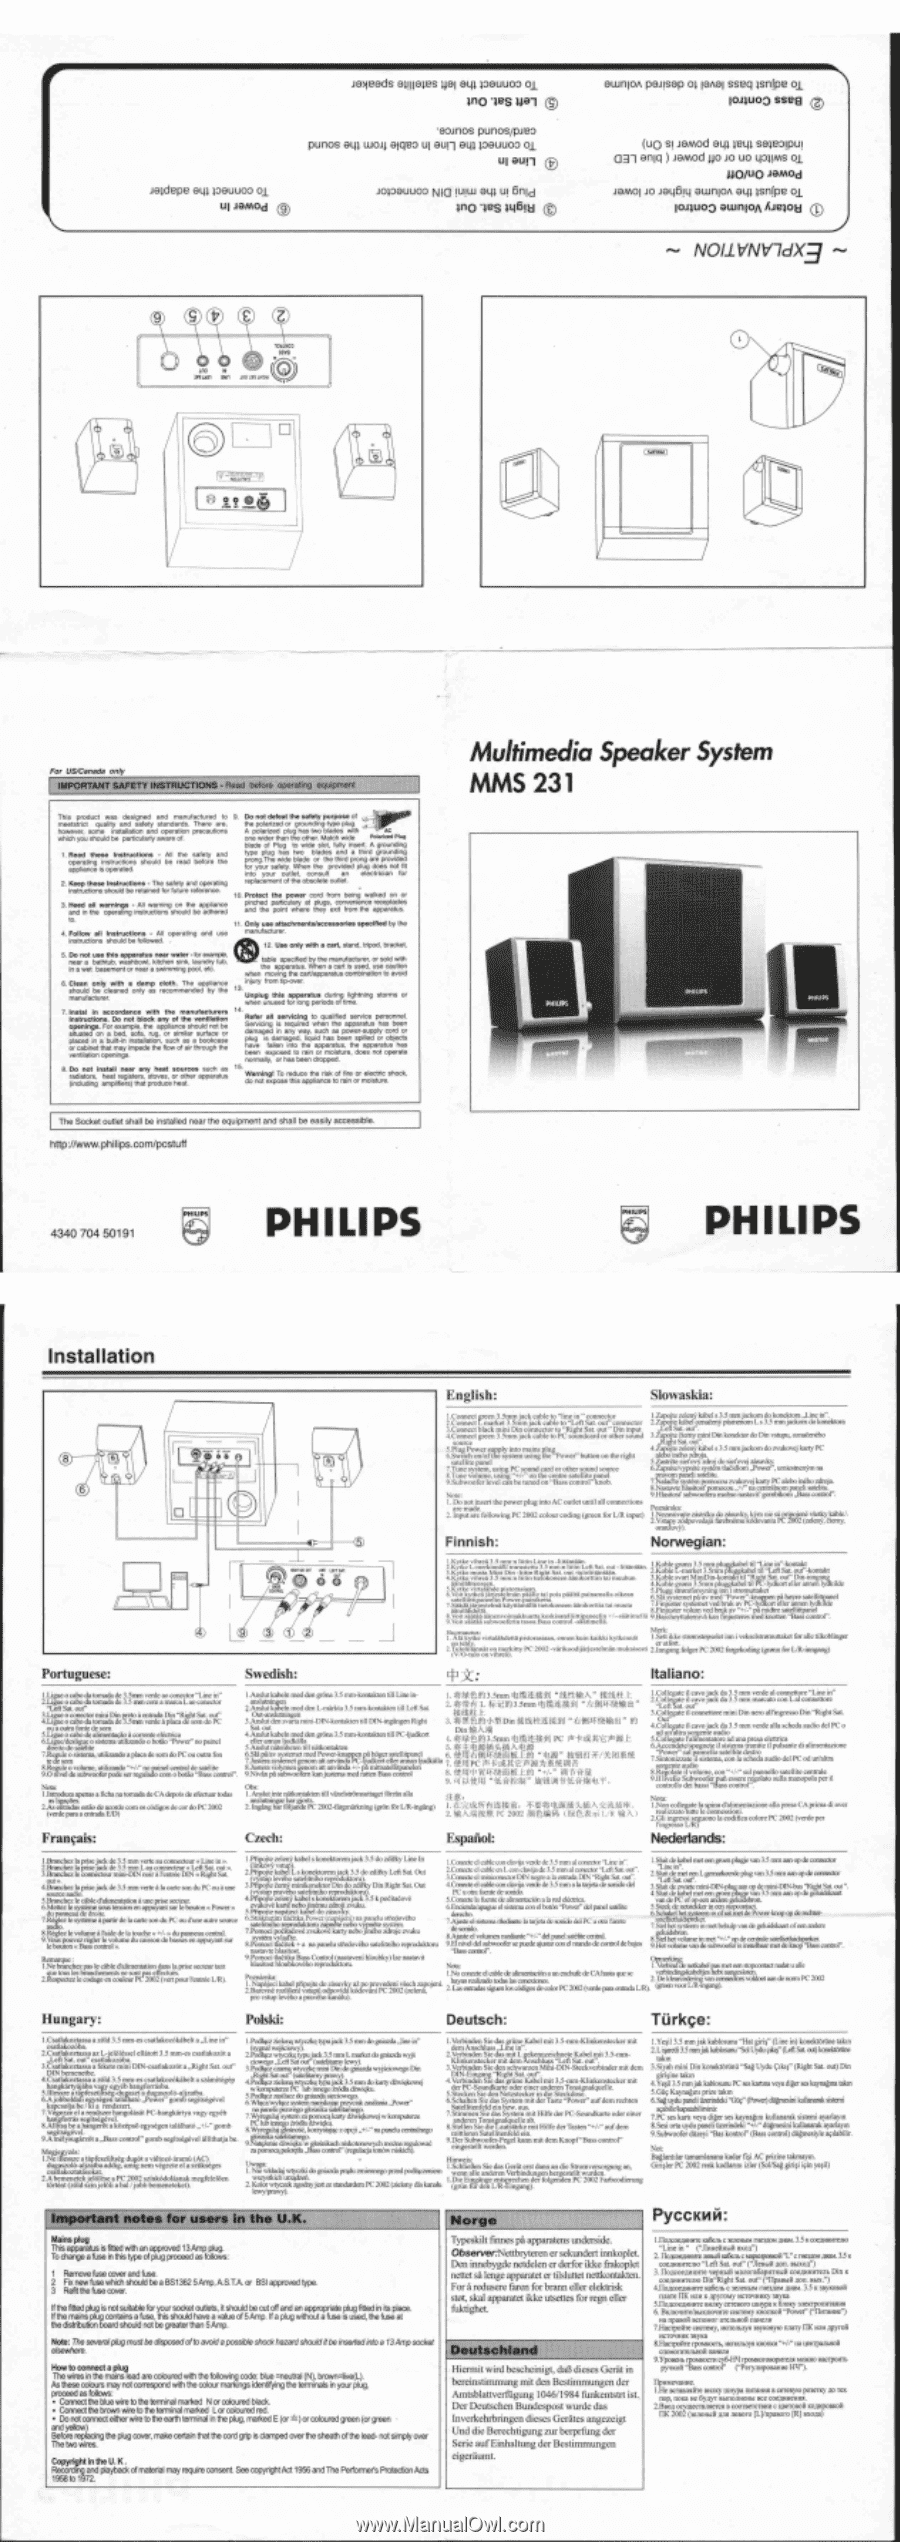
Installation
PHILIPS
-
NOLLVNV7dX3
1,
fumed)
Multimedia
Speaker
System
MMS
231
PHILIPS
PHILIPS
MUDS
Wanes
PHILIPS
PHILIPS
8
6
an
?T.
0
0
Portuguese:
Swedish:
English:
Slowaskia:
I
.Commet
green
3.5min
jack
cable
to
"line
in"
connector
2.Connect
T
market
3.5mm
jack
cable
to
"Left
Sat.
out"
connector
3.Connect
black
mini
Din
connector
to
"Right
Sat.
out
"
Din
input
4.Connect
green
3.5mm
jack
cable
to
PC
soundcard
or
other
sound
source
S.Plug
Power
supply
into
mains
pluif
&Switch
on/of
the
system
using
the
Tower"
button
on
the
tight
satellite
panel
7.Tune
system,
using
PC
sound
card
or
other
sound
source
&Tune
volume,
using
"+/-"
on
the
centre
satellite
panel
9.Subwoofer
level
can
be
tuned
on
"Bass
control
-
knob.
Note,
I.
Do
not
insert
the
power
plug
into
AC
outlet
until
all
connections
are
made.
2.
Input
are
following
PC
2002
colour
coding
(green
for
UR
input)
Finnish:
I.Zapojte
zelenY
kaki
s
3.5
mm
jackom
do
koneloora
_Line
in".
2.2apope
Wesel
oznaeenY
Msmenom
L
s
3.5
mrnjackom
do
konektora
3.7.ro
"U
g
i,
ft
te
S'
e
L
iem
M
y
"
mini
.
Din
konektor
de
Din
vsnmu,
omateneho
4.Zapojte
zeleny
Libel
s
3.5
mm
jackom
do
zvulcovej
kart,/
PC
alobaiineho
zdroja.
5.Zastrete
siefovjezdroj
do
siceovej
zesuvicy.
6.Zapnittheypnite
system
daeidlom
„Power
',
unnestnenym
na
prawn,
punch
satelitu
7.Naladle
system
pomocou
vukovej
batty
PC
alebo
ineho
atroja.
8.Nasurne
hlasitost
.
pomoeou
fl
u
panch
.telitu.
9.Hlasitost'
subwoofera
Ino/no
nastavie
gornblkom
,j3ass
control".
Poznamka:
I
Ne.sevajte
zest:retro
(to
aistoky.
Icym
se
mpojeneveetky
2.Vstupy
zodpovedajo
farebnemu
kesdovaniu
PC
2002
(mime
,
.
diem.
omnbove).
Norwegian:
1.1<ytke
vihrea
3.5
um
oi
tulle
Line
in
-Iiitintain.
2.Kytkc
L-merkionalliwarustettu
3.5
inin:n
hint,
Left
Sat.
out
-
-
Haman.
3.Kytke
musts
Mini
Din
-hitin
Right
Sat.
out
..tuloititintWan.
4.K.r
ke
vihrea
3.5
nun
al
I
iitin
tiefokoneen
einikoMiin
tai
muuhun
MnilAhteeseen.
5.Kytke
pistorasiaan.
&Von
Itytketijiinestetram
paella
tai
pois
pinta
paintunalla
oikean
Ilimipanenlm
kZeiguili=c
omen
atin
Monne
tai
mama
S.
Volt
MAIM
Ahnenvoimakkuuna
keskisata
iittipaneel
in
la
9.
Von
saitia
subwooferin
taws
Bass
control
..saatimellii.
Huontautus:
I.
All
kytke
virtalandetta
piatorastaan,
ennen
kuin
kaikki
kytkennat
on
itty.
2.Tul
w
ohnannal
on
rnerkitly
PC
2002
-varikoodiji0jestelnuln
rnukaisesti
(V/0-talo
on
vihreiD.
1:Etl:E7.1L;Tr.V4Vc
.so
lnitirilftlAkontakt
3.Koble
swan
MiniDin-kink
tit
"Right
Sat.
out"
Din
-inn
p-
m
4.Koble
green
3.5mm
plegekabel
fi
t
VC-Iydkon
eller
mnen
lydkilde
5.Plugg
stromforsyning
nor
stromuttaket
6.Sle
systemet
paavined"Power"-knappen
pa
boyre
satelli
ve
e.]
7.Finjuster
systemet
wed
bruk
av
PC-Iydkon
eller
annen
lydkilde
8.Finjuster
volum
ved
bock
av
"+/-"pa
midire
satellittpanel
9.Basshoynalemive
ken
fi
njusteres
ru
ed
known
"Bass
control".
Merle
I.Sen
ikke
stromstopselet
owl
vekselstemeataket
for
alle
takoblinger
er
effort.
2.1nngang
folger
PC
2002
fargekoding
(gronn
for
LR-iringaug)
Italiano:
I.Ligueocabods
tomada
de
3.5tran
verde
ao
conector
"Line
in"
2.Ligueocabo
da
tomada
de
3.5
ru
n
com
a
manta
Lao
conector
'Lot
Sat
our
3.Ligue
o
collector
mini
Din
preto
a
entrada
Din
"Right
Sat.
out"
4.Ligue
o
cabo
do
tornado
de
-
3.5mm
verde
a
place
de
som
do
PC
ou
a
outra
fonte
de
som
5.Ligue
o
cats
de
alimentar,ao
a
corrente
elecei.
6.Ligue/d.ligue
o
sistema
utilizando
o
botao
"Power"
no
painel
direito
dome.°
7.Reg.ule
o
sistema,
utilizando
apiece
de
som
do
PC
ou
outra
fon
te
de
som
klieg&
o
volume,
utilizando
"+/-"
no
painel
emend
de
welite
9.0
ra
vel
de
subwoofer
node
set
regula&
comobotao
"Bass
control"
Nom,
LIntroduza
opens
a
fiche
na
tomada
de
CA
depois
de
efectuar
todas
as
ligactles.
2.As
=trades
mein
de
acordo
cons
os
eddigos
de
cot
do
PC
2002
(verde
pant
a
anode
E/13)
Francais:
LAnsha
kabeln
ru
ed
doe
gn5na
3.5
mm-kontakten
till
Line
in-
anslumingen
2.Anslut
k&eln
re
cd
den
L-maria
3.5
mm-koniakion
till
Left
Sal.
Out-anslinningen
3.Anslut
den
warm
mini-DIN-kontakten
fi
ll
DIN-ingangen
Right
Sat.
out
4.Anslut
kabeln
rued
den
gone
35
mm-kontakten
till
PC-Ijudkon
eller
anon
ljudkalla
5.Anslut
natenheten
till
netkontakten
6.Sle
pkav
systemet
ru
ed
Power-knappen
pa
hoger
satellitpancl
7.Justera
mA
-
Mmet
genom
att
anvanda
PC-Ijudkort
ellecannan
budkella
8.1ustera
volymen
genom
er
e
anvanda
1
-pa
minsatellmanelen
9.Niven
pa
subwoofem
kanjusteras
we
ranch
Bass
control
Ohs:
I.
Anslut
isle
nalkontakten
till
vaxeLstnamsunaget
Mein
alla
ansheningar
hoc
gjorts.
2.
Ingeng
her
feljande
PC
2002-fargrnarkning
(gran
Cdr
UR-ingang)
Czech:
1.
iftt
N3.5mtn
"4t.tiOA."
2.
kfIlt-h
L
trJ
3.5mm
"
/EKIM4Kaitt
"
40AtiE
3.
441
.8
,
7
,
1
,
TIDin
41d44.i.t
"tiffilF.t.Vhilli"
flrl
Din
iffiAffff
4.
4tS8.0S8813.5nunItlailtltti
PC
*-Ptait'er
mitp_h
5.
*I
FtilgM
Ekt
ftif*
8.
ft
ifHilINWA
"
tffff"
gtft#T
,
Tv
Pi]
*siA
7.
ftkli
PC
P
-
r
--
44-t'V'rff0Jf..fAh61?':
-.
8.
ttfti
i
Wf
,
f4AMtff
9.
414.
IZPB
"
"
liktg
-6.
hViii
-
114111.
+V46
tkiifk
ff
:/thASCALIO:h..
2.
itl
'-
.N.4Mtrd
PC
2002
itrktQtui
(tit
Espaiiol:
I.Collegate
it
cavo
jack
do
3.5
ram
verde
al
connettore
"Line
in"
2.Collegate
it
cavo
jack
da
3.5
mm
marcato
con
L
al
connenore
"Left
Sat.
out"
3.Collegate
it
cormettore
mini
Din
nero
al
Pingre.o
Din
"Right
Sat.
Out"
4.Collegate
it
cavnjack
da
3.5
mm
verde
alla
mheda
audio
del
PC
o
ad
ti
n
altra
sorgente
audio
5.Collegate
Palimentatore
ad
una
prase
elettrica
6.Accendete/spegnete
sistema
tramite
pulsmte
di
alimentazione
Tower's)
pannello
satellite
desire
7.Sintonizzate
sistema,
con
la
scbeda
audio
del
PC
rid
urealtra
sorgente
audio
8.Regolate
it
volume,
con
"-te."
sal
palmetto
satellite
emirate
9.11
hvello
Subwoofer
putt
essere
regolato
suite
rnanopola
peril
controllo
lei
bassi
"Bass
control".
Note,
I.Non
collegate
la
spina
d'alimentazione
alla
mesa
CA
prima
di
aver
realizzato
tune
le
connessioni.
2.Gli
ingressi
seguono
la
codifica
colore
PC
2002
(verde
per
ringresso
L/R)
Nederlands:
I.Branchez
la
prise
jack
de
3.5
ram
vette
au
connecteur
o
Line
inn.
1Branchez
la
prise
jack
de
3.5
nen
Lau
connecteure
Lett
Sat
out
o.
3.Brancher
le
comecteur
mini
-DIN
noir
a
Pentree
DIN
e
Right
Sat.
out
e.
4.Branchez
la
prise
jack
de
3.5
ram
verse
a
la
.rte
son
du
PC
to
source
audio.
5.Branchez
le
cable
d'alimentation
a
ti
ne
prise
secteur.
6.Mettez
le
systeme
sous
tension
en
appuyant
stir
le
bouton
Power.
du
panneau
de
drake.
7.Reglez
le
system°
a
parer
de
la
carte
son
du
PC
on
dune
autre
source
auto.
teReglez
lc
volume
a
hide
de
la
touche
+/-
e
du
panneau
central.
9.
Vain
power
regler
le
volume
du
ca
isson
de
basses
en
appoyant
stir
le
bouton
o
Bass
control
a
Remarque
I.Ne
branchez
pas
le
cable
d'alimentation
dam
la
prise
secteur
tent
clue
ma
les
branchements
ne
sont
pas
effectues.
2.Respecter
le
codage
m
couleur
PC
2052
(wen
pour
Peninte
UR).
Hungary:
1.7rAzeleny
label
s
konektorem
jack
3.5
do
Milky
Line
In
2.Vtipojte
label
s
konektorem
jack
3.5
do
alas
,
Lett
Sat.
Out
rp
levels°
satelitniho
reproduktor.,
3.
jte
eernY
minikonektor
Din
do
zdu8ky
Din
Right
Sat.
Out
pravehe
satelitniho
repmduktorti).
4.
pope
zeleny
kabel
s
konelctorem
jack
3.5
k
poe(taeove
mukove
kart
.bojinemu
zdroji
muku.
5.Ptiptate
waled
kabel
do
zasuvky.
6.Stisknutim
:bee..
Power
(
jete)
mpandu
sttedoveho
satelimiho
reproduktom
za
te
nebo
vymtete
system
7.Potroci
poditaeove
mukove
kaety
mho
Mao
zdrojemuku
system
vyltufte.
8.Pomoci
dalitek
+
a
FM
panel°
efedoveho
satelitniho
reproduktom
nastame
hlasitost.
9.Pornoci
th
en.
Bass
Control
Mastaveni
Moubky)
he
nastavit
hlasitost
hloubkoveho
reproduktom.
Poznamka:
I.
Napajeci
label
ptipojte
do
zasuv
i
aepo
provedeni
vtech
zapojeni
2.Barevrie
realieenlvstupa
orloovide
ko&vant
PC
2002
(zelena,
pm
vstup
leveho
a
praveho
Poisici:
I.Conecte
el
cable
con
clavija
verde
de
3.5
min
al
cinema
"Line
in
-
.
2.Conole
el
cable
en
L
eon
clavija
de
3.5
mm
al
conector
"Lee
Sat.
out".
3.Cenecte
cI
minicometor
DIN
nem°
a
m
imtrada
DIN
"Right
Sat
out
-
.
4.Conecte
el
cable
con
clavija
verde
de
35
min
a
la
mama
de
sonido
del
PC
u
otra
Comte
de
sonido.
5.Conecte
W
future
de
alimentacian
a
la
ml
elemica.
6.Enciendanpague
el
sinerna
eon
el
boten
"Power
del
panel
said.
dentcho.
7.Ajuste
el
sisterma
inediante
ht
[Meta
de
sonido
del
PC
u
one
fuente
de
sonido.
8.Ajuste
el
volumen
median
"eq."
del
panel
sail.
central.
9.EI
nivel
del
nibwmfor
se
puede
ajustar
con
el
mando
de
control
de
bajos
Notir
I.No
caner.
el
cable
de
alimentackin
a
im
enchiffe de
CA
ha.
qua
se
hayan
realimdo
toles
im
conexionm.
2
Las
mitredas
siguen
ms
codigos
de
color
PC
2022
(verde
paraentrada
UR).
Deutsch:
I.
Skit
de
label
met
eat
gram
plugje
van
3.5
mm
aan
op
de
connector
Line
in".
2.Sluit
de
met
can
L
gonadic..
plug
van
3.5
mm
aan
op
de
connector
3.Sluit
de
zveme
mini
-DIN
-plug
wan
op
de
mini
-DIN
-bus
"Right
S.
out
".
4.Sluit
de
kabel
met
een
green
ploy*
van
33
min
aan
op
de
geluidskaart
van
de
l'C
of
op
.n
andem
geluidsbron.
5.Steek
de
ker
in
cm
slope...met
6.Schakel
id
systemn
in
of
uit
tom
Power-knop
cp
de
iechter-
satellietluidspreker.
7.Stel
het
system
in
met
behuip
van
de
geluidskaart
of
een
cmdere
geluidbion.
.Stel
het
volume
in
met
"-Fe
,
op.
central°
satellietluidspreker
9.Het
volume
van
de
subwoofer
instelbaar
met
de
knop
"Bass
control".
l
j
.Vel
ng
dde
netkabel
pas
me
een
stopoontap
nadatualle
verbindingskabelg.hebt
aangesloten.
2.
De
Ideurcodermg
van
connectors
voldoe
aan
de
norm
PC
2002
(green
veer
L/Rertgang).
Tiirkge:
I
.Csatlakortassa
a
cold
3.5
mm
-es
csallakozOkabelt
a
„Line
in"
csatlakozoba.
2.C.tlakoziassa
az
L-jelolessel
ellatott
3.5
mm
-es
cmtlakozeit
a
,,Left
Sat.
out
-
csatlakozoba.
3.Csatlakortassa
a
fekete
mini
DIN-csatlakozot
a
„Right
Sat.
out"
DIN
bemenetbe.
4.Csatlakortassa
a
Mid
3.5
nun
-es
csatlakozokabek
a
szamitagep
hangkartydj
yam
,
egyeb
hangforresba.
5.Illessze
a
fesziiffseg-dugaszt
a
dugaszold-aljzatba.
6.A
jobbolda
r
egysegen
lalalhato
„Power"
gomb
segitsegevel
kapcsolja
be
/
le
i
a
rendszers
7.
Vegeme
el
a
rendszer
hangolasat
PC-hangkirtya
vagy
egyeb
hangforras.gitsegevel.
8.Alllisa
be
e
hengerot
a
kezepsd
egysegen
talalhatd
gomb
segitsegevel.
9.A
melysugerzet
a
„Bass
control"
gomb
segitsegevel
al
ilthatja
be.
Megjegyzem
1.Ne
illessze
a
tapfe.ilkseg
dug.t
a
viltoz6
Mama
(AC)
dugaszolt5-Mizatba
addig,
amig
nem
vegezte
el
a
szekseges
matlalcortatisolcat.
2.A
bemenetek
jeldlese
a
PC
2002
szinkedolisnak
megfelelden
05rtent
(Mid
sets
jeldli
a
bat
/jobb
bemeneteket).
I
.Podlacz
zielongwtyc
type
jack
33
re
m
do
gniancla
„line
in"
(s
t
ew
wei§thowy
2.PoMimz
wtyczke
type
jack
33
mmLmasket
do
gniazda
wyja
ego
„Left
Sat
out"
(satelitamy
lewy).
3.Pedleca
creme
wrymdce
mini
Din
do
gmazda
wsjkiowego
Din
„Right
Sat
our
(mtelitamy
prawy).
4.
Sat
typu
jack
3.5
mm
do
batty
dawiekowej
iv
komputerze
PC
lob
innego
addle
died*.
5.Podlaczzasilaez
do
gniazda
sieciowego.
system
naciskajecprzycisk
zasilania
„Pow.
•
na
panelu
prawego
gkianka
saternarnego.
7.W
Le
system
za
porno.
kany
dawiekowej
w
km
-
muten
inncgo
andia
diwieku.
j
gttanoSe.
korzystajec
zopcji
„+/-"
panel.
emu
-Arno
eatelitamego.
9.
auger.
diwicku
w
Moenikach
niskotonowycb
monts
regulowee
pomompokretla
„Bass
control"
aegulacja
anew
niskich).
Uwaga.
1.
Nie
wkbd.j
wlyaki
do
gni..la
pradu
zmiermego
pen.
podlit.enian
wsynkich
urzadzen.
2.
Kilos
wtyczek
zgudny
jest
ze
standardem
PC
2002
(zielony
ale
kanalu
levvpete
s
1.
Mains
plug
This
apparatus
is
fitted
with
an
approved
13
Amp
plug.
To
change
a
fuse
in
this
type
of
plug
proceed
as
follows:
1
Remove
fuse
cover
and
fuse.
2
Fix
new
fuse
which
should
be
a
BS1362
5
Amp,
A.S.T.A.
or
BSI
approved
type.
3
Refit
the
fuse
cover.
If
the
fitted
plug
is
not
suitable
for
your
socket
outlets,
it
should
be
cut
off
and
an
appropriate
plug
fitted
in
Is
place.
If
the
mains
plug
contains
a
fuse,
this
should
have
a
value
of
5
Amp.
If
a
plug
without
a
fuse
is
used,
the
fuse
at
the
distribution
board
should
not
be
greater
than
5
Amp.
Note:
The
several
plug
must
be
disposed
of
to
avoids
possible
shock
hazard
should
it
be
inserted
into
a
13
Amp
socket
elsewhere.
How
to
connect
a
plug
The
wires
in
the
mains
lead
are
oploured
with
the
following
code:
blue
=neutral
(N),
brown=live(L).
As
these
colours
may
not
correspond
with
the
colour
markings
identifying
the
terminals
in
your
plug,
plowed
as
follows:
•
Connect
the
blue
wire
to
the
terminal
marked
N
or
coloured
black.
•
Connect
the
brown
wire
to
the
terminal
marked
L
or
coloured
red.
•
Do
not
connect
either
wire
to
the
earth
terminal
in
the
plug,
marked
E
(or
or
coloured
green
(or
green
and
yellow)
Before
replacing
the
plug
cover,
make
certain
that
the
cord
grip
is
clamped
over
the
sheath
of
the
lead-
not
simply
over
The
two
wires.
1.Verbinden
Sin
das
grime
Kobel
mit
3.5-mm-Klinkenstecker
mit
dem
Anschluss
„Line
in'
.
2.Verbinden
Sie
das
mit
L
gekermzeichnete
Kabel
mit
3.5-nma-
Klinkenstecker
mit
dem
Anschlu.ss
"Left
Sat.
out".
3.Verbinden
Sie
den
schwarzen
Mthi-DIN-Steckverbinder
mit
dem
DIN-Eingang
"Right
Sat.
out".
4.Verbinden
S,c
das
gram
Kabel
mit
3,5-mm-Klinkenstecker
mit
der
PC-Soundkarte
oder
enter
anderen
Tonsignalquelle.
5.Stecken
Sic
den
Netzstecker
in
die
Steckdose.
6.Schalten
Sie
das
System
mit
der
Taste
"Power"
auf
dem
rechten
Satellitenfeld
ein
hew.
a..
7.Stimmm
Sie
des
mit
Hilfe
der
PC-Soundkarte
oder
river
an
deren
Tonsi
melte
ab.
8.Stellen
Sie
dieltssutsterke
nth
Hilfe
der
Tasten
"+/-"
auf
dem
mittleren
Satellitenfeld
ein.
Subwoofer-Pagel
kane
mit
dem
Knopf
"Bass
control"
eingestellt
werden.
Hinweis:
I
.SchlieBen
Sie
des
Gerat
crst
dam
an
die
Stromversorgung
an.
wet
alle
mderen
Verbindungen
hergestellt
warden.
I.Die
Eingange
entsprechen
der
folgenden
PC
2002
Farbcodiermg
(griin
ffi
r
den
L
R-Eingang
Norge
Typeskilt
tinnes
pfi
apparatens
underside.
ObserverNettbryteren
er
sekundert
innkoplet.
Den
innebygde
netdelen
er
derfor
ikke
frakoplet
nettet
sa
lenge
apparatet
er
tilsluttet
nettkontakten.
Fora
redusere
faren
for
brann
eller
elektrisk
start,
skal
apparatet
ikke
utsettes
for
regn
eller
fuktighet.
Deutschland
Hiermit
wird
beseheinigt,
dal
-
3
dieses
Gerat
in
bereinstimmung
mit
den
Bestiinmtmgen
der
Arntsblattverffigung
1046/1984
funkentstrt
ist..
Der
Deutschen
Bundespost
wurde
das
Inverkehrbringen
dieses
Gerates
angezeigt
Und
die
Berechtigung
zur
berprfung
der
Serie
auf
Einhaltung
der
Bestimmungen
eigeraumt.
1.'1013.5
mm
jak
kablosunu
"Hat
girl{"
(Line
in)
konekterane
talon
2.L
ishretli
3.5
mmjak
kablosunu"Sol
Uydu
vkir(ltit
Sat
out)
konektorbe
taktn
3.Siyeh
mini
Din
konekterentl
"Sag
Uydu
Cdos"
(Right
Sat.
out)
Din
girisine
taken
4.Yesil
3.5
mrn
jak
kablosunu
PC
ses
karma
veya
diger
ses
kaynagma
Won
5.00/
Kaynagmt
prize
talon
6.*
todu
pancli
itzeindeki
"Mc"
(Power)
dllgmesini
kullanatak
sistemi
ecabilielcapatabilirsiniz
7.PC
ses
karti
veya
diger
ses
kaynagtm
kullanarak
sistemi
ayarlayin
8.Sesi
orta
uydu
paneli
bzerindeki
dligmesini
kullanarak
ayarlaym
9.Sulnvoofer
dilzeyi
"Bas
kontrol"
(Bass
control)
cillgmesiyle
amlabilir.
Not:
Beglantiler
tamamlanana
kadar
fi
ti
AC
prizine
takmaym.
Girisler
PC
2002
renk
kodlanni
izler
(Sol/Sag
girisi
igin
yeti))
PyCCKHcl:
1.flonceemourm
cage.
c
=MUM
=mon
memo
3.5
a
COCARAMPAGO
"Line
in
"
("Jinnegunzg
anon")
2.
Florpteriaame
nexila
memo.
c
Hapiarcateog"L"
c
magma
imam
3.5
commoner.
"Left
Sat.
out"
("netting
non.
maxim")
3.
Roacoeattorre
nepiong
manoragapnrinzil
coenmucrem.
Din
coeminnerao
Din"Right
Sat.
out"
("11pamati
non.
max.")
4.riOACOMMtle
softens
c
3CACHM51
!EMMA
note.
3.5
a
sayaosog
Mare
UK
alma
apyromy
'terming
myna
51loncommturre
mangy
cereaoro
uutypa
a
6noay
onenrponwrama
6.
Bammucre/almouomne
eneremy
IMOIllta
"Power"
("Ilwramte")
xa
npaaog
acnosior
enamor'
fl
axen",
7.Hamporrre
micremy,
mrionssyx
aeyeomeo
missy
FIK
run
Apyr00
NCTOMINK
35tyaa
8.Hampogre
rponcoen,
nenomayx
ammo
-4"v/
,
an
umparomog
enomonere.Ho0
nmemt
9.
Ypoeetts
rpomeocre
cy6-H'{
rposixoroeopmenx
MOM=
nampoirrs
prime
"Bass
control"
("PerymmoaaHHe
flpenecuume.
l.He
scraenerne
amity
tintype
rural.,
m
=cam
posericy
inc
Tex
top,
noea
He
6yeyr
etmonHeme
see
coessueses.
/Boor
ocymeeramierca
a
carmen
-mini
c
IMETOBOti
kostipoaxoP
11K
2002
(seeettme
arm
neeoro
[L]inpaeoro
[RI
axone)
Copyright
in
the
U.
K
.
Recording
and
playback
of
material
may
require
consent
See
copyrkjht
Act
1956
and
The
Performers
Plotestiu
iActs
1958
to
1972.