Philips REM250 User manual - Page 4
Quick Features Setup Guide - programming
 |
View all Philips REM250 manuals
Add to My Manuals
Save this manual to your list of manuals |
Page 4 highlights
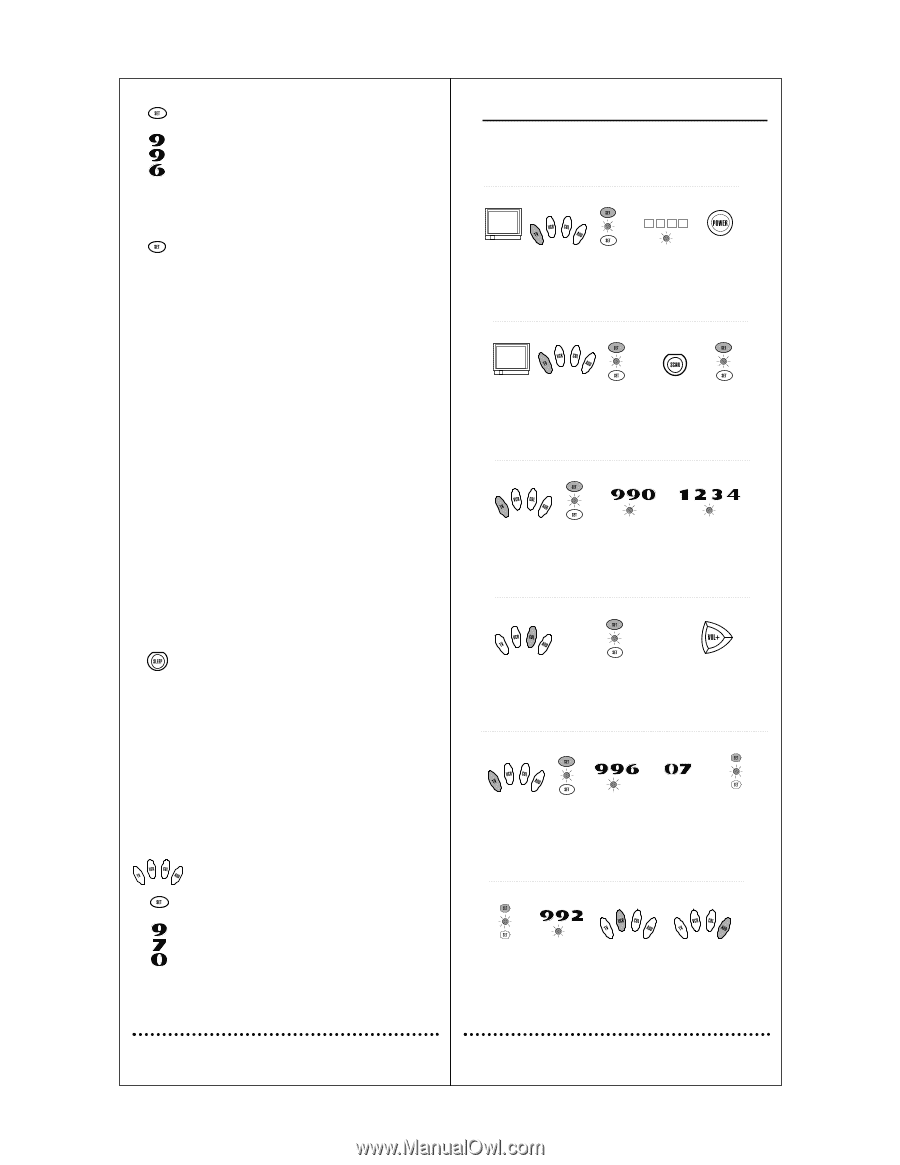
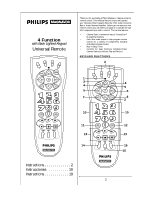
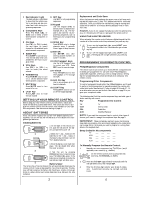
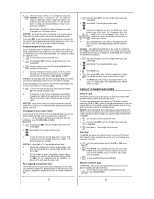
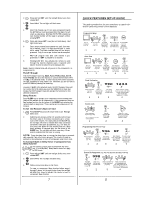
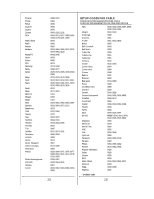
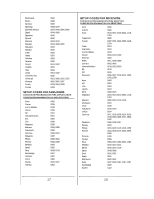
2. Press and hold SET until the red light blinks twice, then release SET. 3. Enter 9-9-6. The red light will blink twice. 4. Enter first channel, e.g., 07. For some component brands the ENTER key must be pressed after the digits, this will count as a key press. Skip Step 5 if ENTER is needed as next channel number will be ready to program without pressing SET. 5. Press and release SET once (do not hold down). Red light blinks twice. 6. Enter second channel, third channel etc. until 10th chan- nel is reached. Note: If 3 digits plus an Enter is need- ed for newer TVs/Cable channels, these will not be pro- grammed. Only 3 entries per channel can be accepted. 7. FAV CH program exits after 10th channel is pro- grammed or if SET is pressed for 3 seconds. 8. Pressing FAV CH key activates the remote to cycle through the favorite channels every 3 seconds until favorite channel is locked in by pressing any key. Note: Favorite channel scan will only work on the component it is programmed to. Punch Through The VCR Transport keys (e.g., REW, PLAY, FFWD, REC, STOP, AND PAUSE) are set at the factory to control the VCR even if TV or CBL is the selected mode. In other words,VCR control "punches through" regardless of what mode is on. Moreover, you do not have to press VCR before pressing the mode key. However, if AUD is the selected mode, the VCR Transport Keys will not control the VCR unless you press the VCR first. In these two modes, the VCR Transport Keys will operate the functions for the selected component. Sleep Feature Press SLEEP key to activate your component's internal sleep timer. (May not be available for all components.) If the component does not have a sleep function, the first press of the SLEEP key activates the remote's built-in sleep timer. Timer can be set to a maximum of 90 minutes. To Set the Remote's Built-in Timer 1. Press SLEEP key once, 15 minute timer is set. Red light blinks once. 2. Additional key presses within 10 seconds will increase the timer value in 15 minute increments up to a maxi- mum of 90 minutes. For each press of the SLEEP key, the red light will blink to indicate how many 15 minute increments have been programmed, e.g., one blink for first press, two blinks for the second press, etc. Sleep timer activates 10 seconds after the last press of the SLEEP key. The red light will blink once every 15 sec- onds to indicate that the timer is running. NOTE: Once the sleep timer is running, the sleep timer is automatically canceled if any other key is pressed. The remote IR must be pointed to the component to turn off component when timer ends. To Activate Built-in Sleep Timer if component has Sleep function 1. On the remote control, press a component key once (e.g., TV, VCR,CBL). Sleep feature does not apply to AUD mode. 2. Press and hold SET until the red light blinks twice, then release SET. 3. Enter 9-7-0. The red light will blink twice. 4. Follow instructions above to Set Timer. To reset to component Sleep function follow steps 1 through 3 above. At the end of step three, the red light will blink four times to indicate the remote is reset to component Sleep function. 7 QUICK FEATURES SETUP GUIDE This guide is provided here for your convenience as a quick reference for performing remote control sequences. Component Setup Turn on component (e.g., TV). 1 x 2 #### x 2 Press component key once (e.g., TV). Press SET until Red Light blinks twice; release SET. 2 3 Enter 4-digit code Press POWER for your brand; once; if no Red Light blinks response, twice after last #. repeat steps with next code. 4 5 Auto Scan x 2 x 2 Turn on component (e.g., TV). Press component Press SET key once until Red Light (e.g., TV). blinks twice; release SET. * NOTE: Not VOL-, LAST, SCAN, or SET. 1 2 3 Aim remote at Press SET component; press until Red Light SCAN once. When blinks twice; off, press any release SET key* to stop. to lock code. 4 5 Code Verification x 2 Press component key once (e.g., TV). Press SET until Red Light blinks twice; release SET. 1 2 x 2 Enter 9-9-0; the Red Light will blink twice. 3 Press 1 once for 1st digit. Wait 3 sec. and count blinks. Number of blinks equals value of code digit. Repeat with 2, 3, and 4. 4 Volume Lock Press component* key once (e.g., CBL). * NOTE: Component must have volume capabilities. 1 x 2 Press SET until Red Light blinks twice; release SET. 2 Press VOL+ once. Volume now controlled through component selected in step 1. 3 Programming The FAV CH Key x 2 x 2 x 2 Press component key once (e.g., TV). 1 Press SET until Red Light blinks twice; release SET. Enter 9-9-6; the Red Light will blink twice. 2 3 Enter channel Press and release Note: Some brands SET once. Red require ENTER Light blinks twice. after channel. Repeat for up to 10 channels. 4 5 Device Re-Assignment (e.g., AUD Key Becomes Secondary VCR Key) x 2 x 2 Press SET until Red Light blinks twice; release SET. Enter 9-9-2; the Red Light will blink twice. 1 2 Press component key Press component key to be moved once to be reassigned once (e.g.,VCR). (e.g., AUD). Red Light will blink twice. Reassigned key is now ready for programming. 3 4 8
-
 1
1 -
 2
2 -
 3
3 -
 4
4 -
 5
5 -
 6
6 -
 7
7 -
 8
8 -
 9
9 -
 10
10
 |
 |