Philips SRU3006 User manual - Page 9
Learning Commands, IR Transmitter Finder Feature - remote control codes
 |
UPC - 609585157194
View all Philips SRU3006 manuals
Add to My Manuals
Save this manual to your list of manuals |
Page 9 highlights
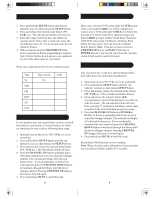
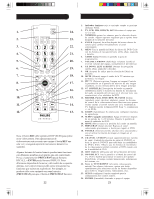
IR Transmitter Finder Feature Learning Commands This feature assists you in identifying where your original remotes IR transmitter is located and is particularly useful if your original remote's IR transmitter is hidden behind a lens. 1. Point both remotes facing each other by approximately 1 inch apart (see Tips on Learning on previous pages) 2. Press and hold the SETUP button until the red indicator turns on, then release the button. 3. Press and release the desired Mode button (TV, VCR, etc.), the red indicator blinks then stays on. 4. Press and release the LEARN button, the red indicator blinks then stays on. 5. Press and hold any Original Remote button and move the Original Remote to the left and right, and/ or, up and down in front of the Learning remote IR transmitter. The red indicator will remain on if no IR from the Original remote is found and the red indicator will blink on and off more rapidly when the IR transmitters are lining up. The point where the red indicator blinks most rapidly is where the two IR transmitters are aligned. Note some original remotes will only transmit IR on the initial button press then stop. In these cases, quickly press and release the original remote button repeatedly during this procedure. 6. You can now learn a button from your original remote by continuing from "Step 4" in the "Learning Commands" section on the next page, or, to exit at this point, press and release the SETUP button The learning feature allows you to "learn" functions from your original remote control. For example - you may want to use your remote to operate the RANDOM PLAY feature from your original CD remote control. This remote is equipped with an "easy learning" feature that allows you to "learn" features (such as RANDOM PLAY from your original CD remote) by following the steps below, and on the next page: 1. Press and hold the SETUP button until the red indicator turns on, then release the button. 2. Press and release the desired mode button (TV, VCR, etc.), the red indicator blinks then stays on. 3. Press and release the LEARN button, the red indicator blinks then stays on. 4. Press and release the Learning Remote button that you want to teach (e.g. POWER). 5. Point both remotes facing each other by approximately 1 inch apart (see tips on page 14). 6. Press and hold the Original Remote button (e.g. Power) until the red indicator blinks once and stays on. If there is a learning problem, the indicator blinks for three seconds and stays on. If this happens, repeat Steps 4 to 6. 7. Repeat Steps 4-6 for other buttons you want to learn. 8. Press and release the SETUP button when all desired remote commands are learned. Code Learning is now complete. 6. Line up your remotes (that you're learning from) in front of the Learning remote, on a hard surface approx. 1 inch apart. 4. 2. 1. 3. 16 17
-
 1
1 -
2
-
3
-
 4
4 -
 5
5 -
 6
6 -
 7
7 -
 8
8 -
 9
9 -
 10
10 -
 11
11 -
 12
12 -
 13
13 -
 14
14 -
15
-
16
-
17
-
18
-
19
-
20
-
21
-
22
-
23
-
24
-
25
-
26
-
27
-
28
-
29
 |
 |