Philips SRU8015 User manual
Philips SRU8015 - Prestigo Universal Remote Control Manual
 |
UPC - 609585141599
View all Philips SRU8015 manuals
Add to My Manuals
Save this manual to your list of manuals |
Philips SRU8015 manual content summary:
- Philips SRU8015 | User manual - Page 1
SRU8015_IFU_Bundel1v4.qxd 16-05-2007 17:01 Pagina 1 SRU8015 www.philips.com/urc EN Instructions for Use 3 FR Mode d'emploi 19 DE Bedienungsanleitung 37 ES Instrucciones de manejo 55 IT Istruzioni per l'uso 73 NL Gebruiksaanwijzing 89 - Philips SRU8015 | User manual - Page 2
SRU8015_IFU_Bundel1v4.qxd 16-05-2007 17:01 Pagina 2 A E 1 2 3 4 5 B C D F 2 - Philips SRU8015 | User manual - Page 3
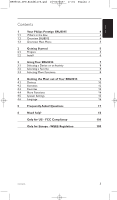
Selecting More Functions 8 4 Getting the Most out of Your SRU8015 9 4.1 Devices 10 4.2 Activities 12 4.3 Favorites 13 4.4 More Functions 14 4.5 System Settings 15 4.6 Language 16 5 Frequently Asked Questions 17 6 Need help? 18 Only for US - FCC Compliancy 106 Only for Europe - Philips SRU8015 | User manual - Page 4
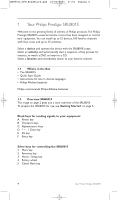
.qxd 16-05-2007 17:01 Pagina 4 1 Your Philips Prestigo SRU8015 Welcome to the growing family of owners of Philips products. The Philips Prestigo SRU8015 universal remote control has been designed to control your equipment. You can install up to 15 devices, 100 favorite channels with their icons and - Philips SRU8015 | User manual - Page 5
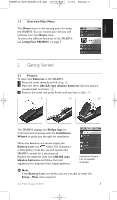
Philips logo for 3 seconds and continues with the Installation Wizard to guide you through the installation. When the batteries are almost empty, the Battery Low icon blinks. This indicates a critical battery level.You can still operate the SRU8015 control . Your Philips Prestigo SRU8015 5 - Philips SRU8015 | User manual - Page 6
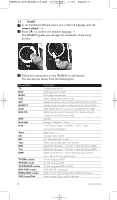
, select your preferred language with the rotary wheel. 4 2 Press to confirm the selected language. 5 The SRU8015 guides you through the remainder of the setup process. 4 5 3 Follow the instructions on the SRU8015 to add devices. You can add any device from the following list. Device Name TV DVD - Philips SRU8015 | User manual - Page 7
out of Your SRU8015' on page 9. 3 Using Your SRU8015 The SRU8015 has been designed to control your equipment with one remote control. Simply add the Play button to start the DVD. With an activity the SRU8015 executes all these steps with just one press. The SRU8015's large color display allows - Philips SRU8015 | User manual - Page 8
wheel. The SRU8015 is set to operate the selected device.You can now control that device with the black keys on the SRU8015. -or- SRU8015 is set to operate the device you selected for this activity. List of installed devices and activities To setup your devices, see 'Add a Device' on page 10 - Philips SRU8015 | User manual - Page 9
4 Getting the Most out of Your SRU8015 Via the Setup menu you have access to the various advanced features of the SRU8015. To enter the Setup menu: Press and new device 10 Fixes a key that is not working correctly by copying the signal form your original remote control 10 Copies the volume - Philips SRU8015 | User manual - Page 10
by learning it from your original remote control 14 Renames a function 14 Deletes an installed function 15 Changes the brightness of the display 15 Changes the time-out of the backlight on the SRU8015 15 Turns the key backlight on or off 15 Deletes all your personal settings on - Philips SRU8015 | User manual - Page 11
4 Position the SRU8015 and your original remote control as shown. 6 6 5 Select the key or extra function you want to fix. 0.80 - 2 inches To select extra functions: 2-5 cm 1 Press . 2 Select the function with the rotary wheel and press . 6 Follow the instructions on the SRU8015. The key - Philips SRU8015 | User manual - Page 12
the SRU8015 inserts a delay of 600ms between every key press to make sure your devices are responding correctly to the IR signals.You can overwrite this default delay. • If one of your devices needs a longer delay before receiving the next IR signal, you can insert a delay of 1, 3, 5 or 15 seconds - Philips SRU8015 | User manual - Page 13
create a new label. 3 Follow the instructions on the SRU8015. • Select a device with the rotary wheel, press and 15 seconds delay with the rotary wheel and press . -orSelect Hold Last Key with the rotary wheel and press . 4 Repeat step 3 to create another activity. The activity is added to the SRU8015 - Philips SRU8015 | User manual - Page 14
Function and press . 2 Position the SRU8015 and your original remote control as shown. 7 7 3 Select the device you want to add a function to. 4 Select the label you want to use for the extra function. 0.80 - 2 inches 2-5 cm 5 Follow the instructions on the SRU8015 to copy the function from - Philips SRU8015 | User manual - Page 15
Time-Out and press . 2 Select the preferred backlight time-out with the rotary wheel: 3 seconds, 5 seconds, 10 seconds, 20 seconds. 3 Confirm the new time-out setting. The backlight time-out is changed. D Note The Select On or Off with the rotary wheel. Getting the Most out of Your SRU8015 15 - Philips SRU8015 | User manual - Page 16
completely, all installed devices, activities, favorites and other settings are deleted. After the reset, the SRU8015 needs to be installed again. To reset the SRU8015: 1 Go to Setup - System Settings, select Full Reset and press . 2 Select Yes with the rotary wheel and press . 3 Press to recon - Philips SRU8015 | User manual - Page 17
my device? Not all functions are available in the database of the SRU8015 or the code behind the key is defect. You can fix a key by copying the signal from your original remote. See 'Fix a Key' on page 10. How can I add extra functions to the SRU8015? See 'Add a Function' on page 14. Brand Why can - Philips SRU8015 | User manual - Page 18
see www.philips.com/support. For warranty information, see www.philips.com/guarantee. Make sure the SRU8015 is at hand when you call our helpline so that our operators can help you determine whether it is working properly. The model number of your Philips universal remote control is SRU8015. Date of - Philips SRU8015 | User manual - Page 19
Philips Prestigo SRU8015 20 1.1 Contenu 20 1.2 Vue d'ensemble de la SRU8015 20 1.3 Aperçu du Menu Principal 21 2 Première approche 21 2.1 Préparation 21 2.2 Installation 22 3 Utilisation de la SRU8015 la SRU8015 - Philips SRU8015 | User manual - Page 20
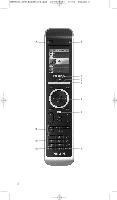
chaîne préférée. 1.1 Contenu • La télécommande SRU8015 • Le guide de démarrage rapide • Les instructions d'utilisation en plusieurs langues • Des piles alcalines Philips. Philips recommande l'utilisation de piles alcalines Philips. 1.2 Vue d'ensemble de la SRU8015 La photo à la page 2 vous donne - Philips SRU8015 | User manual - Page 21
des langues disponibles D Remarque Si l'icône de Pile Faible clignote, vous ne pouvez plus accéder au menu Configuration - Menu Princ. Votre télécommande Philips Prestigo SRU8015 21 - Philips SRU8015 | User manual - Page 22
de la touche de navigation. 4 2 Appuyez sur pour confirmer la langue sélectionnée. 5 La SRU8015 vous guide durant tout le reste de la configuration. 4 5 3 Suivez les instructions affichées sur la SRU8015 pour ajouter des appareils. Vous pouvez ajouter n'importe quel appareil de la liste suivante - Philips SRU8015 | User manual - Page 23
avec une seule télécommande. Ajoutez simplement vos appareils, vos activités, vos favoris et vos fonctions supplémentaires pour profiter pleinement de la SRU8015. Un appareil est un élément de votre équipement. Dès que vous avez installé vos appareils, vous pouvez les contrôler avec les touches de - Philips SRU8015 | User manual - Page 24
vos favoris installés : 1 Appuyez sur . 2 Sélectionnez un favori à l'aide de la touche de navigation et appuyez sur pour confirmer votre choix. La SRU8015 envoie un signal et passe sur la chaîne sélectionnée. Pour configurer vos favoris, voir Ajouter un Favori, page 30. Liste des favoris - Philips SRU8015 | User manual - Page 25
installées : 1 Appuyez sur . 2 Sélectionnez une fonction à l'aide de la touche de navigation et appuyez sur pour confirmer votre choix. La SRU8015 envoie un signal pour activer la fonction sélectionnée. Pour configurer plus de fonctions pour vos appareils, voir Ajouter une Fonction, page 31 - Philips SRU8015 | User manual - Page 26
du menu Configuration 25 4.1 Appareils 4.1.1 Ajouter un appareil Pour faire fonctionner vos appareils spécifiques avec la SRU8015, vous devez ajouter ces appareils.Vous pouvez ajouter jusqu'à 15 appareils. Pour obtenir une liste des appareils, allez à la page 22. 26 Utilisation optimale de la - Philips SRU8015 | User manual - Page 27
Sélectionnez l'appareil que vous souhaitez ajouter. 3 Suivez les instructions affichées sur la SRU8015. L'appareil sélectionné est installé puis ajouté à la SRU8015. Vous pouvez désormais faire fonctionner votre appareil avec la SRU8015 : Appuyez sur , sélectionnez l'appareil à l'aide de la touche - Philips SRU8015 | User manual - Page 28
celles de l'amplificateur pour le lecteur DVD. D Remarques • La fonction Copier le Volume remplace les réglages de volume par défaut de la SRU8015. • Les réglages de volume définis auparavant en utilisant Copier le volume ou Réparer une Touche sont effacés. • Les réglages de volume sont supprim - Philips SRU8015 | User manual - Page 29
la SRU8015. Une activité est une succession de pressions de touches transmise par la SRU8015 à l'aide d'une seule touche. Par défaut, la SRU8015 inclut infrarouge suivant, vous pouvez définir un délai de 1, 3, 5 ou 15 secondes. • Si une activité nécessite une pression prolongée, par exemple pour - Philips SRU8015 | User manual - Page 30
16-05-2007 17:01 Pagina 30 3 Suivez les instructions affichées sur la SRU8015. • Sélectionnez un appareil à l'aide de la touche de navigation, appuyez sur puis appuyez sur une touche pour l'ajouter à l'activité. • Sélectionnez un délai de 1, 3, 5 ou 15 secondes à l'aide de la touche de navigation et - Philips SRU8015 | User manual - Page 31
16-05-2007 17:01 Pagina 31 FRANÇAIS 3 Suivez les instructions affichées sur la SRU8015. La chaîne sélectionnée est installée et ajoutée à la SRU8015. Vous pouvez désormais passer sur vos chaînes préférentielles avec la SRU8015. Appuyez sur , sélectionnez la chaîne préférentielle à l'aide de la - Philips SRU8015 | User manual - Page 32
luminosité de l'écran est modifiée. 4.5.2 Temporisation rétroéclairage Quand vous utilisez la SRU8015, l'écran rétroéclairé s'allume. Il s'éteint à nouveau après 5 secondes. à l'aide de la touche de navigation : 3 secondes, 5 secondes, 10 secondes, 20 secondes. 32 Utilisation optimale de la SRU8015 - Philips SRU8015 | User manual - Page 33
Complète et appuyez sur . 2 Sélectionnez Oui à l'aide de la touche de navigation et appuyez sur . 3 Appuyez sur pour confirmer à nouveau. La SRU8015 supprime tous les réglages et redémarre par l'assistant d'installation. Cette opération peut prendre jusqu'à une minute. 4.6 Langue Pour modifier la - Philips SRU8015 | User manual - Page 34
.qxd 16-05-2007 17:01 Pagina 34 5 Questions fréquemment posées Touches Pourquoi une ou plusieurs touches ne fonctionnent-elles pas sur mon appareil ? Toutes les fonctions ne sont pas forcément disponibles dans la base de données de la SRU8015 ou le code défini pour la touche est défectueux - Philips SRU8015 | User manual - Page 35
nir les touches de volume : • Vous pouvez installer l'appareil source sur la SRU8015.Voir Ajouter un appareil, page 26. - ou • Vous pouvez copier les . Remplacez les piles usagées par des piles alcalines neuves. Pourquoi la SRU8015 ne veut-elle plus s'activer ? Le niveau des piles est trop faible - Philips SRU8015 | User manual - Page 36
d'aide ? Tout d'abord, lisez attentivement les instructions d'utilisation. Pour toute autre question concernant l'utilisation ou la configuration de la SRU8015, consultez le site www.philips.com/URC. Pour les coordonnées, consultez le site www.philips.com/support. Pour obtenir des informations sur la - Philips SRU8015 | User manual - Page 37
16-05-2007 17:01 Pagina 37 Inhalt 1 Ihre Philips Prestigo SRU8015 38 1.1 Was ist in der Verpackung 38 1.2 Übersicht SRU8015 38 1.3 Übersicht Hauptmenü 39 2 Erste Schritte 39 2.1 Vorbereiten 39 2.2 Installieren 40 3 Ihre SRU8015 benutzen 41 3.1 Ein Gerät oder eine Aktivität ausw - Philips SRU8015 | User manual - Page 38
-05-2007 17:01 Pagina 38 1 Ihre Philips Prestigo SRU8015 Herzlich Willkommen in der stetig wachsenden Familie der Besitzer von Philips-Produkten. Mit der Philips Prestigo SRU8015 UniversalFernbedienung können Sie Ihre Geräte bequem bedienen. Sie können bis zu 15 Geräte, 100 Kanäle als Favoriten mit - Philips SRU8015 | User manual - Page 39
SRU8015, siehe Kapitel 'Ihre SRU8015 benutzen' auf Seite 41. 2 Erste Schritte 2.1 Vorbereiten Batterien in die SRU8015 2 3 DEUTSCH Das Philips-Logo erscheint 3 Sekunden lang auf dem Display der SRU8015. Danach startet der wechseln sollten. Sie können die SRU8015 noch kurze Zeit bedienen. Ersetzen - Philips SRU8015 | User manual - Page 40
die gewünschte Sprache mit dem Drehknopf. 4 2 Bestätigen Sie die Spracheinstellung mit . 5 Die SRU8015 führt Sie weiter durch den Setup-Vorgang. 4 5 3 Folgen Sie den Anweisungen auf der SRU8015, um Geräte hinzuzufügen. Sie können jedes Gerät aus der nachstehenden Liste hinzufügen. Ger - Philips SRU8015 | User manual - Page 41
ät ist ein Teil Ihrer Anlage. Sobald Sie Ihre Geräte installiert haben, können Sie sie über die Tasten der SRU8015 bedienen. Geräte können neben den Tasten der SRU8015 noch weitere Funktionen besitzen. Sie können diese weiteren Funktionen über das Display wählen. Eine Aktivität ist eine Folge von - Philips SRU8015 | User manual - Page 42
auswählen Ihre installierten Favoriten auswählen: 1 Drücken Sie . 2 Wählen Sie einen Favoriten mit dem Drehknopf und bestätigen Sie mit . Die SRU8015 sendet ein Signal und schaltet zu dem ausgewählten Kanal um. Zum Einrichten Ihrer Favoriten, siehe Kapitel 'Favoriten Hinzufügen' auf Seite 48 - Philips SRU8015 | User manual - Page 43
SRU8015_IFU_Bundel1v4.qxd 16-05-2007 17:02 Pagina 43 DEUTSCH 3.3 Weitere Funktionen auswählen Geräte können neben den Tasten der SRU8015 noch weitere Funktionen besitzen. Weitere installierte Funktionen auswählen: 1 Drücken Sie . 2 Wählen Sie eine Funktion mit dem Drehknopf und bestätigen - Philips SRU8015 | User manual - Page 44
verlassen Verlässt das Setup-Menü 43 4.1 Geräte 4.1.1 Gerät Hinzufügen Um Ihre Geräte mit der SRU8015 bedienen zu können, müssen Sie diese Geräte hinzufügen. Sie können bis zu 15 Geräte hinzufügen. Die Geräteliste finden Sie auf Seite 40. D Hinweis Sie können ein Gerät mehr - Philips SRU8015 | User manual - Page 45
ählen: 1 Drücken Sie . 2-5 cm 2 Wählen Sie die Funktion mit dem Drehknopf und drücken Sie . 6 Folgen Sie den Anweisungen auf der SRU8015. Die Taste wird kopiert und repariert. D Hinweis Alle Tasten können repariert werden, außer: • • • 4.1.3 Lautstärke Kopieren Nach dem Hinzufügen eines - Philips SRU8015 | User manual - Page 46
ärketasten des Verstärkers für Ihren DVDPlayer benutzen möchten. D Hinweis • Die Funktion Lautstärke Kopieren überschreibt die Voreinstellungen auf der SRU8015. • Frühere Lautstärkeeinstellungen, die Sie über Lautstärke Kopieren oder Taste Reparieren gespeichert haben, gehen verloren. • Die Lautst - Philips SRU8015 | User manual - Page 47
der Liste, um einen neuen Namen zu erstellen. 3 Folgen Sie den Anweisungen auf der SRU8015. • Wählen Sie ein Gerät mit dem Drehknopf, drücken Sie und drü Sie der Aktivität hinzufügen möchten. • Wählen Sie 1, 3, 5 oder 15 Sekunden Zeitverzögerung mit dem Drehknopf und drücken Sie . - oder Wählen Sie - Philips SRU8015 | User manual - Page 48
Sie den Kanal, den Sie als Favoriten hinzufügen möchten. 3 Folgen Sie den Anweisungen auf der SRU8015. Der ausgewählte Kanal wird installiert und der SRU8015 hinzugefügt. Sie können nun mit der SRU8015 auf diesen Kanal umschalten: Drücken Sie , wählen Sie den Kanal mit dem Drehknopf und drücken - Philips SRU8015 | User manual - Page 49
Funktion hinzufügen: 1 Gehen Sie zu Setup - Weitere Funktionen, wählen Sie Funktion Hinzufügen und drücken Sie . 2 Positionieren Sie die SRU8015 und die Originalfernbedienung wie dargestellt. 7 7 3 Wählen Sie das Gerät, dem Sie eine Funktion hinzufügen möchten. 4 Wählen Sie einen Namen, den - Philips SRU8015 | User manual - Page 50
Helligkeit des Displays wird geändert. 4.5.2 Beleuchtungszeit Wenn Sie die SRU8015 benutzen, schaltet sich die Beleuchtung ein. Nach 5 Sekunden schaltet sie die gewünschte Beleuchtungszeit mit dem Drehknopf: 3 Sekunden, 5 Sekunden, 10 Sekunden, 20 Sekunden. 3 Bestätigen Sie die neue Einstellung der - Philips SRU8015 | User manual - Page 51
initialisieren, werden alle Geräte, Aktivitäten, Favoriten und andere Einstellungen gelöscht. Nach der Initialisierung muss die SRU8015 neu installiert werden. Die SRU8015 initialisieren: 1 Gehen Sie zu Setup - Einstellungen, wählen Sie Initialisieren und drücken Sie . 2 Wählen Sie Ja mit dem - Philips SRU8015 | User manual - Page 52
Kapitel 'Taste reparieren' auf Seite 45. - oder • Sie können Nicht in der Liste wählen und eine Datenbanksuche durchführen. Die SRU8015 prüft dann alle verfügbaren Codes. Dies kann bis zu 25 Minuten dauern. Lautstärke Warum funktionieren die Lautstärketasten nicht richtig? Nach dem Hinzufügen eines - Philips SRU8015 | User manual - Page 53
die Batterien zu schwach sind, können Sie das Setup-Menü nicht aufrufen. Ersetzen Sie die Batterien mit neuen Alkalibatterien. Warum schaltet sich die SRU8015 nicht mehr ein? Die Batterien sind zu schwach. Ersetzen Sie die Batterien mit neuen Alkalibatterien. Gehen meine Daten verloren, wenn ich die - Philips SRU8015 | User manual - Page 54
ältig durch. Wenn Sie weitere Fragen zur Bedienung oder Einrichtung der SRU8015 haben, gehen Sie bitte zu www.philips.com/URC. Kontaktdetails finden Sie unter www.philips.com/support. Informationen zur Garantie finden Sie unter www.philips.com/guarantee. Wenn Sie unsere Hotline anrufen, halten Sie das - Philips SRU8015 | User manual - Page 55
SRU8015_IFU_Bundel1v4.qxd 16-05-2007 17:02 Pagina 55 Índice 1 Acerca de su Philips Prestigo SRU8015 56 1.1 Contenido del paquete 56 1.2 Descripción general del SRU8015 56 1.3 Descripción general del menú principal 57 2 Primeros pasos 57 2.1 Preparación del equipo 57 2.2 Instalación - Philips SRU8015 | User manual - Page 56
de propietarios de productos de Philips. El mando a distancia universal Philips Prestigo SRU8015 ha sido diseñado para permitirle controlar sus equipos. Podrá instalar hasta 15 dispositivos, definir 100 canales favoritos con sus iconos y hasta 15 actividades. Seleccione un dispositivo y seleccione - Philips SRU8015 | User manual - Page 57
y presiónela con firmeza hasta que escuche un clic. 3 1 2 3 ESPAÑOL l SRU8015 muestra el logotipo de Philips durante 3 segundos y, a continuación, se inicia el Asistente de Instalación para guiarle a través de Instalación - Lista de idiomas disponibles Acerca de su Philips Prestigo SRU8015 57 - Philips SRU8015 | User manual - Page 58
idioma que desee usando la rueda giratoria. 4 2 Pulse para confirmar el idioma seleccionado. 5 El SRU8015 le guiará durante el resto del proceso de configuración. 4 5 3 Siga las instrucciones del SRU8015 para añadir dispositivos. Puede añadir cualquier dispositivo de la lista siguiente. Nombre del - Philips SRU8015 | User manual - Page 59
instalación inicial o instalar más funciones posteriormente mediante el menú Configuración. Consulte 'Cómo sacarle el máximo partido a su SRU8015' en la página 61. 3 Uso del SRU8015 El SRU8015 ha sido diseñado para controlar todos sus equipos con un solo mando a distancia. Para comenzar a disfrutar - Philips SRU8015 | User manual - Page 60
SRU8015_IFU_Bundel1v4.qxd 16-05-2007 17:02 Pagina 60 Al programar una actividad, el SRU8015 ejecuta todos estos pasos con tan solo pulsar una tecla. La gran pantalla en color del SRU8015 le permitirá reconocer fácilmente sus favoritos y cambiar rápidamente a esos canales.Ya no tendrá que introducir - Philips SRU8015 | User manual - Page 61
Pagina 61 3.3 Selección de funciones adicionales Los dispositivos pueden tener funciones adicionales además de las teclas que aparecen en el SRU8015. Para seleccionar más funciones programadas: 1 Pulse . 2 Seleccione una función con la rueda giratoria y pulse para confirmar su elección. El - Philips SRU8015 | User manual - Page 62
Sale del menú de Configuración. 61 4.1 Dispositivos 4.1.1 Agregar un dispositivo Para poder manejar sus dispositivos mediante el SRU8015, tendrá que añadirlos primero. Podrá añadir hasta 15 dispositivos. Para ver una lista de dispositivos, consulte la página 58. 62 Cómo sacarle el máximo partido - Philips SRU8015 | User manual - Page 63
y pulse . 2 Seleccione el dispositivo para el que desee fijar una tecla. 3 Confirme que tiene preparado el mando a distancia original. 4 Coloque el SRU8015 y su mando a distancia original tal y como se muestra en la imagen. 6 6 5 Seleccione la tecla o la función adicional que desee fijar. Para - Philips SRU8015 | User manual - Page 64
las teclas de volumen del amplificador para el DVD. D Notas • La función Copiar Volumen sobrescribe los ajustes de volumen predeterminados del SRU8015. • Los ajustes de volumen que haya definido previamente mediante las funciones Copiar Volumen o Fijar una Tecla se perderán. • Los ajustes de volumen - Philips SRU8015 | User manual - Page 65
señal por IR, podrá introducir una demora de 1, 3, 5 ó 15 segundos. • Si una actividad requiere pulsaciones largas, por ejemplo, para subir el crear una etiqueta nueva. 3 Siga las instrucciones que aparecerán en el SRU8015. • Seleccione un dispositivo mediante la rueda giratoria, pulse y pulse una - Philips SRU8015 | User manual - Page 66
y pulse . 4 Repita el tercer paso, si desea crear otra actividad. Se añadirá la actividad al SRU8015. Desde este momento, podrá ejecutar la actividad desde el SRU8015: Pulse , seleccione la actividad con la rueda giratoria y pulse . 4.2.2 Renombrar una actividad Para renombrar una actividad - Philips SRU8015 | User manual - Page 67
Funciones adicionales 4.4.1 Agregar una función Para añadir más funciones: 1 Vaya a Config. - Más Funciones, seleccione Agregar función y pulse . 2 Coloque el SRU8015 y su mando a distancia original tal y como se muestra en la imagen. 7 7 3 Seleccione el dispositivo al que desee añadir una - Philips SRU8015 | User manual - Page 68
de la pantalla. 4.5.2 Duración de la retroiluminación Cada vez que utilice el SRU8015, se encenderá la retroiluminación. Al cabo de cinco segundos se volverá a retroiluminación que desee con la rueda giratoria: 3 segundos, 5 segundos, 10 segundos, 20 segundos. 3 Confirme el nuevo ajuste de duración. - Philips SRU8015 | User manual - Page 69
los ajustes y volverá a mostrar el Asistente de instalación. Esta operación puede tardar hasta un minuto. 4.6 Idioma Para cambiar el idioma del SRU8015: 1 Vaya a Configuración - Idioma y pulse . 2 Seleccione el idioma que desee con la rueda giratoria: English, Français, Deutsch, Español, Italiano - Philips SRU8015 | User manual - Page 70
70 5 Preguntas frecuentes Teclas ¿Por qué no funcionan una o más teclas en mi dispositivo? No todas las funciones están disponibles en la base de datos del SRU8015 o el código que utiliza la tecla es incorrecto. Podrá fijar una tecla copiando la señal de su mando a distancia original. Vea 'Fijar una - Philips SRU8015 | User manual - Page 71
pilas sea demasiado bajo, no podrá entrar en el menú Configuración. Sustituya las pilas por unas pilas alcalinas nuevas. ¿Por qué no responde el SRU8015? El nivel de carga de las pilas es demasiado bajo. Sustituya las pilas por unas pilas alcalinas nuevas. ¿Pierdo los datos al sustituir las pilas - Philips SRU8015 | User manual - Page 72
las instrucciones de uso. Si tiene alguna pregunta adicional sobre el uso o la configuración del SRU8015, consulte el sitio web www.philips.com/URC. Puede consultar los datos de contacto en www.philips.com/support. Si desea obtener información acerca de la garantía, consulte el sitio web www - Philips SRU8015 | User manual - Page 73
SRU8015_IFU_Bundel1v4.qxd 16-05-2007 17:02 Pagina 73 Indice 1 Il vostro Prestigo SRU8015 di Philips 74 1.1 Contenuto del pacchetto 74 1.2 Panoramica dell'SRU8015 74 1.3 Panoramica del Menu Principale 75 2 Inizio 75 2.1 Preparazione 75 2.2 Installazione 76 3 Come utilizzare l' - Philips SRU8015 | User manual - Page 74
sempre più numerosa degli utenti dei prodotti Philips. Il telecomando universale Prestigo SRU8015 di Philips è stato ideato per controllare i vostri apparecchi. Potete installare fino a 15 dispositivi, 100 canali preferiti con i relativi loghi e fino a 15 attività. Selezionate un dispositivo e fatelo - Philips SRU8015 | User manual - Page 75
il telecomando SRU8015 ancora per breve tempo. Sostituite le batterie con batterie alcaline nuove del tipo LR6 AA e seguite le norme locali relative allo smaltimento delle batterie scariche. Guida All'Installazione Elenco delle lingue disponibili Il vostro Prestigo SRU8015 di Philips 75 - Philips SRU8015 | User manual - Page 76
- Menu Principale. 2.2 Installazione 1 Nella Guida All'Installazione, selezionate la vostra lingua preferita con il tasto rotante. 4 2 Premete per confermare la lingua selezionata. 5 L'SRU8015 vi guida attraverso le fasi rimanenti del processo di installazione. 4 5 3 Seguite le istruzioni sull - Philips SRU8015 | User manual - Page 77
la fase iniziale d'installazione oppure installare in seguito più funzioni mediante il menu Setup. Cfr. 'Come sfruttare al massimo l'SRU8015' a pagina 79. 3 Come utilizzare l' SRU8015 L'SRU8015 è stato ideato per controllare i vostri apparecchi con un solo telecomando. Per iniziare a utilizzare - Philips SRU8015 | User manual - Page 78
84. Elenco dei preferiti installati 3.3 Selezione di Più Funzioni I dispositivi possono avere più funzioni rispetto ai tasti presenti sull'SRU8015. Per selezionare più funzioni installate: 1 Premete . 2 Selezionate una funzione con il tasto rotante e premete per confermare la vostra scelta - Philips SRU8015 | User manual - Page 79
da assegnare ai vostri dispositivi, cfr. 'Aggiungere Una Funzione' a pagina 85. 4 Come sfruttare al massimo l'SRU8015 Mediante il menu Setup potete accedere alle varie funzioni avanzate dell'SRU8015. Per accedere al menu Setup: Premete e tenete premuto per 3 secondi . D Nota Non potete accedere - Philips SRU8015 | User manual - Page 80
il menu Setup 79 4.1 Dispositivi 4.1.1 Aggiungere un dispositivo Per far funzionare i vostri dispositivi specifici con l'SRU8015, è necessario aggiungerli. Potete aggiungere fino a 15 dispositivi. Per l'elenco dei dispositivi, consultare la pagina 76. D Nota Potete aggiungere un dispositivo più di - Philips SRU8015 | User manual - Page 81
non funzionano correttamente con il vostro dispositivo, potete copiare il segnale di quel tasto dal vostro telecomando originale sull'SRU8015. B Attenzione Quando utilizzate l'opzione 'Aggiustare Un Tasto', i nuovi dati si sovrascrivono ai dati attualmente memorizzati per quel tasto. 1 Andate - Philips SRU8015 | User manual - Page 82
Copiare Il Volume sovrascrive le impostazioni del volume predefiniti dell'SRU8015. • Le precedenti impostazioni del volume che avete installato tasti del volume che avete copiato, saranno ugualmente cancellati. Controllate le attività che avete installato e installarle nuovamente se necessario. - Philips SRU8015 | User manual - Page 83
ricevere il segnale IR successivo, potete inserire un tempo di 1, 3, 5 o 15 secondi. • Se un'attività necessita di una lunga pressione del tasto, ad Nell'Elenco per creare un nuovo nome. 3 Seguire le istruzioni sull'SRU8015. • Selezionate un dispositivo con il tasto rotante, premete e premete un - Philips SRU8015 | User manual - Page 84
preferito che desiderate aggiungere. 3 Seguite le istruzioni che compaiono sull'SRU8015. Il canale selezionato è stato installato e aggiunto all'SRU8015. Ora potete passare ai vostri canali preferiti usando l'SRU8015: Premete , selezionate il canale preferito con il tasto rotante e premete - Philips SRU8015 | User manual - Page 85
una funzione Per aggiungere più funzioni: 1 Andate su Setup - Più Funzioni, selezionate Aggiungere Una Funzione e premete . 2 Posizionate l'SRU8015 e il vostro telecomando originale come illustrato nella figura. 7 3 Selezionate il dispositivo al quale desiderate 7 aggiungere una funzione - Philips SRU8015 | User manual - Page 86
out della retroilluminazione mediante il tasto rotante: 3 secondi, 5 secondi, 10 secondi, 20 secondi. 3 Confermate la nuova impostazione del time-out. può durare fino a un minuto. 4.6 Lingua Per cambiare la lingua dell'SRU8015: 1 Andate su Setup - Lingua e premete . 2 Selezionate la lingua preferita - Philips SRU8015 | User manual - Page 87
5 Domande frequenti Tasti Perché uno o più tasti non funzionano con il mio dispositivo? Non tutte le funzioni sono disponibili nel database dell'SRU8015 oppure il codice del tasto è difettoso. Potete aggiustare un tasto copiando il segnale dal vostro telecomando originale. Cfr. 'Aggiustare Un Tasto - Philips SRU8015 | User manual - Page 88
avete altre domande sull'uso o sull'installazione dell'SRU8015, visitate il sito www.philips.com/URC. Per i dettagli sui contatti, visitate il sito www.philips.com/support. Per informazioni riguardanti la garanzia visitate il sito www.philips.com/guarantee. Se contattate la nostra helpline, tenete - Philips SRU8015 | User manual - Page 89
-2007 17:02 Pagina 89 Inhoudsopgave 1 Jouw Philips Prestigo SRU8015 90 1.1 Wat zit er in de verpakking? 90 1.2 Overzicht van de SRU8015 90 1.3 Overzicht Hoofdmenu 91 2 Aan de slag 91 2.1 Voorbereiding 91 2.2 Installeren 92 3 Je SRU8015 gebruiken 93 3.1 Een apparaat of activiteit - Philips SRU8015 | User manual - Page 90
16-05-2007 17:02 Pagina 90 1 Jouw Philips Prestigo SRU8015 Welkom bij de groeiende familie van eigenaars van Philipsproducten. De Philips Prestigo SRU8015 universele afstandsbediening is ontworpen om je apparaten te bedienen. Je kunt hiermee tot 15 apparaten bedienen, 100 favoriete kanalen met hun - Philips SRU8015 | User manual - Page 91
klepje en druk er stevig op totdat je een klik hoort. 3 1 2 3 NEDERLANDS De SRU8015 toont gedurende 3 seconden het Philipslogo en start de Installatiewizard die je helpt bij het installeren. Bij knippert, kun je niet langer het Setup - Hoofdmenu openen. Jouw Philips Prestigo SRU8015 91 - Philips SRU8015 | User manual - Page 92
Installatiewizard met het draaiwieltje de gewenste taal. 4 2 Druk op om je taalkeuze te bevestigen. 5 De SRU8015 gidst je door de rest van het setupproces. 4 5 3 Volg de instructies op de SRU8015 om apparaten toe te voegen. U kunt een apparaat toevoegen uit de onderstaande lijst. Naam apparaat - Philips SRU8015 | User manual - Page 93
van je installatie. Zodra je je apparaten hebt geïnstalleerd, kun je ze allemaal bedienen met de toetsen op de SRU8015. Naast de toetsen kun je met de SRU8015 ook extra functies programmeren. Selecteer extra functies op de display. Een activiteit is een reeks toetsdrukken die je kunt programmeren - Philips SRU8015 | User manual - Page 94
Om extra functies te selecteren: 1 Druk op . 2 Selecteer een functie met het draaiwieltje en druk op om je keuze te bevestigen. De SRU8015 verstuurt een signaal voor de geselecteerde functie. Om extra functies voor je apparaten te selecteren, zie 'Een favoriet toevoegen' op pagina 100. Lijst - Philips SRU8015 | User manual - Page 95
SRU8015_IFU_Bundel1v4.qxd 16-05-2007 17:02 Pagina 95 4 Haal het meeste uit je SRU8015 Via het Setup-menu heb je toegang tot de diverse geavanceerde functies van de SRU8015. Om het Setup-menu te openen: Hou de toets ingedrukt. gedurende 3 seconden D Opmerking Je kunt het Setup-menu niet openen - Philips SRU8015 | User manual - Page 96
. 103 Sluit het Setup-menu af. 95 4.1 Apparaten 4.1.1 Een apparaat toevoegen Om je apparaten met de SRU8015 te kunnen bedienen, moet je ze eerst toevoegen. Je kunt tot 15 apparaten programmeren. De lijst met apparaten vind je op pagina 92. D Opmerking Je kunt een apparaat ook meerdere keren - Philips SRU8015 | User manual - Page 97
druk op . 2 Selecteer het apparaat waarvoor je een toets wilt repareren. 3 Bevestig dat je de originele afstandsbediening klaarliggen hebt. 4 Plaats de SRU8015 en je originele afstandsbediening zoals op de afbeelding. 6 6 5 Selecteer de toets of extra functie die je wilt repareren. Om extra - Philips SRU8015 | User manual - Page 98
. D Opmerking Ook de toetsen van het verwijderde apparaat die elders worden gebruikt, bv. in een activiteit of de door jou gekopieerde volumetoetsen, worden verwijderd. Controleer de activiteiten die je programmeerde en programmeer ze indien nodig opnieuw. Zie 'Een activiteit toevoegen' op pagina 99 - Philips SRU8015 | User manual - Page 99
om een nieuwe naam aan te maken. 3 Volg de aanwijzingen op de SRU8015. • Selecteer een apparaat met het draaiwieltje, druk op en druk op een toets om het aan de activiteit toe te voegen. • Selecteer 1, 3, 5 of 15 seconden vertraging met het draaiwieltje en druk op . - of - Selecteer Laatste Toets - Philips SRU8015 | User manual - Page 100
druk op . 2 Selecteer het favoriete kanaal dat je wilt toevoegen. 3 Volg de aanwijzingen op de SRU8015. Het geselecteerde kanaal is nu geprogrammeerd en toegevoegd aan de SRU8015. Je kunt nu vlot met de SRU8015 schakelen naar je favoriete kanalen: Druk op , selecteer het favoriete kanaal met het - Philips SRU8015 | User manual - Page 101
toevoegen Om extra functies toe te voegen: 1 Ga naar Setup - Extra Functies, selecteer Functie Toevoegen en druk op . 2 Plaats de SRU8015 en je originele afstandsbediening zoals op de afbeelding. 7 3 Selecteer het apparaat waarvoor je een 7 functie wilt toevoegen. 4 Selecteer de naam - Philips SRU8015 | User manual - Page 102
van het oplichten met het draaiwieltje: 3 seconden, 5 seconden, 10 seconden, 20 seconden. 3 Bevestig de nieuwe instelling voor het met het draaiwieltje en druk op . 3 Druk op om te herbevestigen. De SRU8015 wist nu alle instellingen en start opnieuw op met de Installatiewizard. Dit kan een minuut - Philips SRU8015 | User manual - Page 103
gestelde vragen Toetsen Waarom werken een of meerdere toetsen niet met mijn apparaat? Niet alle functies zijn beschikbaar in de databank van de SRU8015, of de code achter de toets is defect. Je kunt een toets repareren door het signaal te kopiëren van je originele afstandsbediening. Zie 'Een toets - Philips SRU8015 | User manual - Page 104
.qxd 16-05-2007 17:02 Pagina 104 Volume Waarom werken de volumetoetsen niet correct? Nadat je de apparaten toevoegde, kopieert de SRU8015 automatisch de volumetoetsen en Mute-toets als volgt: • Videoapparaten, zoals DVD, DVDR,VCR en satellietbox gebruiken de volumetoetsen van de TV. • Audioapparaten - Philips SRU8015 | User manual - Page 105
bijkomende vragen over het gebruik of de programmering van de SRU8015, zie www.philips.com/URC. Voor contactgegevens, zie www.philips.com/support. Voor informatie over de garantie, zie www.philips.com/guarantee. Let erop dat je je SRU8015 bij de hand hebt wanneer je onze hulplijn contacteert, zodat - Philips SRU8015 | User manual - Page 106
a Class B digital device, pursuant to part 15 of the FCC rule and ICES 003 in Canada installed and used in accordance with the instructions, may cause harmful interference to radio an experienced radio/TV technician for help. C CAUTION: User changes or modifications not expressly approved by the - Philips SRU8015 | User manual - Page 107
Pagina 107 Limited one year warranty Warranty coverage begins the day you buy your product. For one year thereafter, a defective or inoperative because of misuse, accident, unauthorized repair, modification or other cause not within the control of Philips Consumer Electronics. Replacement as provided - Philips SRU8015 | User manual - Page 108
and do not dispose of your old products with your normal household waste.The correct disposal of your old product will help prevent potential negative consequences for the environment and human health. Vanhan tuotteen hävittäminen Tuotteesi on suunniteltu ja valmistettu laadukkaista materiaaleista - Philips SRU8015 | User manual - Page 109
SRU8015_IFU_Bundel1v4.qxd 16-05-2007 17:02 Pagina 109 Italian Smaltimento di vecchi prodotti Il prodotto è stato progettato e assemblato con materiali e componenti di alta qualità che possono essere riciclati e riutilizzati. Se su un prodotto si trova il simbolo di un bidone con ruote, ricoperto - Philips SRU8015 | User manual - Page 110
SRU8015_IFU_Bundel1v4.qxd 16-05-2007 17:02 Pagina 110 Turkish Eski ürününüzün atılması Ürününüz, geri dönüşüme tabi tutulabilen ve yeniden kullanılabilen, yüksek kalitede malzeme ve parçalardan tasarlanmış ve üretilmiştir. Bir ürüne, çarpı işaretli tekerlekli çöp arabası işaretli etiket yapıştırı - Philips SRU8015 | User manual - Page 111
SRU8015_IFU_Bundel1v4.qxd 16-05-2007 17:02 Pagina 111 ...111 - Philips SRU8015 | User manual - Page 112
SRU8015_IFU_Bundel1v4.qxd 16-05-2007 17:02 Pagina 112 © Copyright 2007 Royal Philips Electronics, Interleuvenlaan 74-76, 3001 Leuven (Belgium) 3104 205 3448.1
-
 1
1 -
 2
2 -
 3
3 -
 4
4 -
 5
5 -
 6
6 -
 7
7 -
8
-
9
-
10
-
11
-
12
-
13
-
14
-
15
-
16
-
17
-
18
-
19
-
20
-
21
-
22
-
23
-
24
-
25
-
26
-
27
-
28
-
29
-
30
-
31
-
32
-
33
-
34
-
35
-
36
-
37
-
38
-
39
-
40
-
41
-
42
-
43
-
44
-
45
-
46
-
47
-
48
-
49
-
50
-
51
-
52
-
53
-
54
-
55
-
56
-
57
-
58
-
59
-
60
-
61
-
62
-
63
-
64
-
65
-
66
-
67
-
68
-
69
-
70
-
71
-
72
-
73
-
74
-
75
-
76
-
77
-
78
-
79
-
80
-
81
-
82
-
83
-
84
-
85
-
86
-
87
-
88
-
89
-
90
-
91
-
92
-
93
-
94
-
95
-
96
-
97
-
98
-
99
-
100
-
101
-
102
-
103
-
104
-
105
-
106
-
107
-
108
-
109
-
110
-
111
-
112
 |
 |

SRU8015
www.philips.com/urc
EN
Instructions for Use
3
FR
Mode d’emploi
19
DE
Bedienungsanleitung
37
ES
Instrucciones de manejo
55
IT
Istruzioni per l’uso
73
NL
Gebruiksaanwijzing
89
SRU8015_IFU_Bundel1v4.qxd
16-05-2007
17:01
Pagina 1