Pioneer 151FD Owner's Manual
Pioneer 151FD - PRO - 60" Plasma TV Manual
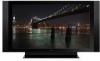 |
UPC - 012562887128
View all Pioneer 151FD manuals
Add to My Manuals
Save this manual to your list of manuals |
Pioneer 151FD manual content summary:
- Pioneer 151FD | Owner's Manual - Page 1
- Pioneer 151FD | Owner's Manual - Page 2
servicing) instructions in the literature accompanying the appliance. D3-4-2-1-1_En-A 1) Read these instructions. 2) Keep these instructions. 3) Heed all warnings. 4) Follow all instructions Use only with the cart, stand, tripod, bracket, or table NUMBER ON YOUR ENCLOSED WARRANTY CARD AND KEEP IN - Pioneer 151FD | Owner's Manual - Page 3
's guide and manual to learn about the many features and benefits that set the KURO apart. We hope you enjoy the experience of owning the KURO and invite you to enter a new world of seeing and hearing like never before. TABLE OF CONTENTS 1 Introduction to the ELITE Series Flat Panel TVs 6 1.1 Flat - Pioneer 151FD | Owner's Manual - Page 4
Block ...54 3.6 Smart Starts for New Owners ...55 3.6.1 Use the TOOLS Settings ...75 4.7.5 Use Auto Volume Control (AVC)...75 4.8 Manage the Power ...76 5 Use Other Equipment With Your Flat Panel TV 78 5.1 Program the Remote Codes from the Remote Control 80 5.1.5 Control a Pioneer Receiver ...80 - Pioneer 151FD | Owner's Manual - Page 5
and Clock Adjustments 122 5.13.2 Manual Image Position and Clock Adjustments 122 6 Helpful Information ...123 6.1 Frequently Asked Questions (FAQs) ...123 6.2 Check Your Software/Hardware Version...124 6.3 Cleaning Methods...124 6.4 Troubleshooting & Service Information...125 6.4.1 Check the - Pioneer 151FD | Owner's Manual - Page 6
Remote (2) Cleaning Cloth Power Cord (2 m/6.6 feet) Cable Clamps (4) Operating Instructions Color Sensor Screws (x 2) (M5 x 8 mm) Warranty Card Stand kit Base Cover Color Sensor Bracket (when attached to the top right of the rear panel) Bracket (for 60") Also shipped with the PRO-151FD (60 - Pioneer 151FD | Owner's Manual - Page 7
the ELITE Series Flat Panel TVs 01 Also shipped with the PRO-151FD (60" panel) Silver Screws (4) (4×10 mm) Falling Prevention Metal Fittings (2) Black Screws (4) (M6×20 mm) Light-Blocking Shield Screws to Metal Fittings (4) (M4×35 mm) Speaker accessories Speaker Cables (2) Speaker Mounting - Pioneer 151FD | Owner's Manual - Page 8
to identify the various options. ELITE Series Models: Face of Panel 6 (PRO-111FD) 1 23 1 - Power ON indicator 2 - STANDBY indicator 3 - SLEEP indicator Command Side of the Panel (left side) 8 13 14 9 15 (PRO-151FD) 1 23 45 7 4 -Room Light sensor 5 -Remote Control sensor 6 -Color Sensor - Pioneer 151FD | Owner's Manual - Page 9
Introduction to the ELITE Series Flat Panel TVs 01 1 - ANT terminal 2 - PC Input terminal (Analog RGB) 3 - Color SPEAKERS (right/left) terminal (PRO-151FD) (lower bank) 25 26 27 28 25 -Speakers (R) terminal (speaker side) 26 -Color Sensor 27 -Power On button 28 -Speakers (L) terminal (speaker - Pioneer 151FD | Owner's Manual - Page 10
01 Introduction to the ELITE Series Flat Panel TVs 1.2.2 Operating the Remote Control The remote control for the ELITE Series panels is a powerful tool. This section provides a brief introduction to your remote control while later sections explore more advanced operations. Insert the Batteries into - Pioneer 151FD | Owner's Manual - Page 11
Introduction to the ELITE Series Flat Panel TVs 01 Operating Range for the Remote Control To control the flat panel TV, point the remote towards the sensor on the panel's bottom right corner. For easy operation, keep the distance between the remote control and the sensor less than 7 m (23 feet) - Pioneer 151FD | Owner's Manual - Page 12
ELITE Series Flat Panel TVs 1.2.3 Buttons on the Remote Control Except for a few options, commands available through the buttons on the flat panel TV are duplicated on the remote control. The remote Enter a dot for selecting a sub-channel VOL +/-: 9 Set the volume EXIT: 10 Exit the menu to return to - Pioneer 151FD | Owner's Manual - Page 13
Lights up all buttons Lights turn off if no operations are performed within five seconds. This is used for remote control use in dark locations. 17 TV/DTV: Select analog or digital TV Display the TOOLS Menu - refer to "3.6 Smart Starts for New Owners" 27 ENTER: Execute a command 28 RETURN: Return to - Pioneer 151FD | Owner's Manual - Page 14
and parts included with the shipment. Pioneer recommends working with a qualified installer whenever possible. Regardless of the mounting method, anchor or secure your flat panel TV using a combination of the mounting holes and/or supplied bolts. Rear view (PRO-151FD) Mounting hole Mounting hole - Pioneer 151FD | Owner's Manual - Page 15
around the flat panel TV to allow cooling. The diagram below is an example of a stand-mounted panel with proper ventilation direct sunlight Away from strong lighting sources For specific cautions and sensor, speaker or speaker brackets. Note: Do not use the handles to hang the flat panel TV or as - Pioneer 151FD | Owner's Manual - Page 16
added. Refer to "Attach/Detach the Speaker" on page 19 for assistance. 2 ) Lay the flat panel TV down on a raised surface with the stand base hanging over the edge. 3 ) Place all stand parts on a soft cloth to avoid scratching. If you are mounting the PRO-151FD continue with Steps 4 and 5. If you - Pioneer 151FD | Owner's Manual - Page 17
, attach the falling prevention metal fittings using the installation screws. (PRO-151FD) Installation screws (M4 x 35 mm: black) Falling prevention metal fitting 8 ) With the flat panel TV still face down, insert the stand's supports into the bottom of the panel then tighten the screws. Line - Pioneer 151FD | Owner's Manual - Page 18
02 Install Your Flat Panel TV Attach the Light-Blocking Shield Conduct after attaching the flat panel TV onto the stand. Light-blocking shield Front Base cover Rear Note: Attach the light-blocking shield after anchoring the base cover on a flat stable place. Peel off one side of the double-stick - Pioneer 151FD | Owner's Manual - Page 19
from scratches or other damage during mounting. Stand-Mounted Panel 1 ) Attach the appropriate speaker brackets (left and right) to the top and bottom on the back of the speakers using the supplied screws. (PRO-151FD) Screw holes Speaker bracket (For TOP-Right) Speaker bracket (For BOTTOM-Right - Pioneer 151FD | Owner's Manual - Page 20
02 Install Your Flat Panel TV (PRO-111FD) Speaker bracket (For TOP-Right) Speaker bracket (For BOTTOM-Right) Screw holes Screw holes Speaker bracket (For TOP-Right) Speaker bracket (For BOTTOM-Right) Place the speaker so its terminals (bottom) are facing you. 2 ) Screw a supplied screw into the - Pioneer 151FD | Owner's Manual - Page 21
onto it. (PRO-151FD) (PRO-111FD) After passing the wide part of the hole over the screw, lower the speaker. After passing the wide part of the hole over the screw, lower the speaker. Tighten with the provided screw the bottom speaker bracket to the flat panel TV temporarily (one place bottom - Pioneer 151FD | Owner's Manual - Page 22
02 Install Your Flat Panel TV 8 ) Insert the cable in the groove on the speaker. (PRO-151FD) Speaker cable Speaker terminal Insertion in groove Speaker cable (PRO-111FD) Speaker terminal Insertion in groove 9 ) Connect the other end of the speaker cables to the rear of the panel. Refer to " - Pioneer 151FD | Owner's Manual - Page 23
short causing malfunction or damage to the system. • Do not connect any devices to the speaker terminals other than the speakers specified. (PRO-111FD) 2.3 Wall/Ceiling Mounting Lay the 50" panel down on a raised surface then remove the stand. Installation bolts (1) Installation bolts (2) 23 En - Pioneer 151FD | Owner's Manual - Page 24
the wall/ceiling mount unit. 2.4 Mount the Flat Panel TV Because your flat panel TV is slim but heavy, have at least two people mount and/or position the panel. The following sections provide instructions for the different mounting and anchoring options. Anchor the Panel When Using a Stand When - Pioneer 151FD | Owner's Manual - Page 25
or electrical shock could result. Follow the steps below to secure your flat panel TV. 1 ) Mark locations for metal fittings and screws on the back edge of the table using the panel stand to determine placement. (PRO-151FD) (PRO-111FD) 8 mm to 15 mm (3/8 inch to 5/8 inch) 4 mm (5/32 inch) 20 mm - Pioneer 151FD | Owner's Manual - Page 26
1 or Mode 2 on the Room Light Sensor menu (refer to "3.4.1 Adjust the Picture for Your Room Lighting." We strongly suggest you attach the color at the bottom right of the front panel using a magnet. Magnet Flat panel TV (Front) Color sensor (Rear) 2 ) Attach the color sensor along the bottom - Pioneer 151FD | Owner's Manual - Page 27
on the panel with or without sidemounted speakers. (when side-mounted speakers are installed) 1 ) Remove the screws of the color sensor then replace the bracket. Use the removed screws again. (Bracket for PRO-151FD) 2 ) Loosen the upper two (2) speaker bracket screws. 3 ) Fit the color sensor - Pioneer 151FD | Owner's Manual - Page 28
the supplied color sensor screws in the speaker screw holes. 3 ) Fit the color sensor bracket's lower grooves into the screws. Adjust the bracket position to stay in place. The bracket is for PRO-151FD panel but the procedure is the same for PRO-111FD. 4 ) Fasten the screws. 5 ) Connect the cable - Pioneer 151FD | Owner's Manual - Page 29
a reference tool for non-Pioneer devices but port locations may differ or be unavailable. Connect cable or Satellite using STB (Set Top Box): T T When using a cable STB or Satellite STB, plug in to the antenna/cable TV wall outlet using the STB cable provided with your STB. If your STB has an - Pioneer 151FD | Owner's Manual - Page 30
02 Install Your Flat Panel TV Connect HDMI equipment (INPUT 4 through INPUT 6): T T W W Rear view Connect use this connection instead of making video connections. For details, refer to the operation manual that came with the DVD player. This connection is not required when connecting an AV - Pioneer 151FD | Owner's Manual - Page 31
Your Flat Panel TV Connect a VCR: other audiovisual equipment. For details, refer to the operation manual that came with the game console or camcorder. Connect control INPUT terminal (Analog RGB) when (OUT) terminal and other Pioneer equipment having connecting a PC. If you also connect PC audio - Pioneer 151FD | Owner's Manual - Page 32
plasma as well as saves energy. Plug the cord in to the panel but do NOT plug it in to a power outlet yet. T T W W 2.7 Route then Bundle the Power Cord and Cables Once the flat panel TV is mounted and the speaker shows a bundled speaker cable. (PRO-151FD) Speaker cable Cable clamp Bundle - Pioneer 151FD | Owner's Manual - Page 33
cable(s) in the cable clamp. 2 ) Push and hold the levers then insert the hook into an appropriate hole on the rear of the flat panel TV. 3 ) Pull up the clamp band to lock. 1 2 Cable clamp 4 ) Confirm that the cable clamp is seated firmly in the panel. Note: Avoid pinching or creating - Pioneer 151FD | Owner's Manual - Page 34
new to flat panel TV features. 3.1 Turn the Flat Panel TV ON/OFF Your flat panel TV has three activity levels: Power On, Standby, and Power Off. Standby saves energy but allows the remote control to turn on the panel. The following instructions use the remote control. To operate the flat panel TV - Pioneer 151FD | Owner's Manual - Page 35
TV channels. 1) Confirm that the remote control is set to TV. Located at the bottom of the remote control. 2) Press TV/DTV on the remote control. Located at the top of the remote ) to scroll through options for that menu item. Remote control SAT GUIDE DVD TOP MENU ENTER HOME MENU 4) Highlight the - Pioneer 151FD | Owner's Manual - Page 36
91 HDMI Control Setting 56 Orbiter 43 Label Input Favorites Setup 42 Channel Mode 43 Sort Favorites 46 Blue LED Dimmer 56 Orbiter 56 Video Pattern 59 Game Control Pref 45 Room Light Sensor 55 Screen Protection System Setup 43 Label Input 38 Auto Installation 39 Analog TV Setup 41 Digital - Pioneer 151FD | Owner's Manual - Page 37
Basic Operations For Television Viewing 03 TV Screen Components Your flat panel TV has easy-to-read menus and graphic symbols that provide quick access to the desired options. Menus appearing in this manual may differ slightly from the actual menus but the functionality remains the same. 1 2 3 - Pioneer 151FD | Owner's Manual - Page 38
and set up TV channels. There are two ways to add channels to your flat panel TV, Auto Installation for automatic channel selection or manual channel Installation Auto Installation searches for and adds TV channels to your list of viewable channels. Using the remote control, follow the steps below to - Pioneer 151FD | Owner's Manual - Page 39
Television the Setup. 2 ) Select Analog TV Setup from the System Setup menu. 3 ) Select Manual Adjust from the Analog TV Setup menu. 4 ) Select Program manually but digital channels can only be added using the Add New Channels button on the Digital Tuner Setup menu. Add New Channels To add new - Pioneer 151FD | Owner's Manual - Page 40
03 Basic Operations For Television Viewing 3 ) Select Installation from the Digital Tuner Setup menu. Installation Channel management Clock 4 ) Select Add New Channels. Channel search starts automatically. If a new channel is found, it is stored automatically in the flat panel TV. To cancel channel - Pioneer 151FD | Owner's Manual - Page 41
next to the added/restored channel. To skip an analog channel, follow the steps below. • Analog TV channels: Manual Adjust > Store > No Radio Skip This function allows skipping of radio channels at a time. To set this option, follow the steps below. 1 ) Access the System Setup through the Setup - Pioneer 151FD | Owner's Manual - Page 42
03 Basic Operations For Television Viewing 3.2.7 Channel List Your flat panel TV offers three channel lists for quick access XXXXXX XXXXXX 1/2 00001.000 00004.000 00007.000 00009.000 00013.002 00015.000 00024.000 Set Favorite Channels Select up to ten (10) channels per list page, up to five pages - Pioneer 151FD | Owner's Manual - Page 43
Television Viewing 03 4 ) Select a TV channel to store. If the screen fails to fit in the window, a scroll bar appears. Pressing ENTER while watching a TV or RETURN on the remote control. Sort Favorite The software keyboard appears. 4 ) Enter the new name. Label K I DS 1234567890 ABCDE FGH I - Pioneer 151FD | Owner's Manual - Page 44
03 Basic Operations For Television Viewing 3.3 Quick Start for Watching Television Your flat panel TV has many functions and features, some of which you may simply lack the time to set when first installing the panel. To begin watching TV quickly, refer to the basic information within this section. - Pioneer 151FD | Owner's Manual - Page 45
Operations For Television Viewing 03 The SLEEP indicator on the front of the flat panel TV lights orange when the Sleep Timer is set. To check Pattern is explained fully later in this manual. 3.4 Adjust the Picture and Sound Quality Your flat panel TV has many adjustment options for the picture - Pioneer 151FD | Owner's Manual - Page 46
channel. 1 ) Access the System Setup through the Setup. 2 ) Select Analog TV Setup from the System Setup menu. 3 ) Select Manual Adjust from the submenu. Only analog channels set using Auto Installation are manually adjustable. 4 ) Select Program Entry. 5 ) Select a channel number to be added. Use - Pioneer 151FD | Owner's Manual - Page 47
the best picture for your viewing area. As each option changes, refer back to the previously set image for comparison. This section includes adjustment notes and steps to adjust the flat panel TV After screen stores the new entry in memory and deactivates the TOOLS button. • - Pioneer 151FD | Owner's Manual - Page 48
Television no selections are made within 60 seconds, the menu closes automatically and the current settings are saved to memory. To • Analyzer: Histogram, RGB, Room Light, Color Sensor • Picture: Contrast, Brightness press and hold DISPLAY on the remote control to show OPTIMUM Performance. OPTIMUM - Pioneer 151FD | Owner's Manual - Page 49
Basic Operations For Television Viewing 03 3.4.5 Sound Control Setting the Sound Control option to On Many prefer a heavier base when watching movies or music videos from an AV source or on TV. Others like a more balanced sound. To adjust the sound to your preference, follow the directions - Pioneer 151FD | Owner's Manual - Page 50
03 Basic Operations For Television Viewing 3.5 Block Programs, Channels, or Content Although blocking programs, channels, or content is optional, some images may be inappropriate for all family members. Your flat panel TV supports a blocking function known as Parental Control. With Parental Control - Pioneer 151FD | Owner's Manual - Page 51
Basic Operations For Television Viewing 03 3.5.2 Activate Parental Control The Parental Control off, the symbol is a (V) and the channel/program is viewable. The lock symbol here marks blocked TV ratings. FV D B B B B V 3.5.3 Assign a Rating System to Create Blocks Besides choosing to - Pioneer 151FD | Owner's Manual - Page 52
03 Basic Operations For Television Viewing MPAA Ratings menu N/A G PG PG-13 R NC-17 NR : View : View : View : View : View : View "None" The flat panel TV also provides a rating setting that blocks programs with a rating of None. The US TV Parental Guidelines Rating system identifies - Pioneer 151FD | Owner's Manual - Page 53
HOME MENU to exit the menu. Note: Your flat panel TV ships with this option set to View. New Ratings System for Digital Broadcasts Some Digital broadcasts carry new ratings that are not compatible with the panel's original Parental Control settings. When first tuning to one of these broadcasts, the - Pioneer 151FD | Owner's Manual - Page 54
Television Viewing Delete a New Ratings System If an added ratings system is no longer needed, delete the ratings system from your flat panel TV When a four-digit password is entered, or no operation is performed within 60 seconds, the window disappears. To recall the window after it disappears, - Pioneer 151FD | Owner's Manual - Page 55
while watching a program. To display the menu, press TOOLS on the remote control. The menus shown in this section differ, depending upon the menu. EXIT SAT GUIDE DVD TOP MENU ENTER HOME MENU SAT / DVD MENU TOOLS RETURN TELEVISION TOOLS All Sound Random Play Mode : Single A-B Repeat Time Search - Pioneer 151FD | Owner's Manual - Page 56
Operations For Television Viewing as the picture position shifts. Also, when the Orbiter function is set to Mode 1 or Mode 2, the image may appear to drop slightly on burnin. While the Video Pattern screen is on, only the remote's TV (a) button and the panel's STANDBY/ON button is available. - Pioneer 151FD | Owner's Manual - Page 57
etc.) Similar to the purpose for the room light sensor, the AV Option or Selection depends upon seven AV Selections for the best image from an external AV Source. Use either the remote control or the Home Menu input and TV input sources) allows customizing settings as desired (set the mode - Pioneer 151FD | Owner's Manual - Page 58
Home Menu. Follow the directions below to set an AV Selection for an external AV environment. Your flat panel TV employs advanced sound reproduction collected at the Room Light Sensor, as well as between the two AV Selections for the best image. The options are as follows: • STANDARD: for - Pioneer 151FD | Owner's Manual - Page 59
exit the menu. To activate the Game Control Pref option, set the AV Selection to GAME and use an external input (unless Elements Plasma technology delivers one of the best images best viewing experience. 4.2.1 Choose a Screen Size (Automatically or Manually) Automatic Screen Sizing The flat panel TV - Pioneer 151FD | Owner's Manual - Page 60
Manually select an appropriate screen size if an image fails to appear in the correct format. Browse the menu for the correct screen size for a specific program. The selectable screen sizes differ depending on the types of input signals. While watching a TV broadcast, press SCREEN SIZE on the remote - Pioneer 151FD | Owner's Manual - Page 61
unanticipated image changes. Your flat panel TV offers several adjustment options. AV Source adjust. AV Source PC Source AV Selection Contrast Brightness Color Tint Sharpness Pro Adjust Reset Picture : PERFORMANCE : 40 : 0 : 0 : : Reset returns all settings to the factory defaults. 61 En - Pioneer 151FD | Owner's Manual - Page 62
TV provides various advanced functions for optimizing the picture quality that go beyond the basic adjustments explained earlier in this manual. This section explores the value offered through Pioneer's Pro Adjust High Definition (HD) support when the Auto Size menu is set to Wide-Zoom and Side Mask - Pioneer 151FD | Owner's Manual - Page 63
Level for High Quality Image Pioneer's PureCinema automatically detects and analyses a film-based source (originally encoded at 24 frames/ second) then recreates each still film frame for HD picture quality. The function supports both film and text material. To set the PureCinema level for your - Pioneer 151FD | Owner's Manual - Page 64
Option menu disables the PureCinema setting. 4.3.3 Select an Intelligent Mode Option Use this function to optimize color tones and brightness for images. To select the Intelligent Mode, follow the steps below. 1 ) Access the Picture through the Setup. 2 ) Select Pro Adjust from the Picture menu - Pioneer 151FD | Owner's Manual - Page 65
Adjust the Color Temperature for better white balance. To set the color temperature level, follow the steps below. 1 ) Access the Picture through the Setup. 2 ) Select Pro Adjust from the Picture menu. 3 ) Select Color Detail from the Pro Adjust menu. 4 ) Select Color Temp from the submenu - Pioneer 151FD | Owner's Manual - Page 66
option to fine adjust the coloring of images. To set the Color Management option, follow the steps below. 1 ) Access the Picture through the Setup. 2 ) Select Pro Adjust from the Picture menu. 3 ) Select Color Detail from the Pro Adjust menu. 4 ) Select Color Management from the submenu. 66 - Pioneer 151FD | Owner's Manual - Page 67
available noise reduction functions. To select the Noise Reduction options, follow the steps below. 1 ) Access the Picture through the Setup. 2 ) Select Pro Adjust from the Picture menu. 3 ) Select Noise Reduction from the Pro Adjust menu. 4 ) Select 3DNR, Field NR, Block NR or Mosquito NR. 67 En - Pioneer 151FD | Owner's Manual - Page 68
Others from the Pro Adjust menu. 4 ) Select 3DYC or I-P Mode. 5 ) Select the desired parameter. 3DYC Option I-P Mode Parameter Description Off No effect High enhances 3DYC Mid standard 3DYC Low moderate 3DYC 1 optimizes video images 2 standard setting 3 optimizes still images - Pioneer 151FD | Owner's Manual - Page 69
Adjustment Options 04 4.4 View in Multi-Screen The flat panel TV can show multiple screens at the same time; two-screen To split the screen so that two channels appear, press the SPLIT button on the remote control. Each press of the button cycles the screen through two-screen, picture-in-picture - Pioneer 151FD | Owner's Manual - Page 70
Press SWAP to switch the position of the two screens. Press SHIFT to move the position of the small screen counter-clockwise. TV INPUT 1 2 3 4 TV/DTV 5 6 7 AV SCREEN SELECTION DISPLAY SIZE PC FREEZE SPLIT SWAP SHIFT The multi-screen function is unavailable when viewing source from - Pioneer 151FD | Owner's Manual - Page 71
Options 04 4.6 Use the Banner Feature When tuning in a TV channel or an input signal changes, any available information appears on ) D00001.000 ABCDE 4 XXXXXXXXXXXXXXXXXXXXXXXXXXXXX 7:07PM-8:08PM 5 6 STEREO 9:30AM PRT_10 TV PG V HD 7 8 9 1011 12 1 - Broadcast signal (Digital/Analog - Pioneer 151FD | Owner's Manual - Page 72
Types of Closed Caption Broadcast TV offers different types of closed captioning. Your flat panel TV provides support for the recognized types on menu. 3 ) Select Analog Settings from the submenu. 4 ) Select the desired closed caption. Status : Analog Settings : Digital Settings Off CC 1 5 ) - Pioneer 151FD | Owner's Manual - Page 73
. 2 ) Select Closed Captions from the System Setup menu. 3 ) Select Digital Settings from the submenu. 4 ) Select Digital Service. 5 ) Select the desired closed caption service level (/). Digital Settings Digital Service : Font Size : Font : Font Color : Font Opacity : Background Color - Pioneer 151FD | Owner's Manual - Page 74
-channel Television Sound (MTS) allows switching the audible language if it is available for that program. Available languages differ depending on the current broadcast. When watching a digital TV program that provides multi language services, follow the steps below. 1 ) Press TOOLS on the remote - Pioneer 151FD | Owner's Manual - Page 75
Options 04 When stereo sound is difficult to hear, manually switch to MONO for clearer sound. The panel's sound . In this case, the video source determines the sound. 4.7.4 Apply Sound Effect Settings Your flat panel TV offers four sound effects: SRS FOCUS, SRS, SRS TruBass and SRS Definition. • - Pioneer 151FD | Owner's Manual - Page 76
the life of your flat panel TV, have the screen turn Off. To deactivate the screen, follow the steps below. 1 ) Press TOOLS on the remote control. The TOOLS Menu appears Off setting is not memorized by the system. AV Source - No Signal To save energy and extend the life of your flat panel TV, the - Pioneer 151FD | Owner's Manual - Page 77
is received from the PC for eight minutes; using the PC has no effect on the panel Note: Pressing the remote's TV () or the panel's STANDBY/ON reactivates the flat panel TV. 4 ) Press HOME MENU to exit the menu. These power management options are unavailable when a PC is connected to the panel - Pioneer 151FD | Owner's Manual - Page 78
to Program into the Remote Control" in Appendix 8.2 of this manual. 5.1.1 Use the Learning Feature The Learning function allows the panel's remote control to memorize other remote controls' codes. 2 cm to 5 cm (0.8 inches to 2.0 inches) TV 1 5 PC SPLIT 1 4 7 VOL EXIT SAT GUIDE DVD TOP MENU - Pioneer 151FD | Owner's Manual - Page 79
TV for more than two seconds. The remote control starts deleting all learned codes for selected modes. When completed, the mode indicator blinks Off and the remote unit, follow the steps below using differemt codes to find the best match. 1 ) Press SELECT to choose the device to program. 2 ) - Pioneer 151FD | Owner's Manual - Page 80
is cancelled if no action is taken within 60 seconds. Also, switching the Mode during this procedure cancels the reset. 5.1.5 Control a Pioneer Receiver The flat panel TV's remote control has a bank of buttons specifically for controlling a Pioneer receiver. The active buttons, left to right, are - Pioneer 151FD | Owner's Manual - Page 81
Equipment With Your Flat Panel TV 05 5.1.6 Control a Cable (CBL) or Satellite (SAT) System When Mode is set to CBL/SAT, a cable EXIT SAT GUIDE 2 DVD TOP MENU TOOLS 3 ENTER HOME MENU 4 SAT / DVD MENU RETURN 9 HDMI CTRL SOURCE STOP REC 5 HMG RECEIVER VOL INPUT SELECT TV CBL EDIT/ - Pioneer 151FD | Owner's Manual - Page 82
Other Equipment With Your Flat Panel TV 5.1.7 Control a Video Cassette Recorder (VCR) When Mode is set to VCR, verify that the proper begins recording) 7 8 9 0 CH ENTER CH RETURN VOL MUTING CH 4 EXIT SAT GUIDE DVD TOP MENU ENTER HOME MENU TOOLS RETURN SAT / DVD MENU 1 HDMI CTRL 5 - Pioneer 151FD | Owner's Manual - Page 83
set to DVD/DVR, the remote control can operate DVD players, DVD recorders or BD players connected to the flat panel TV • 9 TOOLS (assigns the code for a Pioneer BD player) • 10 RETURN (restores the RETURN VOL MUTING CH 8 EXIT TOOLS 1 SAT GUIDE 9 DVD TOP MENU 2 ENTER HOME MENU 3 - Pioneer 151FD | Owner's Manual - Page 84
manual(s) that came with the equipment. One of the benefits of using your flat panel TV to control other equipment is the support of 1 ) Select the Input for the connected equipment. Press the INPUT button (remote control or panel) until the correct input is showing (INPUT 4, INPUT 5, INPUT - Pioneer 151FD | Owner's Manual - Page 85
Use Other Equipment With Your Flat Panel TV 05 In Video mode, the image is over-scanned ( colorings. 5.2.3 Specify an Audio HDMI Signal Type For the necessary audio signal type, check the operating manual that came with the other equipment. When using INPUT 4 or INPUT 5 for HDMI, select the - Pioneer 151FD | Owner's Manual - Page 86
Notes: The KURO LINK function name used on the web and in catalogs is referred to as HDMI Control in the operating instructions and on the product. Except for Power Off and Display Language Setup functions, only a single HDMI terminal may be active at a time. The flat panel TV's remote can control - Pioneer 151FD | Owner's Manual - Page 87
(controls a BD player) 4 • 5 TOOLS (assigns the code for a Pioneer BD player) • 6 ENTER (activates the selected function) • 7 RETURN ( TV and all other equipment. 2 ) Confirm that the panel's Input Setting for HDMI Control Setting options comply with directions in the operating instructions - Pioneer 151FD | Owner's Manual - Page 88
TV 3 ) Confirm that the other equipment is set for HDMI Control. 4 ) Check that the audio and video are playing back properly from the equipment connected to the HDMI terminal(s). 5 ) Turn Off the flat panel TV supported device using an HDMI port other than the terminal selected in Input Setting, - Pioneer 151FD | Owner's Manual - Page 89
Use Other Equipment With Your Flat Panel TV 05 During playback, use the remote control's up/down arrows (/ ) to (Play), (Stop), (Pause), (Fast Forward) and (Fast Reverse) on the remote control to conduct the same operations as the control menu buttons. 5.3.3 Control a Player Press ENTER - Pioneer 151FD | Owner's Manual - Page 90
05 Use Other Equipment With Your Flat Panel TV 5.3.4 Add an AV Amp or a BD Player To add an AV amp and/or a BD Player, refer to the appropriate cabling diagram below. AV Amp & - Pioneer 151FD | Owner's Manual - Page 91
other devices or features On and Off. This section provides steps for commonly desirable setting changes. 5.4.1 Play Source Sound Using an HDMI Command When sound is coming from a Pioneer AV System through the flat panel TV, placing the panel in Standby causes the sound to stop. To have the sound - Pioneer 151FD | Owner's Manual - Page 92
points and the settings. 5.5 Connect a Game Console or Camcorder Your flat panel TV supplies direct connections for remote control or repeatedly press INPUT on the panel to select INPUT 3. For details on game console settings, refer to "2.6.2 Connect Your Other Pioneer Equipment" and "4.1.4 Set - Pioneer 151FD | Owner's Manual - Page 93
the digital content visible on the Home Media Gallery. The flat panel TV supports Mass Storage Class and PTP devices through USB interface and DLNA-compatible this player, some setting changes of software or other devices may be required. Please refer to the operating instructions for the software - Pioneer 151FD | Owner's Manual - Page 94
supported. Pioneer set up the Home Media Gallery through the Home Media Gallery menu. Press the HMG button on the remote 32-bit PC with Windows XP Service Pack 2 (SP2) installed. If other updated setting changes of the software or device may be required. Refer to the device(s) operating instructions for - Pioneer 151FD | Owner's Manual - Page 95
servers on a home or local area network (LAN), connect the flat panel TV to the Ethernet (LAN) hub using a standard ("straight-through") Ethernet (LAN) cable. See the diagram below. Note: Although the Home Media Gallery supports 10BASE-T, it is better to use 100BASE-TX for improved display quality - Pioneer 151FD | Owner's Manual - Page 96
. The Home Media Gallery supports Auto IP and DHCP (Dynamic instructions. You may need to contact your service provider or network administrator when manually entering an IP Address. Some media servers block or are programmed to block access to client servers. When connecting the flat panel TV - Pioneer 151FD | Owner's Manual - Page 97
from a PC or other equipment. Your flat panel TV supports the USB Mass Storage Class and PTP devices. Some The setup is done on the camera. See the operating instructions supplied with the digital camera. Depending on the type be damaged. Pioneer is not liable for any loss or damage to the - Pioneer 151FD | Owner's Manual - Page 98
05 Use Other Equipment With Your Flat Panel TV 5.8 Run the Home Media Gallery 1 ) Press HMG. The automatically connects the server. You can also use the TOOLS Menu to switch to another server or manually select a server from the Server List. The screen automatically changes to the Server List if - Pioneer 151FD | Owner's Manual - Page 99
Use Other Equipment With Your Flat Panel TV 05 Navigate through a USB Device's Files and Folders Like navigating through media servers, select the specific file from a device on the USB Device screen to - Pioneer 151FD | Owner's Manual - Page 100
05 Use Other Equipment With Your Flat Panel TV Screen Components Screen display options are: • List • Thumbnail • Thumbnail List Press TOOLS then select Change View from the TOOLS Menu to choose from the screen - Pioneer 151FD | Owner's Manual - Page 101
to exit Home Media Gallery. 5.8.1 Show Your Movie Files on the Flat Panel TV When selecting movie content from the server menu on the Media Navigator screen or Movie Player launches or playback status changes (controlled by the remote, for example). Pressing DISPLAY or selecting Information on the - Pioneer 151FD | Owner's Manual - Page 102
05 Use Other Equipment With Your Flat Panel TV Movie Player key guide Mode Key(s) used Function Playback ENTER, ( press ENTER or PLAY. Normal playback mode returns. Note: This function may not be supported, depending on the content. Forward (15 sec.) Skips 15 seconds forward then plays - Pioneer 151FD | Owner's Manual - Page 103
TV. The USB device's Folder/Contents List appears on screen. Refer to the operation manual that came with the individual device for connection and setting on the file. Not all files (including edited files) may be supported with the Movie Player. Stored content may not appear in the "Shortcut - Pioneer 151FD | Owner's Manual - Page 104
TV Music Player key guide Mode Key(s) used Function Playback Stop ENTER, (PLAY) Plays back the selected content (STOP), Stops the playback PAUSE ENTER, (PAUSE) Pauses the playback Fast Forward (FF) See the Movie Player key guide may not be supported, depending on the remote, - Pioneer 151FD | Owner's Manual - Page 105
Use Other Equipment With Your Flat Panel TV 05 Photo Player key guide Mode Key(s) used Function Playback ENTER, (PLAY) Menu Note: Some functions may not be supported, depending on the server type or software version. Even files in the supported format may fail to play properly, depending - Pioneer 151FD | Owner's Manual - Page 106
TV. 1 ) Press TOOLS while showing the Server List. The TOOLS Menu appears on screen. TELEVISION TOOLS Update Server List Music Player 2 ) Select Update menu provides a screen to see what USB device(s) are connected or supported. Follow the directions below to open the USB Device screen. This - Pioneer 151FD | Owner's Manual - Page 107
Media Gallery top screen while watching TV or other programs. This option is available on the Home Media Gallery screen. 1 ) Press TOOLS. The TOOLS Menu appears on screen. TELEVISION TOOLS Favorite Entry : Off On Delete from HMG Playlist 2 ) Select Favorites Entry. 3 ) Set the option to On then - Pioneer 151FD | Owner's Manual - Page 108
05 Use Other Equipment With Your Flat Panel TV • Order: Bottom-Up or Top-Down 5 ) Select Start on used. Available submenus for Condition vary, depending on the server used. Search The flat panel TV's built-in Search function provides a convenient way to find items held in a Folder/Contents List - Pioneer 151FD | Owner's Manual - Page 109
Use Other Equipment With Your Flat Panel TV 05 Slide Show A slideshow is simply a series of still Photo Player, press RETURN or (Stop) during playback. The previous screen returns. Note: After setting the Interval time, it may take longer than the preset time. As the Interval time refers to the - Pioneer 151FD | Owner's Manual - Page 110
05 Use Other Equipment With Your Flat Panel TV Add to HMG Playlist The Home Media Gallery function provides " if the server is in sleep mode, the server name is dimmed. In some cases, media servers that support "Wake On LAN" can be booted up. Select the server then press ENTER to transmit a "Wake - Pioneer 151FD | Owner's Manual - Page 111
Flat Panel TV 05 Play Mode Your flat panel TV provides four Plays all selected folder content in order only once TELEVISION TOOLS All Sound Random Play Mode : Single A-B VWX Y Z Delete Space Caps OK Cancel 3 ) Enter the new name. Refer to "Software Keyboard" under "3.2.5 Create the List of - Pioneer 151FD | Owner's Manual - Page 112
Flat Panel TV Change View option from List, Thumbnail or Thumbnail List. TOOLS Menu TELEVISION TOOLS Thumbnail List Music Player Add to HMG Playlist Change View playing from the set time. To cancel the Time Search, press RETURN. Note: The Time Search function may not be supported, depending on - Pioneer 151FD | Owner's Manual - Page 113
Flat Panel TV 05 Picture The Picture option is another way to adjust the image quality. This option is available on the Movie Player and Photo Player screens. To adjust the picture, follow the steps below. 1 ) Press TOOLS. The TOOLS Menu appears on screen. TELEVISION TOOLS Information Picture - Pioneer 151FD | Owner's Manual - Page 114
05 Use Other Equipment With Your Flat Panel TV Audio Use this option to switch to another TOOLS Menu appears on screen. TELEVISION TOOLS Music Player Slide Show 2 ) Select Music Player from the TOOLS Menu. The Music Player screen appears. After entering the setting, press RETURN. The previous - Pioneer 151FD | Owner's Manual - Page 115
HMG Playlist Sometimes a file is no longer wanted. Your flat panel TV provides a method to delete content from a HMG Playlist. This option is Music Player. To set Repeat, follow the steps below. 1 ) While playing content, press TOOLS. The TOOLS Menu appears on screen. TELEVISION TOOLS A-B Repeat : - Pioneer 151FD | Owner's Manual - Page 116
05 Use Other Equipment With Your Flat Panel TV Random Use this option to shuffle the order in the steps below. 1 ) While photo content appears, press TOOLS. The TOOLS Menu appears on screen. TELEVISION TOOLS Rotate : 90 Time Search 2 ) Select Rotate from the TOOLS Menu. Each press of the ENTER - Pioneer 151FD | Owner's Manual - Page 117
Your Flat Panel TV 05 Zoom Use the Zoom option to enlarge the photo content displayed. This option is available on the Photo Player screen. To enlarge content, follow the steps below. 1 ) While photo content appears, press TOOLS. The TOOLS Menu appears on screen. TELEVISION TOOLS Music Player - Pioneer 151FD | Owner's Manual - Page 118
Default Settings Network Setup Select whether to acquire the IP Address automatically or manually or, when acquiring manually, set the Select Yes. The flat panel TV seeks and acquires an IP Address if available. 6 ) Press EXIT or HMG to exit Home Media Gallery. Manual: Before activating, check your - Pioneer 151FD | Owner's Manual - Page 119
return your flat panel TV to the HMG default values rather than try to correct a large number of accidental entries. To restore default settings within the Home Media DISPLAY to show the Player status or key guide before the screen saver activates may cause image retention. Important • Do not - Pioneer 151FD | Owner's Manual - Page 120
Your Flat Panel TV Dialog Screen Message No. 001 100 101 102 103 300 301 500 501 502 503 504 505 506 507 508 Message Problem Content cannot be played No further details are availabe for the error This format is not supported. An unsupported file is selected (301) Failed to authenticate. (500 - Pioneer 151FD | Owner's Manual - Page 121
audio delay between the speakers and the sound from the AV receiver. To reduce the delay, mute the speakers on the flat panel TV. Nonetheless, you may output terminal (optical), select settings according to your AV Receiver. For more information, see the operating instructions that came with the AV - Pioneer 151FD | Owner's Manual - Page 122
section covers how to manually adjust the image position and clock. The AV source device must be connected to the flat panel TV and turned on for image and try again. 5.13.2 Manual Image Position and Clock Adjustments Usually Auto Setup for a PC is the best practice for adjusting the image position - Pioneer 151FD | Owner's Manual - Page 123
/hardware used in your flat panel TV, cleaning methods, and troubleshooting/service information. If you need further assistance, please contact us and give us the chance to correct any issues you are experiencing. Thank you again for buying Pioneer! 6.1 Frequently Asked Questions (FAQs) This section - Pioneer 151FD | Owner's Manual - Page 124
won't my Pioneer flat panel TV turn on? It may be that your remote has failing batteries or has been damaged. Check the power cord connection at the wall and on the back of the panel. Also try pressing a on you panel. Why does the blue or red power light on my flat panel TV blink? The - Pioneer 151FD | Owner's Manual - Page 125
Troubleshooting & Service Information General Issue Possible Solutions No power • Check the connection seating at the wall and panel. • See if the panel's Power On button is turned ON. • Confirm that the remote is set to TV. If the panel indicator lights red, press TV (a) on the remote control - Pioneer 151FD | Owner's Manual - Page 126
if the speaker cable connections have been reversed between the left and right. only or reversed between • Confirm that speaker cables are connected HDMI equipment. • Confirm that settings for the equipment are correct. For details, refer to the operating instructions that came with the equipment. - Pioneer 151FD | Owner's Manual - Page 127
100BASETX for best quality instruction manual for procedures. • Wait for a short period then select "Update problem, try turning TV a off on the remote control unit then turn a on on the flat panel TV. An available server is selected but cannot be navigated • Check if the server is correctly set - Pioneer 151FD | Owner's Manual - Page 128
of purchase. Please obtain a new license or use the PC for 100BASETX for best quality playback and • Some files that comply with the supported format may not be played back or . With the flat panel TV you cannot play DRM content images due to a bit-rate problem). When using a digital camera that - Pioneer 151FD | Owner's Manual - Page 129
a bit-rate problem). When using a is connectable to the flat panel TV. • Re-insert the USB cable to the instruction manual for the set to display in Slide Show settings. Reduce the picture size using a PC and try again. • Slide Show only displays supported files. If there is only one supported - Pioneer 151FD | Owner's Manual - Page 130
a Pioneer-authorized service representative. Do not attempt to service the panel yourself. Opening or removing covers exposes you to possible electrical shock and other dangers as well as possibly voiding your warranty. Request a qualified service professional to check you flat panel TV. Some - Pioneer 151FD | Owner's Manual - Page 131
not intend to use your flat panel TV for an extended period, occasionally power on and run the panel to maintain functionality. 7.1 Installation Details It is best to use parts and accessories designed by Pioneer. Use of accessories other than the Pioneer stand or installation bracket may result in - Pioneer 151FD | Owner's Manual - Page 132
flat panel TV. Pixel Information Plasma screens show picture using pixels. Pioneer flat panel TVs contain a very large number of pixels. The size of the panel determines the number of pixels. With the ELITE Series models, there are over 6.2 million pixels in the 50"/60" panel. All Pioneer display - Pioneer 151FD | Owner's Manual - Page 133
or single color display) please immediately contact Pioneer Customer Support (USA) or Customer Satisfaction (CANADA). LDC, plasma, direct view CRT TVs, and projection TVs. On today's plasma displays, unless doing so would be a copyright infringement. • Set the Side Mask detection function to Mode 1 or - Pioneer 151FD | Owner's Manual - Page 134
please follow the instructions below when installing, operating, and cleaning your flat panel TV. • Read & Retain Instructions - Read all operating hazard, do not place any naked flame sources (such as a lighted candle) on the equipment. D3-4-2-1-7a_A_En VENTILATION CAUTION: When installing this - Pioneer 151FD | Owner's Manual - Page 135
services such as video-on-demand, a cable operator's enhanced program guide and dataenhanced television services may require the use of a set Panel TV Model Number: PRO-151FD/PRO-111FD Product Category: Class B Personal Computers & Peripherals Responsible Party Name: PIONEER ELECTRONICS SERVICE, INC - Pioneer 151FD | Owner's Manual - Page 136
recognized by your flat panel TV. 8.1.1 TV Ratings (age-based) Rating TV-Y TV-Y7 TV-G TV-PG TV-14 TV-MA Description All children Children seven Parental guidance suggested Parents strongly cautioned Mature audiences only 8.1.2 U.S. TV Parental Guideline Ratings (age/category-based) Rating FV V S - Pioneer 151FD | Owner's Manual - Page 137
Appendix 08 8.1.4 Canadian - English Ratings (age-based) Rating E (exempt) C (children) C8+ (children over 8) G (general) PG (parental guidance) 14+ (children over 14) 18+ (adults) Description News, sports, documentaries, other information programming, talk shows, music videos, variety - Pioneer 151FD | Owner's Manual - Page 138
to Program into the Remote Control 8.2.1 Cable 0144, 0107 Paragon 0000, 0008, 0525 Penney 0000 Philips 1305, 0317 Pioneer 1877, 0877, 0144, 0533, 0023, 0260, 1021 Pulsar 0000 Quasar Toshiba 0000 Tristar 0883 United Cable 0276, 0003 US Electronics 0276, 0003, 0008 V2 0883 Videoway 0000 Viewmaster - Pioneer 151FD | Owner's Manual - Page 139
Appendix 08 8.2.3 VCR (Brands A - F) Brand/Code A-Mark 0037, 0240, 0000, 0278, 0046 ABS 1972 Accurian 0000 Admiral 0060, 0048, 0039, 0047, 0104, 0209, 0479 Adventura 0037, 0240, 0000 Adyson 0072 Aiko 0278 Aiwa 0037, 0000, 0124, 0307, 1137, 0468 Akai 0041, 0175 Alba 0209, 0072, 0278 Alienware 1972 - Pioneer 151FD | Owner's Manual - Page 140
, 0072 Lumatron 0278 Luxor 0046 LXI 0037, 0000, 0042, 0067 Brand/Code M Electronic 0240 Magnasonic 0037, 0240, 0000, 0072, 0278, 0593 Magnavox 0035, 0037, 0048 0104, 0058 Brand/Code NEC 0104, 0067, 0041, 0038, 0040, 0050 New Tech 0072 Nikko 0037, 0278 Nikkodo 0037, 0278 Nishi 0240 Niveus Media 1972 - Pioneer 151FD | Owner's Manual - Page 141
0042 Philco 0035, 0081, 0000, 0209, 0479 Philips 0035, 0162, 0048, 0081, 0045, 0000, 0209, 0616, 0618, 0739, 1081, 1181, 1818 Pilot 0037 Pioneer 0162, 0081, 0042, 0067, 0058, 0168, 1337, 1803 Polk Audio 0081 Portland 0278 Presidian 1593 Profitronic 0240 Brand/Code Proscan 0060 Protec 0000, 0072 - Pioneer 151FD | Owner's Manual - Page 142
1972 Dell 1972 DirecTV 0739, 0740 Dish Network System 1944 Dish Pro 1944 Brand/Code Echostar 1944 Expressvu 1944 Gateway 1972 Go Video , 1738 Brand/Code Magnavox 0646, 0675, 1506 Panasonic 0490 Philips 0646, 1340 Pioneer 0631, 1460, 1475, 1476, 1512 Brand/Code Polaroid 1086, 2130 Presidian 1738 - Pioneer 151FD | Owner's Manual - Page 143
Appendix 08 8.2.10 DVD (Brands A - N) Brand/Code 3D LAB 0503, 0539 Accurian 0675, 1072, 1416, 1737 Acoustic Solutions 0730 Adcom 1094 Afreey 0698 Aiwa 0641 Akai 0695, 0705, 0770, 1089 Alba 0672, 0717 Alco 0790 Allegro 0869 Amphion Media Works 0872, 1245 AMW 0872, 1245 Apex Digital 0533, 0672, - Pioneer 151FD | Owner's Manual - Page 144
0633, 0770, 1043, 1077, 1889 Shinsonic 0533, 0839 Slim Art 0784 SM Electronic 0730 Sonic Blue 0573, 0715, 0783, 0869, 1099, 2002 Sony 0533, 0772 0717, 0860, 1105 Sylvania 0675, 1268 Symphonic 0675, 0894, Brand/Code Pioneer 0059, 0023, 0241, 0463, 0572, 1274 Polk Audio 0194 Quasar 0204 Renaissance - Pioneer 151FD | Owner's Manual - Page 145
Specifications Flat Panel TV Number of pixels Audio Amplifier Speaker Sound Effect On-Screen Languages Power Requirement Weight PRO-151FD (60") PRO-111FD (50") 1920 (74.5 lbs) Stand: 2.5 kg (5.6 lbs)(including bolts) Speaker: 3.6 kg (7.9 lbs) (including cables, speaker brackets and screws) Color - Pioneer 151FD | Owner's Manual - Page 146
(Fixed) IR REPEATER OUT 1 DIGITAL OUT Optical ETHERNET 1 CONTROL OUT 1 SPEAKERS 6 Ω to 16 Ω SUB WOOFER OUT Variable * conforms to HDMI1.3 ( are subject to change without notice. Dimensions PRO-151FD (60" panel) 93 (3-21/32) 1677 (66-1/32) 93 (3-21/32) PRO-111FD (50" panel) 1445 (56 - Pioneer 151FD | Owner's Manual - Page 147
AS IS" AND ANY EXPRESSED OR IMPLIED WARRANTIES, INCLUDING, BUT NOT LIMITED TO, THE IMPLIED WARRANTIES OF MERCHANTABILITY AND FITNESS FOR A PARTICULAR in a product, Eric Young should be given attribution as the author of the parts of the library used. This can be in the form of a textual message - Pioneer 151FD | Owner's Manual - Page 148
WARRANTIES OF MERCHANTABILITY AND FITNESS FOR A PARTICULAR PURPOSE ARE DISCLAIMED. IN NO EVENT SHALL THE AUTHOR OR CONTRIBUTORS BE LIABLE FOR ANY DIRECT, INDIRECT, INCIDENTAL, SPECIAL, EXEMPLARY, OR CONSEQUENTIAL DAMAGES (INCLUDING, BUT NOT LIMITED TO, PROCUREMENT OF SUBSTITUTE GOODS OR SERVICES - Pioneer 151FD | Owner's Manual - Page 149
IMPLIED WARRANTIES OF MERCHANTABILITY AND FITNESS FOR A PARTICULAR PURPOSE ARE DISCLAIMED. IN NO EVENT SHALL INTEL OR CONTRIBUTORS BE LIABLE FOR ANY DIRECT, INDIRECT, INCIDENTAL, SPECIAL, EXEMPLARY, OR CONSEQUENTIAL DAMAGES (INCLUDING, BUT NOT LIMITED TO, PROCUREMENT OF SUBSTITUTE GOODS OR SERVICES - Pioneer 151FD | Owner's Manual - Page 150
" is defined as the following set of individuals: Andreas Dilger Dave Martindale warranties, expressed or implied, including, without limitation, the warranties source code as a component to supporting the PNG file format in commercial zlib] This software is based in part on zlib see http://www.zlib. - Pioneer 151FD | Owner's Manual - Page 151
IS PROVIDED AS IS WITH NO WARRANTIES OF ANY KIND INCLUDING THE WARRANTIES OF DESIGN, MERCHANTIBILITY AND FITNESS FOR A PARTICULAR PURPOSE, OR ARISING FROM A COURSE OF DEALING, USAGE OR TRADE PRACTICE. Sun RPC is provided with no support and without any obligation on the part of Sun Microsystems, Inc - Pioneer 151FD | Owner's Manual - Page 152
TO PROVIDE MAINTENANCE, SUPPORT, UPDATES, ENHANCEMENTS, OR to freedom, not price. Our General Public Licenses charge for this service if you wish pieces of it in new free programs; and that understands that there is no warranty for this free software. original, so that any problems introduced by others will - Pioneer 151FD | Owner's Manual - Page 153
notice and a notice that there is no warranty (or else, saying that you provide a warranty) and that users may redistribute the program under distribute them as separate works. But when you distribute the same sections as part of a whole which is a work based on the Program, the distribution of - Pioneer 151FD | Owner's Manual - Page 154
address new problems or concerns decision will be guided by the two WARRANTIES OF MERCHANTABILITY AND FITNESS FOR A PARTICULAR PURPOSE. THE ENTIRE RISK AS TO THE QUALITY AND PERFORMANCE OF THE PROGRAM IS WITH YOU. SHOULD THE PROGRAM PROVE DEFECTIVE, YOU ASSUME THE COST OF ALL NECESSARY SERVICING - Pioneer 151FD | Owner's Manual - Page 155
New Programs If you develop a new program, and you want it to be of the greatest possible use to the public, the best ANY WARRANTY; without even the implied warranty of how to contact you by electronic and paper mail. If c' should show the appropriate parts of the General Public License - Pioneer 151FD | Owner's Manual - Page 156
freedom of use, not price. Our General Public Licenses are and charge for this service if you wish); that use pieces of it in new free programs; and that you very clear that there is no warranty for the free library. Also, reputation will not be affected by problems that might be introduced by others - Pioneer 151FD | Owner's Manual - Page 157
the physical act of transferring a copy, and you may at your option offer warranty protection in exchange for a fee. 2. You may modify your copy or copies them as separate works. But when you distribute the same sections as part of a whole which is a work based on the Library, the distribution - Pioneer 151FD | Owner's Manual - Page 158
works made from that copy. This option is useful when you wish to copy part of the code of the Library into a program that is not a library. a "work that uses the Library" uses material from a header file that is part of the Library, the object code for the work may be a derivative work of - Pioneer 151FD | Owner's Manual - Page 159
above. b) Give prominent notice with the combined library of the fact that part of it is a work based on the Library, and explaining where to find Foundation may publish revised and/or new versions of the Lesser General Public License from time to time. Such new versions will be similar in spirit - Pioneer 151FD | Owner's Manual - Page 160
guided WARRANTIES OF MERCHANTABILITY AND FITNESS FOR A PARTICULAR PURPOSE. THE ENTIRE RISK AS TO THE QUALITY AND PERFORMANCE OF THE LIBRARY IS WITH YOU. SHOULD THE LIBRARY PROVE DEFECTIVE, YOU ASSUME THE COST OF ALL NECESSARY SERVICING New Libraries If you develop a new you by electronic and paper - Pioneer 151FD | Owner's Manual - Page 161
machine readable copy of the corresponding source code is available for the cost of distribution. For more information or to obtain a copy, contact your local Pioneer Customer Service center. Details of the GNU General Public License can be found at the GNU website (http://www.gnu.org). 161 En - Pioneer 151FD | Owner's Manual - Page 162
in 1/60 of a second for a complete frame of an image (525 lines). Effective scanning lines are expressed as "480i" and "1080i" ("i" stands for " to recognize products that meet the new standard for home network PCs and other digital devices, as set down in the DLNA Guidelines for interoperability - Pioneer 151FD | Owner's Manual - Page 163
are broken into several parts. It is expressed supports the Mass Storage Class and PTP (Picture Transfer Protocol) devices. Windows Media Connect Microsoft Windows Media Connect is a new technology to distribute music, photos and video stored on a PC with Windows XP installed to a stereo system of TV - Pioneer 151FD | Owner's Manual - Page 164
TV Setup 39, 41, 46 Auto Installation 38, 41 Auto Size 55, 59, 62 AV Selection 57, 58 AVC 49, 75 B Balance 36, 49, 60 84, 86, 88 HDMI Control Setting 87, 91 HDMI Input 84, , 73, 74, 86 M Manual Adjust 39, 46 MOVIE 12, Pro Adjust 62 R RCV 12 Red 61, 73 Remote Control 10, 12, 78 Room Light - Pioneer 151FD | Owner's Manual - Page 165
website and performing updating procedures, make sure that your connections from the network to your USB flash drive, and from your USB flash drive to the flat panel TV are uninterrupted. Pioneer bears no responsibility for any failures or damage resulting from connection problems. Content may not - Pioneer 151FD | Owner's Manual - Page 166
replacement parts, operating instructions, service manuals, or accessories, please call the number shown below. 8 0 0 - 4 2 1 - 1 6 2 5 Please do not ship your product to Pioneer without first calling the Customer Support Division at the above listed number for assistance. Pioneer Electronics - Pioneer 151FD | Owner's Manual - Page 167
EUROPE NV Haven 1087, Keetberglaan 1, B-9120 Melsele, Belgium TEL: 03/570.05.11 PIONEER ELECTRONICS ASIACENTRE PTE. LTD. 253 Alexandra Road, #04-01, Singapore 159936 TEL: 65-6472-7555 PIONEER ELECTRONICS AUSTRALIA PTY. LTD. 178-184 Boundary Road, Braeside, Victoria 3195, Australia, TEL: (03) 9586
-
 1
1 -
 2
2 -
 3
3 -
 4
4 -
 5
5 -
 6
6 -
 7
7 -
8
-
9
-
10
-
11
-
12
-
13
-
14
-
15
-
16
-
17
-
18
-
19
-
20
-
21
-
22
-
23
-
24
-
25
-
26
-
27
-
28
-
29
-
30
-
31
-
32
-
33
-
34
-
35
-
36
-
37
-
38
-
39
-
40
-
41
-
42
-
43
-
44
-
45
-
46
-
47
-
48
-
49
-
50
-
51
-
52
-
53
-
54
-
55
-
56
-
57
-
58
-
59
-
60
-
61
-
62
-
63
-
64
-
65
-
66
-
67
-
68
-
69
-
70
-
71
-
72
-
73
-
74
-
75
-
76
-
77
-
78
-
79
-
80
-
81
-
82
-
83
-
84
-
85
-
86
-
87
-
88
-
89
-
90
-
91
-
92
-
93
-
94
-
95
-
96
-
97
-
98
-
99
-
100
-
101
-
102
-
103
-
104
-
105
-
106
-
107
-
108
-
109
-
110
-
111
-
112
-
113
-
114
-
115
-
116
-
117
-
118
-
119
-
120
-
121
-
122
-
123
-
124
-
125
-
126
-
127
-
128
-
129
-
130
-
131
-
132
-
133
-
134
-
135
-
136
-
137
-
138
-
139
-
140
-
141
-
142
-
143
-
144
-
145
-
146
-
147
-
148
-
149
-
150
-
151
-
152
-
153
-
154
-
155
-
156
-
157
-
158
-
159
-
160
-
161
-
162
-
163
-
164
-
165
-
166
-
167
 |
 |