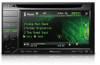
Pioneer AVH-P2300DVD Owner's Manual
Pioneer AVH-P2300DVD Manual
 |
UPC - 884938124508
View all Pioneer AVH-P2300DVD manuals
Add to My Manuals
Save this manual to your list of manuals |
Pioneer AVH-P2300DVD manual content summary:
- Pioneer AVH-P2300DVD | Owner's Manual - Page 1
Owner's Manual DVD RDS AV RECEIVER AVH-P2300DVD English - Pioneer AVH-P2300DVD | Owner's Manual - Page 2
this unit 6 About this manual 7 Operating environment 7 After-sales service for Pioneer products 7 Visit our website 7 Resetting the microprocessor 8 Demo mode 8 Adjusting the response positions of the touch panels (Touch Panel Calibration) 8 Use and care of the remote control 8 What's what Head - Pioneer AVH-P2300DVD | Owner's Manual - Page 3
40 Displaying the Radio ID 41 Switching the SIRIUS display 41 Using the Instant Replay function 41 Switching the seek mode 42 Switching the reception mode 42 Using the missed, received and dialed call lists on the optional Bluetooth adapter 42 Setting automatic answering 42 Switching the ring - Pioneer AVH-P2300DVD | Owner's Manual - Page 4
unless the parking brake is on, and the vehicle is not in motion. 10 Never set the volume of your display so high that you cannot hear outside traffic and emergency vehicles. WARNING ! Do not attempt to install or service your display by yourself. Installation or servicing of the display by - Pioneer AVH-P2300DVD | Owner's Manual - Page 5
(3) apply the parking brake again. Please keep the brake pedal pushed down before releasing the parking brake. When using a display connected to V OUT This unit's V OUT is for connection of a display to enable passengers in the rear seats to watch the DVD or Video CD. WARNING NEVER install the rear - Pioneer AVH-P2300DVD | Owner's Manual - Page 6
two conditions: (1) This device may not cause harmful interference, and (2) this device must accept any interference received, including interference that may cause undesired operation. Information to User Alteration or modifications carried out without appropriate authorization may invalidate the - Pioneer AVH-P2300DVD | Owner's Manual - Page 7
in this manual. Operating environment This unit should be used within the temperature ranges shown below. Operating temperature range: -10 °C to +60 °C (14 °F to 140 °F) EN300328 ETC test temperature: -20 °C and +55 °C (-4 °F and 131 °F) After-sales service for Pioneer products Please contact - Pioneer AVH-P2300DVD | Owner's Manual - Page 8
theft. 2 Receive updates on the latest products and technologies. 3 Download owner's manuals, order product its initial (factory) settings Demo mode The feature demo automatically starts when you select of the remote control Installing the battery Slide the tray on the back of the remote control out - Pioneer AVH-P2300DVD | Owner's Manual - Page 9
the remote control fall onto the floor, where it may become jammed under the brake or accelerator pedal. Before you start WARNING ! Keep the battery out of the reach of children. Should the battery be swallowed, consult a doctor immediately. ! Batteries (battery pack or batteries installed) must - Pioneer AVH-P2300DVD | Owner's Manual - Page 10
7 MUTE MODE 8 Turning the infor- mation display off. MENU Displaying the 9 menu. Returning to the normal display. USB port a When connecting, open the USB connector lid. AUX input jack (3.5 mm stereo/ b video jack) Use to connect an auxiliary device. CAUTION ! Use an optional Pioneer USB cable (CD - Pioneer AVH-P2300DVD | Owner's Manual - Page 11
when playing discs with compressed audio and audio data (CDDA) such as CDEXTRA and MIXEDMODE CDs. Press to display the DVD menu during DVD playback. Press to return to the top menu during DVD playback. Press to change the audio language during DVD playback. Press to switch audio output for Video CD - Pioneer AVH-P2300DVD | Owner's Manual - Page 12
panel keys 1 Touch the source icon and then touch the desired source name. ! XM - XM tuner ! Sirius - SIRIUS tuner ! Radio/HD Radio - Radio/Digital Radio tuner ! AV - AV input ! Disc - Built-in DVD player ! USB/iPod - USB/iPod ! EXT1 - External unit 1 ! EXT2 - External unit 2 ! AUX - AUX ! TEL/Audio - Pioneer AVH-P2300DVD | Owner's Manual - Page 13
Turning the display to simpli- fied display. Returning to the normal dis- play by touching the screen 1 when playing moving images. Returning to the normal dis- play by touching same posi- tion when playing audio. 2 Viewing the hidden touch panel keys. 3 Shorten the touch panel area - Pioneer AVH-P2300DVD | Owner's Manual - Page 14
Section 04 Basic operations Common operations for menu settings/lists Displaying the list menu. Starting the search function. Displaying the menu. Refer to Introduction of menu operations on page 45. Displaying still images as a slide show when listening to another source. Viewing slide shows. Refer - Pioneer AVH-P2300DVD | Owner's Manual - Page 15
on page 29. 4 Band: Selecting a band (FM1, FM2, FM3 for FM or AM). Recalling radio station fre- 5 quencies assigned to preset tuning keys. Manual tuning (step by step) using the buttons 1 Press c or d (TRACK/SEEK). Seek tuning using the buttons 1 Press and hold c or d (TRACK/SEEK). Note - Pioneer AVH-P2300DVD | Owner's Manual - Page 16
Section 06 Playing moving images Introduction of video playback operations You can view DVD/DVD-R/DVD-RW/CD/CD-R/ CD-RW/USB/iPod. DVD video 1 01 1 L+R Abcdeabcdeabcdeabcdeab Wed 28 May 12:45 PM 8 12 01:45 -02:45 Return Video CD Return DivX iPod video iPod ALL Songs S.Rtrv - Pioneer AVH-P2300DVD | Owner's Manual - Page 17
slow Refer to Playing videos from down playback speed. your iPod on page 31 and Speeding up the playback Browsing for a video/music speed in your iPod on page 30. Switching between media file types to play on DVD/CD/ m USB. Skipping to another title. f Selecting a folder during Refer to - Pioneer AVH-P2300DVD | Owner's Manual - Page 18
Playback will automatically start. ! If you are playing a DVD or Video CD, a menu may appear. Refer to Operating the DVD menu on page 30 and PBC playback on page title. Refer to Automatic playback of DVDs on page 51. ! While an iPod is connected to this unit, PIONEER, OK to disconnect or (check mark - Pioneer AVH-P2300DVD | Owner's Manual - Page 19
iPod menus. Refer to Browsing for a video/music on the iPod on page 32. Pausing and starting playback. Switching the text information to display on this unit when playing MP3/ WMA/AAC files. Selecting a folder. Switching between media file types on a DVD/CD/USB. Refer to Switching the media file - Pioneer AVH-P2300DVD | Owner's Manual - Page 20
not be displayed. ! Text information may not be correctly displayed depending on the recorded environment. ! Disconnect the USB portable audio player/ USB memory when you are done using it. ! When you select Clock on Selecting the background display on page 55, the artwork is not displayed. 20 En - Pioneer AVH-P2300DVD | Owner's Manual - Page 21
CD-R/CDRW/USB. CD 123 4 Photo Off Full Wed 28 May 12:45 PM Abcdeabcdeabcde Abcdeabcdeabcde 2 2 Capture 5 67 8 When playing a disc Playing files in a random 2 order. Refer to Random play (shuf- fle) on page 31. Changing the screen 3 mode. Refer to Changing the wide screen mode - Pioneer AVH-P2300DVD | Owner's Manual - Page 22
order. Refer to Random play (shuf- fle) on page 31. Changing the screen 3 mode. Refer to Changing the wide screen mode on page 36. Displaying still images as a slide show. 2 Select the device containing the files that you want to display. ! Disc - Built-in DVD player ! USB - USB # To cancel - Pioneer AVH-P2300DVD | Owner's Manual - Page 23
other information on using the SIRIUS tuner, please refer to the SIRIUS operation manual. ! With this unit, you can operate one additional function: XM/SIRIUS channel direct selection. Refer to Selecting an XM/SIRIUS channel directly on page 37. ! Touch panel keys Mode Selecting a channel by All - Pioneer AVH-P2300DVD | Owner's Manual - Page 24
Category. Refer to Switching the XM/SIRIUS channel selec- tion mode on page 37 and Selecting a XM/SIR- IUS channel from a chan- nel category on page 37. Selecting a track, fast for- warding/reversing or Instant pausing/playing for the Replay 9 SIRIUS tuner. Refer to Using the Instant - Pioneer AVH-P2300DVD | Owner's Manual - Page 25
. For details concerning operation, refer to the HD Radio tuner's operation manual. ! Touch panel keys Turning local seek tuning on 1 or off. same fre- 3 Blending quency. Refer to Switching the recep- Analog tion mode on page 42. Switching the equalizer 4 curves. Refer to Using the - Pioneer AVH-P2300DVD | Owner's Manual - Page 26
Bluetooth adapter (e.g. CD-BTB200)(sold separately) to AVHP2300DVD, you can control Bluetooth received/ missed call history. Selecting a phone number 4 from the call history. Refer to Using the missed, re- ceived and dialed call lists on the optional Bluetooth Scroll connection mode on this - Pioneer AVH-P2300DVD | Owner's Manual - Page 27
Audio/Video Remote Control Profile): You can perform playback, pause playback, select songs, etc. ! Since there are a number of Bluetooth audio players available on the market, available operations will vary extensively. When operating your player with this unit, refer to the instruction manual that - Pioneer AVH-P2300DVD | Owner's Manual - Page 28
is set for the auto/manual setting. Performing fast forward or rewind when Manual is set for the auto/ manual setting. Pausing a song. Touch and hold for more than two seconds to activate connection F1 mode on this unit and establish a Bluetooth wireless connection from your player. Refer - Pioneer AVH-P2300DVD | Owner's Manual - Page 29
Section 12 Detailed instructions Storing and recalling stations You can easily store up preset tuning keys Preset1 to Preset6 when the Mode All CH mode is selected. (Function of SIRIUS tuner) Storing the strongest stations BSM (best stations memory) automatically stores the six strongest stations - Pioneer AVH-P2300DVD | Owner's Manual - Page 30
or later) ! iPod touch 1st generation (software version 3.1.3 or later) 1 Switch the control mode to App Mode. Refer to Introduction of video playback operations on page 16. Refer to Introduction of sound playback operations on page 19. 2 Operate the connected iPod to select a video/song and play. - Pioneer AVH-P2300DVD | Owner's Manual - Page 31
if the control mode is set to App Mode. However, the operation will depend on your applications. ! Pausing ! Fast forwarding/reversing ! Tracking up/down ! Moving to a chapter up/down Random play (shuffle) iPod-videos/songs can be played back in random order. ! Songs - Play back videos/songs in the - Pioneer AVH-P2300DVD | Owner's Manual - Page 32
Section 12 Detailed instructions 1 Display the iPod menus. Refer to Playing moving images on page 16. 2 Switch to iPod video mode. Video Switching to iPod video mode. 3 Play the video from the iPod. # If you want to switch to iPod music mode, touch the icon. ! Audiobooks (audiobooks) 3 Touch - Pioneer AVH-P2300DVD | Owner's Manual - Page 33
Section 12 Detailed instructions Resume playback (Bookmark) (Function for DVD video) By using the Bookmark function, language on page 48. ! Depending on the setting, the video may not be played back with the audio system used to record the DVD. ! You will return to normal playback if you change - Pioneer AVH-P2300DVD | Owner's Manual - Page 34
function cannot be used if a specified scene has not been preprogrammed on the DVD disc. Selecting audio output When playing DVD video discs recorded with LPCM audio, you can switch the audio output. When playing video CDs, you can switch between stereo and monaural audio output. ! This function is - Pioneer AVH-P2300DVD | Owner's Manual - Page 35
instructions Selecting tracks from the track title list You can select tracks to playback using the track title list which is a list of the tracks recorded on a disc. 1 Display the track title list. Refer to Playing effective than . Playing DivXâ VOD content Some DivX VOD (video on demand) content - Pioneer AVH-P2300DVD | Owner's Manual - Page 36
is displayed. # To cancel the storage process, touch No. Changing the wide screen mode You can select a desired mode for enlarging a 4:3 picture to a 16:9 picture. 1 Display the screen mode. Refer to Introduction of video playback operations on page 16. Refer to Introduction of still image playback - Pioneer AVH-P2300DVD | Owner's Manual - Page 37
may constitute an infringement on the author's rights protected by the Copyright Law. ! The video image will appear coarser when viewed in Cinema or Zoom mode. Switching the XM/SIRIUS channel selection mode You have two methods for selecting a channel: by number and by category. When selecting - Pioneer AVH-P2300DVD | Owner's Manual - Page 38
Section 12 Detailed instructions 1 Display the preset channel list. Refer to Introduction of XM/SIRIUS tuner operations on page 23. 2 for GEX-P920XM/ SIRIUS tuner. ! The track itself is NOT downloaded. Only the song title and artist name are stored. Making the MyMix playlist You can add a song that - Pioneer AVH-P2300DVD | Owner's Manual - Page 39
then change each alert setting. Set the alert to on to receive an alert when the song is broadcast, or set it to off to stop delete each song in the MyMix playlist. 1 Switch to memo edit mode. Refer to Introduction of XM/SIRIUS tuner operations on page 23. The MyMix playlist is displayed. 2 - Pioneer AVH-P2300DVD | Owner's Manual - Page 40
Detailed instructions That song will be deleted from the MyMix playlist. A message to confirm deletion will appear. 3 Touch Yes. # To cancel deletion, touch No. Deleting a song from the MyMix playlist for SIRIUS tuner You can delete each song in the MyMix playlist. 1 Switch to memo edit mode. Refer - Pioneer AVH-P2300DVD | Owner's Manual - Page 41
game score will be updated automatically. 3 Switch mode. ! To use this function, a Pioneer SIRIUS bus interface (e.g. CD-SB10) is required. ! To use this function, a SIRIUS plug-and- play unit with an Instant Replay Function is required. ! For details, refer to the SIRIUS plug-andplay unit's manuals - Pioneer AVH-P2300DVD | Owner's Manual - Page 42
! When BLENDING is set to Analog, if you switch SEEK MODE from Seek All to Seek HD, BLENDING is changed to D/A Auto. Using the missed, received and dialed call lists on the optional Bluetooth adapter The 3 most recent calls dialed, received, and missed are stored in the memory. You can browse them - Pioneer AVH-P2300DVD | Owner's Manual - Page 43
Section 12 Detailed instructions Using a cellular phone to initiate a connection A Bluetooth wireless connection can be established from your phone by putting the unit into initiating a connection mode. You may need to refer to the operation manual that came with your phone if you are - Pioneer AVH-P2300DVD | Owner's Manual - Page 44
12 Detailed instructions If your Bluetooth device is ready for a Bluetooth wireless connection, a connection to this unit will automatically be established. # To turn automatic connection off, touch Auto Connect again. 2 Turn your vehicle's ACC switch off and on. Displaying Bluetooth Device address - Pioneer AVH-P2300DVD | Owner's Manual - Page 45
Refer to Customizing menus on page 56. Notes ! You can display the Video Setup menu when a Disc or USB source is selected. ! If you start the Video Setup menu, playback is stopped. ! You cannot display the Audio function menu when the mute function/attenuation is on or a JPEG file is playing. En - Pioneer AVH-P2300DVD | Owner's Manual - Page 46
Display Vocal Custom1 Custom2 Flat Super Bass Equalizer curve Vocal Custom 1 Custom 2 Flat Super bass ! The equalizer curves for make adjustments when the Custom2 curve is selected, the Custom2 curve will be updated. 1 Display the audio function menu. Refer to Introduction of menu operations - Pioneer AVH-P2300DVD | Owner's Manual - Page 47
d to select a desired level. Range: 0 to +6 Using the high pass filter When you do not want low sounds from the subwoofer output frequency range to play from the front or rear speakers, turn on the HPF (high pass filter). Only frequencies higher than those in the selected range are output from - Pioneer AVH-P2300DVD | Owner's Manual - Page 48
Video CD, CD, compressed audio and DivX are automatically set to the same source level adjustment volume. ! iPod and USB to Playing moving code chart for DVD on page 84. 1 Touch 0 to 9 to input the language code. # To cancel the entered numbers, touch C. 2 Registering the code. Registering the code - Pioneer AVH-P2300DVD | Owner's Manual - Page 49
is not available, the language specified on the disc is displayed. Setting the multi-angle DVD display The angle icon can be set so it appears on scenes where the angle can be switched. 1 Display the Video Setup menu. Refer to Introduction of menu operations on page 45. 2 Touch Multi Angle on - Pioneer AVH-P2300DVD | Owner's Manual - Page 50
switched manually Setting parental lock Some DVD video discs let you use parental lock to restrict children from viewing violent and adult-oriented scenes. You can set parental lock to the desired level. ! When you have a parental lock level set and play a disc featuring parental lock, code number - Pioneer AVH-P2300DVD | Owner's Manual - Page 51
Touch DivX Subtitle on the Video Setup menu to select the desired subtitle setting. ! Original - Display the DivX subtitles ! Custom - Display the DivX external not be displayed. Displaying the DivXâ VOD registration code In order to play DivX VOD (video on demand) contents on this unit, the unit - Pioneer AVH-P2300DVD | Owner's Manual - Page 52
Section 13 Menu operations 1 Display the Video Setup menu. Refer to Introduction of menu operations on page 45. 2 Touch DVD Auto Play to turn automatic playback on. # To turn automatic playback off, touch DVD Auto Play again. System settings Switching the auxiliary setting Activate this setting - Pioneer AVH-P2300DVD | Owner's Manual - Page 53
or attenuated when a signal from equipment with a mute function is received. ! Sound from this system returns to normal when the muting or ! The language can be changed for the fol- lowing: - System menu - Video Setup - On-screen display - Multi language setting for DivX - Language for cautions Some - Pioneer AVH-P2300DVD | Owner's Manual - Page 54
view camera (back up camera) CAUTION Pioneer recommends the use of a camera which outputs mirror-reversed images. Otherwise, the screen image will appear reversed. This unit features a function that automatically switches to the rear view camera video (R.C IN) when a rear view camera is installed on - Pioneer AVH-P2300DVD | Owner's Manual - Page 55
on page 45. 2 Touch Appearance. 3 Touch Illumination and then touch Custom icon. Selecting the OSD color The OSD color can be changed. 1 4 Touch one of the colors on the list. Selecting the background display You can switch the background that is displayed when listening to a source. 1 Display the - Pioneer AVH-P2300DVD | Owner's Manual - Page 56
Refer to Introduction of menu operations on page 45. You can customize menus except Video Setup menu. 2 Touch and hold the menu column to register it. # To cancel registration, touch and hold the menu column again. 3 Display the custom menu and choose a registered menu. Refer to Introduction of menu - Pioneer AVH-P2300DVD | Owner's Manual - Page 57
the Picture Adjustment for the Navigation system. Adjusting the Picture Adjustment for the rear view camera. Source Adjusting the Picture or green is emphasized) ! Dimmer - Adjusts the brightness of the dis- play ! Temperature - Adjusts the color tempera- ture, resulting in a better white - Pioneer AVH-P2300DVD | Owner's Manual - Page 58
be required in order for the sound and video image to be reproduced correctly. % Insert the stereo mini plug into the AUX input jack on this unit. Refer to What's what on page 10. Using an external unit An external unit refers to a Pioneer product, such as those which will be available - Pioneer AVH-P2300DVD | Owner's Manual - Page 59
unit. For details concerning these functions, refer to the owner's manual for the external unit. Basic operations The functions allocated the connected external unit. Audio Video Switching to video and audio. Changing the screen mode. Refer to Changing the wide screen mode on page 36. Switching the - Pioneer AVH-P2300DVD | Owner's Manual - Page 60
DVD features should not be used. CAUTION ! PIONEER does not recommend that you in- stall or service your display unit yourself. Installing or servicing - NECTOR IS DESIGNED TO DETECT PARKED STATUS AND MUST BE CONNECTED TO THE POWER SUPPLY SIDE OF THE PARKING BRAKE SWITCH. IMPROPER CONNECTION OR USE - Pioneer AVH-P2300DVD | Owner's Manual - Page 61
installed in a vehicle without ACC (accessory installation. - Secure the wiring with cable clamps or adhesive tape. Wrap adhesive tape around wiring that comes into contact with metal parts to protect the wiring cable. Connect this cable to the system remote control of an external power amp or the - Pioneer AVH-P2300DVD | Owner's Manual - Page 62
Section 15 Installation When connecting to separately sold power amp Rear output or subwoofer output of the power amp or auto-antenna relay control terminal. (max. 300 mA 12 V DC). System remote control Left Right Front speaker Front speaker Rear speaker or Subwoofer - Pioneer AVH-P2300DVD | Owner's Manual - Page 63
HD Radio tuner (sold separately) Black IP-BUS cable (Supplied with HD Radio tuner) Section 15 Microphone for hands-free phoning (supplied with Bluetooth adapter) Bluetooth adapter (e.g. CD-BTB200) (sold separately) Installation IP-BUS input This product Blue Black IP-BUS cable (Supplied with - Pioneer AVH-P2300DVD | Owner's Manual - Page 64
Section 15 Installation Connecting the power cord Navigation system can be connected (AVIC-U220 (sold separately)). 26 pin cable (Supplied with Navigation system) Insert the 26 pin cable in the direction indicated in the figure. This product RGB input Antenna input Please contact your dealer - Pioneer AVH-P2300DVD | Owner's Manual - Page 65
firmly with needle-nosed pliers. Note: · The position of the parking brake switch depends on the vehicle model. For details, consult the vehicle Owner's Manual or dealer. Light green Used to detect the ON/OFF status of the parking brake. This lead must be connected to the power supply side of the - Pioneer AVH-P2300DVD | Owner's Manual - Page 66
component (sold separately) When using a display connected to rear video output This product's rear video output is for connection of a display to enable passengers in the rear seats to watch the DVD, etc. WARNING ! Never install the display in a location where it is visible to the driver while - Pioneer AVH-P2300DVD | Owner's Manual - Page 67
appear closer or more distant than they actually are. Rear view camera input (R.C IN) This product RCA cable (sold separately) To video output Fuse resistor Rear view camera (sold separately) Violet/white Of the two lead wires connected to the back lamp, connect the one in which the voltage - Pioneer AVH-P2300DVD | Owner's Manual - Page 68
at an angle of less than 30°. ! To some types of vehicles, this unit cannot be properly installed. In such case, use the optional installation kit (ADT-VA133). Installation using the screw holes on the side of the unit % Fastening the unit to the factory radiomounting bracket. Position the unit - Pioneer AVH-P2300DVD | Owner's Manual - Page 69
(Reference page) There is no image displayed. The parking brake cable is not connected. Connect the parking brake cable, and apply the parking brake. The parking brake is not applied. Connect the parking brake cable, and apply the parking brake. The icon is The operation is This operation is - Pioneer AVH-P2300DVD | Owner's Manual - Page 70
view Connect a rear played. camera is not view camera. The touch connected. panel keys cannot be used. Camera Polarity is at Video Setup menu. The language cannot be switched if the selected language is not recorded on the disc. The viewing angle cannot be switched. The DVD being played - Pioneer AVH-P2300DVD | Owner's Manual - Page 71
and reset it. The iPod version Update the iPod is old. version. Bluetooth audio/telephone Symptom Cause Action The sound from the Bluetooth audio source is not played back. There is a call in progress on a Bluetooth connected cellular phone. The sound will be played back when the call is - Pioneer AVH-P2300DVD | Owner's Manual - Page 72
a file that cannot be played can be played. on this unit. There are no songs. Transfer the audio files to the USB portable audio player/USB memory and connect. Security for the connected USB memory is enabled. Follow the USB memory instructions to disable security. Format Read/ Ready Sometimes - Pioneer AVH-P2300DVD | Owner's Manual - Page 73
sound. when you start to hear any sound. Video frame rate not supported. DivX file's frame Select a file that rate is more than can be played. 30 fps. Audio Format This type of file is Select a file that not sup- not supported on can be played. ported. this unit. iPod Message Cause Action - Pioneer AVH-P2300DVD | Owner's Manual - Page 74
and reset it. The iPod firmware version is old. Update the iPod version. There Bluetooth module of this unit. Turn the ignition switch OFF and then to ACC or ON. If the error message is still displayed after performing the above action, please contact your dealer or an authorized Pioneer Service - Pioneer AVH-P2300DVD | Owner's Manual - Page 75
On is being played. Shows when HD Radio signal is received. Shows when analog audio of HD Radio signal is received. Shows when digital audio of HD Radio signal is received. Shows when HD Radio station information is received. Shows while searching a song/ video in alphabet search mode. Shows which - Pioneer AVH-P2300DVD | Owner's Manual - Page 76
played. Shows when the game alert function is on while receiving SIRIUS stations. Indicates that the feature demo is on. Use 12-cm discs. Do not use 8-cm discs or an adapter for 8-cm discs. Use only conventional, fully circular discs. Do not use shaped discs. Do not insert anything other than a DVD - Pioneer AVH-P2300DVD | Owner's Manual - Page 77
to play back DVD-RAM discs. This unit is not compatible with discs recorded in AVCHD (Advanced Video Codec High Definition) format. Do not insert AVCHD discs as you may not be able to eject the disc. External storage device (USB) Depending on the external storage device (USB), the following problems - Pioneer AVH-P2300DVD | Owner's Manual - Page 78
is used most commonly with digital still cameras.) Playback of EXIF format files that were processed by a personal computer may not be possible. There is no progressive JPEG compatibility. DivX video files Depending on the composition of the file information, such as the number of audio streams - Pioneer AVH-P2300DVD | Owner's Manual - Page 79
files: Not compatible Partitioned external storage device (USB): Only the first playable partition can be played. There is no compatibility for Multi Media Cards (MMC). CAUTION ! Pioneer accepts no responsibility for data lost on the USB memory/USB portable audio player even if that data is - Pioneer AVH-P2300DVD | Owner's Manual - Page 80
may vary depending on the software version of iPod. When using an iPod, an iPod Dock Connector to USB Cable is required. When you use Pioneer CD-IU50V/CD-IU200V interface cable, consult your dealer for details. About the file/format compatibility, refer to the iPod manuals. Audio Book, Podcast - Pioneer AVH-P2300DVD | Owner's Manual - Page 81
off the power immediately and consult your dealer or the nearest authorized PIONEER Service Station. Using this unit in this condition may result in permanent keep the antenna away from the display to prevent disruption of the video image by the appearance of spots, colored stripes, etc. LED (light - Pioneer AVH-P2300DVD | Owner's Manual - Page 82
used under license. ABOUT DIVX VIDEO: DivXâ is a digital video format created by DivX, Inc. This is an official DivX Certifiedâ device that plays DivX video. Visit divx.com for more information and software tools to convert your files into DivX video. ABOUT DIVX VIDEO-ON-DEMAND: This DivX Certified - Pioneer AVH-P2300DVD | Owner's Manual - Page 83
Pioneer service station regarding the satellite radio tuner that can be connected to this unit. For satellite radio tuner operation, please refer to the satellite radio tuner owner's manual Radio logo and all related marks are trademarks of Sirius Satellite Radio Inc., and XM Satellite Radio Inc. - Pioneer AVH-P2300DVD | Owner's Manual - Page 84
Appendix Additional Information Language code chart for DVD Language (code), input code Japanese (ja), 1001 Dzongkha (dz), 0426 English (en), 0514 Ewe (ee), 0505 French (fr), 0618 Esperanto (eo), 0515 Spanish (es), 0519 Estonian (et), 0520 German ( - Pioneer AVH-P2300DVD | Owner's Manual - Page 85
video, Video CD, CD, CD-R/RW, DVD-R/RW/R DL Region number 1 Frequency response 5 Hz to 44 000 Hz (with DVD, at sampling frequency 96 kHz) Signal-to-noise ratio 96 dB (1 kHz) (IHF-A network) (RCA level) Output level: Video 1.0 Vp-p/75 W (±0.2 V) Number of channels 2 (stereo) MP3 decoding format - Pioneer AVH-P2300DVD | Owner's Manual - Page 86
Appendix Additional Information Usable sensitivity 25 µV (S/N: 20 dB) Signal-to-noise ratio 62 dB (IHF-A network) CEA2006 Specifications Power output 14 W RMS × 4 Channels (4 W and ≦ 1 % THD+N) S/N ratio 91 dBA (reference: 1 W into 4 W) Note Specifications and the design are subject to - Pioneer AVH-P2300DVD | Owner's Manual - Page 87
En 87 - Pioneer AVH-P2300DVD | Owner's Manual - Page 88
ELECTRONICS OF CANADA, INC. 300 Allstate Parkway, Markham, Ontario L3R 0P2, Canada TEL: 1-877-283-5901 TEL: 905-479-4411 PIONEER ELECTRONICS DE MEXICO, S.A. de C.V. Blvd.Manuel Avila Camacho 138 10 piso Col.Lomas de Chapultepec, Mexico, D.F. 11000 TEL: 55-9178-4270 407號8 02) 2657-3588 9樓
-
 1
1 -
 2
2 -
 3
3 -
 4
4 -
 5
5 -
 6
6 -
 7
7 -
8
-
9
-
10
-
11
-
12
-
13
-
14
-
15
-
16
-
17
-
18
-
19
-
20
-
21
-
22
-
23
-
24
-
25
-
26
-
27
-
28
-
29
-
30
-
31
-
32
-
33
-
34
-
35
-
36
-
37
-
38
-
39
-
40
-
41
-
42
-
43
-
44
-
45
-
46
-
47
-
48
-
49
-
50
-
51
-
52
-
53
-
54
-
55
-
56
-
57
-
58
-
59
-
60
-
61
-
62
-
63
-
64
-
65
-
66
-
67
-
68
-
69
-
70
-
71
-
72
-
73
-
74
-
75
-
76
-
77
-
78
-
79
-
80
-
81
-
82
-
83
-
84
-
85
-
86
-
87
-
88
 |
 |
Owner
’
s Manual
DVD RDS AV RECEIVER
AVH-P2300DVD
English