Pioneer AVH-P3300BT Owner's Manual - Page 58
Audio Adjustments, Menu operations
 |
UPC - 884938123341
View all Pioneer AVH-P3300BT manuals
Add to My Manuals
Save this manual to your list of manuals |
Page 58 highlights
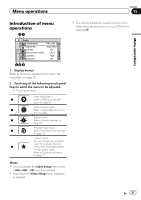
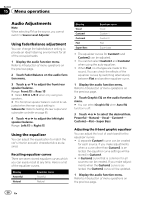
Section 15 Menu operations Audio Adjustments Note When selecting FM as the source, you cannot switch to Source Level Adjuster. Using fader/balance adjustment You can change the fader/balance setting to provide an ideal listening environment for all of the occupied seats. 1 Display the audio function menu. Refer to Introduction of menu operations on the previous page. 2 Touch Fader/Balance on the audio function menu. 3 Touch a or b to adjust the front/rear speaker balance. Range: Front:15 to Rear:15 # Select F/R: 0 L/R: 0 when only using two speakers. # The front/rear speaker balance cannot be adjusted when the rear output setting is Subwoofer. Refer to Setting the rear output and subwoofer controller on page 65. 4 Touch c or d to adjust the left/right speaker balance. Range: Left:15 to Right:15 Using the equalizer You can adjust the equalization to match the car's interior acoustic characteristics as desired. Recalling equalizer curves There are seven stored equalizer curves which you can easily recall at any time. Here is a list of the equalizer curves. Display Powerful Natural Equalizer curve Powerful Natural Display Vocal Custom1 Custom2 Flat Super Bass Equalizer curve Vocal Custom 1 Custom 2 Flat Super bass ! The equalizer curves for Custom1 and Custom2 can be adjusted. ! You cannot select Custom1 and Custom2 when using the auto-equalizer. ! When Flat, no changes are made to the sound. You can check the effects of the equalizer curves by switching alternatively between Flat and another equalizer curve. 1 Display the audio function menu. Refer to Introduction of menu operations on the previous page. 2 Touch Graphic EQ on the audio function menu. # You can select Graphic EQ when Auto EQ function is off. 3 Touch c or d to select the desired item. Powerful-Natural-Vocal-Custom1- Custom2-Flat-Super Bass Adjusting the 8-band graphic equalizer You can adjust the level of each band for the equalizer curves. ! A separate Custom1 curve can be created for each source. If you make adjustments when a curve other than Custom2 is selected, the equalizer curve settings will be stored in Custom1. ! A Custom2 curve that is common for all sources can be created. If you make adjustments when the Custom2 curve is selected, the Custom2 curve will be updated. 1 Display the audio function menu. Refer to Introduction of menu operations on the previous page. 58 En
-
 1
1 -
2
-
3
-
4
-
5
-
6
-
7
-
8
-
9
-
10
-
11
-
12
-
13
-
14
-
15
-
16
-
17
-
18
-
19
-
20
-
21
-
22
-
23
-
24
-
25
-
26
-
27
-
28
-
29
-
30
-
31
-
32
-
33
-
34
-
35
-
36
-
37
-
38
-
39
-
40
-
41
-
42
-
43
-
44
-
45
-
46
-
47
-
48
-
49
-
50
-
51
-
52
-
 53
53 -
 54
54 -
 55
55 -
 56
56 -
 57
57 -
 58
58 -
 59
59 -
 60
60 -
 61
61 -
 62
62 -
 63
63 -
64
-
65
-
66
-
67
-
68
-
69
-
70
-
71
-
72
-
73
-
74
-
75
-
76
-
77
-
78
-
79
-
80
-
81
-
82
-
83
-
84
-
85
-
86
-
87
-
88
-
89
-
90
-
91
-
92
-
93
-
94
-
95
-
96
-
97
-
98
-
99
-
100
-
101
-
102
-
103
-
104
-
105
-
106
-
107
-
108
 |
 |