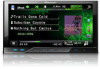
Pioneer AVH-P4200DVD Installation Manual
Pioneer AVH-P4200DVD Manual
 |
UPC - 012562975825
View all Pioneer AVH-P4200DVD manuals
Add to My Manuals
Save this manual to your list of manuals |
Pioneer AVH-P4200DVD manual content summary:
- Pioneer AVH-P4200DVD | Installation Manual - Page 1
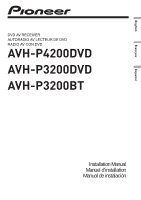
English Français Español DVD AV RECEIVER AUTORADIO AV LECTEUR DE DVD RADIO AV CON DVD AVH-P4200DVD AVH-P3200DVD AVH-P3200BT Installation Manual Manuel d'installation Manual de instalación - Pioneer AVH-P4200DVD | Installation Manual - Page 2
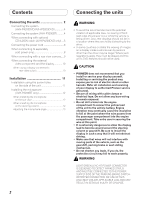
you to risk of electric shock or other hazards. Refer all installation and servicing of your display to authorized Pioneer service personnel. • Secure all wiring with cable clamps or electrical tape. Do not allow any bare wiring to remain exposed. • Do not drill a hole into the engine compartment - Pioneer AVH-P4200DVD | Installation Manual - Page 3
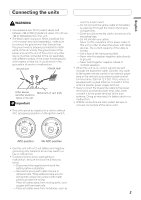
wire the speaker negative cable directly to ground. - Never band together negative cables of multiple speakers. • When this unit is on, control signals are sent through the blue/white cable. Connect this cable to the system remote control of an external power amp or the vehicle's auto-antenna relay - Pioneer AVH-P4200DVD | Installation Manual - Page 4
for hands-free phoning (supplied with Bluetooth adapter) Bluetooth adapter (e.g. CD-BTB200) (sold separately) This product (AVH-P4200DVD only) 1.5 m (4 ft. 11 in.) Wired remote input Hard-wired remote control adaptor can be connected (sold separately). USB cable (supplied with this unit) Connect - Pioneer AVH-P4200DVD | Installation Manual - Page 5
CD-IU200V cable (AVHP4200DVD only) IP-BUS input AUX input (AUX) Microphone for hands-free phoning (supplied with Bluetooth adapter) Wired remote input Hard-wired remote control adaptor can be connected (sold separately). Bluetooth adapter (e.g. CD-BTB200) (sold separately) iPod with video - Pioneer AVH-P4200DVD | Installation Manual - Page 6
(Supplied with Navigation unit) Insert the 26 pin cable in the direction indicated in the figure. RGB input This product Antenna input AUX jack (3.5 ø) (AVH-P4200DVD only) Fuse (10 A) Use a mini plug cable to connect with auxiliary device. Microphone input (AVH-P3200BT only) (AVHP4200DVD only - Pioneer AVH-P4200DVD | Installation Manual - Page 7
Connecting the units English 4 m (13 ft. 1 in.) Microphone (AVH-P3200BT only) Wired remote input Hard-wired remote control adaptor can be connected (sold separately). Fuse resistor Violet/white Of the two lead wires connected to the back lamp, connect the one in which the voltage changes when - Pioneer AVH-P4200DVD | Installation Manual - Page 8
This product (AVH- P4200DVD only) To subwoofer output Power amp (sold separately) Power amp (sold separately) Power amp (sold separately) Connect with RCA cables (sold separately) Blue/white Connect to system control terminal of the power amp or auto-antenna relay control terminal. (max - Pioneer AVH-P4200DVD | Installation Manual - Page 9
must use a camera which outputs mirror reversed images. This product To video output RCA cable (sold separately) (AVH-P4200DVD only) Rear view camera (sold separately) Fuse resistor Violet/white Of the two lead wires connected to the back lamp, connect the one in which the voltage changes when - Pioneer AVH-P4200DVD | Installation Manual - Page 10
connecting the external video component and the display Display with RCA input jacks (sold separately) To video input To audio input Video input (V IN) Rear monitor output (V OUT) (AVH-P4200DVD/AVH-P3200BT only) RCA cables (sold separately) Rear audio output (REAR AUDIO OUT) Mini pin plug - Pioneer AVH-P4200DVD | Installation Manual - Page 11
injury to a passenger as a result of a sudden stop. • Do not install the display where it may (i) obstruct the driver's vision, (ii) impair make sure you leave ample space behind the rear panel and wrap any loose cables so they are not blocking the vents. Leave ample space Dashboard Use either - Pioneer AVH-P4200DVD | Installation Manual - Page 12
Installation Installing the microphone (AVH-P3200BT only) Installation notes Install the microphone in a position and orientation that will enable it to pick up the voice of the person operating the system. 2. Install the microphone clip on the sun visor. • With the sun visor up, install the - Pioneer AVH-P4200DVD | Installation Manual - Page 13
English Installation 2. Install the microphone clip on the steering column. Double-sided tape Install the microphone clip on the rear side of the steering column. Clamp Use separately sold clamps to secure the lead where necessary inside the vehicle. - Pioneer AVH-P4200DVD | Installation Manual - Page 14
(AVH-P4200DVD/AVH-P3200DVD 4 Raccordement du système (AVH-P3200BT) ... 4 Raccordement avec le câble optionnel CD-IU200V (AVH-P4200DVD d'autres dangers. Confiez tous les travaux d'installation et d'entretien de votre écran au personnel de service Pioneer agréé. • Immobilisez toutes les câblages avec - Pioneer AVH-P4200DVD | Installation Manual - Page 15
en premier. Assurez-vous que le fil de masse est connecté correctement aux parties métalliques de la carrosserie du véhicule. Le fil de masse de , assurez-vous de suivre les instructions ci-dessous. - Déconnectez la borne négative de la batterie avant l'installation. - Fixez le câblage avec - Pioneer AVH-P4200DVD | Installation Manual - Page 16
Raccordements des appareils Raccordement du système (AVH-P4200DVD/AVH-P3200DVD) Entrée IP-BUS Cet appareil (AVH-P4200DVD seulement) 1,5 m Microphone pour téléphonie mains libres (fourni avec l'adaptateur Bluetooth) Adaptateur Bluetooth (par ex. CD-BTB200) (vendu séparément) Entrée pour télé - Pioneer AVH-P4200DVD | Installation Manual - Page 17
Français Raccordements des appareils Raccordement avec le câble optionnel CD-IU200V (AVHP4200DVD seulement) Entrée IP-BUS Entrée AUX (AUX) Microphone pour téléphonie mains libres (fourni avec l'adaptateur Bluetooth) Entrée pour télécommande câblée Un adaptateur de télécommande câblée peut être - Pioneer AVH-P4200DVD | Installation Manual - Page 18
à cette entrée. Veuillez contacter votre revendeur pour en savoir plus sur les unités de navigation pouvant être raccordées. Entrée RGB Entrée d'antenne (AVH-P4200DVD seulement) Prise AUX (3,5 ø) (AVH-P4200DVD seulement) Fusible (10 A) Utilisez un câble a fiches mini pour raccorder un appareil - Pioneer AVH-P4200DVD | Installation Manual - Page 19
. 300 mA, 12 V CC). Avec un système à 2 enceintes, ne connectez rien aux câbles d'enceinte qui ne sont pas connectés aux enceintes. Contacteur de frein à main Remarque: · Change le réglage initial de cet appareil (reportez-vous aux mode d'emploi). La sortie de caisson de grave de cet appareil est - Pioneer AVH-P4200DVD | Installation Manual - Page 20
à un amplificateur de puissance vendu séparément Sortie arrière (AVH-P4200DVD/AVH-P3200BT seulement) Sortie avant À la sortie arrière À la sortie avant Sortie du caisson (AVH- de grave Cet appareil P4200DVD seulement) À la sortie du caisson de grave Amplificateur de puissance - Pioneer AVH-P4200DVD | Installation Manual - Page 21
la caméra de recule peuvent apparaître plus proche ou plus loin qu'en réalité. ATTENTION Entrée de la caméra de recul (R.C IN) (AVH-P4200DVD/AVH-P3200BT seulement) Vous devez utiliser une caméra capable de fournir des images inversées, comme dans un miroir. Cet appareil À la sortie vidéo Câble - Pioneer AVH-P4200DVD | Installation Manual - Page 22
l'option AV Input dans le menu System. Lors de l'utilisation d'un écran raccordé à la sortie vidéo arrière La sortie vidéo arrière et la sortie audio arrière de cet appareil sont destinées au raccordement d'un écran permettant aux passagers de sièges arrières de regarder n DVD, etc. AVERTISSEMENT - Pioneer AVH-P4200DVD | Installation Manual - Page 23
et vissez des vis à 3 ou 4 emplacements de chaque côté. Si la languette est gênante, tordez-la vers bas. Support de montage d'origine • Lors de l'installation de l'appareil, laissez suffisamment d'espace derrière le panneau arrière pour permettre une dissipation correcte de la chaleur et pliez - Pioneer AVH-P4200DVD | Installation Manual - Page 24
. Microphone Attache du microphone Serre-fils Utilisez des serre-fils vendus séparément pour fixer le fil conducteur aux endroits nécessaires dans le véhicule. Installation du microphone sur la colonne de direction 1. Fixez le microphone sur l'attache du microphone. Microphone Attache du - Pioneer AVH-P4200DVD | Installation Manual - Page 25
Français Installation 2. Fixez l'attache du microphone sur la colonne de direction. Bande adhésive double face Installez l'attache du microphone sur l'arrière de la colonne de direction Serre-fils Utilisez des serre-fils vendus séparément pour fixer le fil conducteur aux endroits nécessaires dans - Pioneer AVH-P4200DVD | Installation Manual - Page 26
AVH-P4200DVD/AVH-P3200DVD 4 Conexión del sistema (AVH-P3200BT 4 Cuando conecte con el cable CD-IU200V opcional (solamente AVH-P4200DVD) ...... 5 Conexión del cable usarse las funciones de DVD de esta unidad. PRECAUCIÓN • PIONEER no recomienda que sea usted mismo quien instale o revise su pantalla. - Pioneer AVH-P4200DVD | Installation Manual - Page 27
1 Ω a 3 Ω con esta unidad. • El cable negro es el cable a tierra. Cuando instale esta unidad o el amplificador de potencia (vendido por separado control a través del cable azul/blanco. Conecte este cable al mando a distancia del sistema de un amplificador de potencia externo o al terminal de control - Pioneer AVH-P4200DVD | Installation Manual - Page 28
(solamente AVH-P4200DVD) 1,5 m Micrófono para telefonía de manos libres (suministrado con el adaptador Bluetooth) Adaptador Bluetooth (e.g., CD-BTB200) (vendido separadamente) Entrada remota cableada Se puede conectar el adaptador de control remoto cableado (vendido separadamente) Cable USB - Pioneer AVH-P4200DVD | Installation Manual - Page 29
el cable CD-IU200V opcional (solamente AVH-P4200DVD) Entrada IP-BUS Entrada AUX (AUX) Micrófono para telefonía de manos libres (suministrado con el adaptador Bluetooth) Entrada remota cableada Se puede conectar el adaptador de control remoto cableado (vendido separadamente) iPod con capacidades - Pioneer AVH-P4200DVD | Installation Manual - Page 30
para cuestiones sobre la unidad de navegación que puede conectarse. Entrada RGB Entrada para antena (solamente AVH-P4200DVD) Toma AUX (3,5 ø) (solamente AVH-P4200DVD) Fusible (10 A) Utilice un cable con enchufe miniatura para conectar a un dispositivo auxiliar. Entrada del micrófono (solamente - Pioneer AVH-P4200DVD | Installation Manual - Page 31
4 m Micrófono (solamente AVH-P3200BT) Entrada remota cableada Se puede conectar el adaptador de control remoto cableado (vendido separadamente). el manual del propietario del vehículo o a su concesionario. Verde claro Se utiliza para detectar el estado ON/OFF del freno de mano. Este cable - Pioneer AVH-P4200DVD | Installation Manual - Page 32
producto P4200DVD) A salida de altavoz de subgraves Amplificador de potencia (vendido separadamente) Amplificador de potencia (vendido separadamente) Amplificador de potencia (vendido separadamente) Conecte los cables RCA (vendidos separadamente) Azul/blanco Conecte al terminal de control de - Pioneer AVH-P4200DVD | Installation Manual - Page 33
imágenes invertidas de espejo. Este producto A la salida de vídeo Cámara de vista trasera (vendido separadamente) Cable RCA (vendido separadamente) (solamente AVH-P4200DVD) Resistencia de fusible Violeta/blanco De los dos conductores conectados a la lámpara trasera, conecte el conductor cuyo - Pioneer AVH-P4200DVD | Installation Manual - Page 34
OUT) (solamente AVH-P4200DVD/ AVH-P3200BT) Salida de audio trasera (REAR AUDIO OUT) Cable RCA (vendido separadamente) Cable con enchufe miniatura pantalla que permite la contemplación de DVD, etc. a los pasajeros en los asientos traseros. ADVERTENCIA No instale nunca la pantalla en un lugar donde - Pioneer AVH-P4200DVD | Installation Manual - Page 35
hacia abajo. Ménsula de montaje de radio de fábrica Español • Cuando instale, para asegurar la dispersión apropiada del calor durante el uso de esta unidad, amplio espacio por detrás del panel trasero y enrolle cualesquiera cables sueltos de modo que no bloqueen las aberturas de ventilación. - Pioneer AVH-P4200DVD | Installation Manual - Page 36
ófono. Micrófono Presilla de micrófono Abrazadera Utilice abrazaderas vendidas separadamente para asegurar el cable en el interior del vehículo donde sea necesario. Cuando instale el micrófono en la base del volante 1. Instale el micrófono en la presilla de micrófono. Micrófono Presilla de micr - Pioneer AVH-P4200DVD | Installation Manual - Page 37
de micrófono en la base del volante. Cinta con adhesivo de doble cara Instale la presilla del micrófono en el lado trasero de la base del volante. Abrazadera Utilice abrazaderas vendidas separadamente para asegurar el cable en el interior del vehículo donde sea necesario. Ajuste del ángulo del micr - Pioneer AVH-P4200DVD | Installation Manual - Page 38
- Pioneer AVH-P4200DVD | Installation Manual - Page 39
- Pioneer AVH-P4200DVD | Installation Manual - Page 40
. 178-184 Boundary Road, Braeside, Victoria 3195, Australia TEL: (03) 9586-6300 PIONEER ELECTRONICS OF CANADA, INC. 300 Allstate Parkway, Markham, Ontario L3R 0P2, Canada TEL: 1-877-283-5901 TEL: 905-479-4411 PIONEER ELECTRONICS DE MEXICO, S.A. de C.V. Blvd.Manuel Avila Camacho 138 10 piso Col.Lomas
-
 1
1 -
 2
2 -
 3
3 -
 4
4 -
 5
5 -
 6
6 -
 7
7 -
8
-
9
-
10
-
11
-
12
-
13
-
14
-
15
-
16
-
17
-
18
-
19
-
20
-
21
-
22
-
23
-
24
-
25
-
26
-
27
-
28
-
29
-
30
-
31
-
32
-
33
-
34
-
35
-
36
-
37
-
38
-
39
-
40
 |
 |

English
Français
Español
Installation Manual
Manuel d’installation
Manual de instalación
DVD AV RECEIVER
AUTORADIO AV LECTEUR DE DVD
RADIO AV CON DVD
AVH-P4200DVD
AVH-P3200DVD
AVH-P3200BT