Pioneer AVH-X5500BHS Owner's Manual - Page 39
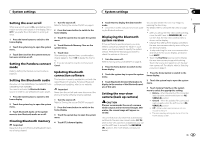
Clearing Bluetooth memory, Displaying the Bluetooth - rear view camera installation
 |
View all Pioneer AVH-X5500BHS manuals
Add to My Manuals
Save this manual to your list of manuals |
Page 39 highlights
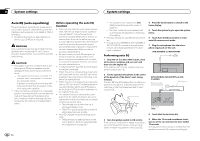
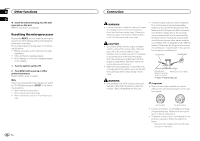
System settings System settings Section 20 English Setting the ever scroll When ever scroll is set to On, recorded text information scrolls continuously in the display. Set to Off if you prefer the information to scroll just once. 1 Press the home button to switch to the home display. 2 Touch the system key to open the system menu. 3 Touch Ever Scroll on the system menu to turn ever scroll on or off. Setting the Pandora connect mode Refer to Setting the Pandora connect mode on page 28. Setting the Bluetooth audio (Function of AVH-X5500BHS/AVH-X4500BT/AVHX3500BHS/AVH-X2500BT) You need to activate the Bluetooth Audio source in order to use a Bluetooth audio player. 1 Press the home button to switch to the home display. 2 Touch the system key to open the system menu. 3 Touch Bluetooth Audio on the system menu to turn Bluetooth audio on or off. Clearing Bluetooth memory Important Never turn the unit off while the Bluetooth memory is being cleared. 1 Turn the source off. Refer to Turning the source ON/OFF on page 8. 2 Press the home button to switch to the home display. 3 Touch the system key to open the system menu. 4 Touch Bluetooth Memory Clear on the system menu. 5 Touch Clear. After selecting a desired item, a confirmation display appears. Touch OK to delete the memory. # If you do not want to clear the memory, touch Cancel. Updating Bluetooth connection software This function is used to update this unit with the latest Bluetooth software. For about Bluetooth software and updating, refer to our website. Important Never turn the unit off and never disconnect the phone while the software is being updated. 1 Turn the source off. Refer to Turning the source ON/OFF on page 8. 2 Press the home button to switch to the home display. 3 Touch the system key to open the system menu. 4 Touch BT Software Update. 5 Touch Start to display the data transfer mode. # Follow the on-screen instructions to finish updating the Bluetooth software. Displaying the Bluetooth system version If this unit fails to operate properly, you may need to consult your dealer for repair. In such cases, you may be asked to specify the system version. Perform the following procedure to check the version on this unit. 1 Turn the source off. Refer to Turning the source ON/OFF on page 8. 2 Press the home button to switch to the home display. 3 Touch the system key to open the system menu. 4 Touch Bluetooth Version Information to display to the version of the Bluetooth module of this unit. Setting the rear view camera (back up camera) CAUTION Pioneer recommends the use of a camera which outputs mirror-reversed images. Otherwise, the screen image will appear reversed. This unit features a function that automatically switches to the rear view camera video (R.C IN) when a rear view camera is installed on your car and the shift lever is moved to the REVERSE (R) position. (For more details, consult your dealer.) You can also switch the rear view image by pressing the touch key. For details refer to Using the rear view on page 10. ! After you set up the rear view camera setting, move the shift lever to REVERSE (R) and confirm that the rear view camera video is shown on the display. ! Change this setting if the display switches to the rear view camera video by error while you are driving forward. ! To stop watching the rear view camera video and return to the source display, press and hold MUTE. ! Touch the RearView source icon to display the rear view camera image while driving. Touch the source icon again to turn the rear view camera off. For details, refer to Selecting a source on page 8. 1 Press the home button to switch to the home display. 2 Touch the system key to open the system menu. 3 Touch Camera Polarity on the system menu to select the appropriate setting. ! Battery - When the polarity of the connected lead is positive while the shift lever is in REVERSE (R) position ! Ground - When the polarity of the connected lead is negative while the shift lever is in REVERSE (R) position ! Off - When a rear view camera is not connected to this unit ! The rear view key setting also turns off on the home display screen. En 39
-
 1
1 -
2
-
3
-
4
-
5
-
6
-
7
-
8
-
9
-
10
-
11
-
12
-
13
-
14
-
15
-
16
-
17
-
18
-
19
-
20
-
21
-
22
-
23
-
24
-
25
-
26
-
27
-
28
-
29
-
30
-
31
-
32
-
33
-
 34
34 -
 35
35 -
 36
36 -
 37
37 -
 38
38 -
 39
39 -
 40
40 -
 41
41 -
 42
42 -
 43
43 -
 44
44 -
45
-
46
-
47
-
48
-
49
-
50
-
51
-
52
-
53
-
54
-
55
-
56
-
57
-
58
-
59
-
60
-
61
-
62
-
63
-
64
-
65
-
66
-
67
-
68
-
69
-
70
-
71
-
72
-
73
-
74
-
75
-
76
-
77
-
78
-
79
-
80
-
81
-
82
-
83
-
84
-
85
-
86
-
87
-
88
-
89
-
90
-
91
-
92
-
93
-
94
-
95
-
96
-
97
-
98
-
99
-
100
-
101
-
102
-
103
-
104
-
105
-
106
-
107
-
108
-
109
-
110
-
111
-
112
-
113
-
114
-
115
-
116
-
117
-
118
-
119
-
120
-
121
-
122
-
123
-
124
-
125
-
126
-
127
-
128
-
129
-
130
-
131
-
132
-
133
-
134
-
135
-
136
-
137
-
138
-
139
-
140
-
141
-
142
-
143
-
144
-
145
-
146
-
147
-
148
-
149
-
150
-
151
-
152
-
153
-
154
-
155
-
156
-
157
-
158
-
159
-
160
-
161
-
162
-
163
-
164
-
165
-
166
-
167
-
168
-
169
-
170
-
171
-
172
-
173
-
174
-
175
-
176
-
177
-
178
-
179
-
180
-
181
-
182
-
183
-
184
-
185
-
186
-
187
-
188
-
189
-
190
-
191
-
192
-
193
-
194
-
195
-
196
-
197
-
198
-
199
-
200
-
201
-
202
-
203
-
204
-
205
-
206
-
207
-
208
-
209
-
210
-
211
-
212
 |
 |