Pioneer AVH-X5500BHS Owner's Manual - Page 44
Resetting the microprocessor, Other functions, Connection, WARNING, CAUTION - accessories
 |
View all Pioneer AVH-X5500BHS manuals
Add to My Manuals
Save this manual to your list of manuals |
Page 44 highlights
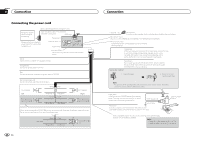
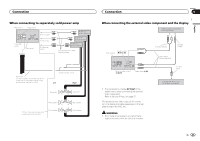
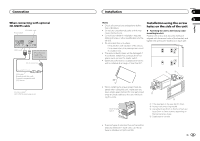
Section 24 Other functions 25 % Insert the stereo mini plug into the AUX input jack on this unit. Refer to Connection on page 46. Resetting the microprocessor By pressing RESET, you can reset the microprocessor to its initial settings without changing the bookmark information. The microprocessor must be reset in the following situations: ! Before using this unit for the first time after installation ! If the unit fails to operate properly ! When strange or incorrect messages appear on the display 1 Turn the ignition switch OFF. 2 Press RESET with a pen tip or other pointed instrument. Refer to What's what on page 7. Note Switch your engine ON or set the ignition switch to ACC ON before pressing RESET in the following situations: ! After completing connections ! When erasing all stored settings ! When resetting the unit to its initial (factory) set- tings 44 En Connection WARNING ! In some countries or states the viewing of images on a display inside a vehicle even by persons other than the driver may be illegal. Where such regulations apply, they must be obeyed and this unit's DVD features should not be used. CAUTION ! Do not drill a hole into the engine compart- ment to connect the yellow cable of the display unit to the vehicle battery. Engine vibration may eventually cause the insulation to fail at the point where the wire passes from the passenger compartment into the engine compartment. Take extra care in securing the wire at this point. ! Make sure that cables will not interfere with moving parts of the vehicle, such as the shift lever, parking brake or seat sliding mechanism. ! The black cable is ground. When installing this unit or power amp (sold separately), make sure to connect the ground wire first. Make sure that the ground cable is properly connected to metal parts of the car body using a spade terminal sold commercially. The ground wire of the power amp and the one of this unit or any other device must be connected to the car separately with different screws. If the screw for the ground wire loosens or falls out, it could result in fire, generation of smoke or malfunction. Ground wire POWER AMP Other devices Metal parts of car's body (Another electronic device in the car) WARNING ! Use speakers over 50 W (output value) and between 4 W to 8 W (impedance value). Do not use 1 W to 3 W speakers for this unit. Important ! This unit cannot be installed in a vehicle without ACC (accessory) position on the ignition switch. F O OF N STAR T ACC position No ACC position ! Use this unit with a 12-volt battery and negative grounding only. Failure to do so may result in a fire or malfunction. ! To prevent a short-circuit, overheating or malfunction, be sure to follow the directions below. - Disconnect the negative terminal of the battery before installation.
-
 1
1 -
2
-
3
-
4
-
5
-
6
-
7
-
8
-
9
-
10
-
11
-
12
-
13
-
14
-
15
-
16
-
17
-
18
-
19
-
20
-
21
-
22
-
23
-
24
-
25
-
26
-
27
-
28
-
29
-
30
-
31
-
32
-
33
-
34
-
35
-
36
-
37
-
38
-
 39
39 -
 40
40 -
 41
41 -
 42
42 -
 43
43 -
 44
44 -
 45
45 -
 46
46 -
 47
47 -
 48
48 -
 49
49 -
50
-
51
-
52
-
53
-
54
-
55
-
56
-
57
-
58
-
59
-
60
-
61
-
62
-
63
-
64
-
65
-
66
-
67
-
68
-
69
-
70
-
71
-
72
-
73
-
74
-
75
-
76
-
77
-
78
-
79
-
80
-
81
-
82
-
83
-
84
-
85
-
86
-
87
-
88
-
89
-
90
-
91
-
92
-
93
-
94
-
95
-
96
-
97
-
98
-
99
-
100
-
101
-
102
-
103
-
104
-
105
-
106
-
107
-
108
-
109
-
110
-
111
-
112
-
113
-
114
-
115
-
116
-
117
-
118
-
119
-
120
-
121
-
122
-
123
-
124
-
125
-
126
-
127
-
128
-
129
-
130
-
131
-
132
-
133
-
134
-
135
-
136
-
137
-
138
-
139
-
140
-
141
-
142
-
143
-
144
-
145
-
146
-
147
-
148
-
149
-
150
-
151
-
152
-
153
-
154
-
155
-
156
-
157
-
158
-
159
-
160
-
161
-
162
-
163
-
164
-
165
-
166
-
167
-
168
-
169
-
170
-
171
-
172
-
173
-
174
-
175
-
176
-
177
-
178
-
179
-
180
-
181
-
182
-
183
-
184
-
185
-
186
-
187
-
188
-
189
-
190
-
191
-
192
-
193
-
194
-
195
-
196
-
197
-
198
-
199
-
200
-
201
-
202
-
203
-
204
-
205
-
206
-
207
-
208
-
209
-
210
-
211
-
212
 |
 |