Pioneer AVH-X5500BHS Owner's Manual - Page 7
Bluetooth Audio, USB/iPod, Digital Radio, Pandora, SiriusXM - app mode
 |
View all Pioneer AVH-X5500BHS manuals
Add to My Manuals
Save this manual to your list of manuals |
Page 7 highlights
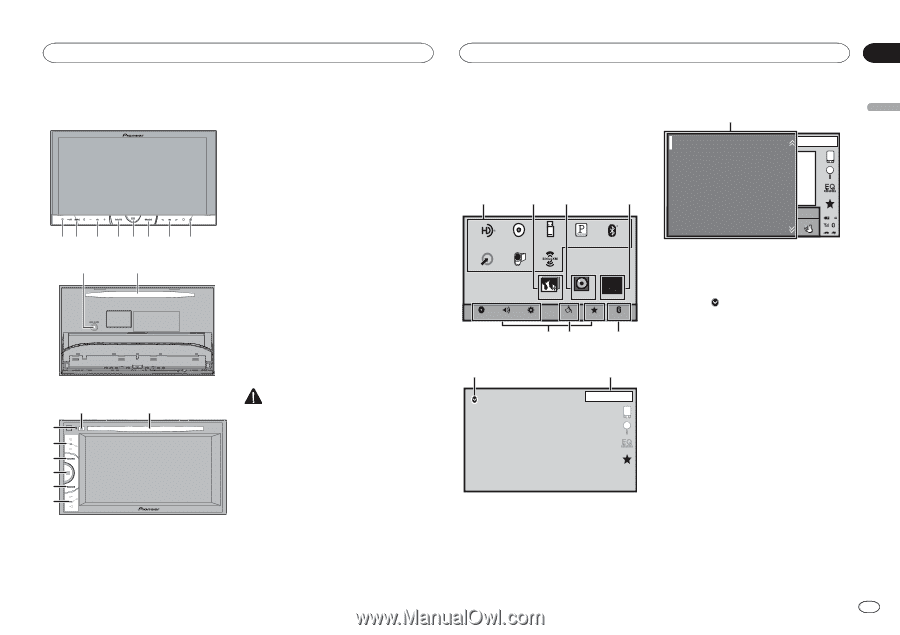
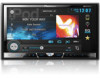
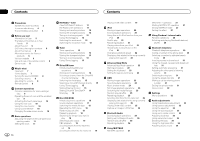
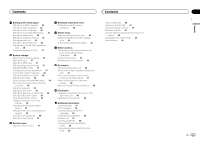
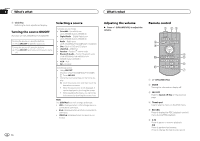
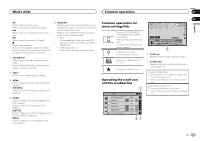
What's what What's what Section 03 English Head unit AVH-X5500BHS and AVH-X4500BT 3 +/- (VOLUME/VOL) 4 MUTE Press to mute. Press again to unmute. 12 3 45 6 7 8 9 a 5 Home button Displaying the home display. The display returns to the Launcher screen while a 3rd-party application is being used in Advanced App Mode. Double-clicking the icon on the Launcher screen returns the display to the home display. 6 MODE Turning the information display off. 7 c/d (TRK) 8 h (eject) 9 Auto EQ microphone input jack Use to connect an auto EQ microphone. AVH-X3500BHS, AVH-X2500BTand AVH-X1500DVD 8 a 1 3 4 5 6 7 1 RESET For details refer to Resetting the microprocessor on page 44. 2 SRC/OFF a Disc loading slot CAUTION Do not use unauthorized products. Notes ! When the navigation system is connected, press MODE to switch to the navigation display. Press MODE and hold to turn the display off. Press MODE again to turn the display on. ! For details on how to operate a navigation system from this unit, refer to its operation manual. ! When an iPhone that is running an application that supports Advanced App Mode is connected, press MODE to switch to the application display. You can use the application by touching the display. ! For details on how to connect an iPod or USB storage device to this unit, refer to When connecting with optional CD-IU201V cable on page 48. Home display Home display 1 23 4 Digital Radio Disc USB/iPod1 Pandora Bluetooth Audio AUX AV SiriusXM Video Audio Apps RearView ON OFF Settings System Theme Favorite Bluetooth 76 5 Source off display 8 9 OFF 1 JAN AM 12:12 Source on display 1 SiriusXM Digital Radio Disc USB/iPod Pandora Bluetooth Audio JAN AM 12:22 S.Rtrv AAppppr Dolby PLII DB 1 Source icon Selecting a favorite source. When the source icon is not displayed, it can be displayed by pressing the home key or touching . 2 Apps key Switching to Advanced App Mode. 3 Rear view key Displaying the rear view image. For details refer to Using the rear view on page 10. 4 Source off key Turning the source off. 5 Bluetooth key Displaying the Bluetooth connection menu. 6 Theme key Displaying the Theme menu. 7 Menu icon Displaying the menu. 8 Source key Displaying the source menu. En 7
-
 1
1 -
 2
2 -
 3
3 -
 4
4 -
 5
5 -
 6
6 -
 7
7 -
 8
8 -
 9
9 -
 10
10 -
 11
11 -
 12
12 -
13
-
14
-
15
-
16
-
17
-
18
-
19
-
20
-
21
-
22
-
23
-
24
-
25
-
26
-
27
-
28
-
29
-
30
-
31
-
32
-
33
-
34
-
35
-
36
-
37
-
38
-
39
-
40
-
41
-
42
-
43
-
44
-
45
-
46
-
47
-
48
-
49
-
50
-
51
-
52
-
53
-
54
-
55
-
56
-
57
-
58
-
59
-
60
-
61
-
62
-
63
-
64
-
65
-
66
-
67
-
68
-
69
-
70
-
71
-
72
-
73
-
74
-
75
-
76
-
77
-
78
-
79
-
80
-
81
-
82
-
83
-
84
-
85
-
86
-
87
-
88
-
89
-
90
-
91
-
92
-
93
-
94
-
95
-
96
-
97
-
98
-
99
-
100
-
101
-
102
-
103
-
104
-
105
-
106
-
107
-
108
-
109
-
110
-
111
-
112
-
113
-
114
-
115
-
116
-
117
-
118
-
119
-
120
-
121
-
122
-
123
-
124
-
125
-
126
-
127
-
128
-
129
-
130
-
131
-
132
-
133
-
134
-
135
-
136
-
137
-
138
-
139
-
140
-
141
-
142
-
143
-
144
-
145
-
146
-
147
-
148
-
149
-
150
-
151
-
152
-
153
-
154
-
155
-
156
-
157
-
158
-
159
-
160
-
161
-
162
-
163
-
164
-
165
-
166
-
167
-
168
-
169
-
170
-
171
-
172
-
173
-
174
-
175
-
176
-
177
-
178
-
179
-
180
-
181
-
182
-
183
-
184
-
185
-
186
-
187
-
188
-
189
-
190
-
191
-
192
-
193
-
194
-
195
-
196
-
197
-
198
-
199
-
200
-
201
-
202
-
203
-
204
-
205
-
206
-
207
-
208
-
209
-
210
-
211
-
212
 |
 |