Pioneer AVIC-F90BT Owner's Manual - Page 11
Map coverage, Protecting the LCD panel, and screen, Viewing the LCD comfortably, Notes for internal - reset
 |
UPC - 012562897271
View all Pioneer AVIC-F90BT manuals
Add to My Manuals
Save this manual to your list of manuals |
Page 11 highlights
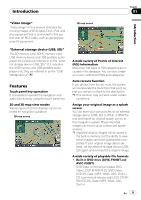
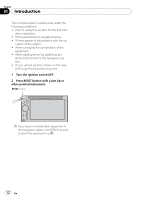
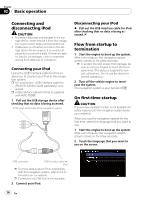
Introduction Chapter 01 Introduction - "Video image" that is output from the builtin DVD drive (DVD-V, DVD-VR, DivX) and AV input (AV1, AV2) can be displayed on the rear display. - This function is available for AVIC-F900BT and AVIC-F90BT. Rear view camera ready You can display what is behind the vehicle if connected to a rear view camera (e.g. NDBC2) (sold separately). Map coverage For more details about the map coverage of this navigation system, refer to the information on our website. first time, the adjustment of the black density for clear viewing is recommended. Notes for internal memory Before removing the vehicle battery If the battery is disconnected or discharged, the memory will be erased and must be reprogrammed. p Some data remains. Read Returning the na- vigation system to the default or factory settings before you operate this function. = For more detailed information about the items to be deleted, refer to Returning the navigation system to the default or factory settings on page 154. Protecting the LCD panel and screen p Do not allow direct sunlight to fall on the LCD screen when this product is not being used. Extended exposure to direct sunlight can result in LCD screen malfunction due to the resulting high temperatures. p When using a cellular phone, keep the antenna of the cellular phone away from the LCD screen to prevent disruption of the video in the form of spots, colored stripes, etc. p To protect the LCD screen from damage, be sure to touch the touch panel keys with your finger. (The stylus is supplied for special calibrations. Do not use the stylus for normal operations.) Viewing the LCD comfortably Due to its construction, the viewing angle of the LCD screen is limited. However, "Brightness" may be used to adjust the black density of the video. When using the screen for the About the data being deleted The information is erased by pressing RESET button or disconnecting the yellow lead from the battery (or removing the battery itself). However, some items remain. p Some data remains. Read Returning the na- vigation system to the default or factory settings before you operate this function. = For more detailed information about the items to be deleted, refer to Returning the navigation system to the default or factory settings on page 154. Resetting the microprocessor CAUTION Pressing RESET button clears the settings for the AV source without clearing all the navigation function items. Please refer to the related section before clearing. = For more detailed information about the items to be deleted, refer to Returning the navigation system to the default or factory settings on page 154. En 11
-
 1
1 -
2
-
3
-
4
-
5
-
 6
6 -
 7
7 -
 8
8 -
 9
9 -
 10
10 -
 11
11 -
 12
12 -
 13
13 -
 14
14 -
 15
15 -
 16
16 -
17
-
18
-
19
-
20
-
21
-
22
-
23
-
24
-
25
-
26
-
27
-
28
-
29
-
30
-
31
-
32
-
33
-
34
-
35
-
36
-
37
-
38
-
39
-
40
-
41
-
42
-
43
-
44
-
45
-
46
-
47
-
48
-
49
-
50
-
51
-
52
-
53
-
54
-
55
-
56
-
57
-
58
-
59
-
60
-
61
-
62
-
63
-
64
-
65
-
66
-
67
-
68
-
69
-
70
-
71
-
72
-
73
-
74
-
75
-
76
-
77
-
78
-
79
-
80
-
81
-
82
-
83
-
84
-
85
-
86
-
87
-
88
-
89
-
90
-
91
-
92
-
93
-
94
-
95
-
96
-
97
-
98
-
99
-
100
-
101
-
102
-
103
-
104
-
105
-
106
-
107
-
108
-
109
-
110
-
111
-
112
-
113
-
114
-
115
-
116
-
117
-
118
-
119
-
120
-
121
-
122
-
123
-
124
-
125
-
126
-
127
-
128
-
129
-
130
-
131
-
132
-
133
-
134
-
135
-
136
-
137
-
138
-
139
-
140
-
141
-
142
-
143
-
144
-
145
-
146
-
147
-
148
-
149
-
150
-
151
-
152
-
153
-
154
-
155
-
156
-
157
-
158
-
159
-
160
-
161
-
162
-
163
-
164
-
165
-
166
-
167
-
168
-
169
-
170
-
171
-
172
-
173
-
174
-
175
-
176
-
177
-
178
-
179
-
180
-
181
-
182
-
183
-
184
-
185
-
186
-
187
-
188
-
189
-
190
-
191
-
192
 |
 |