Pioneer AVIC-F90BT Owner's Manual - Page 20
How to use the map, Basic operation - map 2 0
 |
UPC - 012562897271
View all Pioneer AVIC-F90BT manuals
Add to My Manuals
Save this manual to your list of manuals |
Page 20 highlights
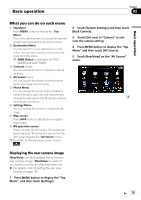
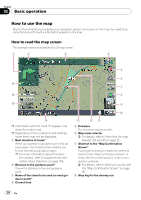
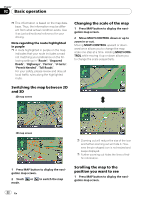
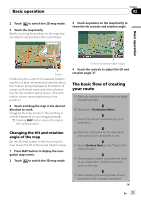
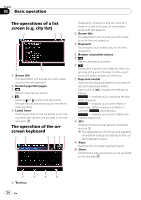
Chapter 02 Basic operation How to use the map Most of the information provided by your navigation system can be seen on the map. You need to become familiar with how the information appears on the map. How to read the map screen This example shows an example of a 2D map screen. 1 2 3 4 5 6 h 7 g 8 f 9 a e p Information with the mark (*) appears only when the route is set. p Depending on the conditions and settings, some items may not be displayed. 1 Next direction of travel* When you approach a guidance point, this appears green. Touching this item enables you to hear the previous guidance again. p For more information about the direction symbol, refer to Supplemental information about directions on page 169. 2 Distance to the guidance point* Shows the distance to the next guidance point. 3 Name of the street to be used (or next guidance point)* 4 Current time d cb 5 Compass The red arrow indicates north. 6 Map mode selector = For details, refer to Switching the map between 2D and 3D on page 22. 7 Shortcut to the "Map Confirmation Screen" Touching this shortcut enables the screen to switch to the "Map Confirmation Screen" directly with the current position or the cursor position centered. = For details, refer to What you can do with the "Map Confirmation Screen" on page 36. 8 Stop key for the dummy run 20 En
-
 1
1 -
2
-
3
-
4
-
5
-
6
-
7
-
8
-
9
-
10
-
11
-
12
-
13
-
14
-
 15
15 -
 16
16 -
 17
17 -
 18
18 -
 19
19 -
 20
20 -
 21
21 -
 22
22 -
 23
23 -
 24
24 -
 25
25 -
26
-
27
-
28
-
29
-
30
-
31
-
32
-
33
-
34
-
35
-
36
-
37
-
38
-
39
-
40
-
41
-
42
-
43
-
44
-
45
-
46
-
47
-
48
-
49
-
50
-
51
-
52
-
53
-
54
-
55
-
56
-
57
-
58
-
59
-
60
-
61
-
62
-
63
-
64
-
65
-
66
-
67
-
68
-
69
-
70
-
71
-
72
-
73
-
74
-
75
-
76
-
77
-
78
-
79
-
80
-
81
-
82
-
83
-
84
-
85
-
86
-
87
-
88
-
89
-
90
-
91
-
92
-
93
-
94
-
95
-
96
-
97
-
98
-
99
-
100
-
101
-
102
-
103
-
104
-
105
-
106
-
107
-
108
-
109
-
110
-
111
-
112
-
113
-
114
-
115
-
116
-
117
-
118
-
119
-
120
-
121
-
122
-
123
-
124
-
125
-
126
-
127
-
128
-
129
-
130
-
131
-
132
-
133
-
134
-
135
-
136
-
137
-
138
-
139
-
140
-
141
-
142
-
143
-
144
-
145
-
146
-
147
-
148
-
149
-
150
-
151
-
152
-
153
-
154
-
155
-
156
-
157
-
158
-
159
-
160
-
161
-
162
-
163
-
164
-
165
-
166
-
167
-
168
-
169
-
170
-
171
-
172
-
173
-
174
-
175
-
176
-
177
-
178
-
179
-
180
-
181
-
182
-
183
-
184
-
185
-
186
-
187
-
188
-
189
-
190
-
191
-
192
 |
 |
