Pioneer AVIC-X930BT Owner's Manual - Page 165
Setting the Volume for, Guidance and Phone, Changing the preinstalled, splash screen, Changing
 |
UPC - 884938127097
View all Pioneer AVIC-X930BT manuals
Add to My Manuals
Save this manual to your list of manuals |
Page 165 highlights
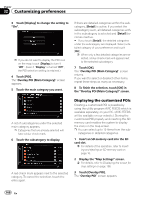
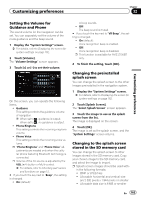
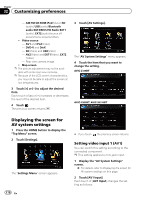
Customizing preferences Chapter 32 Customizing preferences Setting the Volume for Guidance and Phone The sound volume for the navigation can be set. You can separately set the volume of the route guidance and the beep sound. 1 Display the "System Settings" screen. = For details, refer to Displaying the screen for system settings on page 162. 2 Touch [Volume]. The "Volume Settings" screen appears. 3 Touch [+] or [-] to set their volume. On this screen, you can operate the following items. ! Guidance This setting controls the guidance volume of navigation. p When set to , guidance is output. When set to , no guidance is output. ! Phone Ringtone This setting controls the incoming ring tone volume. ! Phone Voice This setting controls the incoming voice volume. p "Phone Ringtone" and "Phone Voice" adjustments are needed only when the cellular phone featuring Bluetooth technology is connected. p Volume of the AV source is adjusted by the VOL (+/-) button or Multi-control. = For details, refer to Checking part names and functions on page 12. # If you touch the key next to "Beep", the setting is changed. ! On (default): A beep sounds. ! Off: The beep sound is muted. # If you touch the key next to "VR Beep", the setting is changed. ! On (default): Voice recognition beep is enabled. ! Off: Voice recognition beep is disabled. p This function is available for AVIC-Z130BT only. 4 To finish the setting, touch [OK]. Changing the preinstalled splash screen You can change the splash screen to the other images preinstalled in the navigation system. 1 Display the "System Settings" screen. = For details, refer to Displaying the screen for system settings on page 162. 2 Touch [Splash Screen]. The "Select Splash Screen" screen appears. 3 Touch the image to use as the splash screen from the list. The image is displayed on the screen. 4 Touch [OK]. The image is set as the splash screen, and the "System Settings" screen returns. Changing to the splash screen stored in the SD memory card You can change the splash screen to other images stored in the SD memory card. Copy your chosen image to the SD memory card, and select the image to import. p Splash screen images should be used with- in the following formats; ! BMP or JPEG files ! Allowable horizontal and vertical size are 2 592 pixels x 1 944 pixels or smaller ! Allowable data size is 6 MB or smaller En 165
-
 1
1 -
2
-
3
-
4
-
5
-
6
-
7
-
8
-
9
-
10
-
11
-
12
-
13
-
14
-
15
-
16
-
17
-
18
-
19
-
20
-
21
-
22
-
23
-
24
-
25
-
26
-
27
-
28
-
29
-
30
-
31
-
32
-
33
-
34
-
35
-
36
-
37
-
38
-
39
-
40
-
41
-
42
-
43
-
44
-
45
-
46
-
47
-
48
-
49
-
50
-
51
-
52
-
53
-
54
-
55
-
56
-
57
-
58
-
59
-
60
-
61
-
62
-
63
-
64
-
65
-
66
-
67
-
68
-
69
-
70
-
71
-
72
-
73
-
74
-
75
-
76
-
77
-
78
-
79
-
80
-
81
-
82
-
83
-
84
-
85
-
86
-
87
-
88
-
89
-
90
-
91
-
92
-
93
-
94
-
95
-
96
-
97
-
98
-
99
-
100
-
101
-
102
-
103
-
104
-
105
-
106
-
107
-
108
-
109
-
110
-
111
-
112
-
113
-
114
-
115
-
116
-
117
-
118
-
119
-
120
-
121
-
122
-
123
-
124
-
125
-
126
-
127
-
128
-
129
-
130
-
131
-
132
-
133
-
134
-
135
-
136
-
137
-
138
-
139
-
140
-
141
-
142
-
143
-
144
-
145
-
146
-
147
-
148
-
149
-
150
-
151
-
152
-
153
-
154
-
155
-
156
-
157
-
158
-
159
-
 160
160 -
 161
161 -
 162
162 -
 163
163 -
 164
164 -
 165
165 -
 166
166 -
 167
167 -
 168
168 -
 169
169 -
 170
170 -
171
-
172
-
173
-
174
-
175
-
176
-
177
-
178
-
179
-
180
-
181
-
182
-
183
-
184
-
185
-
186
-
187
-
188
-
189
-
190
-
191
-
192
-
193
-
194
-
195
-
196
-
197
-
198
-
199
-
200
-
201
-
202
-
203
-
204
-
205
-
206
-
207
-
208
-
209
-
210
-
211
-
212
-
213
-
214
-
215
-
216
-
217
-
218
-
219
-
220
-
221
-
222
-
223
-
224
-
225
-
226
-
227
-
228
-
229
-
230
-
231
-
232
 |
 |