Pioneer AVIC-X930BT Owner's Manual - Page 24
Operating list screens e.g., POI list, Operating the on-screen, keyboard, How to use the navigation - box
 |
UPC - 884938127097
View all Pioneer AVIC-X930BT manuals
Add to My Manuals
Save this manual to your list of manuals |
Page 24 highlights
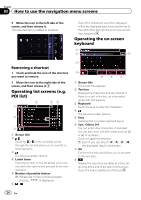
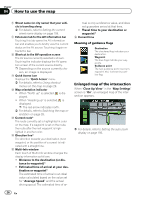
Chapter 03 How to use the navigation menu screens 5 Move the icon to the left side of the screen, and then release it. The selected item is added to shortcut. If all of the characters cannot be displayed within the displayed area, touching the key to the right of the item allows you to see remaining characters. Operating the on-screen keyboard 1 2 8 Removing a shortcut 1 Touch and hold the icon of the shortcut you want to remove. 2 Move the icon to the right side of the screen, and then release it. Operating list screens (e.g. POI list) 4 56 1 2 3 1 Screen title 2 Touching or on the scroll bar scrolls through the list and allows you to view the remaining items. 3 The previous screen returns. 4 Listed items Touching an item on the list allows you to narrow down the options and proceed to the next operation. 5 Number of possible choices p If there are 10 000 or more possible choices, "****" is displayed. 6 3 4 5 6 7 1 Screen title The screen title appears. 2 Text box Displays the characters that are entered. If there is no text in the box, an informative guide with text appears. 3 Keyboard Touch the keys to enter the characters. 4 The previous screen returns. 5 Keys Switches the on-screen keyboard layout. 6 Sym., Others, 0-9 You can enter other characters of alphabet. You can also enter text with marks such as [&] or [+] or numbers. Touch to toggle the selection. p Even if you use any of "A the displayed result is the same. 7 OK Confirms the entry and allows you to proceed to the next step. 8 Deletes the input text one letter at a time, beginning at the end of the text. Continuing to touch the button deletes all of the text. 24 En
-
 1
1 -
2
-
3
-
4
-
5
-
6
-
7
-
8
-
9
-
10
-
11
-
12
-
13
-
14
-
15
-
16
-
17
-
18
-
 19
19 -
 20
20 -
 21
21 -
 22
22 -
 23
23 -
 24
24 -
 25
25 -
 26
26 -
 27
27 -
 28
28 -
 29
29 -
30
-
31
-
32
-
33
-
34
-
35
-
36
-
37
-
38
-
39
-
40
-
41
-
42
-
43
-
44
-
45
-
46
-
47
-
48
-
49
-
50
-
51
-
52
-
53
-
54
-
55
-
56
-
57
-
58
-
59
-
60
-
61
-
62
-
63
-
64
-
65
-
66
-
67
-
68
-
69
-
70
-
71
-
72
-
73
-
74
-
75
-
76
-
77
-
78
-
79
-
80
-
81
-
82
-
83
-
84
-
85
-
86
-
87
-
88
-
89
-
90
-
91
-
92
-
93
-
94
-
95
-
96
-
97
-
98
-
99
-
100
-
101
-
102
-
103
-
104
-
105
-
106
-
107
-
108
-
109
-
110
-
111
-
112
-
113
-
114
-
115
-
116
-
117
-
118
-
119
-
120
-
121
-
122
-
123
-
124
-
125
-
126
-
127
-
128
-
129
-
130
-
131
-
132
-
133
-
134
-
135
-
136
-
137
-
138
-
139
-
140
-
141
-
142
-
143
-
144
-
145
-
146
-
147
-
148
-
149
-
150
-
151
-
152
-
153
-
154
-
155
-
156
-
157
-
158
-
159
-
160
-
161
-
162
-
163
-
164
-
165
-
166
-
167
-
168
-
169
-
170
-
171
-
172
-
173
-
174
-
175
-
176
-
177
-
178
-
179
-
180
-
181
-
182
-
183
-
184
-
185
-
186
-
187
-
188
-
189
-
190
-
191
-
192
-
193
-
194
-
195
-
196
-
197
-
198
-
199
-
200
-
201
-
202
-
203
-
204
-
205
-
206
-
207
-
208
-
209
-
210
-
211
-
212
-
213
-
214
-
215
-
216
-
217
-
218
-
219
-
220
-
221
-
222
-
223
-
224
-
225
-
226
-
227
-
228
-
229
-
230
-
231
-
232
 |
 |