Pioneer AVIC-Z130BT Owner's Manual - Page 147
Reading the screen, Using AV1, Using AV2, Using the touch panel keys, Using AV input - install manual
 |
UPC - 884938127806
View all Pioneer AVIC-Z130BT manuals
Add to My Manuals
Save this manual to your list of manuals |
Page 147 highlights
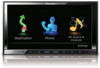
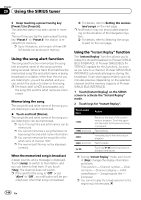
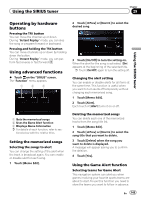
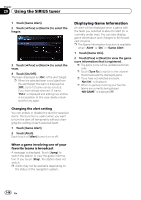
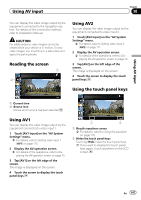
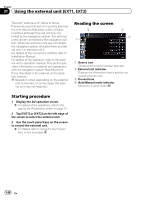
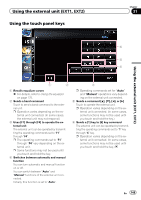
Using AV input Chapter 30 You can display the video image output by the equipment connected to the navigation system. For details of the connection method, refer to Installation Manual. CAUTION For safety reasons, video images cannot be viewed while your vehicle is in motion. To view video images, you must stop in a safe place and apply the parking brake. Reading the screen 1 2 Using AV2 You can display the video image output by the equipment connected to video input 2. 1 Touch [AV2 Input] on the "AV System Settings" menu. = For details, refer to Setting video input 2 (AV2) on page 171. 2 Display the AV operation screen. = For details of the operations, refer to Displaying the AV operation screen on page 70. 3 Tap [AV2] on the left edge of the screen. The image is displayed on the screen. 4 Touch the screen to display the touch panel keys. Using the touch panel keys Using AV input 1 Current time 2 Source icon Shows which source has been selected. Using AV1 You can display the video image output by the equipment connected to video input 1. 1 Touch [AV1 Input] on the "AV System Settings" menu. = For details, refer to Setting video input 1 (AV1) on page 170. 2 Display the AV operation screen. = For details of the operations, refer to Displaying the AV operation screen on page 70. 3 Tap [AV1] on the left edge of the screen. The image is displayed on the screen. 4 Touch the screen to display the touch panel keys. 1 2 1 Recalls equalizer curves = For details, refer to Using the equalizer on page 175. 2 Hides the touch panel keys Touching [Hide] hides the touch panel keys. p If you want to display the touch panel keys again, touch anywhere on the LCD screen. En 147
-
 1
1 -
2
-
3
-
4
-
5
-
6
-
7
-
8
-
9
-
10
-
11
-
12
-
13
-
14
-
15
-
16
-
17
-
18
-
19
-
20
-
21
-
22
-
23
-
24
-
25
-
26
-
27
-
28
-
29
-
30
-
31
-
32
-
33
-
34
-
35
-
36
-
37
-
38
-
39
-
40
-
41
-
42
-
43
-
44
-
45
-
46
-
47
-
48
-
49
-
50
-
51
-
52
-
53
-
54
-
55
-
56
-
57
-
58
-
59
-
60
-
61
-
62
-
63
-
64
-
65
-
66
-
67
-
68
-
69
-
70
-
71
-
72
-
73
-
74
-
75
-
76
-
77
-
78
-
79
-
80
-
81
-
82
-
83
-
84
-
85
-
86
-
87
-
88
-
89
-
90
-
91
-
92
-
93
-
94
-
95
-
96
-
97
-
98
-
99
-
100
-
101
-
102
-
103
-
104
-
105
-
106
-
107
-
108
-
109
-
110
-
111
-
112
-
113
-
114
-
115
-
116
-
117
-
118
-
119
-
120
-
121
-
122
-
123
-
124
-
125
-
126
-
127
-
128
-
129
-
130
-
131
-
132
-
133
-
134
-
135
-
136
-
137
-
138
-
139
-
140
-
141
-
 142
142 -
 143
143 -
 144
144 -
 145
145 -
 146
146 -
 147
147 -
 148
148 -
 149
149 -
 150
150 -
 151
151 -
 152
152 -
153
-
154
-
155
-
156
-
157
-
158
-
159
-
160
-
161
-
162
-
163
-
164
-
165
-
166
-
167
-
168
-
169
-
170
-
171
-
172
-
173
-
174
-
175
-
176
-
177
-
178
-
179
-
180
-
181
-
182
-
183
-
184
-
185
-
186
-
187
-
188
-
189
-
190
-
191
-
192
-
193
-
194
-
195
-
196
-
197
-
198
-
199
-
200
-
201
-
202
-
203
-
204
-
205
-
206
-
207
-
208
-
209
-
210
-
211
-
212
-
213
-
214
-
215
-
216
-
217
-
218
-
219
-
220
-
221
-
222
-
223
-
224
-
225
-
226
-
227
-
228
-
229
-
230
-
231
-
232
 |
 |