Pioneer AVIC-Z130BT Owner's Manual - Page 179
Using sonic center control - mirror
 |
UPC - 884938127806
View all Pioneer AVIC-Z130BT manuals
Add to My Manuals
Save this manual to your list of manuals |
Page 179 highlights
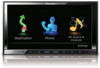
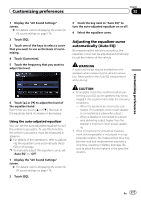
Customizing preferences Chapter 32 Customizing preferences 3 Turn the ignition switch to ON or ACC. If the vehicle's air conditioner or heater is turned on, turn it off. Noise from the fan in the air conditioner or heater may prevent correct Auto EQ. 4 Turn off the AV source. = For details of the operations, refer to Displaying the AV operation screen on page 70. 5 Set the video setting for the rear display to "Mirror AV". = For details of the operations, refer to Selecting the video for rear display on page 168. 6 Display the "AV System Settings" screen. = For details, refer to Displaying the screen for AV system settings on page 170. 7 Touch [Auto EQ Meas.]. The "Auto EQ Measurement" screen appears. 8 Plug the microphone into the mini-jack connector. USB and mini-jack connector Microphone for acoustical measurement (sold separately) 9 Touch [Start]. A 10-second countdown starts. 10 Exit the vehicle and keep the door closed until the countdown finishes. When the countdown is over, a measurement tone (noise) is emitted from the speakers and the Auto EQ measurement begins. 11 Wait until the measurement is completed. When Auto EQ is completed, a message is displayed indicating that the measurement is completed. p If the vehicle's acoustics cannot be measured correctly, an error message will be displayed. p The measurement time varies depending on the type of vehicle. p To stop the measurement, touch [Stop]. 12 Touch [OK]. 13 Store the microphone carefully in the glove compartment or another safe place. If the microphone is subjected to direct sunlight for an extended period of time, high temperatures may cause distortion, color change or malfunction. Using sonic center control Sound that is suited for the listening position can easily be created with this function. 1 Display the "AV Sound Settings" screen. = For details, refer to Displaying the screen for AV sound settings on page 174. 2 Touch [Sonic Center Control]. 3 Touch [c] or [d] to select a listening position. p The larger the value of the range: "Left7" to "Right7" setting, the greater the delay of the speaker output. En 179
-
 1
1 -
2
-
3
-
4
-
5
-
6
-
7
-
8
-
9
-
10
-
11
-
12
-
13
-
14
-
15
-
16
-
17
-
18
-
19
-
20
-
21
-
22
-
23
-
24
-
25
-
26
-
27
-
28
-
29
-
30
-
31
-
32
-
33
-
34
-
35
-
36
-
37
-
38
-
39
-
40
-
41
-
42
-
43
-
44
-
45
-
46
-
47
-
48
-
49
-
50
-
51
-
52
-
53
-
54
-
55
-
56
-
57
-
58
-
59
-
60
-
61
-
62
-
63
-
64
-
65
-
66
-
67
-
68
-
69
-
70
-
71
-
72
-
73
-
74
-
75
-
76
-
77
-
78
-
79
-
80
-
81
-
82
-
83
-
84
-
85
-
86
-
87
-
88
-
89
-
90
-
91
-
92
-
93
-
94
-
95
-
96
-
97
-
98
-
99
-
100
-
101
-
102
-
103
-
104
-
105
-
106
-
107
-
108
-
109
-
110
-
111
-
112
-
113
-
114
-
115
-
116
-
117
-
118
-
119
-
120
-
121
-
122
-
123
-
124
-
125
-
126
-
127
-
128
-
129
-
130
-
131
-
132
-
133
-
134
-
135
-
136
-
137
-
138
-
139
-
140
-
141
-
142
-
143
-
144
-
145
-
146
-
147
-
148
-
149
-
150
-
151
-
152
-
153
-
154
-
155
-
156
-
157
-
158
-
159
-
160
-
161
-
162
-
163
-
164
-
165
-
166
-
167
-
168
-
169
-
170
-
171
-
172
-
173
-
 174
174 -
 175
175 -
 176
176 -
 177
177 -
 178
178 -
 179
179 -
 180
180 -
 181
181 -
 182
182 -
 183
183 -
 184
184 -
185
-
186
-
187
-
188
-
189
-
190
-
191
-
192
-
193
-
194
-
195
-
196
-
197
-
198
-
199
-
200
-
201
-
202
-
203
-
204
-
205
-
206
-
207
-
208
-
209
-
210
-
211
-
212
-
213
-
214
-
215
-
216
-
217
-
218
-
219
-
220
-
221
-
222
-
223
-
224
-
225
-
226
-
227
-
228
-
229
-
230
-
231
-
232
 |
 |