Pioneer AVIC-Z130BT Owner's Manual - Page 25
How to read the map screen, How to use the map
 |
UPC - 884938127806
View all Pioneer AVIC-Z130BT manuals
Add to My Manuals
Save this manual to your list of manuals |
Page 25 highlights
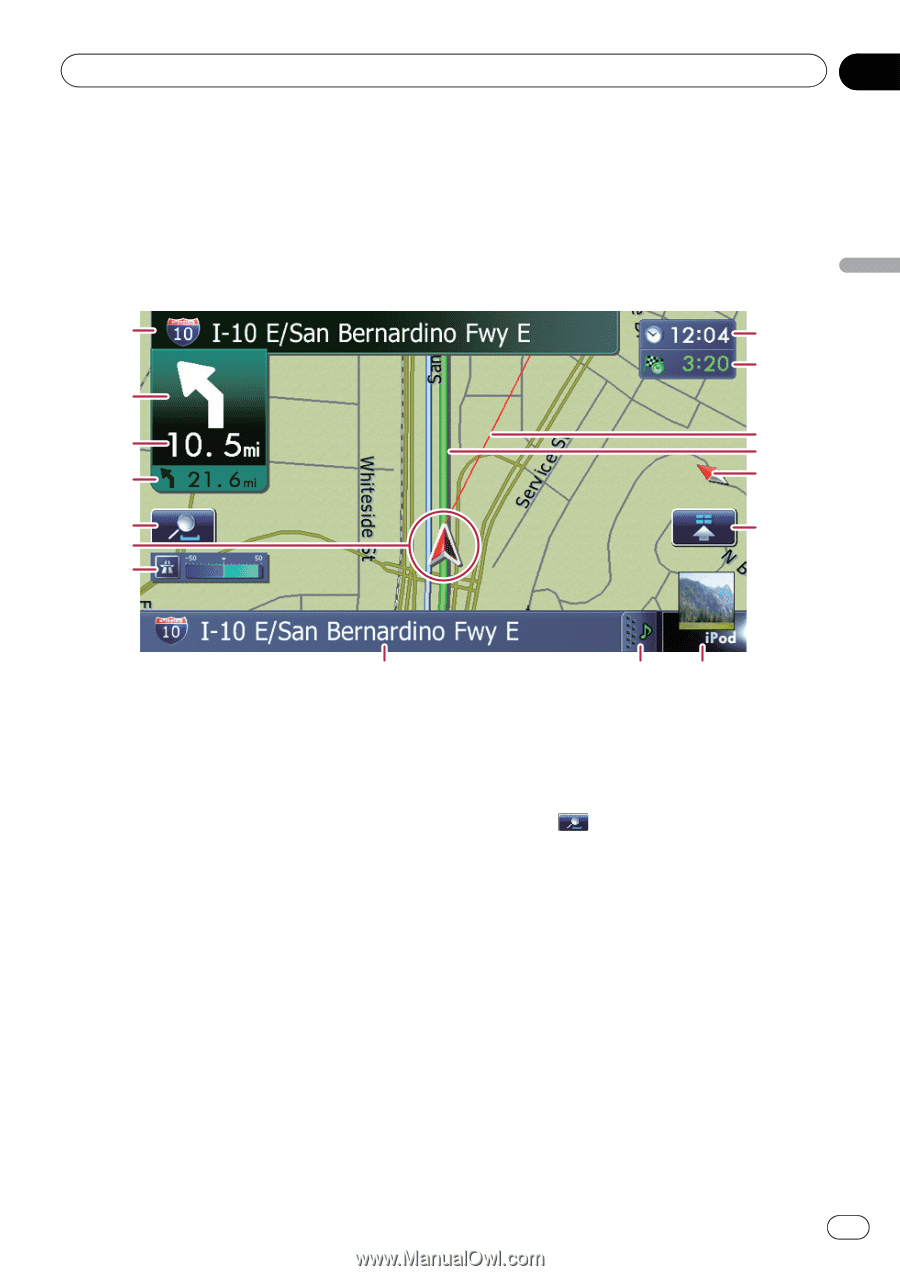
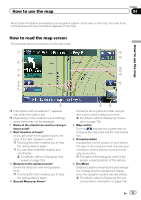
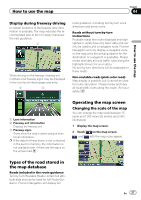
How to use the map Chapter 04 Most of the information provided by your navigation system can be seen on the map. You need to become familiar with how information appears on the map. How to use the map How to read the map screen This example shows an example of a 2D map screen. 1 g f 2 3 e d 4 c 5 b 6 7 8 p Information with an asterisk (*) appears only when the route is set. p Depending on the conditions and settings, some items may not be displayed. 1 Name of the street to be used (or next guidance point)* 2 Next direction of travel* As you get closer to the guidance point, the color of the item changes to green. p Touching this item enables you to hear the next guidance again. p You can select between display and non-display. = For details, refer to Displaying maneuvers on page 159. 3 Distance to the guidance point* Shows the distance to the next guidance point. p Touching this item enables you to hear the next guidance again. 4 Second Maneuver Arrow* 9 a Shows the turning direction after next guidance point and the distance to there. = For details, refer to Displaying maneu- vers on page 159. 5 Map control Touching displays touch panel keys for changing the map scale and the map orientation. 6 Current position Indicates the current location of your vehicle. The apex of the triangular mark indicates your orientation and the display moves automatically as you drive. p The apex of the triangular mark is the proper current position of the vehicle. 7 Eco-Meter Displays a graph comparing the past average fuel mileage and the average fuel mileage since the navigation system was last started. = For details, refer to Displaying the fuel consumption information on page 159. En 25
-
 1
1 -
2
-
3
-
4
-
5
-
6
-
7
-
8
-
9
-
10
-
11
-
12
-
13
-
14
-
15
-
16
-
17
-
18
-
19
-
 20
20 -
 21
21 -
 22
22 -
 23
23 -
 24
24 -
 25
25 -
 26
26 -
 27
27 -
 28
28 -
 29
29 -
 30
30 -
31
-
32
-
33
-
34
-
35
-
36
-
37
-
38
-
39
-
40
-
41
-
42
-
43
-
44
-
45
-
46
-
47
-
48
-
49
-
50
-
51
-
52
-
53
-
54
-
55
-
56
-
57
-
58
-
59
-
60
-
61
-
62
-
63
-
64
-
65
-
66
-
67
-
68
-
69
-
70
-
71
-
72
-
73
-
74
-
75
-
76
-
77
-
78
-
79
-
80
-
81
-
82
-
83
-
84
-
85
-
86
-
87
-
88
-
89
-
90
-
91
-
92
-
93
-
94
-
95
-
96
-
97
-
98
-
99
-
100
-
101
-
102
-
103
-
104
-
105
-
106
-
107
-
108
-
109
-
110
-
111
-
112
-
113
-
114
-
115
-
116
-
117
-
118
-
119
-
120
-
121
-
122
-
123
-
124
-
125
-
126
-
127
-
128
-
129
-
130
-
131
-
132
-
133
-
134
-
135
-
136
-
137
-
138
-
139
-
140
-
141
-
142
-
143
-
144
-
145
-
146
-
147
-
148
-
149
-
150
-
151
-
152
-
153
-
154
-
155
-
156
-
157
-
158
-
159
-
160
-
161
-
162
-
163
-
164
-
165
-
166
-
167
-
168
-
169
-
170
-
171
-
172
-
173
-
174
-
175
-
176
-
177
-
178
-
179
-
180
-
181
-
182
-
183
-
184
-
185
-
186
-
187
-
188
-
189
-
190
-
191
-
192
-
193
-
194
-
195
-
196
-
197
-
198
-
199
-
200
-
201
-
202
-
203
-
204
-
205
-
206
-
207
-
208
-
209
-
210
-
211
-
212
-
213
-
214
-
215
-
216
-
217
-
218
-
219
-
220
-
221
-
222
-
223
-
224
-
225
-
226
-
227
-
228
-
229
-
230
-
231
-
232
 |
 |