Pioneer DDJ-T1 Owner's Manual - Page 17
IN IN ADJUST button, OUT OUT ADJUST button - with traktor 2
 |
UPC - 884938122344
View all Pioneer DDJ-T1 manuals
Add to My Manuals
Save this manual to your list of manuals |
Page 17 highlights
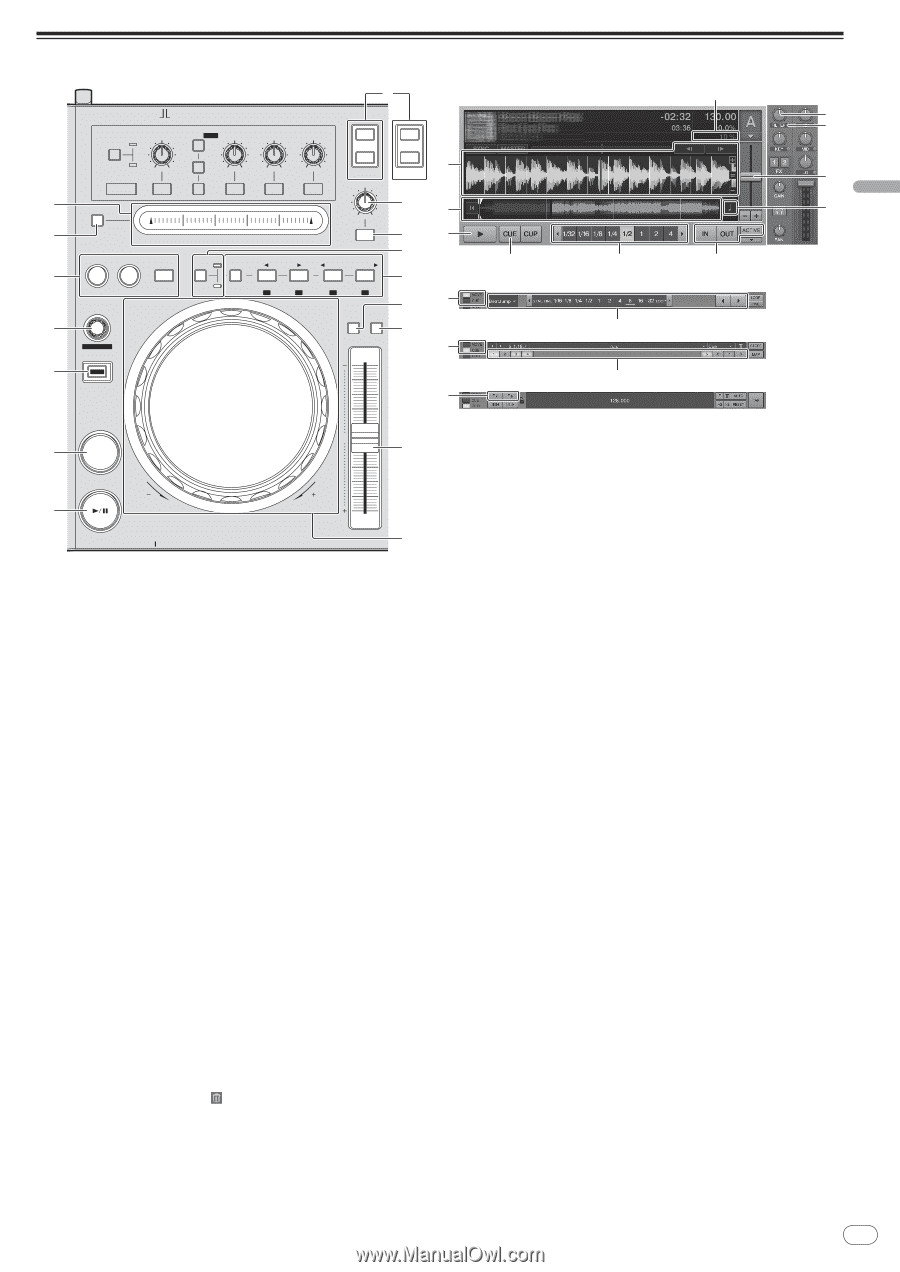
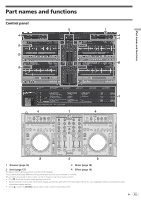
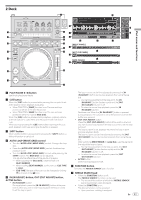
Part names and functions 2 Deck 8 e 7 ADVANCED CHAINED FX1 FUNCTION OFF ON DRY/ WET SELECT/ BACK 1 2 3 1 MIN MAX 2 3 MIN MAX MIN MAX MIN MAX A C DECK LOW HI B D g DECK 97 9 a f d 6 NEEDLE SEARCH FILTER a1 IN OUT MOVE MODE SIZE b BWD FWD 2 4 5 5 ACTIVE HOT CUE DELETE 1 2 3 4 c [MOVE PANEL] IN ADJUST OUT ADJUST AUTO LOOP 5 6 7 8 db KEY TEMPO 4 LOCK RANGE e [HOT CUE PANEL] c MOVE GRID b 3 SHIFT c [GRID PANEL] 4 2 CUE 1 PLAY/PAUSE REV PHONES 0 f FWD TEMPO g 1 PLAY/PAUSE f button Use this to play/pause tracks. 2 CUE button When the [CUE] button is pressed while pausing, the cue point is set at the position where playback is pausing. ! When TRAKTOR's [SNAP] function is on: The cue and loop points can be set at the desired position. ! When TRAKTOR's [SNAP] function is on: The cue and loop points are set to the nearest [Beat Grid]. When the [CUE] button is pressed during playback, playback returns to the set cue point, cues there, and the pause mode is set (back cue). When you keep pressing the [CUE] button after returning to the cue point, playback continues as long as the button is pressed. 3 SHIFT button When another button is pressed while pressing the [SHIFT] button, a different function is called out. 4 AUTO LOOP (MOVE GRID) control ! Turn the [AUTO LOOP (MOVE GRID)] control: Changes the loop size. ! Press the [AUTO LOOP (MOVE GRID)] control: Switches loop playback on/off. ! Turn the [AUTO LOOP (MOVE GRID)] control while pressing the [SHIFT] button: The [Beat Grid] can be adjusted. This adjusts the difference with the results of analysis. - When adjusting the [Beat Grid], create at least one [BEAT MARKER]. - When creating [BEAT MARKER], set the hot cue [CUE TYPE] to [Grid]. - [CUE TYPE] (the type of hot cue) can be changed by clicking [b] to the left of the [ ] icon. 5 IN (IN ADJUST) button, OUT (OUT ADJUST) button, ACTIVE button ! IN (IN ADJUST) button During playback, press the [IN (IN ADJUST)] button at the position at which you want to start loop playback (the loop in point) to set the loop in point. The loop in point can be fine-adjusted by pressing the [IN (IN ADJUST)] button during loop playback then using the jog dial. - During fine-adjustment of the loop point, the [IN (IN ADJUST)] button flashes rapidly and the [OUT (OUT ADJUST)] button is off. - To return to normal loop playback, press the [IN (IN ADJUST)] button. Real-time cue: When the [IN (IN ADJUST)] button is pressed during playback, the cue point is set at the position at which the button was pressed. ! OUT (OUT ADJUST) button Press the [OUT (OUT ADJUST)] button at the position at which you want to stop loop playback (the loop out point) to set the loop out point. The loop out point is set, playback returns to the loop in point and loop playback starts. The loop out point can be fine-adjusted by pressing the [OUT (OUT ADJUST)] button during loop playback then using the jog dial. After switching [MOVE MODE] to [Loop Out], use the jog dial to fine-adjust the loop out point. - During fine-adjustment of the loop out point, the [OUT (OUT ADJUST)] button flashes rapidly and the [IN (IN ADJUST)] button is off. - To return to normal loop playback, press the [OUT (OUT ADJUST)] button. ! ACTIVE button Switches loop playback on/off. 6 FUNCTION button Switches the [NEEDLE SEARCH] pad's function. 7 NEEDLE SEARCH pad ! When the [FUNCTION] button is off: The [NEEDLE SEARCH] function can be used. - The sound at the position at which the [NEEDLE SEARCH] pad is touched can easily be played. ! When the [FUNCTION] is on: The desired function can be assigned. - Upon purchase, nothing is assigned. En 17
-
 1
1 -
2
-
3
-
4
-
5
-
6
-
7
-
8
-
9
-
10
-
11
-
 12
12 -
 13
13 -
 14
14 -
 15
15 -
 16
16 -
 17
17 -
 18
18 -
 19
19 -
 20
20 -
 21
21 -
 22
22 -
23
-
24
-
25
-
26
-
27
-
28
-
29
-
30
-
31
-
32
 |
 |