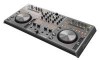
Pioneer DDJ-T1 Owner's Manual - Page 21
Using the mixer functions, Using the effect function, Synchronizing the playing speed, with other - sound quality
 |
UPC - 884938122344
View all Pioneer DDJ-T1 manuals
Add to My Manuals
Save this manual to your list of manuals |
Page 21 highlights
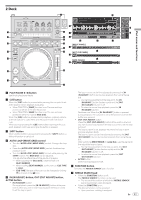
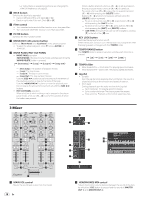
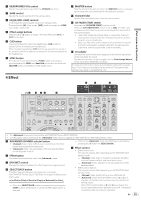
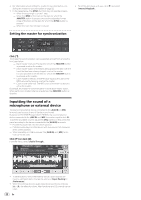
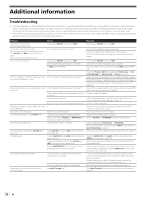
Operations 2 Press the [CUE] button. Cue point [a] is set at the position at which playback was paused. The [PLAY/PAUSE f] indicator flashes and the [CUE] indicator lights. No sound is output at this time. ! When a new Cue Point is set, the previously set Cue Point is deleted. ! For information about setting cue points, see MOVE PANEL/ HOT CUE PANEL on page 18. Adjusting the cue point position 1 Spin the jog dial while pressing down on the top. The pause position is adjusted. 2 Press the [CUE] button. Cue point [a] is set to the [Beat Grid] nearest the position at which the button was pressed. Returning to Cue Point (Back Cue) During playback, press the [CUE] button. The set immediately returns to the currently set cue point and pauses. ! When the [PLAY/PAUSE f] button is pressed, playback starts from the cue point. Checking Cue Point (Cue Point Sampler) Adjusting the sound quality Turn the [EQ (HI, MID, LOW)] controls for the various decks. Monitoring sound with headphones 1 Connect headphones to the [PHONES] jack. 2 Press the headphones [CUE] button for the deck you want to monitor. 3 Turn the [HEADPHONES MIX] control. - Turn counterclockwise: The sound of the deck for which the headphones [CUE] button is pressed becomes relatively louder. - Center position: The sound of the deck for which the headphones [CUE] button is pressed and the [MASTER OUT 1, MASTER2] sound have the same volume. - When turned clockwise: The volume of the sound output from the [MASTER OUT 1, MASTER2] terminals becomes relatively louder. 4 Turn the [HEADPHONES VOL] control. The sound of the deck for which the headphones [CUE] button is pressed is output from the headphones. ! When the headphones [CUE] button is pressed again, monitoring is canceled. Keep pressing the [CUE] button after returning to the cue point. Playback starts from the set cue point. Playback continues as long as the [CUE] button is pressed. Setting Cue Point during playback (Real Time Cue) During playback, press the [IN (IN ADJUST)] button at the position at which you want to set the cue point. Cue point [a] is set to the [Beat Grid] nearest the position at which the button was pressed. Using the mixer functions Outputting sound Set the volume of the power amplifiers connected to the [MASTER OUT 1, MASTER OUT 2] terminals to an appropriate level. Note that very loud sounds will be output if the volume is set too high. 1 Turn the [GAIN] control. Adjusts the sound level input to the various decks. 2 Set the channel fader to the inner position. Adjusts the sound level output from the various decks. 3 Set the crossfader. Switch the deck whose sound is to be output from the speakers. - Left edge: Sound is output from deck [A] or [C]. - Center: The sound of all the decks is mixed and output. - Right edge: Sound is output from deck [B] or [D]. ! The deck assignment can be changed with the [Deck Assign Button] at the sides of the TRAKTOR crossfader. 4 Turn the [MAIN VOL] control. Audio signals are output from the [MASTER1] and [MASTER2] terminals. Using the effect function TRAKTOR is equipped with two effect units, [FX 1] and [FX 2]. Each of the effect units can be assigned to one or more decks. ! TRAKTOR PRO and TRAKTOR SCRATCH PRO are equipped with four effect units. Adding effects ([Chained] mode) 1 Press the effect assign button. Press the [1] or [2] button to assign TRAKTOR effect unit [FX 1] or [FX 2] to the deck. 2 Turn the effect control dial. Adjust the balance between the effect sound for the different effects and the original sound. 3 Press the effect control button. Press the effect control button for the effect you want to apply. ! When the button is pressed again, the effect is turned off. ! The effect unit's three effects can also be turned on simultaneously. 4 Turn the [DRY/WET] control. Adjust the balance between the effect sound for all of the effects together and the original sound. Synchronizing the playing speed with other decks (beat sync) 1 Press the [MASTER] button on the currently playing deck. The deck whose [MASTER] button was pressed is set as the master for synchronization. The [MASTER] indicator and [MASTER] in TRAKTOR light. 2 Press the [SYNC] button on a deck not set as the master for synchronization. That deck is synchronized to the [BPM] and [Beat Grid] of the track on the deck set as the master for synchronization. The [SYNC] indicator and [SYNC] in TRAKTOR light. En 21
-
 1
1 -
2
-
3
-
4
-
5
-
6
-
7
-
8
-
9
-
10
-
11
-
12
-
13
-
14
-
15
-
 16
16 -
 17
17 -
 18
18 -
 19
19 -
 20
20 -
 21
21 -
 22
22 -
 23
23 -
 24
24 -
 25
25 -
 26
26 -
27
-
28
-
29
-
30
-
31
-
32
 |
 |
